Welcome To Kent! 28 Aug 2023 5:00 AM (2 years ago)
Introduction
I’m happy to announce that effective today, August 28th, 2023 I will be going work for the Kent Corporation as a Business Intelligence Engineer.
This opportunity came about from a friend, Patrick Phelan. He works for Kent, and reached out to me to see I was interested in the job. After looking at the company, and the role, I was very interested!
Kent is an agriculture manufacturing company that was started in 1927. They use various types of grains, such as wheat, and make a variety of products. Animal food for horses, sheep, dogs, cats and more. They make distilled grain alcohol for medical use or distilleries. In addition they make additives for a variety of food products such as bread. Another aspect I really appreciate about Kent is their environmental consciousness. They strive to reduce waste by-products as much as possible.
In my role I’ll be working to upgrade and expand their SQL Server Data Warehouse, working with their SSIS packages, create cubes in SSAS, and lots of SSRS reports. I’ll also be working heavily in PowerBI. At some point in the future we plan to be shifting a lot of this up to Azure. Along the way I’ll be whipping up some PowerShell scripts to help automate as much work as possible.
The Future
For the next few months I’ll be focused on Kent. At some point though I plan to resume my videos for Pluralsight working on the evenings / weekends.
In addition, my blogging will become irregular. Previously I’ve been posting weekly, the blog posts focused on the subjects in my videos. Working full time for Kent I won’t have time to dedicate to blogging. I’ll still blog, and while I will try for weekly there may be some weeks that get skipped due to my daytime workload especially in the first few months.
The subjects will also vary, tied more toward some of the BI subjects I’ll be working with at Kent, such as Data Warehousing, SSIS/SSAS/SSRS, PowerBI, and of course PowerShell!
Conclusion
Thanks for joining me on my journey over the last few years as a full time Pluralsight video course author and book writer. I hope you’ll keep my company as I begin a new phase in my career!


Fun With KQL Windowing Functions – Row_Window_Session 21 Aug 2023 7:00 AM (2 years ago)

Introduction
This post will conclude our look at the Kusto Query Language with the row_window_session function. It can be used to group rows of data in a time range, and will return the starting time for that range of data in each row.
If you’ve not read my introductory post on Windowing Functions, Fun With KQL Windowing Functions – Serialize and Row_Number yet, you should do so now as it introduced several important concepts needed to understand how these Windowing Functions work.
The samples in this post will be run inside the LogAnalytics demo site found at https://aka.ms/LADemo. This demo site has been provided by Microsoft and can be used to learn the Kusto Query Language at no cost to you.
If you’ve not read my introductory post in this series, I’d advise you to do so now. It describes the user interface in detail. You’ll find it at https://arcanecode.com/2022/04/11/fun-with-kql-the-kusto-query-language/.
Note that my output may not look exactly like yours when you run the sample queries for several reasons. First, Microsoft only keeps a few days of demo data, which are constantly updated, so the dates and sample data won’t match the screen shots.
Second, I’ll be using the column tool (discussed in the introductory post) to limit the output to just the columns needed to demonstrate the query. Finally, Microsoft may make changes to both the user interface and the data structures between the time I write this and when you read it.
Row_Window_Session Basics
The row_window_session function allows you to group data into time based groups. It will find the beginning of a time group, which KQL calls a session, then will return the beginning time of the session (along with other data) until the conditions are met to cause a new session to start.
Let’s look at an example query, then we’ll break down the various parts.
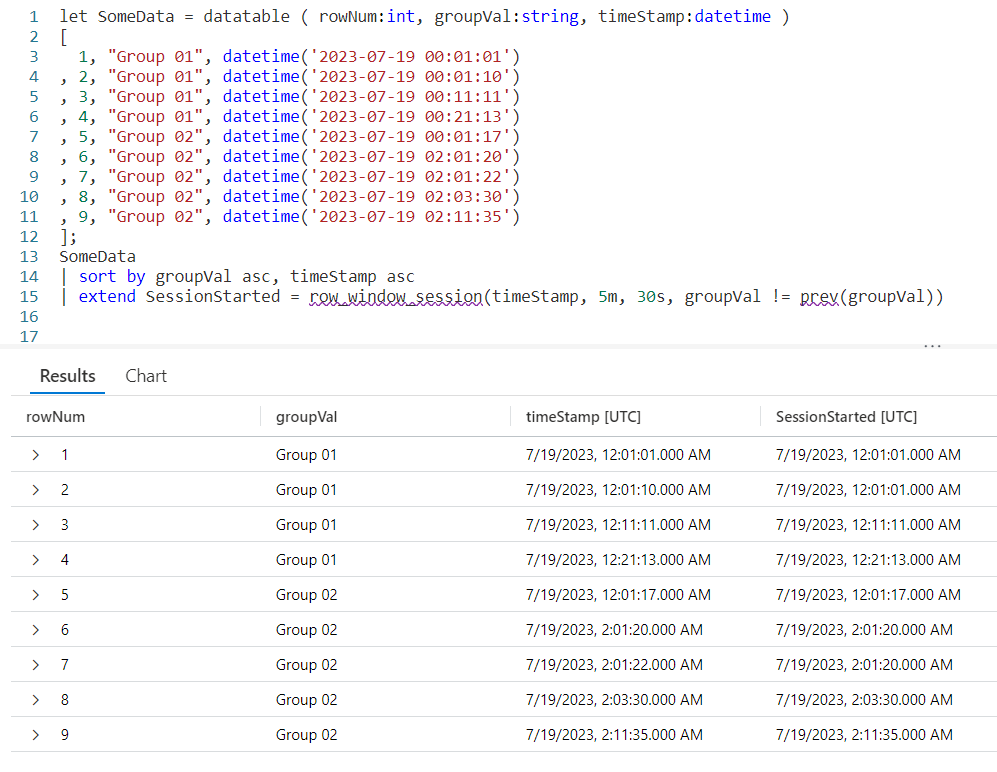
We begin by declaring a datatable to hold our sample data. It has three columns. The rowNum is included to make it easier to discuss the logic of row_window_session in a moment, otherwise it’s just an extra piece of data.
I then include a groupVal column. It will be used to trigger the beginning of a new time group (aka session). Working with real world data, you may use something like the name of a computer for the group.
Finally we have a column of datatype datetime. When working with log data from, for example, the Perf table this would typically be the TimeGenerated column but it doesn’t have to be. Any datetime datatype column can be used. I’ve crafted the data to make it easier to explain how row_window_session works.
Next, I take our SomeData dataset and pipe it into a sort, sorting by the group and time in ascending order. The sort has the added benefit of creating a dataset that is serializable. See my previous post on serialization, mentioned in the introduction, for more on why this is important.
Finally we fall into an extend where we create a new column I named SessionStarted. We then assign it the output of the row_session_started function, which requires four parameters.
The first parameter is the datetime column to be used for determining the session window. Here it is timeStamp. The next three parameters are all conditions which will trigger the beginning of a new “session” or grouping.
The second parameter is a timespan, here I used a value of 5m, or five minutes. If more than five minutes have elapsed since the current row and the first row in this group, it will trigger the creation of a new window session (group).
The third parameter is also a timespan, and indicates the maximum amount of time that can elapse between the current row and the previous row before a new window session is started. Here we used 30s, or thirty seconds. Even if the current row is still within a five minute window from the first row in the group, if the current row is more than thirty seconds in the future from the previous row a new session is created.
The final parameter is a way to trigger a change when the group changes. Here we use the groupVal column, but it’s more likely you’d use a computer name or performance counter here.
Breaking it Down
Since this can get a bit confusing, let’s step through the logic on a row by row basis. You can use the rowNum column for the row numbers.
Row 1 is the first row in our dataset, with a timeStamp of 12:01:01. Since it is first, KQL will use the same value in the SessionStarted column.
In row 2, we have a timeStamp of 12:01:10. Since this is less than five minutes from our first record, no new session is created.
Next, it compares the timeStamp from this row with the previous row, row 1. Less than 30 seconds have elapsed, so we are still in the same window session.
Finally it compares the groupVal with the one from row 1. Since the group is the same, no new session window is triggered and the SessionStarted time of 12:01:01, the time from row 1 is used.
Now let’s move to row 3. It has a time stamp of 12:11:11. This is more than five minutes since the time in row 1, which is the beginning of the session, so it then begins a new window session. It’s time of 12:11:11 is now used for the SessionStarted.
Row 4 comes next. It’s time of 12:21:13 also exceeds the five minute window since the start of the session created in row 3, so it begins a new session.
Now we move into row 5. Because the groupVal changed, we begin a new session with a new session start time of 12:01:17.
In row 6 we have a time of 02:01:20. Well a two am time is definitely more than five minutes from the row 5’s time, so a new session is started.
The time in row 7 is 02:01:22. That’s less than five minutes from row 6, and it’s also less than 30 seconds. Since it is in the same group, no new session occurs and it returns 02:01:20 for the SessionStarted.
Now we get to row 8. The time for this row is 02:03:30, so we are still in our five minute window that began in row 6. However, it is more than 30 seconds from row 7’s time of 02:01:22 so a new window session begins using row 8’s time of 02:03:30.
Finally we get to row 9. By now I’m sure you can figure out the logic. Its time of 02:11:35 is more than five minutes from the session start (begun in row 8), so it triggers a new session window.
Remember the Logic
While this seems a bit complex at times, if you just remember the logic it can be pretty easy to map out what you want.
Did the group change as defined in the fourth parameter? If yes, then start a new window session.
Compared to the session start row, is the time for the current row greater in the future by the value specified in parameter 2? Then start a new window session.
Compared to the previous row, is the time for the current row farther in the future then the amount of time in parameter 3? If so, start a new window session.
TimeSpans
In this example I used small values for the timespans, 5m and 30s. You can use any valid timespan though, including days and hours.
For a complete discussion on the concept of timespans, see my blog post Fun With KQL – Format_TimeSpan.
Let’s Use Real Data
For completeness I wanted to include a final example that uses the Perf table from the LogAnalytics demo website.
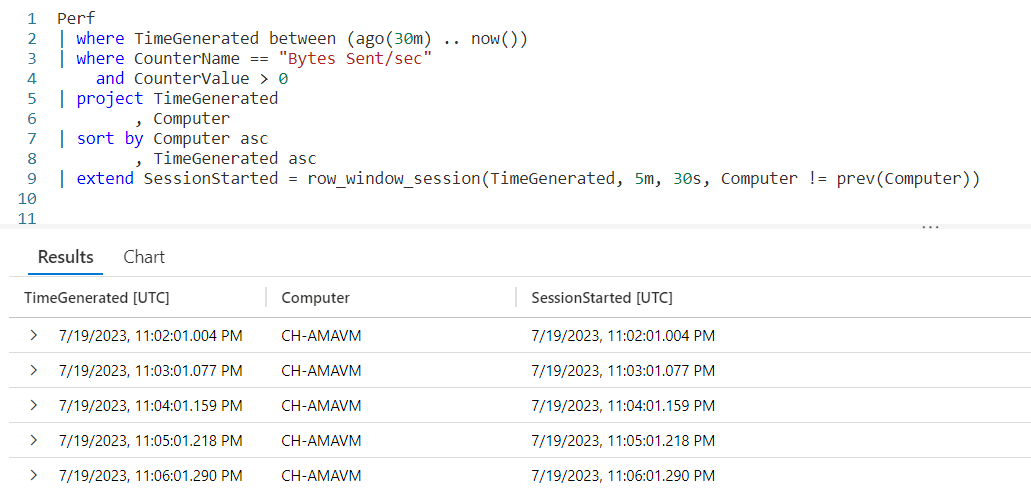
The logic is similar to the previous example. Since you now have an understanding of the way row_window_session works, I’ll leave it up to you to step through the data and identify the new window sessions.
See Also
The following operators, functions, and/or plugins were used or mentioned in this article’s demos. You can learn more about them in some of my previous posts, linked below.
Fun With KQL – Format_TimeSpan
Fun With KQL Windowing Functions – Prev and Next
Conclusion
With this post on row_window_session, we complete our coverage of Kusto’s Windowing Functions. You saw how to use it to group data into timespans based on a beginning date, with the ability to group on total elapsed time since the start of a window or since the previous row of data.
The demos in this series of blog posts were inspired by my Pluralsight courses on the Kusto Query Language, part of their Kusto Learning Path.
There are three courses in this series so far:
I have two previous Kusto courses on Pluralsight as well. They are older courses but still valid.
These are a few of the many courses I have on Pluralsight. All of my courses are linked on my About Me page.
If you don’t have a Pluralsight subscription, just go to my list of courses on Pluralsight. On the page is a Try For Free button you can use to get a free 10 day subscription to Pluralsight, with which you can watch my courses, or any other course on the site.
Fun With KQL Windowing Functions – Row_Rank_Dense 14 Aug 2023 7:00 AM (2 years ago)

Introduction
The Kusto Windowing Function row_rank_dense is an interesting function. It lets you get a unique count of a specific column in a dataset. Unlike other methods of getting counts, row_rank_dense allows you to see each individual row of data.
First though, if you’ve not read the introductory post on Windowing Functions, Fun With KQL Windowing Functions – Serialize and Row_Number, you should do so now as it introduced several important concepts needed to understand how these Windowing Functions work.
The samples in this post will be run inside the LogAnalytics demo site found at https://aka.ms/LADemo. This demo site has been provided by Microsoft and can be used to learn the Kusto Query Language at no cost to you.
If you’ve not read my introductory post in this series, I’d advise you to do so now. It describes the user interface in detail. You’ll find it at https://arcanecode.com/2022/04/11/fun-with-kql-the-kusto-query-language/.
Note that my output may not look exactly like yours when you run the sample queries for several reasons. First, Microsoft only keeps a few days of demo data, which are constantly updated, so the dates and sample data won’t match the screen shots.
Second, I’ll be using the column tool (discussed in the introductory post) to limit the output to just the columns needed to demonstrate the query. Finally, Microsoft may make changes to both the user interface and the data structures between the time I write this and when you read it.
Row_Rank_Dense Basics
The row_rank_dense is used to determine the density of a value. By passing in a sorted dataset, you can get a rank number for each item. The rank number changes only when the value we’re evaluating changes.
An example will make this much clearer. We start by creating a datatable with three columns. The rowNum is just used to make it easier to discuss the output in a moment. Likewise rowVal provides some easy to consume text.
The important column is valToRankOn. It is this value that is going to be evaluated within our row_rank_dense Windowing Function.
The SomeData dataset is piped into a sort, where we sort on the value we are evaluating in ascending order. We will also sort on the rowVal, so when we have two identical values in valToRankOn, we can display the output in a logical fashion. In a real world situation, this might be the name of computer or perhaps a counter of some kind.
Using a sort will also mark the data as serializable, which is required in order to use row_rank_dense. For more on serialization, see the Fun With KQL Windowing Functions – Serialize and Row_Number post I mentioned in the introduction.
Finally we fall into an extend, creating a new column Rank. We’ll assign it the output of our row_rank_dense function. In it we use one parameter, the name of the column to be evaluated, here it is valToRankOn.
In the output, our first row is row 7, with a valToRankOn of 1. Thus it is assigned a Rank of 1.
The next row is row 8, it has the next smallest value of 6 in the valToRankOn column, so it gets a Rank of 2.
Rows 6 and 9 both have the same valToRankOn, 17. Since 17 is the third smallest value, both rows are given a Rank of 3. Because we included rowVal in the sort, they are listed in order of the rowVal, Value 06 then Value 09.
This continues for the remaining rows of data. We can see both how many unique values we have, six, and still see each individual row of data.
Density by Largest Value
In the above example, by sorting the valToRankOn in ascending order the smallest values come first, then increase with a Rank of 1 being given to the smallest value.
If we had instead sorted valToRankOn in descending order, sort by valToRankOn desc, ..., then the Rank of 1 would have been assigned to the largest value, then as the valToRankOn decreased the Rank would have increased. I’ll leave it as an exercise for you to play with this by altering the sort order for your sample queries.
Grouping In Row_Rank_Dense
It is also possible to organize rankings within a group. For example, within a single computer you might want to rank a counter value. With the next computer you’d want the rankings to begin again. This would allow you to have rankings that are unique to each computer.
In the example below I’ve added a new column to the datatable named groupVal. We’ll be using this column for our grouping. It was also added to the sort operator so we’ll sort by group first, then the value to rank on, and finally the rowVal text.
The row_rank_dense function supports a second parameter, a boolean value that when true will trigger a new group to begin. Here we are using an equation, which will compare the groupVal for the current row to the one of the previous row using the prev Windowing Function. If they are not equal, the comparison will return true and trigger row_rank_dense to begin a new dense rank grouping.
In the output, rows 1 and 3 (from the rowNum column) have the same valToRankOn, so are both given the Rank of 1. The third row in this group, row 2, is assigned a Rank of 2.
With row 4, we see the groupVal has changed. So the row_rank_dense function reset and began a new ranking, assigning this row a Rank of 1.
When the group changes again in row 7, the Rank value is again reset to 1 and we work our way up.
Row_Rank_Dense in the Real World
Let’s take a look now at an example of using row_rank_dense for a “real world” query. Here, we are going to query the Perf table to bring back rows for the last five minutes where the CounterValue is Bytes Sent/sec, and we’ll remove any rows with a value of zero.
We’ll project each column we need and sort the data. Here we’ll again sort in ascending order so the smallest counter values come first, but we could just have easily sorted the CounterValue in descending order so the largest values came first.
When we call row_rank_dense, we’ll pass in the value we want to rank in the first parameter, CounterValue. In the second parameter we’ll compare the name of the computer in this row to the one of the previous row using the prev function. When they don’t match the comparison will return true, which will trigger the row_rank_dense function to begin a new group.
As you can see, we begin with computer CH-AMAVM, with its value of 2.26333 given the rank of 1, then the rank values increase as the counter values increase.
When we hit computer CH1-AVSMGMTVM, note the Rank reset itself. The first row for this computer, with a counter value of 2.34613 has a Rank of 1.
This pattern will repeat for the remaining rows of data from our query.
See Also
The following operators, functions, and/or plugins were used or mentioned in this article’s demos. You can learn more about them in some of my previous posts, linked below.
Fun With KQL Windowing Functions – Prev and Next
Conclusion
In this post you saw how to use the row_rank_dense Windowing Function to order and rank values in a dataset from smallest to largest, or largest to smallest.
The next and final post in the Kusto Window Functions series will cover the use of row_window_session to group and organize data into time windows.
The demos in this series of blog posts were inspired by my Pluralsight courses on the Kusto Query Language, part of their Kusto Learning Path.
There are three courses in this series so far:
I have two previous Kusto courses on Pluralsight as well. They are older courses but still valid.
These are a few of the many courses I have on Pluralsight. All of my courses are linked on my About Me page.
If you don’t have a Pluralsight subscription, just go to my list of courses on Pluralsight. On the page is a Try For Free button you can use to get a free 10 day subscription to Pluralsight, with which you can watch my courses, or any other course on the site.
Fun With KQL Windowing Functions – Row_Rank_Min 7 Aug 2023 7:00 AM (2 years ago)

Introduction
In this post we’ll cover the next in our series on KQL Windowing Functions, row_rank_min. The row_rank_min function will assign rank numbers to an incoming dataset, with the rank of 1 being assigned to the minimal value in the dataset and increasing as the values increase.
First though, if you’ve not read the introductory post on Windowing Functions, Fun With KQL Windowing Functions – Serialize and Row_Number, you should do so now as it introduced several important concepts needed to understand how these Windowing Functions work.
The samples in this post will be run inside the LogAnalytics demo site found at https://aka.ms/LADemo. This demo site has been provided by Microsoft and can be used to learn the Kusto Query Language at no cost to you.
If you’ve not read my introductory post in this series, I’d advise you to do so now. It describes the user interface in detail. You’ll find it at https://arcanecode.com/2022/04/11/fun-with-kql-the-kusto-query-language/.
Note that my output may not look exactly like yours when you run the sample queries for several reasons. First, Microsoft only keeps a few days of demo data, which are constantly updated, so the dates and sample data won’t match the screen shots.
Second, I’ll be using the column tool (discussed in the introductory post) to limit the output to just the columns needed to demonstrate the query. Finally, Microsoft may make changes to both the user interface and the data structures between the time I write this and when you read it.
Row_Rank_Min Basics
We being by using let to define a datatable with some values to use for our example. The rowNum and rowVal are just included to have some data to look at.
The important column is valToRankOn. This is the column that will be evaluated and used to rank the data. Let’s see how our query works.
We take our SomeData and pipe it into a sort, sorting by the value to rank on and the row value (rowVal). Note we need to sort the valToRankOn in ascending order to get the row_rank_min to work correctly, and while we are at it we’ll sort the rowVal in ascending order as well.
The sort has the added benefit as making the data serializable, so it can be used with KQL Windowing Functions, in this case row_rank_min. For more on serialization see the post I referenced in the introduction, Fun With KQL Windowing Functions – Serialize and Row_Number.
After the sort we have an extend where we create a new column Rank. To it we assign the output of row_rank_min. Into the function we pass the column to evaluate for the rank, here we are using valToRankOn.
The smallest value is given a rank of 1, as you can see with rowNum 7. The next smallest value, found on rowNum 8 is assigned a rank of 2. Row 3 has a valToRankOn of 15, which is the next smallest value so it was given a rank of 3.
Rows 6 and 9 both have a value of 17, so both are assigned the same minimal rank number of 4. Because we added the rowVal to the sort, the rows are sorted in ascending order by the rowVal within the Rank of 4.
This pattern is repeated for the remaining rows, with the rank value increasing as the values in valToRankOn increases. As you can see, this provides an easy way to rank values from smallest to largest.
Ranking Within a Group
Similar to the row_cumsum Windowing Function we looked at in the previous post, we can create rankings within a group. In the following sample, a new column of groupVal was added to the SomeData sample dataset.
In the example we made two changes from the previous sample. First, the groupVal was added to the sort statement.
The next change occurred in the row_rank_min function. It supports a second parameter that will trigger a reset of the ranking value. It needs to evaluate to a boolean true/false value. When true, it resets the ranking value.
Here, we are comparing the groupVal of the current row to the groupVal of the previous row using the prev function. If the group name for the current row is different from the previous row, the comparison will return true since they are not equal. This will trigger the ranking to restart.
In rowNum 4 the group changes to Group 2, so Kusto starts the ranking again. Within Group 2, the value of 22 on row 4 is the smallest, so it gets the rank of 1.
This technique lets us create minimal ranking values within individual groups of data. Here we are using groupVal, in a real world you might use something like a computer name or performance counter name.
Real World Example
In this query we’ll create something you might use in the “real world”. We’re going to look at the Perf table for the counter “Bytes Sent/rec”, where there is data (the counter value is greater than zero).
We’ll project only the columns we need, then sort the output. We want to create rankings for each computer, from the smallest counter value to the biggest. By doing so we can easily see what times we had the smallest and largest values.
Here we use row_rank_min to evaluate the CounterValue. In the second parameter we are checking to see if the Computer name has changed, if so the rank will reset for the next computer.
Looking at one example, when the Computer changed from CH-AMAVM changes to CH1-AVSMGMTVM, the rank reset so the smallest value of 16.4175 is given the rank of 1.
See Also
The following operators, functions, and/or plugins were used or mentioned in this article’s demos. You can learn more about them in some of my previous posts, linked below.
Fun With KQL Windowing Functions – Prev and Next
Fun With KQL Windowing Functions – Row_CumSum
Conclusion
With this post we saw how to create rankings for values using the row_rank_min function. This allows us to easily identify the smallest value, with a rank of 1 and work up to the largest value.
In our next post we’ll continue our KQL Windowing Function series by looking at the row_rank_dense function, which is similar to this posts row_rank_min.
The demos in this series of blog posts were inspired by my Pluralsight courses on the Kusto Query Language, part of their Kusto Learning Path.
There are three courses in this series so far:
I have two previous Kusto courses on Pluralsight as well. They are older courses but still valid.
These are a few of the many courses I have on Pluralsight. All of my courses are linked on my About Me page.
If you don’t have a Pluralsight subscription, just go to my list of courses on Pluralsight. On the page is a Try For Free button you can use to get a free 10 day subscription to Pluralsight, with which you can watch my courses, or any other course on the site.
Fun With KQL Windowing Functions – Row_CumSum 31 Jul 2023 7:00 AM (2 years ago)

Introduction
Seeing cumulative totals on a row by row basis is a common need. Think of your bank account, when you look at your ledger it shows each individual transaction. Beside each individual transaction is the current amount in your account, as offset by the amount of the current transaction.
This technique is known as cumulative sums. The Kusto Query Language provides the ability to create cumulative sums using the Windowing Function, row_cumsum. In this post we’ll see how to implement it.
First though, if you’ve not read the introductory post on Windowing Functions, Fun With KQL Windowing Functions – Serialize and Row_Number, you should do so now as it introduced several important concepts needed to understand how these Windowing Functions work.
The samples in this post will be run inside the LogAnalytics demo site found at https://aka.ms/LADemo. This demo site has been provided by Microsoft and can be used to learn the Kusto Query Language at no cost to you.
If you’ve not read my introductory post in this KQL series, I’d advise you to do so now. It describes the user interface in detail. You’ll find it at https://arcanecode.com/2022/04/11/fun-with-kql-the-kusto-query-language/.
Note that my output may not look exactly like yours when you run the sample queries for several reasons. First, Microsoft only keeps a few days of demo data, which are constantly updated, so the dates and sample data won’t match the screen shots.
Second, I’ll be using the column tool (discussed in the introductory post) to limit the output to just the columns needed to demonstrate the query. Finally, Microsoft may make changes to both the user interface and the data structures between the time I write this and when you read it.
Row_CumSum Basics
For this example I’ll be using let to generate a simple dataset using the datatable operator. It will have two columns, the row number rowNum, and a value rowVal. For more information on let, datatable, serialize, and other functions used in this post refer to the See Also later in this post.
Using row_cumsum is simple. First, we need to pipe the dataset SomeData into a serialize so we can use it with Windowing Functions. The serialize also lets us create a new column we named cumSum, and set it equal to the row_cumsum output. As a parameter, I pass in the numeric column I want to add up, here I used the rowNum column.

As you can see in row 1, the row number (rowNum) has a value of 1. There is no data since there are no previous rows, so it just returns 1.
In the second row, the value of rowNum is 2. The cumSum column already had a value of 1, so we’ll add 2 to it, for a result of 3.
With the third row, we’ll add the value in rowNum (3) to the value in cumSum (which also happened to be 3) and we’ll now have a cumulative sum of 6.
This repeats for each row, creating a cumulative summary.
You can also create a way to decrement the data by using a negative value for the row_cumsum parameter. For example, row_cumsum(rowNum * -1) could have been used to create a decrementing value much as spending money out of your checking account would decrement your balance. You’d just want to determine the best way to handle the beginning value (first row) of the dataset.
Resetting the Cumulative Counter
It’s possible you may not want to keep accumulating for all rows, but instead only have the accumulation for a group of rows. A common task is to reset the sum when a computer name changes, or perhaps the calendar month.
For this example, I’ve added a third column to our datatable, rowBucket. Whenever the value in rowBucket changes, I want to reset the cumulative sum value.

The row_cumsum supports a second parameter that is a boolean value. When true, the counter resets. Here, I’m using an equation to calculate “is the current rows rowBucket value not equal to the one from the previous row”. If this is true, in other words not equal, then the counter will reset.
Sure enough, on row 4 the rowBucket changed to 2. On this row the cumulative sum reset itself. It now keeps adding up until the bucket number changes again, as it does with row 6.
A Real World Example
Using a datatable made the examples easy to understand, but it’s time to look at an example you might want to use in the “real world”.
Let’s imagine a scenario where you’ve detected a large amount of network traffic coming from one of the computers on your Azure network. You’d like to check the performance log table (Perf) to see how many bytes each computer sent in the last five minutes.
You need to see the number of bytes sent by a computer for each log entry, but you also want to see the total bytes sent by a computer for that time period. Let’s look at a query to accomplish this goal.

We begin with our old buddy the Perf table. A where will limit the data to the last five minutes. A second where will limit the counter to just the one we are interested in, Bytes Sent/sec. Since we only need to see this data when the virtual Azure server sent data, we’ll add a final where to remove any rows where the CounterValue is zero.
Next, we’ll use a project to strip down the columns to only the three we are interested in: the Computer, TimeGenerated, and CounterValue.
We then want to use a sort, so the data for each computer will be grouped together, then within a Computer the time the performance data was generated. Note that since the default for a sort is descending order, an asc was added after the TimeGenerated so the entries would go from the oldest to the most recent.
I normally might include an asc after the Computer so the computer names would be sorted alphabetically from A to Z, but left it off for this example just to remind you that with a sort you can mix and match the asc and desc columns.
Using a sort has another benefit. If you did go back and read my post Fun With KQL Windowing Functions – Serialize and Row_Number as I suggested in the introduction, you’ll know that the sort marks a dataset as safe for serialzation. In order to use Windowing Functions, such as row_cumsum and prev, a dataset needs to be safe for serialization.
The final line of the query is where the magic happens. Since using sort eliminated the need to use serialize, we can just use an extend to create a new column. I chose to name it cumulativeBytes.
We assign it the output of our row_cumsum Windowing Function. In the first parameter we pass in the CounterValue. In the second column we create an expression that will evaluate to true or false. We compare the Computer column for the current row and call the prev Windowing Function to get the Computer from the previous row of data.
If they are not equal, then the equation returns true. This will cause the row_cumsum to reset the cumulative sum.
Looking at the output, you can indeed see that occurred. The first computer in the list is CH1-VM-CTS. With each row it begins accumulating the CounterValue into the cumulativeBytes column.
When the Computer changed to CH-DMAVM, you can see the cumulativeBytes counter was reset. It kept accumulating the values for CH-DMAVM until the Computer changed to CH-AVSMGMTVM at which point it was again reset, and the pattern continues.
See Also
The following operators, functions, and/or plugins were used or mentioned in this article’s demos. You can learn more about them in some of my previous posts, linked below.
Fun With KQL Windowing Functions – Prev and Next
Fun With KQL Windowing Functions – Serialize and Row_Number
Conclusion
Cumulative sums are not an uncommon need when retrieving data. Kusto provides this ability with the Windowing Function row_cumsum, which you saw how to use in this post.
Our next post will continue the coverage of Kusto Windowing Functions by looking at the row_rank_min function.
The demos in this series of blog posts were inspired by my Pluralsight courses on the Kusto Query Language, part of their Kusto Learning Path.
There are three courses in this series so far:
I have two previous Kusto courses on Pluralsight as well. They are older courses but still valid.
These are a few of the many courses I have on Pluralsight. All of my courses are linked on my About Me page.
If you don’t have a Pluralsight subscription, just go to my list of courses on Pluralsight. On the page is a Try For Free button you can use to get a free 10 day subscription to Pluralsight, with which you can watch my courses, or any other course on the site.
Fun With KQL Windowing Functions – Prev and Next 24 Jul 2023 7:00 AM (2 years ago)

Introduction
In this post we’ll continue our series on Kusto’s Windowing Functions by covering prev and next. If you’ve not read the introductory post, Fun With KQL Windowing Functions – Serialize and Row_Number, you should do so now as it introduced several important concepts needed to understand how these functions are used.
So what do prev and next do? They allow you to retrieve a value in a column from a previous row, or the next (or upcoming) row. This can be very useful in many situations. For instance, calculating the time between two rows based on a datetime column, or the change in a value from one row to the next.
The samples in this post will be run inside the LogAnalytics demo site found at https://aka.ms/LADemo. This demo site has been provided by Microsoft and can be used to learn the Kusto Query Language at no cost to you.
If you’ve not read my introductory post in this series, I’d advise you to do so now. It describes the user interface in detail. You’ll find it at https://arcanecode.com/2022/04/11/fun-with-kql-the-kusto-query-language/.
Note that my output may not look exactly like yours when you run the sample queries for several reasons. First, Microsoft only keeps a few days of demo data, which are constantly updated, so the dates and sample data won’t match the screen shots.
Second, I’ll be using the column tool (discussed in the introductory post) to limit the output to just the columns needed to demonstrate the query. Finally, Microsoft may make changes to both the user interface and the data structures between the time I write this and when you read it.
Prev Basics
To make these examples simple, I’m going to use the datatable operator to generate a very simple dataset. For more on how datatable works, please see my post Fun With KQL – Datatable.
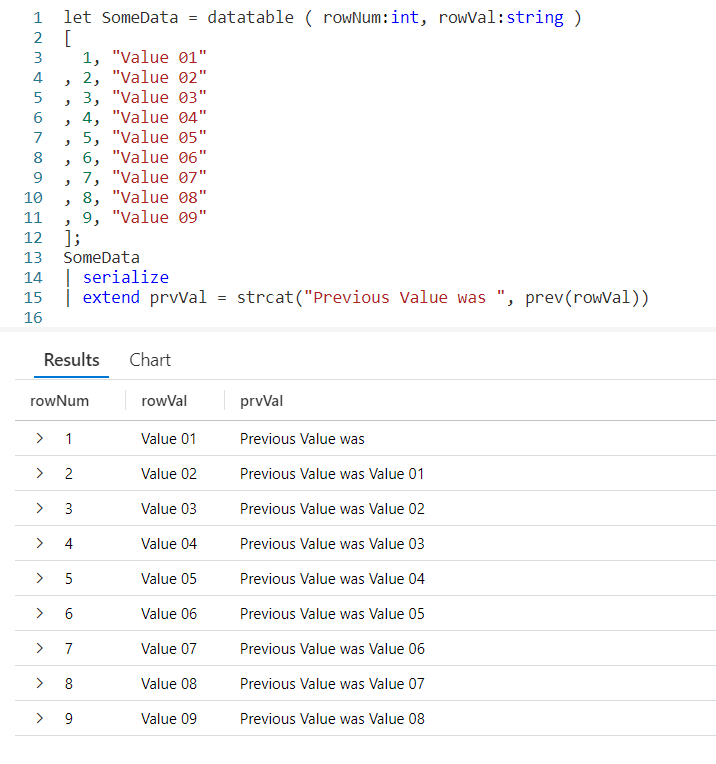
Using a let, I’ve created a dataset named SomeData. It has nine rows and two columns: rowNum and rowVal.
After my let, I take the SomeData dataset and pipe it into a serialize so it can be used with Windowing Functions like prev. Refer back to my previous post on serialize for more information on how serializing a dataset lets you use Windowing Functions.
Now the data pipes into an extend, where we add a new column I named prvVal (short for previous value). We then use strcat to combine a text string, Previous Value was with the output of our prev Windowing Function.
Into prev we pass one parameter, the name of the column from the previous row we want the data for. Here we want to pull data from the column rowVal.
As you can see in the output, the right most column displays our Previous Value was text string, plus the value from the rowVal column in the previous row.
Even More Previous
We can go back more than just one row. The prev function supports a second parameter that indicates the number of rows to go back.

First, I decided to use two extends. The first will copy the previous value into a variable, prvVal2. Into the prev function I pass two values, the first is the column name we want the data from. Here we’ll use rowVal again. The second parameter is the number of rows we want to go back, in this case we just used the value of 2.
In the next extend I user strcat to combine the prvVal2 variable with a text string and put it into the new column prvValOutput. I did this just to demonstrate you could pull a value from a previous row and use it in the query. I could have done other things with prvVal2, such as use it in a calculation.
Previous Value? What Previous Value?
You probably noticed that when we are on the first row, there is no previous value. Likewise, when on the first or second rows, and going back two there was no data. In this case the prev just returned a null value.
In the past I’ve written about functions like iif and isnull to help handle null values. Fortunately, prev eliminates the need for these as it supports and optional third parameter. Into it you can supply a value to use when the value returned by prev would otherwise be null.

In our prev we first pass the column from the previous row we want the data from, rowVal. In this example we are only going to go back one row, but since we want to use the third parameter we have to supply a value in the second parameter position. In this example we’ll use the number 1.
Finally in our third parameter we supply a value to be returned when the result of a prev would be null. Here we used the text not valid for this row, although we could have used a different datatype such as a numeric value or a datetime if that would have been more appropriate to our query.
Next
Next, let’s look at next. The next function behaves just like prev, except it will get data from the next row in our serialized dataset instead of a previous row.
Just like with prev, as the parameter to next we pass in the name of the column to get the data from.

The next function also supports the optional second and third parameters. The second being a number indicating how many rows to go forward, the third being a value to use when next would otherwise return a null value.
Since you’ve already seen these in play I won’t create samples here, but you should be able to easily create them for yourself following the examples from prev.
Calculating a Moving Average
So it’s time for a more realistic example. Here I want to get the % Processor Time from the Perf table for a particular computer. I’m going to summarize it by hour. Then I want to create a moving average for the last three hours.
Most of the query will be pretty straightforward if you’ve been following my KQL series. I capture a start and end time using let. I then use the Perf table, followed by several where statements to limit the data.
Next I use summarize to create an average, bucketed by hour. In essence I’ll have an average of all the processor times for the 1 am hour, then 2 am, and so on.
After that we’ll sort them by the time of the day. Not only will the sort put the data in the order we want, it will also mark them as serialized. This means we can use them with our Window Function prev.
The last line is where the exciting things happen, so take a look and we’ll break it down.
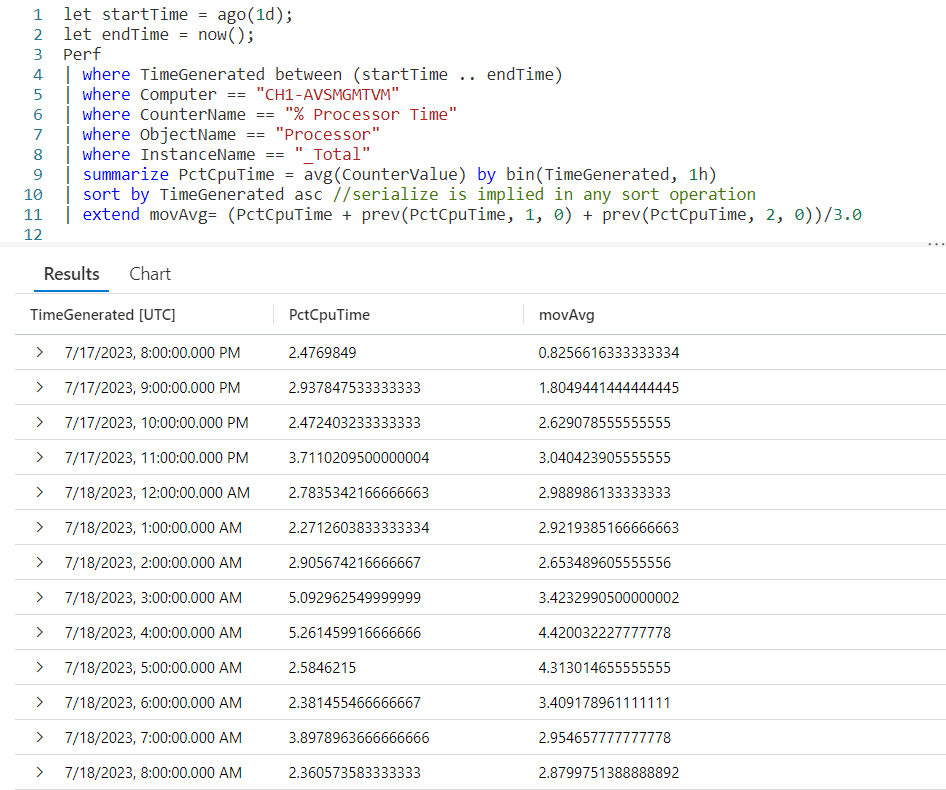
We begin with extend in order to create a new column, movAvg. We are then going to add three values. The first value is the PctCpuTime from the current row, which was calculated during the summarize.
Next, I want to add in the PctCpuTime from the previous row. To do that we’ll use the prev function, pass in the PctCpuTime as the column to get, 1 to indicate we want to go back one row, then tell it to return a 0 (zero) when the previous row would return null.
This is then repeated only we pass in a value of 2, indicating we should go back two rows.
After the closing parentheses we divide by 3.0. Note its important to include the .0 otherwise it would try to create an integer output and we want a full decimal value.
And there you go, we now have an average for the last three rows of data.
Let me acknowledge, by returning a 0 for missing (null) values from the prev, the averages for the first two rows will be off. In a real world situation you’d want to make sure to take this into account, creating a solution appropriate to your situation. For this example I used zero in order to keep things simple.
See Also
The following operators, functions, and/or plugins were used or mentioned in this article’s demos. You can learn more about them in some of my previous posts, linked below.
Fun With KQL – IsNull and IsEmpty
Fun With KQL Windowing Functions – Serialize and Row_Number
Conclusion
This post continued our journey with KQL Windowing Functions, seeing how the useful prev and next functions could get data from adjacent rows of a serialized dataset. In our next post we’ll be looking at a Windowing Function to let us get cumulative sums.
The demos in this series of blog posts were inspired by my Pluralsight courses on the Kusto Query Language, part of their Kusto Learning Path.
There are three courses in this series so far:
I have two previous Kusto courses on Pluralsight as well. They are older courses but still valid.
These are a few of the many courses I have on Pluralsight. All of my courses are linked on my About Me page.
If you don’t have a Pluralsight subscription, just go to my list of courses on Pluralsight. On the page is a Try For Free button you can use to get a free 10 day subscription to Pluralsight, with which you can watch my courses, or any other course on the site.
Fun With KQL Windowing Functions – Serialize and Row_Number 17 Jul 2023 7:00 PM (2 years ago)

Introduction
The Kusto Query Language includes a set of functions collectively known as Window Functions. These special functions allow you to take a row and put it in context of the entire dataset. For example, creating row numbers, getting a value from the previous row, or maybe the next row.
In order for Window Functions to work, the dataset must be serialized. In this post we’ll cover what serialization is and how to create serialized datasets. This is a foundational post, as we’ll be referring back to it in future posts that will cover some of the KQL Windowing Functions.
The samples in this post will be run inside the LogAnalytics demo site found at https://aka.ms/LADemo. This demo site has been provided by Microsoft and can be used to learn the Kusto Query Language at no cost to you.
If you’ve not read my introductory post in this series, I’d advise you to do so now. It describes the user interface in detail. You’ll find it at https://arcanecode.com/2022/04/11/fun-with-kql-the-kusto-query-language/.
Note that my output may not look exactly like yours when you run the sample queries for several reasons. First, Microsoft only keeps a few days of demo data, which are constantly updated, so the dates and sample data won’t match the screen shots.
Second, I’ll be using the column tool (discussed in the introductory post) to limit the output to just the columns needed to demonstrate the query. Finally, Microsoft may make changes to both the user interface and the data structures between the time I write this and when you read it.
Serialization
When a dataset is serialized, its data is placed in a specific order and that order is retained as the dataset goes through various transformations. Some of the Windowing Functions that require a serialized dataset to work are row_number, next, and prev to name just a few that will be covered in this and future posts.
There are some KQL functions that by their nature emit a dataset that is already ordered, in other words serialized. These include functions that I’ve already written about such as top and sort.
There are also some operators that if they receive a serialized dataset as input, will preserve the serialized ordering when the data is output. I’ve written about all of these in past posts, and they include: extend, mv-expand, parse, project, project-away, project-rename, take and where.
So the big question is, what if I need to use a Window Function but my data is not already serialized?
The Serialize Operator
For situations when you do not have an already serialized dataset you can easily create one using the serialize operator. Here’s a simple example.

All we have to do is take our dataset and pipe it into the serialize operator. The dataset will then have its order preserved, and will mark the dataset safe for use with KQLs Windowing Functions, similar to when a social media site lets you mark yourself safe from a hurricane, tornado, or all night HeavyDSparks marathon on YouTube. (#GuiltyPleasures)
Of course we don’t see any visible change here, but now we can use it with a Windowing Function. If you peeked at the post title, you’ve probably guessed already that for this post we’ll use the Window Function row_number.
But first…
A Warning!
Eagle eyed readers may notice the serialze in the screen shot above is underlined with red squiggles. This indicates there is a warning associated with this operator.
If we hover over the serialize operator the interface will display the specific warning to us.

It’s letting us know that in addition to being marked safe for Kusto Window Functions, the dataset will also be stored in memory. This could adversely affect the query runtime.
Sometimes it’s necessary to use serialize in order to get the results you need, but keep it in mind. Should you have a slow running query think about reducing the size of the dataset or see if there are other ways to accomplish the same results.
That said, let’s see how to use a basic Window Function, the row_number.
Row_Number
Calling the row_number function is easy. After the serialize operator we first provide a new column name that will hold our row number, here I used MyRowNumber. I then assign it the function row_number(). Note because it is a function we have to include the parenthesis after the function name.
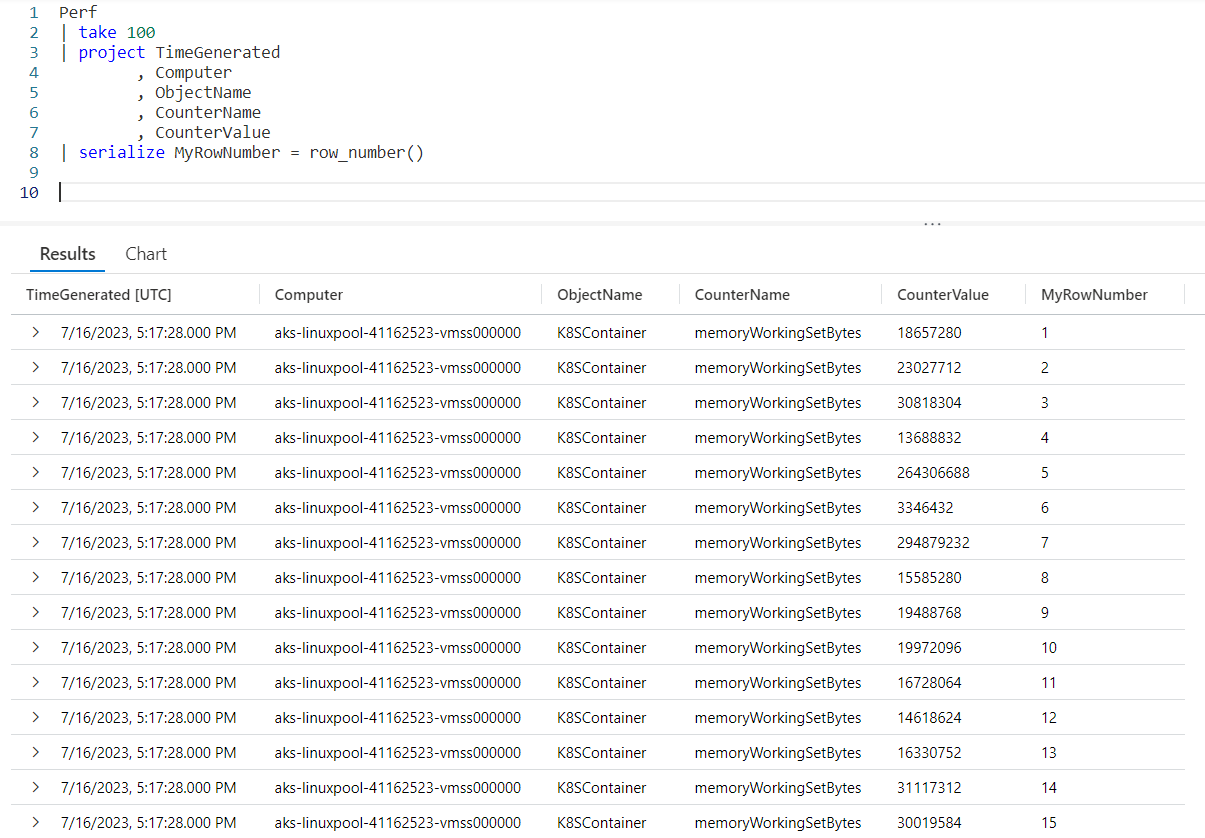
In the very right most column you can see our new row number column, MyRowNumber. The value is incremented with each row.
Row_Number Without Serialize
It’s possible to call the row_number function without using the serialize operator. As discussed earlier in this post the Windowing Functions need a serialized dataset to work with, and there are a few operators that will produce a dataset that is already safe to be serialized, such as top and sort.
In addition we have the operators that will preserve serialization when a serialized dataset is passed in. As a refresher these operators include: extend, mv-expand, parse, project, project-away, project-rename, take and where.
In this example, we’ll use a sort to get our data in the order we want, then use an extend to add the new MyRowNumber column by calling the row_number() function.
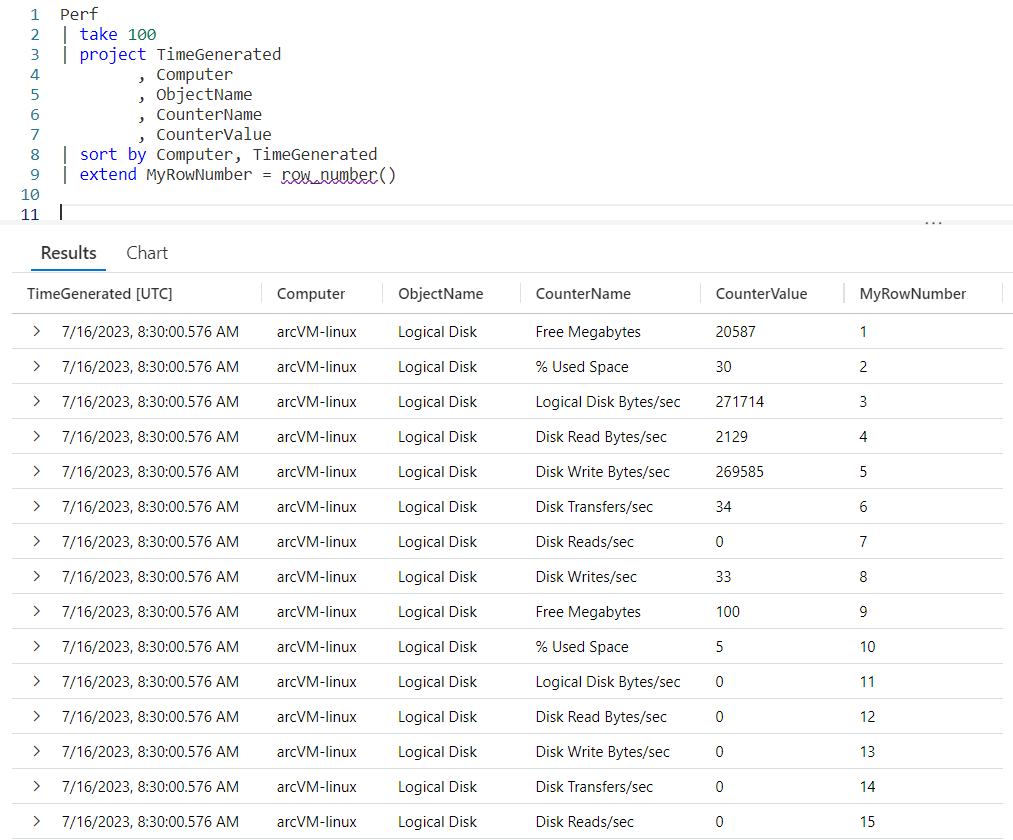
As you can see, after the sort we call extend and use the same syntax as before, creating the new column of MyRowNumber and assigning it the function row_number(). Looking to the right you can see the new MyRowNumber column in the output.
You also may notice the row_number function now has a red squiggly line under it, indicating a warming. Let’s go see what that’s all about…
Another Warning!
Hovering over the row_number displays the following warning:

This warning is similar to the one you saw when we used the serialzie operator. It states that by calling row_number the data will be stored in memory, which could slow down the query.
It does have an interesting implication though. Using sort means the data can be serialized, but doesn’t mean it is. The warning states it’s the calling of a Windowing Function, such as our new friend row_number, that actually triggers the data to be serialized.
Serialize and Window Functions Recap
When we talk about Windowing Functions, I wanted to stress an important point. The serialize operator is used to convert a dataset that is not already safe for serialization into one that is. The serialization is required in order to use a Windowing Function such as row_number or one of the other’s we’ll cover in this series.
There are a list of other operators though that output data that is already safe for serialization, in other words if we use one of these operators then we can use a Windowing Function without the need to use serialize. I mentioned top and sort already, but for completeness here is the full list.
I’ve already done blog posts for the first two (you can click on the command to follow the link to the post), and have one planned for range. If there’s interest I may cover the other two.
For completeness, let me go ahead and list the operators that will preserve the serialized state of the data when used. Note each is linked to a blog post I’ve done previously which covers each operator.
See Also
The following operators, functions, and/or plugins were used or mentioned in this article’s demos. You can learn more about them in some of my previous posts, linked below.
Fun With KQL – Project – Variants of Project (Project-Away and Project-Rename)
Conclusion
In this post we learned hot to use serialize to create a dataset with which we can call one of the Kusto Languages Windowing Functions. We also learned there are a handful of operators that already produce datasets safe for serialization, and can be used with Windowing Functions without the requirement to use the serialize operator.
Finally we saw the row_number Windowing Function in action. In future posts we’ll cover more of the Windowing Functions built into the Kusto Query Language.
The demos in this series of blog posts were inspired by my Pluralsight courses on the Kusto Query Language, part of their Kusto Learning Path.
There are three courses in this series so far:
I have two previous Kusto courses on Pluralsight as well. They are older courses but still valid.
These are a few of the many courses I have on Pluralsight. All of my courses are linked on my About Me page.
If you don’t have a Pluralsight subscription, just go to my list of courses on Pluralsight. On the page is a Try For Free button you can use to get a free 10 day subscription to Pluralsight, with which you can watch my courses, or any other course on the site.
Fun With KQL – Datatable and Calculations 10 Jul 2023 7:00 AM (2 years ago)

Introduction
In the conclusion of my last post, Fun With KQL – Datatable, I mentioned a datatable can also be useful when you need to do special calculations. I decided it really needed further explanation and created this post to dive in a bit deeper.
If you haven’t read my datatable post yet, you should as I’ll refer back to it. Go ahead, I’ll wait.
The samples in this post will be run inside the LogAnalytics demo site found at https://aka.ms/LADemo. This demo site has been provided by Microsoft and can be used to learn the Kusto Query Language at no cost to you.
If you’ve not read my introductory post in this series, I’d advise you to do so now. It describes the user interface in detail. You’ll find it at https://arcanecode.com/2022/04/11/fun-with-kql-the-kusto-query-language/.
Note that my output may not look exactly like yours when you run the sample queries for several reasons. First, Microsoft only keeps a few days of demo data, which are constantly updated, so the dates and sample data won’t match the screen shots.
Second, I’ll be using the column tool (discussed in the introductory post) to limit the output to just the columns needed to demonstrate the query. Finally, Microsoft may make changes to both the user interface and the data structures between the time I write this and when you read it.
Datatable and Calculations
For this example we’ll revisit the Perf table. The Perf table has two main columns that we’ll use in this example, CounterName and CounterValue.
Our goal for this query is to multiply the CounterValue by some number, based on the CounterName. We could of course use a case or iif within the query, but that would result in a query that is long and hard to read and later modify if we need to.
Using a datatable will result in a query that is much more readable and maintainable. As the actual code for the query is a bit long I’ll place it below to make it easy to follow along. Note I’ll only skim over things we covered in the previous post, refer to it for more detailed explanations.
let CounterMultipliers = datatable (CounterName:string, Multiplier:int)
[
  "CounterName", 2,
  "restartTimeEpoch", 3,
  "memoryWorkingSetBytes", 4,
  "memoryRssBytes", 5,
  "memoryRequestBytes", 2,
  "memoryLimitBytes", 3,
  "memoryCapacityBytes", 4,
  "memoryAllocatableBytes", 5,
  "cpuUsageNanoCores", 2,
  "cpuRequestNanoCores", 3,
  "cpuLimitNanoCores", 4,
  "cpuCapacityNanoCores", 5,
  "cpuAllocatableNanoCores", 2,
  "Total Bytes Transmitted", 3,
  "Total Bytes Received", 4,
  "Logical Disk Bytes/sec", 5,
  "Free Megabytes", 2,
  "Disk Writes/sec", 3,
  "Disk Write Bytes/sec", 4,
  "Disk Transfers/sec", 5,
  "Disk Reads/sec", 2,
  "Disk Read Bytes/sec", 3,
  "Disk Bytes/sec", 4,
  "Bytes Sent/sec", 5,
  "Bytes Received/sec", 2,
  "Avg. Disk sec/Write", 3,
  "Avg. Disk sec/Transfer", 4,
  "Avg. Disk sec/Read", 5,
  "Available MBytes Memory", 2,
  "Available MBytes", 3,
  "% Used Space", 4,
  "% Processor Time", 5,
  "% Free Space", 6
];
let PerfData = view() {
Perf
| project CounterName
        , CounterValue
        , Computer
        , ObjectName
        , TimeGenerated
};
PerfData
| join CounterMultipliers on CounterName
| project CounterName
        , CounterValue
        , Multiplier
        , CounterExpanded = CounterValue * Multiplier
        , Computer
        , ObjectName
        , TimeGenerated
We begin with a let, where we will create a new datatable. I chose to name it CounterMultipliers, but we could have used any name we wanted.
The datatable will have two columns, the CounterName which is a string, and the Multiplier which I made an int.
I used a simple query to get the list of CounterName values:
Perf
| distinct CounterName
| sort by CounterName
I then copied the output into my query editor. I wrapped the names in quotes so they would be interpreted as strings. Next I have a comma, then the integer value to use for the multiplier.
Note I just picked a few random values to use here. In a real world situation this kind of operation, multiplying counter values, might not make much sense, but it will serve OK for this example.
After finishing the datatable definition I use a second let to create a temporary view on top of the Perf table and named the view PerfData. For more on this technique refer back to the Fun With KQL – Datatable post.
Now we take our PerfData view and join it to our datatable, CounterMultipliers. Note that I used the best practice of naming the counter name column in the datatable the same as in the PerfData view. It makes the query easier to read, and avoids the need for $left and $right as I described in the previous post.
Finally we pipe the output of the join into a project operator. I return all the columns, but add a new one, CounterExpanded. For its calculation I simply take the CounterValue column from the PerfData view and multiply it by the Multiplier column from the `datatable.
Below you can see the output from the query.

If you look in the lower right though, you will spot an issue. The query only returned 32 rows.
This demonstrates a critical piece of information when it comes to the join. For each row in the first table, PerfData, it grabs a row from the second table. Since we had 32 rows in the datatable, only 32 rows were returned.
Fixing the Query
Fixing the query is simple. All we need to do is swap the order of the two tables.
CounterMultipliers
| join PerfData on CounterName
| project CounterName
        , CounterValue
        , Multiplier
        , CounterExpanded = CounterValue * Multiplier
        , Computer
        , ObjectName
        , TimeGenerated
Note I only included the last part of the query, everything above this piece is still the same.
Now look at the output.

In the lower right, as well as in the blue area at the top of the output, you can see over 300,000 rows were returned. This is the output we expect, every row in the Perf table (from the view) linked to each row in the CounterMultipliers datatable.
Including and Excluding Columns
In this example, in the output I included the Multiplier column. This was done so you could see the data and test the calculation for yourself. In a normal situation you likely wouldn’t be doing this.
I also included the CounterValue column. Again, this may or may not be needed, you could choose to have just the CounterExpanded column.
Think about the output, and how it will be used to decide if you want to include these types of columns in your query output.
See Also
The following operators, functions, and/or plugins were used or mentioned in this article’s demos. You can learn more about them in some of my previous posts, linked below.
Conclusion
In this post we learned how to use a datatable to create calculated values. This made the code much cleaner, and easier to read.
The demos in this series of blog posts were inspired by my Pluralsight courses on the Kusto Query Language, part of their Kusto Learning Path.
There are three courses in this series so far:
I have two previous Kusto courses on Pluralsight as well. They are older courses but still valid.
These are a few of the many courses I have on Pluralsight. All of my courses are linked on my About Me page.
If you don’t have a Pluralsight subscription, just go to my list of courses on Pluralsight. On the page is a Try For Free button you can use to get a free 10 day subscription to Pluralsight, with which you can watch my courses, or any other course on the site.
Fun With KQL – Datatable 3 Jul 2023 7:00 AM (2 years ago)

Introduction
As you’ve seen with the join in my Fun With KQL – Join post it can be useful to combine two tables in order to clarify the output. What if, though, you need data that isn’t in an existing table?
That’s where the datatable operator comes into use. The datatable allows you to create a table of data right within the query. We’ll see a few useful examples in this post.
The samples in this post will be run inside the LogAnalytics demo site found at https://aka.ms/LADemo. This demo site has been provided by Microsoft and can be used to learn the Kusto Query Language at no cost to you.
If you’ve not read my introductory post in this series, I’d advise you to do so now. It describes the user interface in detail. You’ll find it at https://arcanecode.com/2022/04/11/fun-with-kql-the-kusto-query-language/.
Note that my output may not look exactly like yours when you run the sample queries for several reasons. First, Microsoft only keeps a few days of demo data, which are constantly updated, so the dates and sample data won’t match the screen shots.
Second, I’ll be using the column tool (discussed in the introductory post) to limit the output to just the columns needed to demonstrate the query. Finally, Microsoft may make changes to both the user interface and the data structures between the time I write this and when you read it.
DataTable Basics
Let’s say you have a table that stores colors. These colors though are stored in decimal format, the application that uses them converts them to an HTML hex color. For our report though, we’d like to convert these to a friendly name, which is not stored in the source data.
To accomplish this we can create a color table with the codes as well as friendly color names. We’ll use the datatable operator to do this.
We’ll need to use our old friend let. Following we declare a name for our datatable, here we used HTMLColors although we could use any name we want.
After the equal sign we use the datatable operator. In the parenthesis we declare our column names and their data types. The first is Name, then a colon, then the data type of string. Our second column is also a string, with the name of HexCode.
The final column is DecimalValue, and its datatype is int. You can find a complete list of Kusto data types in the Microsoft documentation, Scalar data types.
After we finish the datatable declaration with a closing right parenthesis, we have an opening square bracket then declare our data. Here I put each row of data on a line by itself, this is a good practice to make it easy to read and modify.
As you can see, our first row is:
"Red", "#FF0000", 16711680,
First is what I call our friendly name associated with the color, followed by a comma. We wrapped it in double quotes, since it is a string datatype.
Then we have the hex color code, also wrapped in quotes to make it a string, followed by a comma. Finally comes the decimal value, which is just an integer number, no quotes required.
Then line ends in a comma, then we proceed to the next line of data. At the end of our data, the row with Aquamarine, we do not have a comma since that is the last row of data. We have a closing square bracket to finish off the datatable data, then a semicolon as the KQL query will continue.
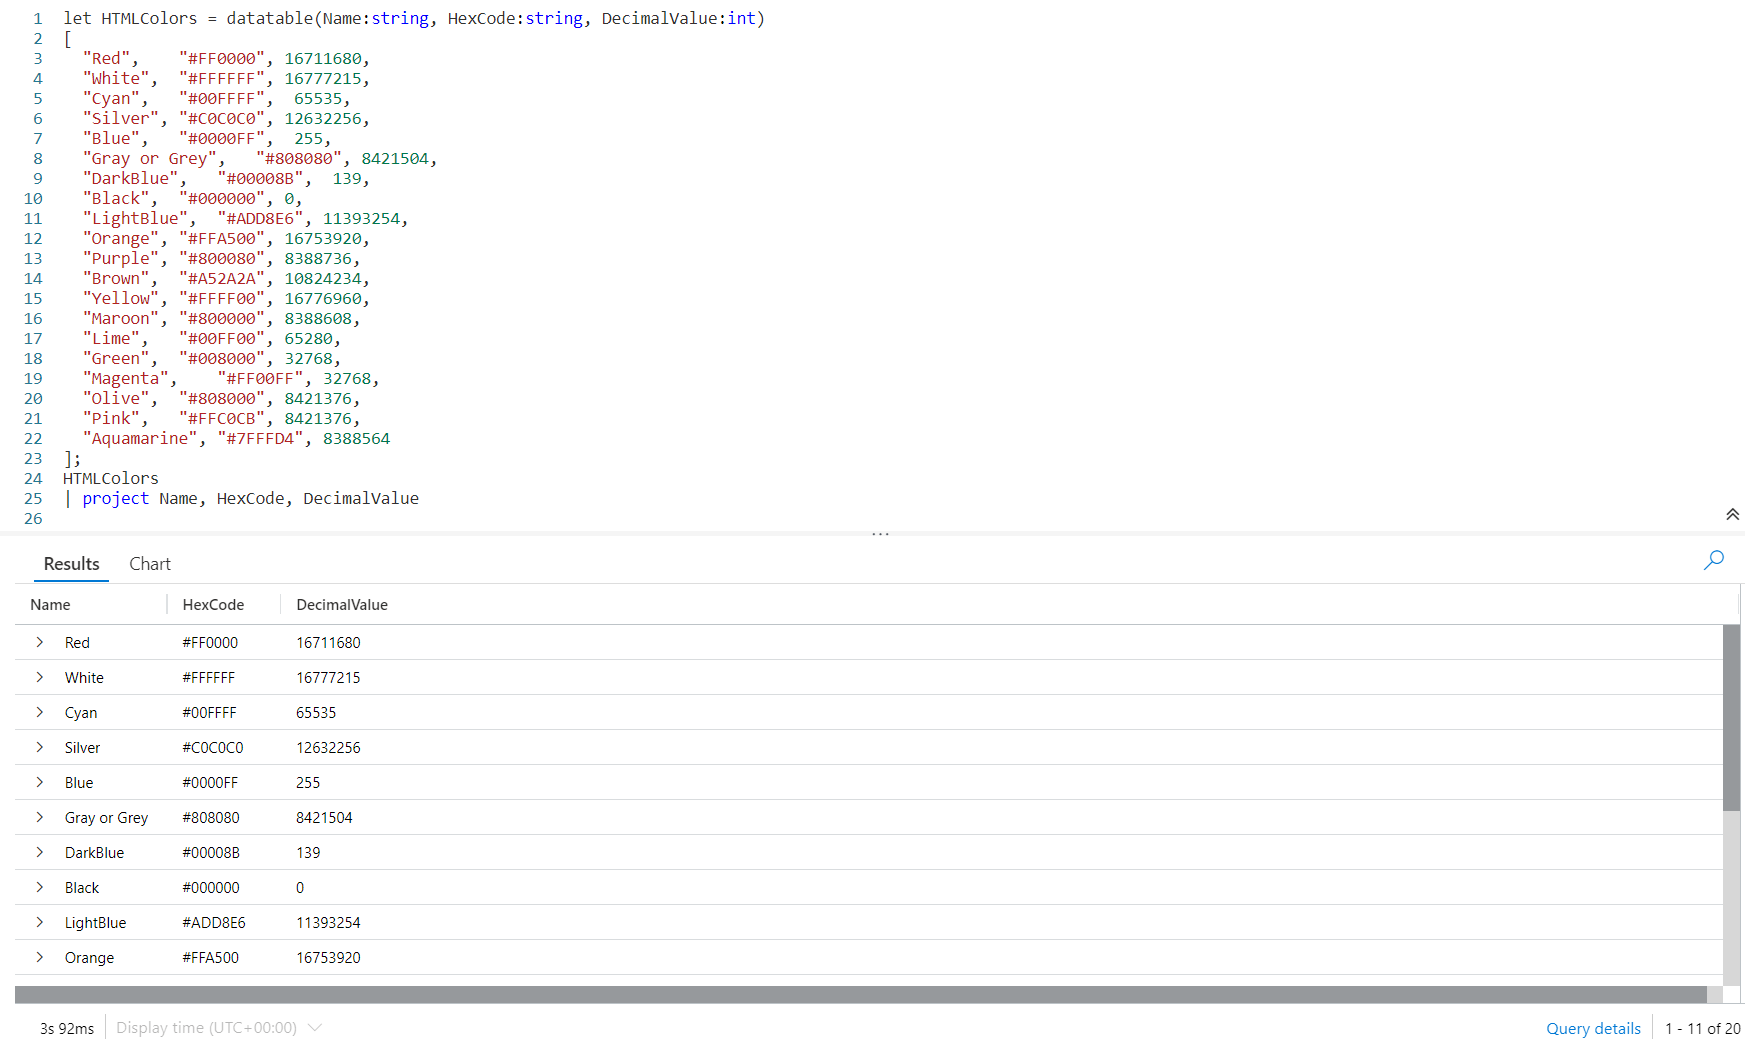
Next have the name of our datatable, piped into a project, then we listed the three columns in the datatable.
As you can see in the image above, the output section has a list of colors, hex values, and decimal value. Note that a few scrolled off the bottom of the screen.
Now we could join this to a table, linking on the DecimalValue column and display the friendly Name column in the output.
Datatable In Practice
Let’s look at an example of the datatable in practice. The Perf table has a column, ComputerName. A lot of the computer names are rather cryptic though. It’d be nice to have a friendly, human readable name that clearly says what the computer is used for, rather than unclear like JBOX10.
Let’s take a look at the query needed to add friendly names to our Perf table output.
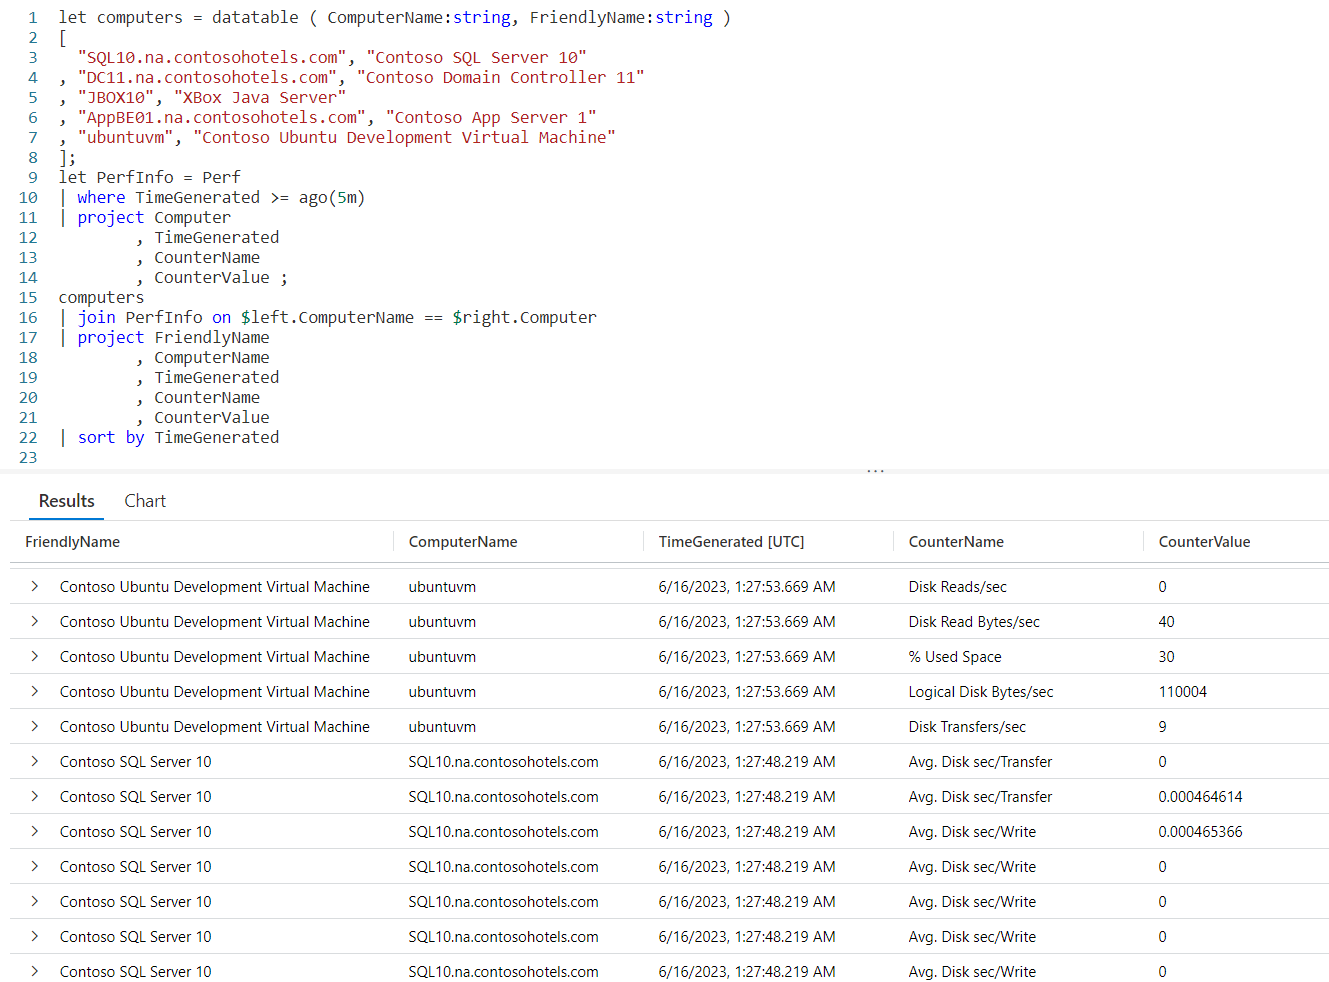
We begin with a let and define a datatable we’ll call computers. It will have two columns, ComputerName and FriendlyName, both of which are strings.
We fall into our data, each line is simply the computer name as found in the Perf table, followed by the friendly name we want to use.
Next comes another let in which we create a datatable from Perf for the last five minutes, and use project to pick out a few columns. We’ve named this datatable PerfInfo.
Now we take our computer datatable and join it to PerfInfo. Because the column we are joining on has different names in each table, I had to use the $left and $right, as described in my Fun With KQL – Join post.
We then project the columns we want, and use sort to order the output.
I should mention I just guessed at the friendly names for some of the computer names in the Perf table. I have no idea if JBOX10 is really the XBox Java Server, but it just sounded good for this demo.
Naming DataTable Columns
I just wanted to mention that normally I would use the same column name in the datatable that is used in the table I’m joining. For example, I would use just Computer in the datatable so it would match up with the Computer column in the Perf table. That way I wouldn’t have to use the $left and $right syntax.
For this example though, I deliberately used a different name so I could remind you of the ability to use $left and $right to join tables when the column name is different.
The most frequent time you’d need this is when you are joining multiple tables with different column names for the same data, which as anyone who has worked with databases for any length of time happens far too often.
Again, for more information on this technique see my Fun With KQL – Join post.
See Also
The following operators, functions, and/or plugins were used or mentioned in this article’s demos. You can learn more about them in some of my previous posts, linked below.
Conclusion
The datatable can be a useful operator for situations where you want to provide user friendly names, but don’t have an existing table that contains them.
It could also be used if you needed to do calculations. For example, rather than using iif statements you could create a datatable with a country code and a standard shipping amount, then in the table use that shipping amount in a calculation, perhaps adding it to the total value of a purchase.
The demos in this series of blog posts were inspired by my Pluralsight courses Kusto Query Language (KQL) from Scratch and Introduction to the Azure Data Migration Service, two of the many courses I have on Pluralsight. All of my courses are linked on my About Me page.
If you don’t have a Pluralsight subscription, just go to my list of courses on Pluralsight . At the top is a Try For Free button you can use to get a free 10 day subscription to Pluralsight, with which you can watch my courses, or any other course on the site.
Fun With KQL – Union Modifiers 26 Jun 2023 7:00 AM (2 years ago)

Introduction
In my previous post, Fun With KQL – Union I covered how to use the union operator to merge two tables or datasets together. The union has a few helpful modifiers, which I’ll cover in this post.
The samples in this post will be run inside the LogAnalytics demo site found at https://aka.ms/LADemo. This demo site has been provided by Microsoft and can be used to learn the Kusto Query Language at no cost to you.
If you’ve not read my introductory post in this series, I’d advise you to do so now. It describes the user interface in detail. You’ll find it at https://arcanecode.com/2022/04/11/fun-with-kql-the-kusto-query-language/.
Note that my output may not look exactly like yours when you run the sample queries for several reasons. First, Microsoft only keeps a few days of demo data, which are constantly updated, so the dates and sample data won’t match the screen shots.
Second, I’ll be using the column tool (discussed in the introductory post) to limit the output to just the columns needed to demonstrate the query. Finally, Microsoft may make changes to both the user interface and the data structures between the time I write this and when you read it.
The Kind Modifier
By default, when executing a Kusto Query if a column is null for every row in the result, that column is not displayed in the output. This is the behavior when using union without the kind a modifier. By default the kind modifier is set to kind=inner.
It is possible to force the union to display all columns, even if all the values for a column are null. To do so, after the union add kind=outer as shown in the example below.
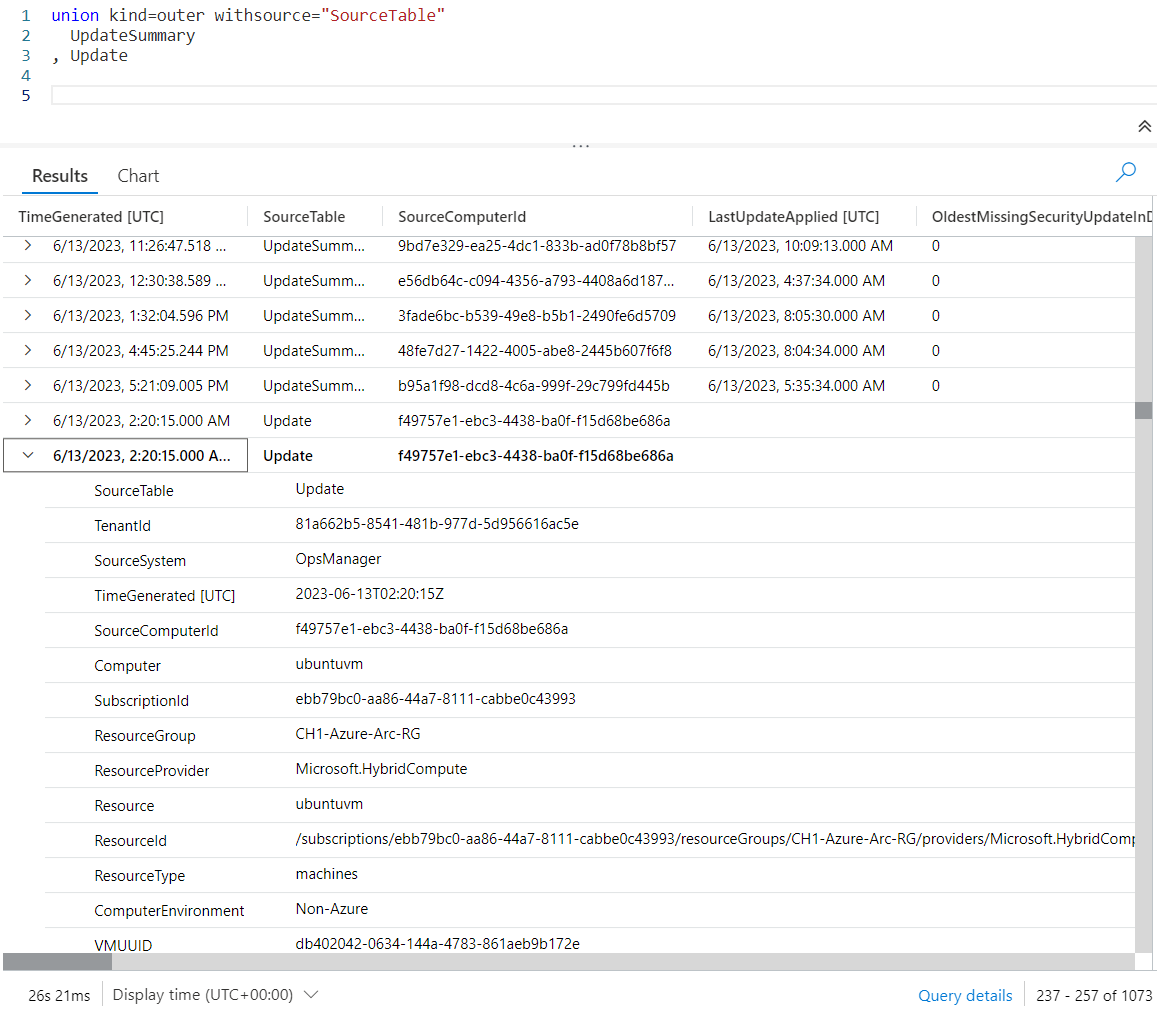
Unfortunately, there’s not enough space to display all the output, but if you execute your own queries you’ll find columns for which every value is null in the output.
As a side note, the order of the modifiers isn’t important. The withsource could have been placed before the kind, for example.
The IsFuzzy Modifier
We’ve all been there. You have a query that’s been working fine, then all of a sudden it fails because someone deleted a table.
You may also be in a situation where you wish to union two tables, but the second table is a temporary table. Sometimes its there, sometimes not. You’d like to write a query to handle it.
Fortunately union has a modifier, isfuzzy. When you set it to true, it will successfully execute the query even if the second table is absent.
In this example I will union two tables, Update and ArcaneCode. Obviously there is no table named ArcaneCode in the LogAnalytics sample database.
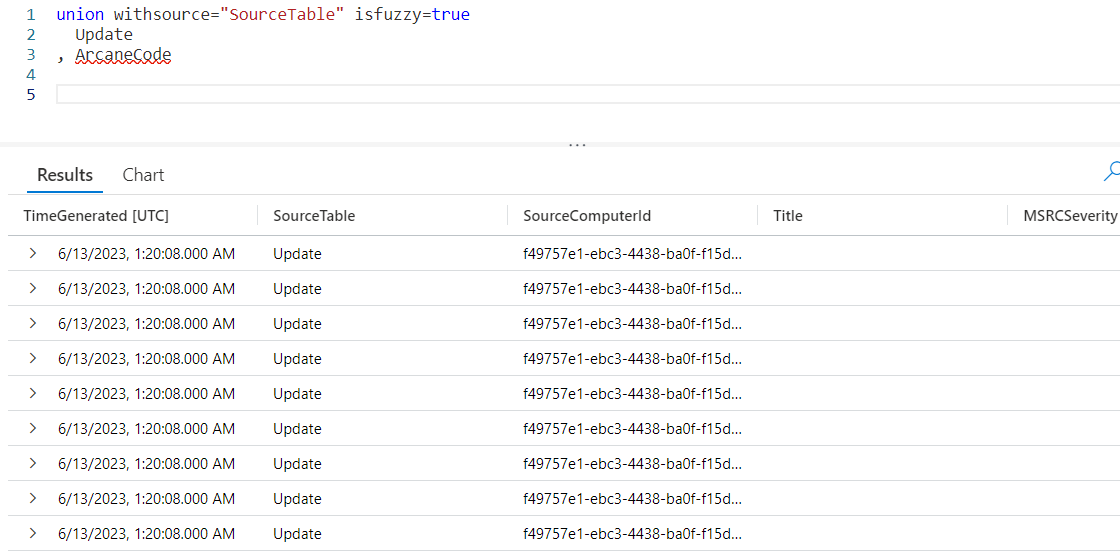
As you can see, Kusto still executed the query successfully. It simply ignored the absence of ArcaneCode.
Putting It All Together
I’ll wrap this series on union up with a more complex but real world example. This query might be one you want to use for troubleshooting. Let’s look at the query first, then we’ll see the results.
let compName = "JBOX10";
let dateDiffInDays = ( date1:datetime, date2:datetime = datetime(2023-01-01) )
                     {
                       (date1 - date2) / 1d
                     };
let UpdtSum = view() {
  UpdateSummary
  | where Computer == compName
  | project Computer
          , ComputerEnvironment
          , ManagementGroupName
          , OsVersion
          , Resource
          , ResourceGroup
          , SourceSystem
          , Type
          , NETRuntimeVersion
          , TimeGenerated
  } ;
let Updt = view() {
  Update
  | where Computer == compName
  | project Computer
          , ComputerEnvironment
          , ManagementGroupName
          , OSVersion
          , Resource
          , ResourceGroup
          , SourceSystem
          , Type
          , Title
          , UpdateState
          , TimeGenerated
  } ;
union withsource = "SourceTable"
      UpdtSum
    , Updt
| extend DaysSinceStartOfYear=dateDiffInDays(TimeGenerated)
It begins with a let, in which we define a variable, compName, to hold the name of the computer we want to get data for. This will make it easy to reuse the query with other computers.
In the next let we will create our own function to calcuate the difference between two dates. I’ll cover functions in more detail in a future post, but for now let me provide a simple overview.
After giving the function a name, here dateDiffInDays, we have a set of parenthesis. Inside we declare the parameters for the function. The first parameter is named date1, although we could use any name we want here such as endDate, thruDate, or even HeyHereIsTheThruDateWeWantToUse.
Following is a colon, then the datatype for the variable. In this case it will be a datetime datatype. After this is a comma, then the second parameter.
We’ll call this one date2 and it also be of type datetime. Then we have something interesting, an equal sign. With this we can assign a default value to this parameter, if the user fails to pass in a value the default is used.
In this example we want it to be from the start of the year, so we entered 2023-01-01. If that’s all we were to put though, KQL would try to do a calculation and generate an error, since the result of 2021 isn’t a datetime datatype.
To fix this we need to wrap the date in the datetime() function, which is built into KQL. This will correctly convert the date to January 1, 2023.
We then have a set of squiggly braces {}, in which we define our function. Here the function is only one line. We subtract date2 from date1, and wrap it in parenthesis so that calculation will be done first.
We then divide it by 1d to convert it to the number of days. The result is then returned. For more on datetime math, see my post Fun With KQL – DateTime Arithmetic.
Next are two let statements where I create views on top of the UpdateSummary and Update tables. Since I covered this method in the previous post Fun With KQL – Union, I won’t go into any further detail here.
We then fall into the hero of our story, the union. Having declared our data with the let statements its very easy to read.
Finally we finish up with an extend. We create a new column, DaysSinceStartOfYear. We assign it the function dateDiffInDays, and pass in the TimeGenerated column. This will be placed in the functions date1 parameter.
Since we didn’t pass in a second parameter, the default value of Jan 1, 2023 will be used as the value for date2.
Let’s take a look at the result of our query.
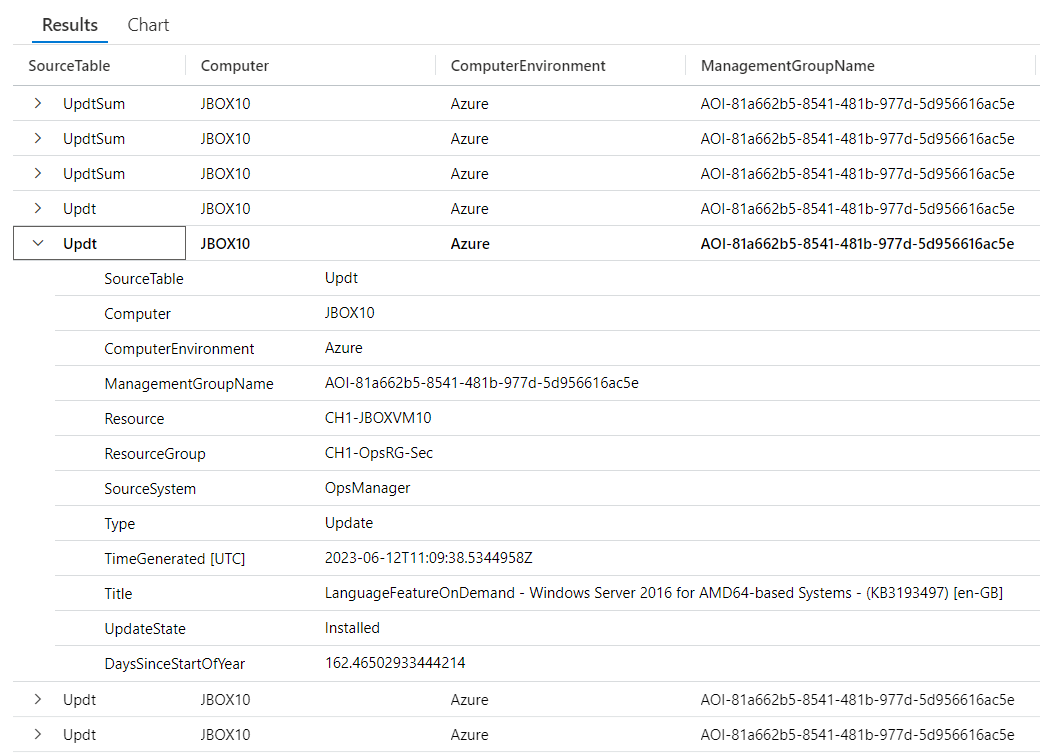
I expanded one of the rows from the Updt dataset so you could see all the columns (there were too many to fit on a single screen width wise). At the bottom of the expanded rows you can see our calculated value of DateSinceStartOfYear, showing 146.465 days.
This worked, by the way, because both tables had a column named TimeGenerated. If the column name was different between the tables, for example table one called it TimeGen and table two GeneratedTime, you could just rename them within the view definitions using project. For example:
project MyTimeGenerated = TimeGen, ...more columns
and
project MyTimeGenerated = GeneratedTime, ...more columns
See Also
The following operators, functions, and/or plugins were used or mentioned in this article’s demos. You can learn more about them in some of my previous posts, linked below.
Fun With KQL – DateTime Arithmetic
Conclusion
With this post we’ve added to our knowledge of the KQL union operator. We saw two of its useful modifiers, kind and isfuzzy. Finally we wrapped it up with an example that put everything we’ve learned together, plus introduced the concept of functions within the Kusto Query Language.
The demos in this series of blog posts were inspired by my Pluralsight courses on the Kusto Query Language, part of their Kusto Learning Path.
There are three courses in this series so far:
I have two previous Kusto courses on Pluralsight as well. They are older courses but still valid.
These are a few of the many courses I have on Pluralsight. All of my courses are linked on my About Me page.
If you don’t have a Pluralsight subscription, just go to my list of courses on Pluralsight. On the page is a Try For Free button you can use to get a free 10 day subscription to Pluralsight, with which you can watch my courses, or any other course on the site.
Fun With KQL – Union 19 Jun 2023 7:00 AM (2 years ago)

Introduction
In today’s post we will look at the union operator. A union will create a result set that combines data from two or more tables into a single result set.
Unlike the join, which was covered in my previous post Fun With KQL – Join, the union does not combine the columns from each table into single rows. Rather it returns rows from the first table, then rows from the second table, then if supplied third, forth and so on.
The examples in this post will demonstrate the union and make its use clearer.
The samples in this post will be run inside the LogAnalytics demo site found at https://aka.ms/LADemo. This demo site has been provided by Microsoft and can be used to learn the Kusto Query Language at no cost to you.
If you’ve not read my introductory post in this series, I’d advise you to do so now. It describes the user interface in detail. You’ll find it at https://arcanecode.com/2022/04/11/fun-with-kql-the-kusto-query-language/.
Note that my output may not look exactly like yours when you run the sample queries for several reasons. First, Microsoft only keeps a few days of demo data, which are constantly updated, so the dates and sample data won’t match the screen shots.
Second, I’ll be using the column tool (discussed in the introductory post) to limit the output to just the columns needed to demonstrate the query. Finally, Microsoft may make changes to both the user interface and the data structures between the time I write this and when you read it.
Union Explained
Let’s say we have two tables. The first table might be called SalesPeople.
| Name | District | Sales Quota |
|---|---|---|
| Fred | US | 33,000 |
| Gunther | Europe | 42,000 |
Now let’s say we also have a Sales table.
| Name | District | Company | Sale Amount |
|---|---|---|---|
| Fred | US | Big Tech Inc | 1,033 |
| Fred | US | Fun Chemicals | 927 |
| Fred | US | Farm Stuff Corporation | 2,237 |
| Gunter | Europe | Satellites R Us | 383 |
| Gunther | Europe | Fox Brothers | 5,235 |
When you union these tables, the result would look like:
| Name | District | Sales Quota | Company | Sale Amount |
|---|---|---|---|---|
| Fred | US | 33,000 | ||
| Gunther | Europe | 42,000 | ||
| Fred | US | Big Tech Inc | 1,033 | |
| Fred | US | Fun Chemicals | 927 | |
| Fred | US | Farm Stuff Corporation | 2,237 | |
| Gunter | Europe | Satellites R Us | 383 | |
| Gunther | Europe | Fox Brothers | 5,235 |
The empty cells are due to columns that are only in one table or the other (or, they could be empty in the source table). Sales Quota is only in the first table, SalesPeople, so there is no data for it in the lower rows where Sales is displayed.
When the column names are identical, they are lined up, as happened with Name and District.
Union Basics
In this example, we will be unioning two tables, Update and UpdateSummary. You’ll find these under the Security and Audit branch in the Log Analytics samples.
If we were to run UpdateSummary | count, it would show we had 47 rows (at least at the time of this writing). Running Update | count shows there are 997 rows.
Let’s create our first union query. We start with the name of the first table, UpdateSummary, the comes the pipe character. Next comes the union, and the second table, Update.
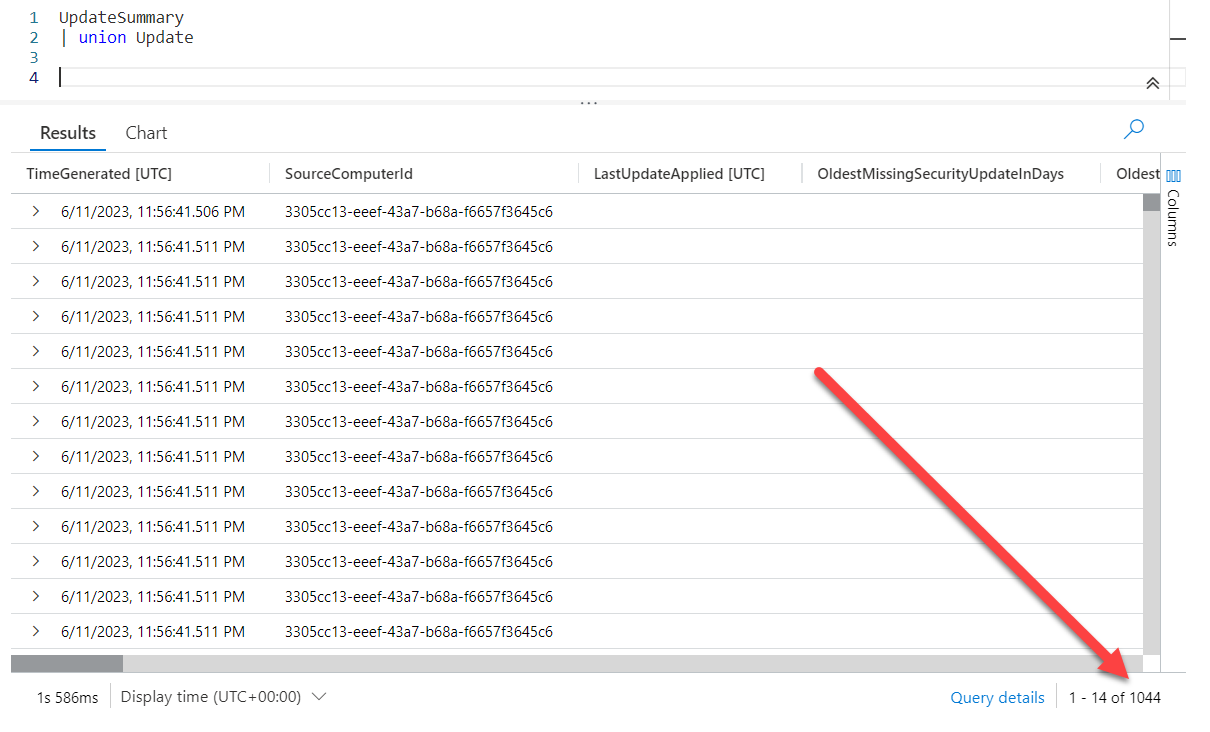
If you look on the lower right, you see the query returned 1044 rows, which is the sum of 47 + 997.
If you scroll through the output though, you have a problem. You can’t tell which rows came from which table. There is a way to fix that however. The union operator has a modifier which will add a column that indicates which table the data comes from, withsource.
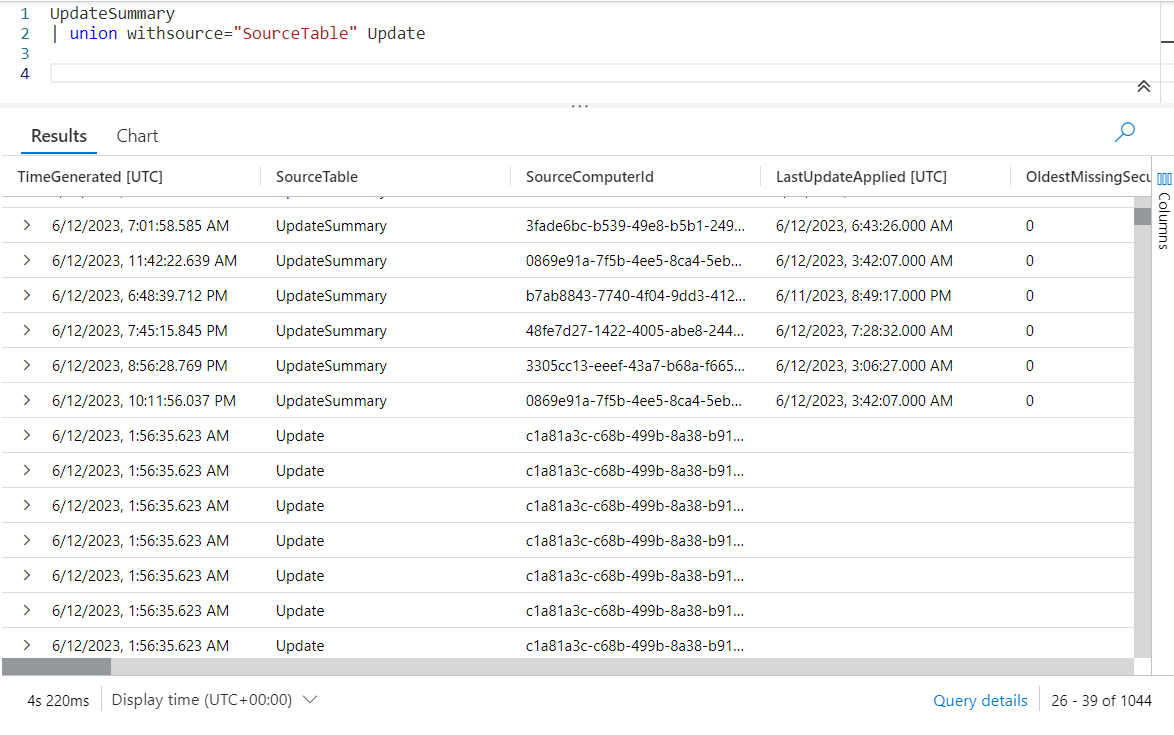
As you can see, there is a new column, SourceTable, which indicates which table the data came from. Here I picked SourceTable as the column name, but you can use anything you want, FromTable, TheSource, even WhichTableDidThisComeFrom.
Union – The Preferred Way
Since I first began using KQL, the language has evolved a bit. The method I just showed was created to make users coming from the world of SQL more comfortable with the language. Today, the preferred way of doing a union though is to place the union first.

As you can see, we begin with the union which is then followed by the withsource. Afterward we list the tables to be unioned separated by commas. Here we only have two, but you could list more as needed.
This is an opportune time to point out that by default the order of the rows is not set. If you were to keep scrolling down, you would see more rows from the Update table.
This can easily be fixed though by adding a sort after the union.
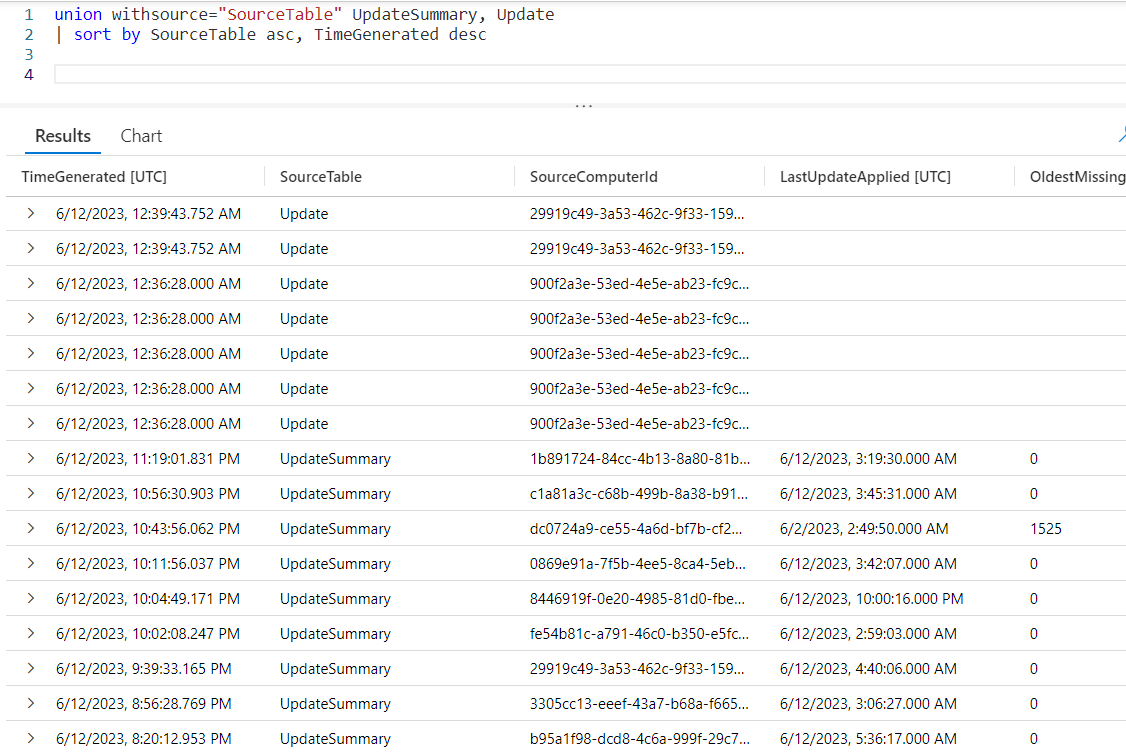
A More Complex Union
Let’s look at a slightly more complex example. Here, we are going to union the results of two queries.

Instead of table names, we supply two queries each wrapped in parenthesis. If you look in the SourceTable though, the names aren’t really very clear.
The first is union_arg0. This indicates the data came from the first query in the union. Then we have union_arg1, which is the second query in the union.
We can create better names for the sources, and make the query easier to read, by using our old friend the let operator.
Using Let to Name Sources
In this demo we’ll use let to create new datatables. Well, sort of. By using = view() in front we create a view on top of the query. This is more memory efficient than actually pulling all the data into memory.
After this we have our query. Note that instead of parenthesis we wrap the query in squiggly braces {}.
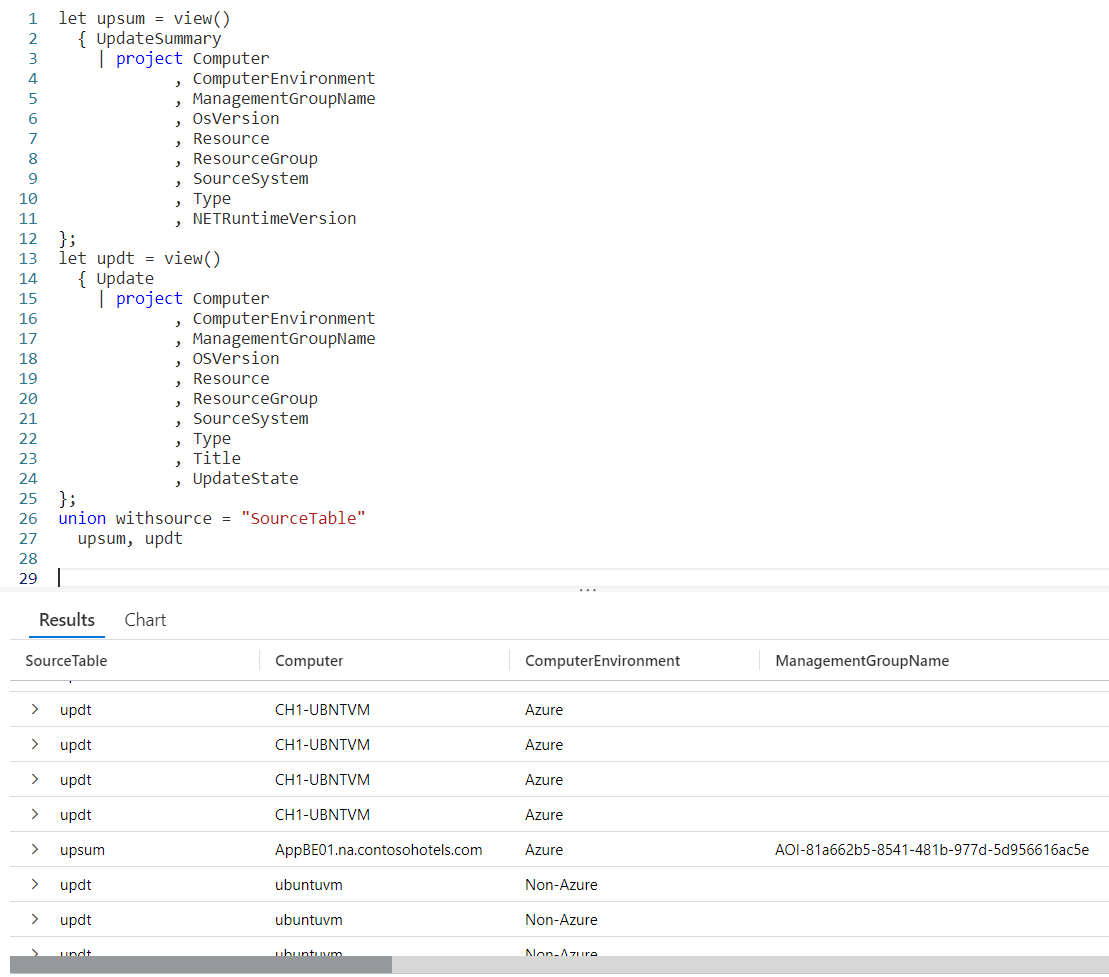
After declaring our let statements we fall into the union. All we have to do is list the names of the tables to be combined. In the results it uses the name of our view in the SourceTable column.
As you can see this structure makes the query much easier to read and modify in the future.
See Also
The following operators, functions, and/or plugins were used or mentioned in this article’s demos. You can learn more about them in some of my previous posts, linked below.
Conclusion
It can be useful to combine two tables, or queries, in the output of our data. As you’ve seen in this post, the union operator will let you do just this.
The union has a few more options, formally called modifiers, you can use with it. We’ll look at those in the next post in this Kusto Query Language series.
There are three courses in this series so far:
I have two previous Kusto courses on Pluralsight as well. They are older courses but still valid.
These are a few of the many courses I have on Pluralsight. All of my courses are linked on my About Me page.
If you don’t have a Pluralsight subscription, just go to my list of courses on Pluralsight. On the page is a Try For Free button you can use to get a free 10 day subscription to Pluralsight, with which you can watch my courses, or any other course on the site.
Fun With KQL – Join 12 Jun 2023 7:00 AM (2 years ago)

Introduction
I’m still working on my ArcaneBooks project, mostly documentation, so I thought I’d take a quick break and go back to a few posts on KQL (Kusto Query Language). In this post we’ll cover the join operator.
A join in KQL operates much as it does in SQL. It will join two datasets together into a single result.
The samples in this post will be run inside the LogAnalytics demo site found at https://aka.ms/LADemo. This demo site has been provided by Microsoft and can be used to learn the Kusto Query Language at no cost to you.
If you’ve not read my introductory post in this series, I’d advise you to do so now. It describes the user interface in detail. You’ll find it at https://arcanecode.com/2022/04/11/fun-with-kql-the-kusto-query-language/.
Note that my output may not look exactly like yours when you run the sample queries for several reasons. First, Microsoft only keeps a few days of demo data, which are constantly updated, so the dates and sample data won’t match the screen shots.
Second, I’ll be using the column tool (discussed in the introductory post) to limit the output to just the columns needed to demonstrate the query. Finally, Microsoft may make changes to both the user interface and the data structures between the time I write this and when you read it.
A Basic Join
Here is a basic join. Since the image is a bit small I’ll reproduce the query first.
Perf
| where TimeGenerated >= ago(30d)
| take 1000
| join (Alert) on Computer
We start with the first table, Perf. We use a where to limit the data to the last thirty days, then use take to grab 1000 rows.
Then comes the join. After the join comes the table we want to join to, enclosed in parethesis. In this case we are joining to the Alert table.
After the table name we have the keyword on, then the column name to use for the join, here Computer.

Here you can see the query returned three rows. The first set of columns come from the Perf table. There is a second TimeGenerated (UTC) column, this came from the Alert table, as well as the rows to the right of it. Note there are more columns that are off to the right.
A More Complex Join
Here we have a more complex, and realistic join. Because the image is a bit small I’ll reproduce it below.
Perf
| where TimeGenerated >= ago(10m)
| where CounterName == "% Free Space"
| project PerfComputer = Computer
        , CounterName
        , CounterValue
        , PerfTime=TimeGenerated
| join ( InsightsMetrics
       | where TimeGenerated >= ago(10m)
       | project IMComputer = Computer
               , Namespace
               , Name
               , Val
               , IMTime=TimeGenerated
       )
    on $left.PerfComputer == $right.IMComputer
We grab the Perf table, and use some where statements to limit the results. The query then falls into a project so we can limit the number of columns. Note we are renaming two of the columns, the Computer and TimeGenerated.
Next comes the join. In parenthesis we have a second query that access the InsightsMetrics table. We have a where, then a project. Within it we rename the Computer and TimeGenerated columns.
Next we have the on, followed by the columns to join on. Because we are joining on different column names we need to specify both names, and use == to show they match.
We also have to indicate which sides of the query the columns come from. To do so we prefix the column names with $left and $right. The left side is the first query coming into the join, the right side will be the second query.
Here is the query, with the results.

Note that in a real world query we’d probably want to add the TimeGenerated to the query, and perhaps other columns, but I kept it to just one for simplicity. If we had more, we would just add the conditions after a comma.
Join Types
Similar to SQL, join supports multiple types. By default it uses an innerunique, but there are quite a few.
- fullouter
- inner
- innerunique
- leftanti
- leftantisemi
- leftouter
- leftsemi
- rightanti
- rightantisemi
- rightouter
- rightsemi
To use one of these, after the join just specify the kind.
join kind=fullouter
Join Kind Reference
Below is an explanation of the various types of joins.
- innerunique
Only one row from the left is matched for each value of the on key. Output contains a match for each row on the right with a row on the left. NOTE: This is the default. If you are coming from a SQL background, you might expect the behavior to be inner, so be careful to look over your results. If you wanted a SQL style inner join you will need to
explicitly specify kind=inner when you execute the query!
- inner
Output has one row for every combination of left and right.
- leftouter
In addition to every match, there’s a row for every row on the left even if there’s no match on the right
- rightouter / fullouter
Same as left outer, but either includes all rows from the right side, or all rows, regardless of matches.
- leftanti / rightanti
The reverse of outer joins, only returns rows who do NOT have a match on the right (or left depending on which was used).
- leftsemi / rightsemi
Returns rows who have a match on both sides, but only includes the columns from the left side (or right if rightsemi was used)
A Complex Example
Let’s wrap this up with a more complex example. This query will make use of the let operator which I covered in my pervious post on KQL.
We start with two let statements to set the start and end time ranges. This will make it easy to update these when we need to use the query in the future. Note that we need to end each line in a semicolon since we have multiple KQL queries we are joining together to make our ultimate query.
The next let will create a new datatable and store the result of a query. We give it a name, ProcData, then assign it by creating a valid KQL query within parenthesis.
We repeat to create a second datatable, named MemData. Again note the use of semicolons.
Now we fall into the main query. By using the datatable names it makes the join query very easy to read. After the main query we fall into a project to limit the output columns, then a sort to get the columns in the order we want.
let startTime = ago(1d);
let endTime = now();
let ProcData = (
    Perf
    | where TimeGenerated between (startTime .. endTime)
    | where CounterName == "% Processor Time"
    | where ObjectName == "Processor"
    | where InstanceName == "_Total"
    | summarize PctCpuTime = avg(CounterValue)
            by Computer, bin(TimeGenerated, 1h)
);
let MemData = (
    Perf
    | where TimeGenerated between (startTime .. endTime)
    | where CounterName == "Available MBytes"
    | summarize AvailableMB = avg(CounterValue)
            by Computer, bin(TimeGenerated, 1h)
);
ProcData
| join kind= inner (
   MemData
) on Computer, TimeGenerated
| project TimeGenerated, Computer, PctCpuTime, AvailableMB
| sort by TimeGenerated desc, Computer asc
Here is the result of the query.

See Also
The following operators, functions, and/or plugins were used or mentioned in this article’s demos. You can learn more about them in some of my previous posts, linked below.
Conclusion
In this post, we learned how to use a join operator to merge two tables together.
The demos in this series of blog posts were inspired by my Pluralsight courses Kusto Query Language (KQL) from Scratch and Introduction the Azure Data Migration Service, two of the many courses I have on Pluralsight. All of my courses are linked on my About Me page.
If you don’t have a Pluralsight subscription, just go to my list of courses on Pluralsight . At the top is a Try For Free button you can use to get a free 10 day subscription to Pluralsight, with which you can watch my courses, or any other course on the site.
Fun With PowerShell – Showing Book Data at the Library of Congress with Start-Process 5 Jun 2023 7:00 AM (2 years ago)

In my previous post, Fun With PowerShell – Opening Websites with Start-Process, I showed how to use the Start-Process cmdlet to open a website. This is part of my ongong ArcaneBooks Project, in which I created a new function to display the webpage for a book at the OpenLibrary website by using the ISBN.
I wanted to create a similar function to work with the Library of Congress website, and so let me present the Show-LCCNBookData function.
Show-LCCNBookData
The function I created, Show-LCCNBookData is almost identical to the Show-ISBNBookData function I covered in the previous post, so I won’t go into a lot of depth in this post.
As with the ISBN version, I made this an advanced function so users could pipe data into it.
function Show-LCCNBookData
{
  [CmdletBinding(HelpURI="https://github.com/arcanecode/ArcaneBooks/blob/1ebe781951f1a7fdf19bb6731487a74fa12ad08b/ArcaneBooks/Help/Get-ISBNBookData.md")]
  [alias("slccn")]
  param (
         [Parameter( Mandatory = $true,
                     ValueFromPipeline = $true,
                     HelpMessage = 'Please enter the LCCN (Library of Congress Control Number).'
                     )]
         [string] $LCCN
        )
Note I still need to update the help URL to the correct one, but the rest of the function opening is complete, with the sole parameter being the $LCCN.
Now we fall into the process block.
  process
  {
    foreach($number in $LCCN)
    {
      Write-Verbose "Beginning Show-LCCNBookData for $ISBN at $(Get-Date).ToString('yyyy-MM-dd hh:mm:ss tt')"

      $lccnCleaned = $LCCN.Replace('-', '').Replace(' ', '')
      $lccnPrefix = $lccnCleaned.Substring(0,2)
      $lccnPadded = $lccnCleaned.Substring(2).PadLeft(6, '0')

      # Now combine the reformatted LCCN and save it as a property
      $lccnFormatted ="$($lccnPrefix)$($lccnPadded)"

      $baseURL = "https://lccn.loc.gov/"

      $url = "$($baseURL)$($lccnFormatted)"

      Write-Verbose 'Opening the Book on Library of Congress Number'

      Start-Process $url

      Write-Verbose "Finished Getting Data for $($LCCN)"
    }

    Write-Verbose "Done opening the web pages at Library of Congress"

  }
When we fall into the process loop we first need to clean up the LCCN that was passed in. As was documented in my LCCN overview post the LCCN is the two digit year at front, then six digits. If the number of digits after the first two isn’t six in length we have to zero pad it to become six, which will make the entire LCCN string eight digits.
We then append the formatted LCCN to the base URL for the LOC website. Then we use the Start-Process cmdlet to open the webpage.
Calling Show-LCCNBookData
Calling the function is pretty easy, you can either pass in a Library of Congress Control Number as a parameter or via the pipeline. All these examples should open the Library of Congress website, in your default browser, with the book associated with the LCCN you passed in.
# Pass in a single LCCN as a parameter
$LCCN = '54009698'
Show-LCCNBookData -LCCN $LCCN -Verbose

# Alias
$LCCN = '54009698'
slccn -LCCN $LCCN -Verbose

# Pipe in a single ISBN
$LCCN = '54-9698'
$LCCN | Show-LCCNBookData

.EXAMPLE
# Pipe in an array of LCCNs
$LCCNs = @( '54-9698'
          , '40-33904'
          , '41-3345'
          , '64-20875'
          , '74-75450'
          , '76-190590'
          , '71-120473'
          )
$LCCNs | Show-LCCNBookData -Verbose
In the final example we can actually pipe in an array of LCCNs, it should open up a page for each one.
Note the Library of Congress isn’t perfect, sometimes it will bring up a page with multiple items for the number passed in as it may have multiple entries. It’s still faster though than having to do manual searches on the LoC website.
See Also
You may find more helpful information at the links below.
ArcaneBooks Project Introduction
ArcaneBooks – Library of Congress Control Number (LCCN) – An Overview
Fun With PowerShell – Advanced Functions
Fun With PowerShell – Opening Websites with Start-Process
Fun With PowerShell – Write-Verbose
Conclusion
This post and the previous one demonstrates how easy it can be to create helper functions for your modules. My two show functions are designed to let users quickly bring up the webpage for the books they are working with.
If you like PowerShell, you might enjoy some of my Pluralsight courses. PowerShell 7 Quick Start for Developers on Linux, macOS and Windows is one of many PowerShell courses I have on Pluralsight. All of my courses are linked on my About Me page.
If you don’t have a Pluralsight subscription, just go to my list of courses on Pluralsight . At the top is a Try For Free button you can use to get a free 10 day subscription to Pluralsight, with which you can watch my courses, or any other course on the site.
Fun With PowerShell – Opening Websites with Start-Process 22 May 2023 7:00 AM (2 years ago)

Introduction
As part of my ArcaneBooks Project I described how to use the OpenLibrary Simple API to get book data.
In that post I also showed a way to bring up the webpage for an ISBN. I had a thought, why not build a function to add to the module to do that? This way a user would have an easy way to compare the output of the web API call to what the site holds.
In this post I’ll describe how to use the Start-Process cmdlet to open a target webpage.
Show-ISBNBookData
I created a new advanced function and named it Show-ISBNBookData. Here is the opening of the function.
function Show-ISBNBookData
{
  [CmdletBinding(HelpURI="https://github.com/arcanecode/ArcaneBooks/blob/1ebe781951f1a7fdf19bb6731487a74fa12ad08b/ArcaneBooks/Help/Get-ISBNBookData.md")]
  [alias("sisbn")]
  param (
         [Parameter( Mandatory = $true,
                     ValueFromPipeline = $true,
                     HelpMessage = 'Please enter the ISBN.'
                     )]
         [string] $ISBN
        )
If you want to learn more about advanced functions, see my post Fun With PowerShell – Advanced Functions. Briefly, the CmdletBinding attribute will turn this into an advanced function. Advanced functions allow you to input one or more parameters via the pipeline.
It has one parameter, the ISBN number you want to find. This can be passed in normally, or via the pipeline.
The Process Loop
In order to process multiple items from the pipeline you must enclose the heart of the function inside a process { } block. The process block is called once for each item passed in via the pipeline.
I then use the Replace method of the string object to remove any dashes or spaces from the ISBN that was passed in. This is then combined with the base OpenLibrary URL to create a new string, $url.
  process
  {
    foreach($number in $ISBN)
    {
      Write-Verbose "Beginning Show-ISBNBookData for $ISBN at $(Get-Date).ToString('yyyy-MM-dd hh:mm:ss tt')"

      $isbnFormatted = $ISBN.Replace('-', '').Replace(' ', '')
      $baseURL = "https://openlibrary.org/isbn/"

      $url = "$($baseURL)$($isbnFormatted)"

      Write-Verbose 'Opening the Book on OpenLibrary'

      Start-Process $url

      Write-Verbose "Finished Getting Data for $($ISBN)"
    }
The magic comes in the Start-Process cmdlet. This cmdlet analyzes the string that was passed in. It then looks for the default application for it, and attempts to open the associated application for the passed in string.
As an example, if you were to pass in the name of a Microsoft Word document, Start-Process would open Microsoft Word with the document name you passed in.
In this case, passing in a URL will attempt to open up your default web browser to the page you passed in.
If you called Show-ISBNBookData using the pipeline, the function will attempt to open up a new tab in your browser for each URL passed in via the pipeline.
Note I also used several Write-Verbose commands, you can learn more about it at Fun With PowerShell – Write-Verbose.
An Example
Calling the function is very simple.
$ISBN = '0-87259-481-5'
Show-ISBNBookData -ISBN $ISBN -Verbose
This should open up the following webpage in your default browser.
https://openlibrary.org/books/OL894295M/Your_HF_digital_companion
This is a reference to the book You HF Digital Companion.
See Also
You may find more helpful information at the links below.
Fun With PowerShell – Advanced Functions
Fun With PowerShell – Write-Verbose
Conclusion
As you can see, Start-Process is extremely easy to use. Just pass in a URL or the name of a file, and PowerShell will attempt to open the item using the default application assigned in the operating system. In the ArcaneBooks project I’m using it to open a website, but you can use it for a variety of purposes.
If you like PowerShell, you might enjoy some of my Pluralsight courses. PowerShell 7 Quick Start for Developers on Linux, macOS and Windows is one of many PowerShell courses I have on Pluralsight. All of my courses are linked on my About Me page.
If you don’t have a Pluralsight subscription, just go to my list of courses on Pluralsight . At the top is a Try For Free button you can use to get a free 10 day subscription to Pluralsight, with which you can watch my courses, or any other course on the site.
Fun With PowerShell – Elapsed Timers 15 May 2023 7:00 AM (2 years ago)

Introduction
I’m still working on my documentation for my ArcaneBooks project, but wanted to have something for you to read this week, so decided to show you how to create an elapsed timer in PowerShell.
It can be helpful to determine how long a process runs in PowerShell. You can use it to determine what parts of code may need to be optimized, or gather metrics around your functions.
Creating and Using a Timer
The .NET framework has a class named System.Diagnostics.Stopwatch. It has a static function named StartNew that you can call which will create a new instance from the Stopwatch class.
$processTimer = [System.Diagnostics.Stopwatch]::StartNew()
So now you go off and do your code, routine, whatever it is you want to measure. When you are done, you call the Stop method of your timer.
$processTimer.Stop()
Now what? How do we get the time from this? Well to do that you can grab the Elapsed property of your timer.
$processTimer.Elapsed
This produces the following output:
Days              : 0
Hours             : 0
Minutes           : 0
Seconds           : 20
Milliseconds      : 698
Ticks             : 206988710
TotalDays         : 0.000239570266203704
TotalHours        : 0.00574968638888889
TotalMinutes      : 0.344981183333333
TotalSeconds      : 20.698871
TotalMilliseconds : 20698.871
It’d be nice to have it in something more readable. So in this example I’ll capture the elapsed time into a variable, then use PowerShell’s string formatting technique to produce something easily understandable.
$ts = $processTimer.Elapsed
$elapsedTime = "{0:00}:{1:00}:{2:00}.{3:00}" -f $ts.Hours, $ts.Minutes, $ts.Seconds, ($ts.Milliseconds / 10)
Write-Host "All done - Elapsed Time $elapsedTime `r`n"
This produces:
All done - Elapsed Time 00:00:20.70
Alternatively you could use a string that expanded the time fields a bit. In this example I’ll also include the number of days. Since the timer shows days, milliseconds probably aren’t that important so I’ll omit them. If you needed it though it’d be easy enough to add.
$elapsedTime = "The process took $($ts.Days) days, $($ts.Hours) hours, $($ts.Minutes) minutes, and $($ts.Seconds) seconds."
Write-Host "All done - Elapsed Time $elapsedTime `r`n"
This will produce:
All done - Elapsed Time The process took 0 days, 0 hours, 0 minutes, and 20 seconds.
Multiple Timers
You may have a situation where you need multiple timers. For example, one for a full function, and a second to log the time of a loop in the function. Just create multiple process timer variables, for example $processTimer1 and $processTimer2.
There’s nothing special about the variable name either, you could use names like $myFunctionsTimer, $mainLoopTimer, and $loggingTimer.
See Also
If you want to learn more about the string formatting technique used in this post, see my Fun With PowerShell – String Formatting post.
Conclusion
Optimizing your PowerShell code is made much easier when you can measure the runtime of sections of code. It lets you know what sections are running slow, and when you make changes did you actually improve things or make it worse.
As you saw in this post, creating one or more timers is very simple. You can insert them into your code temporarily, or leave them there as part of your metrics logging strategy.
Fun With PowerShell – Authoring About Help 8 May 2023 7:00 AM (2 years ago)

Introduction
In my previous post, Fun With PowerShell – Authoring Help, I covered how to author comment based help for your functions.
In addition to help for your functions, it’s also possible to write about_ help. PowerShell itself contains many about topics for PowerShell itself.
These about topics are designed to provide further information for your users, information that may not fit into the confines of a functions help. These texts can be as long as you need.
The Contents of an About Topic File
An about file can contain literally any text you want. Whatever is in there will be returned when you use Get-Help to retrieve its contents.
However, there is a suggested guideline for the formatting of an about file.
about_TopicName

SHORT DESCRIPTION
   Brief description, one to two sentences.

LONG DESCRIPTION
   Much longer text, could be several paragraphs.

BACKGROUND
   This isn't a standard option but one I like to include to provide context
   to the reader about why the module was created. What problem was it meant
   to solve.

NOTE
   Miscellaneous notes about the module, such as the copyright

TROUBLESHOOTING NOTE
   Warning notes of issues you may find, perhaps a to-do list

SEE ALSO
  links to relevant things, such as the project github site
  or the authors website

ABOUT TOPICS
   List other about topics

KEYWORDS
   Keywords here
I usually leave one blank line at the top, to separate the text from the Get-Help command, but this is just my personal preference.
It is then customary to put the name of the about topic, as shown.
The next two are self explanatory, a short and long description for the topic. While not required by PowerShell code, it is highly suggested as PowerShell can use the text in the SHORT DESCRIPTION with Get-Help, but we’ll talk about that later in the post.
Next up is a section I call BACKGROUND. I usually include this in the about topic for a module, to explain what problem this module was meant to solve, how it came to be, and so on. If I have any other about topics I generally omit this unless it is appropriate to the topic. To be clear, this is something I do, not a standard.
The note section is just what it says, it is for any notes that haven’t been covered in the other sections. I generally use this to place the copyright notice, the author name and contact info, and similar data.
The TROUBLESHOOTING NOTE area is used to let the user know of any issues they may encounter. One common one I find is that about topics don’t display correctly in some (but not all) version of Linux.
You might also include information about functions that will have further development done, or perhaps a note that documentation is still being worked on. This type of information can be especially useful for a module that is still in the alpha or beta stages, where further work will still be done.
Under the SEE ALSO section you can provide links to a projects github site, the PSGallery page, the author website, or other relevant links.
In the about topic page for the module, I like to provide a full list of all the about topics provided in the module, so the reader will know what else is available. Again, I usually only include this in the about page for the module itself and omit from other about topics unless it is relevant. We’ll touch on the about topic for a module momentarily.
The final section allows you to place keywords for a module or about topic. These can be useful when searching for a module that covers the included keywords.
Placement of About Topics
Under the modules main folder, you should create a folder with the standard language abbreviation for your target language. For example, for US English the folder would be named en-us. If I were to also write documentation for the French language (which would be a real feat as I don’t know any French) I would create a folder named fr-FR.
Here is the layout for my ArcaneBooks module.

At the top is the folder ArcaneBooks, which is the root folder for the module. Under it is a folder, en-us where English language help files are placed. Here I only have about topics, but if I were using XML based help those files would also be placed here.
Let’s talk now about how to name your about files.
Naming Your About Topic Files
The names of all about files should begin with about_. They should end with .help.txt. To create an about topic for the module itself (which you should at the very least include one about for the module) use the module name as I did here, with about_ArcaneBooks.help.txt.
If you then call help for the module, Get-Help ArcaneBooks, it will display the contents of the about file with the module name, about_ArcaneBooks.help.txt.
I’ve included two other about topics for the ArcaneBooks module. The first, about_ABFunctions, displays a list of functions in the module, with the synopsis of its purpose. I’ve found this to be of aid to the end user to help them see what functions are in the module. They can see this information using Get-Help about_ABFunctions.
The final about topic, about_ABUsage, has examples of how to use the module. I usually develop a PS1 script to test out a module as it is being developed. I find this makes for great examples of how to use the module overall, and include a copy inside an about topic so an end user can use it as well. As with the functions, a user can see this using Get-Help about_ABUsage.
Getting Help
This is an example of calling help for the module.
PS D:\OneDrive\PSCore\ArcaneBooks\ArcaneBooks> Get-Help about_ArcaneBooks

about_ArcaneBooks

SHORT DESCRIPTION
   Retrieves book metadata based on the ISBN or LCCN.

LONG DESCRIPTION
   This module is designed to retrieve metadata for books based on either the
   ISBN or the LCCN (Library of Congress Catalog Number). It will return data
   such as the book title, author, and more.

   To see a list of functions, please use "Get-Help about_ABFunctions".

   In addition each cmdlet has help, you can use the Get-Help feature of
   PowerShell to learn more about each one.

BACKGROUND
   The author (Robert Cain aka ArcaneCode) is a member of the Alabama
   Historical Radio Society(https://alhrs.org/). They are beginning a project
   to create metadata for their library (title, author, publisher, etc.) and
   store it in cloud based software.

   Naturally we want to automate as much of this as possible, since the
   collection is rather extensive. Some of our books are so old they have
   neither an ISBN or a Library of Congress Catalog Number (LCCN for short).
   Those will require manual intervention to key in the data.

   Fortunately many of the books have the LCCN, the newer books have an ISBN,
   and a very few have both.

   The goal with this project was to allow a user to create a simple text file
   using notepad, Excel, or something similar. The user can enter an LCCN into
   one file or the ISBN in another.

   That data file will be piped through the appropriate cmdlets found in this
   module and produce a list of metadata for each book including things such
   as the book title, author, publication date, and the like.

   This output can then be piped into standard PowerShell cmdlets to output
   the data to formats such as CSV, XML, JSON, and the like.

   The sources used in this module are the Library of Congress or the
   Open Library site, which is part of the Internet Archive. Both provide
   web APIs that can use to retrieve data.

   For more information, please see the online documentation at the projects
   GitHub site, https://github.com/arcanecode/ArcaneBooks .

NOTE
   Author: Robert C Cain | @ArcaneCode | arcane@arcanetc.com

   This code is Copyright (c) 2023 Robert C Cain All rights reserved

   The code herein is for demonstration purposes. No warranty or guarantee
   is implied or expressly granted.

   This module may not be reproduced in whole or in part without the express
   written consent of the author.

TROUBLESHOOTING NOTE
   Help for the about_* topics doesn't work correctly on all versions of
   Linux due to issues with PowerShell's Help system.

SEE ALSO
     https://github.com/arcanecode/ArcaneBooks
     About Arcane Code

ABOUT TOPICS
   about_ArcaneBooks
   about_ABFunctions
   about_ABUsage

KEYWORDS
     ArcaneBooks, ISBN, LCCN
Getting A List of About Topics
Using Get-Help, you can get a list of all the about topics for modules loaded into memory.
Get-Help about_*
Here is a partial output of the result of the command.
Name                              Category  Module                    Synopsis
----                              --------  ------                    --------
about_ABFunctions                 HelpFile                            This is a listing of the functions available in the ArcaneBooks module.
about_ABUsage                     HelpFile                            Provides examples on how to call the functions with example data.
about_ArcaneBooks                 HelpFile                            Retrieves book metadata based on the ISBN or LCCN.
about_Aliases                     HelpFile
about_Alias_Provider              HelpFile
In order to get the synopsis to show up in the output, you must include a SHORT DESCRIPTION. Then the synopsis must appear on the line immediately after it. There cannot be a blank line between, if there is Get-Help won’t display the synopsis.
Conclusion
As you can see, creating about topic help is very simple. Just create a folder to store it, then create the text file (or files) you need. Name them appropriately, and PowerShell then takes care of the rest!
Fun With PowerShell – Authoring Help 2 May 2023 7:00 AM (2 years ago)

Introduction
Having good help is vital to the construction of a module. It explains not only how to use a function, but the purpose of the module and even more.
Naturally I’ve included good help text in the ArcaneBooks module, but as I was going over the construction of the ArcaneBooks module I realized I’d not written about how to write help in PowerShell. So in this post and the next I’ll address this very topic.
Two Types of Help
There are two ways of creating help for functions in PowerShell modules. The newer method is to create XML files with the help text. I’ll be honest, I’m not a big fan of this method.
The XML is more difficult to author and read in plain text format as the help is surrounded by XML tags. To be able to effectively author it a third party tool is needed.
There is one advantage to the XML format, if you wish to internationalize your module you can write individual XML help files for each language you need. These can all be bundled with your module. In my case I’m only going to use English, so this isn’t of benefit to my ArcaneBooks module.
I’ll admit that I may be a bit old fashioned, but I still prefer the original comment based help when authoring help. It keeps the help text with the function, and is easier to read when looking at the raw code.
Comment Blocks
As its name implies, comment based help is created by placing specially crafted comment blocks beside the function declarations of the functions in your module.
As you may know, a normal comment in PowerShell begins with a #, commonly called a pound sign or hash tag. Some examples:
# This is a comment

$x = 1  # Set X equal to 1
A comment block allows you to create comments that are multiple lines. They begin with a <# and end with #>. An example would be:
<#
Here is a comment block

More text here
#>
You can add text after and before the # characters. I often use these to creeate dividers in my code.
<#-----------------------------------------------
  Do some interesting stuff in this section
-----------------------------------------------#>
I’ll dive a bit deeper into the structure of the comment help block, but first lets talk about placement.
Placement of Comment Help
To associate a help block with a function, it needs to be positioned right before or right after the function declaration.
<#
Comment based help here
#>
function DoSomething()
function DoSomething()
<#
Comment based help here
#>

$x = 1
Either of these are valid, but I much prefer the first version. It keeps the function declaration close to its code.
Contents of Comment Based Help
There is a defined template of what needs to be in comment based help.
<#
.SYNOPSIS
A short one liner that describes the function

.DESCRIPTION
Detailed description of the function

.PARAMETER ParamName
Information about the parameter.

Add additional .PARAMETER tags for more parameters

.INPUTS
What inputs are allowed, useful for when a function allows input to be piped in.

.OUTPUTS
Explanation of what the function outputs.

Can also include sample data

.EXAMPLE
Code example

.EXAMPLE
Additional examples, just add more .EXAMPLE tags as needed

.NOTES
Notes here like author name

.LINK
Link to online help

.LINK
Additional link(s)
#>
As you can see, it uses a series of tags to describe what is in the section. Each tag is preceded by a period.
The SYNOPSIS and DESCRIPTION are both required. In the synopsis you place a short description of the function. One, no more than two sentences go here.
In the description you can place an expanded explanation of the function. You can go into detail of its purpose. It doesn’t need to be a novel, but two to three paragraphs are not uncommon.
Next comes the parameters. Each parameter should be listed individually, getting a PARAMETER tag followed by the name of the parameter. In the accompanying text you can include details to the nature of the parameter, whether it is required, and if appropriate the data type.
Again, you should include one parameter tag for each of your functions parameters.
In the INPUTS area you can give an overall description of the data that will be input to the function. It is also a good place to describe data that can be input to the function through the pipeline.
The OUTPUTS is the place to describe what data is returned from the function. This may be a single value, or an object with multiple values. When returning an object I like to list each property along with a sample value for each.
You should include at least one EXAMPLE section in your help. Include a small code sample of calling your function.
It’s a good idea though to include multiple example sections. For instance, if your function allows for input through the pipeline, have one example for passing data in normally, than a second for using the pipeline. Include as many as you need to give the reader a good set of examples on how to use your function.
NOTES is for just what it says, an area to include any additional notes about the function. In here I often include information such as the author name, copyright notices, and any other information I’d like to have included.
Finally is the LINK section. If you have online help, the first link tag should point to the online help web address that will be used with the -Online switch of the Get-Help cmdlet. You can include as many links as needed, I usually include at least one more pointing to the project website, such as a github site, or back to my own blog.
A Real World Example
Here is a real world example from the ArcaneBooks project I’ve been developing. This is the help for the Get-ISBNBookData function.
<#
.SYNOPSIS
Gets book data from OpenLibrary.org based on the ISBN

.DESCRIPTION
Uses the more advanced API at OpenLibrary to retrieved detailed information
based on the 10 or 13 character ISBN passed in.

.PARAMETER ISBN
A 10 or 13 digit ISBN number. The passed in value can have spaces or dashes,
it will remove them before processing the request to get the book data.

.INPUTS
Via the pipeline this cmdlet can accept an array of ISBN values.

.OUTPUTS
The cmdlet returns one or more objects of type Class ISBNBook with the
following properties. Note that not all properties may be present, it
depends on what data the publisher provided.

ISBN | The ISBN number that was passed in, complete with an formatting
ISBN10 | ISBN as 10 digits
ISBN13 | ISBN in 13 digit format
Title | The title of the book
LCCN | Library of Congress Catalog Number
Author | The author(s) of the book
ByStatement | The written by statement provided by the publisher
NumberOfPages | Number of pages in the book
Publishers | The Publisher(s) of this book
PublishDate | The publication date for this edition of the book
PublisherLocation | The location of the publisher
Subject | Generic subject(s) for the work
LibraryOfCongressClassification | Specialized classification used by Library of Congress
DeweyDecimalClass | Dewey Decimal number
Notes | Any additional information provided by the publisher
CoverUrlSmall | URL link to an image of the book cover, in a small size
CoverUrlMedium | URL link to an image of the book cover, in a medium size
CoverUrlLarge | URL link to an image of the book cover, in a large size

.EXAMPLE
# Pass in a single ISBN as a parameter
$ISBN = '0-87259-481-5'
$bookData = Get-ISBNBookData -ISBN $ISBN
$bookData

.EXAMPLE
# Pipe in a single ISBN
$ISBN = '0-87259-481-5'
$bookData = $ISBN | Get-ISBNBookData
$bookData

.EXAMPLE
# Pipe in an array of ISBNs
$ISBNs = @( '0-87259-481-5'
          , '0-8306-7801-8'
          , '0-8306-6801-2'
          , '0-672-21874-7'
          , '0-07-830973-5'
          , '978-1418065805'
          , '1418065803'
          , '978-0-9890350-5-7'
          , '1-887736-06-9'
          , '0-914126-02-4'
          , '978-1-4842-5930-6'
          )
$bookData = $ISBNs | Get-ISBNBookData -Verbose
$bookData

$bookData | Select-Object -Property ISBN, Title

.NOTES
ArcaneBooks - Get-ISBNBookData.ps1

Author: Robert C Cain | @ArcaneCode | arcane@arcanetc.com

This code is Copyright (c) 2023 Robert C Cain All rights reserved

The code herein is for demonstration purposes.
No warranty or guarantee is implied or expressly granted.

This module may not be reproduced in whole or in part without
the express written consent of the author.

.LINK
https://github.com/arcanecode/ArcaneBooks/blob/1ebe781951f1a7fdf19bb6731487a74fa12ad08b/ArcaneBooks/Help/Get-ISBNBookData.md

.LINK
http://arcanecode.me
#>
When I use the command Get-Help Get-ISBNBookData -Full this is the output.
SYNTAX
    Get-ISBNBookData [-ISBN] <String> [<CommonParameters>]


DESCRIPTION
    Uses the more advanced API at OpenLibrary to retrieved detailed information
    based on the 10 or 13 character ISBN passed in.


PARAMETERS
    -ISBN <String>
        A 10 or 13 digit ISBN number. The passed in value can have spaces or dashes,
        it will remove them before processing the request to get the book data.

        Required?                    true
        Position?                    1
        Default value
        Accept pipeline input?       true (ByValue)
        Accept wildcard characters?  false

    <CommonParameters>
        This cmdlet supports the common parameters: Verbose, Debug,
        ErrorAction, ErrorVariable, WarningAction, WarningVariable,
        OutBuffer, PipelineVariable, and OutVariable. For more information, see
        about_CommonParameters (https://go.microsoft.com/fwlink/?LinkID=113216).

INPUTS
    Via the pipeline this cmdlet can accept an array of ISBN values.


OUTPUTS
    The cmdlet returns one or more objects of type Class ISBNBook with the
    following properties. Note that not all properties may be present, it
    depends on what data the publisher provided.

    ISBN | The ISBN number that was passed in, complete with an formatting
    ISBN10 | ISBN as 10 digits
    ISBN13 | ISBN in 13 digit format
    Title | The title of the book
    LCCN | Library of Congress Catalog Number
    Author | The author(s) of the book
    ByStatement | The written by statement provided by the publisher
    NumberOfPages | Number of pages in the book
    Publishers | The Publisher(s) of this book
    PublishDate | The publication date for this edition of the book
    PublisherLocation | The location of the publisher
    Subject | Generic subject(s) for the work
    LibraryOfCongressClassification | Specialized classification used by Library of Congress
    DeweyDecimalClass | Dewey Decimal number
    Notes | Any additional information provided by the publisher
    CoverUrlSmall | URL link to an image of the book cover, in a small size
    CoverUrlMedium | URL link to an image of the book cover, in a medium size
    CoverUrlLarge | URL link to an image of the book cover, in a large size


NOTES


        ArcaneBooks - Get-ISBNBookData.ps1

        Author: Robert C Cain | @ArcaneCode | arcane@arcanetc.com

        This code is Copyright (c) 2023 Robert C Cain All rights reserved

        The code herein is for demonstration purposes.
        No warranty or guarantee is implied or expressly granted.

        This module may not be reproduced in whole or in part without
        the express written consent of the author.

    -------------------------- EXAMPLE 1 --------------------------

    PS > # Pass in a single ISBN as a parameter
    $ISBN = '0-87259-481-5'
    $bookData = Get-ISBNBookData -ISBN $ISBN
    $bookData


    -------------------------- EXAMPLE 2 --------------------------

    PS > # Pipe in a single ISBN
    $ISBN = '0-87259-481-5'
    $bookData = $ISBN | Get-ISBNBookData
    $bookData


    -------------------------- EXAMPLE 3 --------------------------

    PS > # Pipe in an array of ISBNs
    $ISBNs = @( '0-87259-481-5'
              , '0-8306-7801-8'
              , '0-8306-6801-2'
              , '0-672-21874-7'
              , '0-07-830973-5'
              , '978-1418065805'
              , '1418065803'
              , '978-0-9890350-5-7'
              , '1-887736-06-9'
              , '0-914126-02-4'
              , '978-1-4842-5930-6'
              )
    $bookData = $ISBNs | Get-ISBNBookData -Verbose
    $bookData

    $bookData | Select-Object -Property ISBN, Title


RELATED LINKS
    https://github.com/arcanecode/ArcaneBooks/blob/1ebe781951f1a7fdf19bb6731487a74fa12ad08b/ArcaneBooks/Help/Get-ISBNBookData.md
    http://arcanecode.me
See Also
The ArcaneBooks Project – An Introduction
Conclusion
As you can see, implementing comment based help is quite easy. It’s also important, as users rely on help to understand how to use the functions you author. You’ll also find it helpful as a reminder to yourself about the functionality of your own code down the road.
Another useful feature for help is to create about_ help for your modules. You’ve likely seen these before, Microsoft provides a long list of about topics for PowerShell itself.
You can create your own set of about help for your module, and in the next post I’ll show you how.
ArcaneBooks – Parsing Library of Congress Control Number (LCCN) Data With PowerShell 24 Apr 2023 7:00 AM (2 years ago)

Introduction
In my previous post in this series, ArcaneBooks – Library of Congress Control Number (LCCN) – An Overview, I provided an overview of the LCCN and the basics of calling its public web API to retrieve data based on the LCCN.
In this post I will demonstrate how to call the API and dissect the data using PowerShell. This will be a code intensive post.
You can find the full ArcaneBooks project on my GitHub site. Please note as of the writing of this post the project is still in development.
The code examples for this post can be located at https://github.com/arcanecode/ArcaneBooks/tree/main/Blog_Posts/005.00_LCCN_API. It contains the script that we’ll be dissecting here.
XML from Library of Congress
For this demo, we’ll be using an LCCN of 54-9698, Elements of radio servicing by William Marcus. When we call the web API URL in our web browser, we get the following data.
<zs:searchRetrieveResponse xmlns:zs="http://docs.oasis-open.org/ns/search-ws/sruResponse">
  <zs:numberOfRecords>2</zs:numberOfRecords>
  <zs:records>
    <zs:record>
      <zs:recordSchema>mods</zs:recordSchema>
      <zs:recordXMLEscaping>xml</zs:recordXMLEscaping>
      <zs:recordData>
        <mods xmlns:xsi="http://www.w3.org/2001/XMLSchema-instance"
          xmlns="http://www.loc.gov/mods/v3" version="3.8" xsi:schemaLocation="http://www.loc.gov/mods/v3 http://www.loc.gov/standards/mods/v3/mods-3-8.xsd">
          <titleInfo>
            <title>Elements of radio servicing</title>
          </titleInfo>
          <name type="personal" usage="primary">
            <namePart>Marcus, William. [from old catalog]</namePart>
          </name>
          <name type="personal">
            <namePart>Levy, Alex,</namePart>
            <role>
              <roleTerm type="text">joint author</roleTerm>
            </role>
          </name>
          <typeOfResource>text</typeOfResource>
          <originInfo>
            <place>
              <placeTerm type="code" authority="marccountry">nyu</placeTerm>
            </place>
            <dateIssued encoding="marc">1955</dateIssued>
            <issuance>monographic</issuance>
            <place>
              <placeTerm type="text">New York</placeTerm>
            </place>
            <agent>
              <namePart>McGraw Hill</namePart>
            </agent>
            <dateIssued>[1955]</dateIssued>
            <edition>2d ed.</edition>
          </originInfo>
          <language>
            <languageTerm authority="iso639-2b" type="code">eng</languageTerm>
          </language>
          <physicalDescription>
            <form authority="marcform">print</form>
            <extent>566 p. illus. 24 cm.</extent>
          </physicalDescription>
          <subject authority="lcsh">
            <topic>Radio</topic>
            <topic>Repairing. [from old catalog]</topic>
          </subject>
          <classification authority="lcc">TK6553 .M298 1955</classification>
          <identifier type="lccn">54009698</identifier>
          <recordInfo>
            <recordContentSource authority="marcorg">DLC</recordContentSource>
            <recordCreationDate encoding="marc">820525</recordCreationDate>
            <recordChangeDate encoding="iso8601">20040824072855.0</recordChangeDate>
            <recordIdentifier>6046000</recordIdentifier>
            <recordOrigin>Converted from MARCXML to MODS version 3.8 using MARC21slim2MODS3-8_XSLT1-0.xsl (Revision 1.172 20230208)</recordOrigin>
          </recordInfo>
        </mods>
      </zs:recordData>
      <zs:recordPosition>1</zs:recordPosition>
    </zs:record>
  </zs:records>
  <zs:nextRecordPosition>2</zs:nextRecordPosition>
  <zs:echoedSearchRetrieveRequest>
    <zs:version>2.0</zs:version>
    <zs:query>bath.lccn=54009698</zs:query>
    <zs:maximumRecords>1</zs:maximumRecords>
    <zs:recordXMLEscaping>xml</zs:recordXMLEscaping>
    <zs:recordSchema>mods</zs:recordSchema>
  </zs:echoedSearchRetrieveRequest>
  <zs:diagnostics xmlns:diag="http://docs.oasis-open.org/ns/search-ws/diagnostic">
    <diag:diagnostic>
      <diag:uri>info:srw/diagnostic/1/5</diag:uri>
      <diag:details>2.0</diag:details>
      <diag:message>Unsupported version</diag:message>
    </diag:diagnostic>
  </zs:diagnostics>
</zs:searchRetrieveResponse>
Let’s see how to retrieve this data then parse it using PowerShell.
Parsing LCCN Data
First, we’ll start by setting the LCCN in a variable. This is the LCCN for "Elements of radio servicing" by William Marcus
$LCCN = '54-9698'
To pass in the LCCN to the web API, we need to remove any dashes or spaces.
$lccnCleaned = $LCCN.Replace('-', '').Replace(' ', '')
After 2001 the LCCN started using a four digit year. By that time however, books were already printing the ISBN instead of the LCCN. For those books we’ll be using the ISBN, so for this module we can safely assume the LCCNs we are receiving only have a two digit year.
With that said, we’ll use the following code to extract the two digit year.
$lccnPrefix = $lccnCleaned.Substring(0,2)
Since digits 0 and 1 are the year, we’ll start getting the rest of the LCCN at the third digit, which is in position 2 and go to the end of the string, getting the characters.
Next, the API requires the remaining part of the LCCN must be six digits. So we’ll use the PadLeft method to put 0’s in front to make it six digits.
$lccnPadded = $lccnCleaned.Substring(2).PadLeft(6, '0')
Now combine the reformatted LCCN and save it to a variable.
$lccnFormatted ="$($lccnPrefix)$($lccnPadded)"
Now we’ll combine all the parts to create the URL needed to call the web API.
$baseURL = "http://lx2.loc.gov:210/lcdb?version=3&operation=searchRetrieve&query=bath.lccn="
$urlParams = "&maximumRecords=1&recordSchema=mods"
$url = "$($baseURL)$($lccnFormatted)$($urlParams)"
It’s time now to get the LCCN data from the Library of Congress site. We’ll wrap it in a try/catch so in case the call fails, for example from the internet going down, it will provide a message and exit.
Note at the end of the Write-Host line we use the PowerShell line continuation character of ` (a single backtick) so we can put the foreground color on the next line, making the code a bit more readable.
try {
  $bookData = Invoke-RestMethod $url
}
catch {
  Write-Host "Failed to retrieve LCCN $LCCN. Possible internet connection issue. Script exiting." `
    -ForegroundColor Red
  # If there's an error, quit running the script
  exit
}
Now we need to see if the book was found in the archive. If not the title will be null. We’ll use an if to check to see if the LCCN was found in their database. If not, the title property will be null. If so we display a message to that effect.
If it was found, we fall through into the else clause to process the data. The remaining code resides within the else.
# We let the user know, and skip the rest of the script
if ($null -eq $bookData.searchRetrieveResponse.records.record.recordData.mods.titleInfo.title)
{
  Write-Host = "Retrieving LCCN $LCCN returned no data. The book was not found."
}
else # Great, the book was found, assign the data to variables
{
To get the data, we start at the root object, $bookData. The main node in the returned XML is searchRetrieveResponse. From here we can use standard dot notation to work our way down the XML tree to get the properties we want.
Our first entry gets the Library of Congress Number. The syntax is a little odd. If we walk XML tree, we find this stored in:
<identifier type="lccn">54009698</identifier>
If we display the identifier property using this code:
$bookData.searchRetrieveResponse.records.record.recordData.mods.identifier
We get this result.
type #text
---- -----
lccn 54009698
The LCCN we want is stored in the property named #text. But #text isn’t a valid property name in PowerShell. We can still use it though if we wrap the name in quotes.
$LibraryOfCongressNumber = $bookData.searchRetrieveResponse.records.record.recordData.mods.identifier.'#text'
From here we can process other properties that are easy to access.
  $Title = $bookData.searchRetrieveResponse.records.record.recordData.mods.titleInfo.title
  $PublishDate = $bookData.searchRetrieveResponse.records.record.recordData.mods.originInfo.dateIssued.'#text'
  $LibraryOfCongressClassification = $bookData.searchRetrieveResponse.records.record.recordData.mods.classification.'#text'
  $Description = $bookData.searchRetrieveResponse.records.record.recordData.mods.physicalDescription.extent
  $Edition = $bookData.searchRetrieveResponse.records.record.recordData.mods.originInfo.edition
Now we get to the section where an XML property can contain one or more values.
Books can have multiple authors, each is returned in its own item in an array. One example is the book subjects. Here is a sample of the XML:
<subject authority="lcsh">
  <topic>Radio</topic>
  <topic>Repairing. [from old catalog]</topic>
</subject>
As you can see, this has two topics. What we need to do is retrieve the root, in this case subject, then loop over each item.
For our purposes we don’t need them individually, a single string will do. So in the PowerShell we’ll create a new object of type StringBuilder. For more information on how to use StringBuilder, see my post Fun With PowerShell – StringBuilder.
In the loop if the variable used to hold the string builder is empty, we’ll just add the first item. If it’s not empty, we’ll append a comma, then append the next value.
  $authors = [System.Text.StringBuilder]::new()
  foreach ($a in $bookData.searchRetrieveResponse.records.record.recordData.mods.name)
  {
    if ($a.Length -gt 1)
      { [void]$authors.Append(", $($a.namePart)") }
    else
      { [void]$authors.Append($a.namePart) }
  }
  $Author = $authors.ToString()
As a final step we used the ToString method to convert the data in the string builder back to a normal string and store it in the $Author variable.
From here, we’ll repeat this logic for several other items that can hold multiple values. The books subjects is one example.
  $subjects = [System.Text.StringBuilder]::new()
  $topics = $bookData.searchRetrieveResponse.records.record.recordData.mods.subject | Select topic
  foreach ($s in $topics.topic)
  {
    if ($subjects.Length -gt 1)
      { [void]$subjects.Append(", $($s)") }
    else
      { [void]$subjects.Append($s) }
  }
  $Subject = $subjects.ToString()
A book could have multiple publishers over time. The author could shift to a new publisher, or more likely a publishing house could be purchased and the new owners name used. The data is returned as an array, so combine them as we did with authors and subjects.
Note that in the returned data, the publisher is stored as an "agent". We’ll use the name Publisher to keep it consistent with the ISBN data.
  $thePublishers = [System.Text.StringBuilder]::new()
  foreach ($p in $bookData.searchRetrieveResponse.records.record.recordData.mods.originInfo.agent)
  {
    if ($thePublishers.Length -gt 1)
      { [void]$thePublishers.Append(", $($p.namePart)") }
    else
      { [void]$thePublishers.Append($p.namePart) }
  }
  $Publishers = $thePublishers.ToString()
Since there could be multiple publishers, logically there could be multiple publishing locations. This section will combine them to a single location.
  $locations = [System.Text.StringBuilder]::new()
  foreach ($l in $bookData.searchRetrieveResponse.records.record.recordData.mods.originInfo.place.placeTerm)
  {
    if ($locations.Length -gt 1)
      { [void]$locations.Append(", $($l.'#text')") }
    else
      { [void]$locations.Append($l.'#text') }
  }
  $PublisherLocation = $locations.ToString()
All done! We’ll give a success message to let the user know.
Write-Host "Successfully retrieved data for LCCN $LCCN" -ForegroundColor Green
Finally, we’ll display the results. Note some fields may not have data, that’s fairly normal. The Library of Congress only has the data provided by the publisher. In addition some of the LCCN data dates back many decades, so the data supplied in the 1940’s may be different than what is supplied today.
  "LCCN: $LCCN"
  "Formatted LCCN: $lccnFormatted"
  "Library Of Congress Number: $LibraryOfCongressNumber"
  "Title: $Title"
  "Publish Date: $PublishDate"
  "Library Of Congress Classification: $LibraryOfCongressClassification"
  "Description: $Description"
  "Edition: $Edition"
  "Author: $Author"
  "Subject: $Subject"
  "Publishers: $Publishers"
  "Publisher Location: $PublisherLocation"
}
The Result
Here is the result of the above code.
LCCN: 54-9698
Formatted LCCN: 54009698
Library Of Congress Number: 54009698
Title: Elements of radio servicing
Publish Date: 1955
Library Of Congress Classification: TK6553 .M298 1955
Description: 566 p. illus. 24 cm.
Edition: 2d ed.
Author: Marcus, William. [from old catalog], Levy, Alex,
Subject: Radio, Repairing. [from old catalog]
Publishers: McGraw Hill
Publisher Location: nyu, New York
As you can see it returned a full dataset. Not all books my have data for all the fields, but this one had the full details on record with the Library of Congress.
See Also
This section has links to other blog posts or websites that you may find helpful.
The ArcaneBooks Project – An Introduction
ArcaneBooks – ISBN Overview, PowerShell, and the Simple OpenLibrary ISBN API
ArcaneBooks – PowerShell and the Advanced OpenLibrary ISBN API
ArcaneBooks – Library of Congress Control Number (LCCN) – An Overview
Fun With PowerShell – StringBuilder
The GitHub Site for ArcaneBooks
Conclusion
In this document we covered the basics of the LCCN as well as the web API provided by the Library of Congress. Understanding this information is important when we integrate the call into our PowerShell code.
Fun With PowerShell – StringBuilder 17 Apr 2023 7:00 AM (2 years ago)

Introduction
As I was creating the next post in my ArcaneBooks series, I realized I had not written about the StringBuilder class. As the code in my ArcaneBooks module relies on it in several places, I thought it best to add a new post to my Fun With PowerShell series explaining how to use it before continuing.
It’s a common need in any language, and PowerShell is no exception, to need to add more text to an existing string.
What many people don’t realize though is that PowerShell strings are immutable. They cannot change. As an example, let’s talk about what happens behind the scenes when you execute this code sample.
$x = 'Arcane'
$x = $x + 'Code'
First, PowerShell creates a variable in memory. For an example, we’ll say the memory is located at position 0001.
In the second line of code, PowerShell creates a second variable in memory, let’s say it is position 0002. Into position 0002, it copies the data from position 0001 then adds the Code string.
Next, it changes $x to point to memory location 0002. Finally, it marks position 0001 as no longer in use. At some point in the future, the garbage collector will clean up the memory when there is some idle time. The garbage collector is a system function that removes chunks of memory that are no longer in use, freeing up memory for other code to use.
Why This Is Bad
In the example above, we only had one variable (the one at location 0001) that needed to be garbage collected. Imagine though you were looping over thousands of records of data, building a complex string that perhaps you’ll later save to a file. The amount of work the garbage collector would need to do is enormous. It would have a negative impact on system performance, and create a slow running script.
To solve this, the StringBuilder class was created. Behind the scenes it uses a linked list. Let me step through an example a step at a time.
Step 1 – Create an empty string builder object
$output = [System.Text.StringBuilder]::new()
Step 2 – Append text to the StringBuilder variable we created
To add a string value, we will use the Append method. Note when we use methods such as Append it returns data. Most of the time we don’t need to see this. By using [void] before the line, the output of the Append method is discarded.
[void]$output.Append('Arcane')
We now have an item in memory, we’ll call it position one. This holds two values, the string value and a pointer to the next item. If there is no next item, the pointer value is null.
| Position | Text | Pointer to next item |
|---|---|---|
| 0001 | Arcane | null |
Step 3 – Append a second string
[void]$output.Append('Code')
The string builder now updates the linked list.
| Position | Text | Pointer to next item |
|---|---|---|
| 0001 | Arcane | 0002 |
| 0002 | Code | null |
Step 4 – Retrieve the data
When we go to retrieve the data, the string builder will go through the chain, assemble the final data and return it. In order to copy it into a standard string variable, we’ll need to use the ToString method to convert the result from a string builder object to a standard string.
$result = $output.ToString()
Why this is a good solution
Here, PowerShell only created one variable, then kept appending to the linked list. When we are done with the variable $output the garbage collector only has to cleanup one variable, not hundreds or (potentially) thousands.
When you only have a few items, and are sure their sizes are small, then using a string builder may not provide much benefit in terms of performance. However, when you have an unknown number of items then string builder can be a friend.
In addition to Append, string builder has several more methods that are of use. Let’s look at them now.
Append
While we just looked at using Append, I want to use this section to remind you to include proper spacing when creating your strings.
$output = [System.Text.StringBuilder]::new()
[void]$output.Append( 'PowerShell is awesome!' )
[void]$output.Append( ' It makes my life much easier.' )
[void]$output.Append( ' I think I''ll go watch some of Robert''s videos on Pluralsight.' )
$output.ToString()
This results in:
PowerShell is awesome! It makes my life much easier. I think I''ll go watch some of Robert''s videos on Pluralsight.
Note that on the second and third calls to the Append method I included a space at the beginning of the line. This was needed to make the output look like a true series of sentences, with spaces after the periods.
You could have also put spaces at the end of the lines, that is up to you and your needs when building your code.
AppendLine
When appending, you sometimes want a carriage return / line feed character added to the end of the text that was appended. To handle this, we have the Appendline method.
$output = [System.Text.StringBuilder]::new()
[void]$output.Append( 'PowerShell is awesome!' )
[void]$output.AppendLine( ' It makes my life much easier.' )
[void]$output.Append( 'I think I''ll go watch some of Robert''s videos on Pluralsight.' )
$output.ToString()
In the result, you can see the line wraps after the "…much easier." line.
PowerShell is awesome! It makes my life much easier.
I think I'll go watch some of Robert's videos on Pluralsight.
This can be handy when, for example, you are building a string that will be written out as a CSV (comma separated values) file. Each row of data will be saved as an individual line.
You may also have situations where you are building a big string that you want as something more readable. Perhaps you are building a string that will be emailed as a report. In it you’d want blank lines between each paragraph.
To accomplish this, you can just use AppendLine without passing a value into it.
$output = [System.Text.StringBuilder]::new()
[void]$output.Append( 'PowerShell is awesome!' )
[void]$output.AppendLine( ' It makes my life much easier.' )
[void]$output.AppendLine()
[void]$output.Append( 'I think I''ll go watch some of Robert''s videos on Pluralsight.' )
$output.ToString()
The output from this code is:
PowerShell is awesome! It makes my life much easier.

I think I'll go watch some of Robert's videos on Pluralsight.
AppendFormat
The third version of append is AppendFormat. It allows you to append a numerical value, and specify a string format.
In the example below, the first parameter is {0:C}. Into the spot where the 0 is, the numeric value in the second parameter, $value is placed. The :C indicates a currency format should be used.
$value = 33
$output = [System.Text.StringBuilder]::new()
[void]$output.Append( 'The value is: ' )
[void]$output.AppendFormat( "{0:C}", $value )
$output.ToString()
This results in:
The value is: $33.00
The formats supported by string builder are identical to the ones that the string data type uses.
For more information on string formatting, please see my post Fun With PowerShell String Formatting
Insert
You may have a situation where you need to insert text into the text already saved in your string builder variable. To accomplish this, we can use the Insert method.
As the first parameter we pass in the position we wish to start inserting at. The second parameter holds the text to be inserted.
$output = [System.Text.StringBuilder]::new()
[void]$output.Append( 'Arcane' )
[void]$output.Append( ' writes great blog posts.' )
[void]$output.Insert(6, 'Code')
$output.ToString()
The output of the above sample is:
ArcaneCode writes great blog posts.
Remove
In addition to inserting text, we can also remove text using the Remove method. It requires two parameters, the first is the position to start removing at, the second is the number of characters to remove.
$output = [System.Text.StringBuilder]::new()
[void]$output.Append( 'ArcaneCode' )
[void]$output.Append( ' writes great blog posts.' )
[void]$output.Remove(6, 4)
$output.ToString()
In this example I’m removing the text Code from ArcaneCode.
Arcane writes great blog posts.
Replace
You may recall that the string data type has a replace method. So too does the string builder, also named Replace. In the first parameter you pass in the character to be replaced. The second is what you want to replace it with.
$output = [System.Text.StringBuilder]::new()
[void]$output.Append( 'ArcaneCode' )
[void]$output.AppendLine( ' writes great blog posts.' )
[void]$output.Append( 'I think I''ll go watch some of Robert''s videos on Pluralsight.' )
[void]$output.Replace('.', '!')
$output.ToString()
In this simple example, I’m going to replace all periods in the text with exclamation marks.
ArcaneCode writes great blog posts!
I think I'll go watch some of Robert's videos on Pluralsight!
Be aware Replace works on the entire text held in string builder, replacing every occurance found. If you want to limit the replacements, you’d have to do so prior to any appending you do.
The Replace method is most commonly used to remove special characters from your text, perhaps a result from reading in data from file that contains things like squiggly braces and brackets.
The replacement character can be an empty string, which results in simply removing the unwanted character.
Finally, you can stack multiple methods into one operation. For example, if the string builder holds the text:
{ArcaneCode}, [arcanecode.com]
You can do:
$output.Replace('{', '').Replace('}', '').Replace('[', '').Replace(']', '')
Which results in the following text:
ArcaneCode, arcanecode.com
And you aren’t limited to stacking replaces, you can mix and match methods.
$output = [System.Text.StringBuilder]::new()
[void]$output.Append( '[ArcaneCode]' ).Replace('[', '').Replace(']', '').Insert(6, ' ')
$output.ToString()
Results in:
Arcane Code
If you get carried away this can get ugly and hard to read. But it is possible so you should know about it. There are times when it can make the code more compact and a bit easier to read, such as:
[void]$output.Replace('[', '').Replace(']', '')
Adding the first string when you create a StringBuilder object
There is one last capability to look at. When you instantiate (fancy word for create) the new string builder object, you can pass in the first text value to be stored in the string builder.
Here I’m passing in the text ArcaneCode when we create the variable.
$output = [System.Text.StringBuilder]::new('ArcaneCode')
[void]$output.Append( ' writes great blog posts.' )
$output.ToString()
The output is like you’d expect.
ArcaneCode writes great blog posts.
See Also
You may find more helpful information at the links below.
Fun With PowerShell String Formatting
If you want to go deeper on the internals of the StringBuilder class, Andrew Lock has a great series of articles at his blog.
Conclusion
The string builder class can be a great tool for optimizing your scripts that do a lot of text manipulation.
Now that you have an understanding of the string builder class, we’re free to proceed with the next post in the ArcaneBooks project.
ArcaneBooks – Library of Congress Control Number (LCCN) – An Overview 10 Apr 2023 7:00 AM (2 years ago)
Introduction
This is part of my ongoing series on my ArcaneBooks project. The goal is to provide a module to retrieve book data via provided web APIs. In the SEE ALSO section later in this post I’ll provide links to previous posts which cover the background of the project, as well as how to use the OpenLibrary APIs to get data based on the ISBN.
In this post I will provide an overview of using the Library of Congress API to get data based on the LCCN, short for Library of Congress Control Number.
The next post in this series will provide code examples and an explanation of how to use PowerShell to get data using the Library of Congress API.
LCCN Overview
The abbreviation LCCN, according to the Library of Congress’s own website, stands for Library of Congress Control Number. When the system was first created in 1898, however, LCCN stood for Library of Congress Card Number, and I’ve seen it both ways in publications.
I’ve also seen a few places define it as Library of Congress Catalog Number, although this was never an official designation.
The LCCN was created in 1898 to provide a unique value to every item in the Library of Congress. This not only includes books, but works of art, manuscripts (not in book form), maps, and more.
LCCN Format
The LCCN has two parts, a prefix followed by a serial number. From 1898 to 2000 the prefix was two digits, representing the year. Beginning in 2001 the prefix became four digits, representing the year.
The serial number is simple a sequential number. 45-1 was the first number assigned in 1945. 45-1234 was the 1,234th item assigned in that year.
Be aware from 1969 to 1972 there was an experiment where the single digit of 7 was used for the prefix. They decided this scheme wasn’t going to work out, and reverted to the standard format of year followed by serial number.
Here are a few examples of real LCCNs from books in my personal collection. You can use these in your own testing.
| LCCN | Title |
|---|---|
| 54-9698 | Elements of Radio Servicing |
| 40-33904 | Radio Handbook Twenty-Second Edition |
| 41-3345 | The Radio Amateur’s Handbook 42nd Edition 1965 |
| 64-20875 | Early Electrical Communication |
| 74-75450 | VHF Handbook for Radio Amateurs |
| 76-190590 | Wire Antennas for Radio Amateurs |
| 71-120473 | 73 Vertical, Beam, and Triangle Antennas |
Accessing Book Data from the Library of Congress
The Library of Congress actually provides two web APIs for getting book data. The first API is for accessing assets, such as digital assets. It doesn’t return much data for books.
The second is the LC Z39.50 system, accessible through lx2.loc.gov. Here is an example of calling it to retrieve a record for the book Elements of Radio Servicing, which has the LCCN of 54-9698. (It should, of course, all be used as a single line just in case your web browser wraps it.)
http://lx2.loc.gov:210/lcdb?version=3&operation=searchRetrieve&query=bath.lccn=54009698&maximumRecords=1&recordSchema=mods
Breaking it down, the root call is to http://lx2.loc.gov:210/lcdb. After this is a question mark ?, followed by the parameters.
The first parameter is version=3. This indicates which format to use for the return data. It supports two versions, 1.1 and 3. For our purposes we’ll use the most current version, 3.
Following the ampersand & is operation=searchRetrieve. This instructs the Library of Congress’s API that we want to do a search to retrieve data.
Next is the core piece, we need to tell it what LCCN number to look up, query=bath.lccn=54009698. The root object is bath, then it uses the property lccn.
The LCCN has to be formatted in a specific way. We start with the two or four digit year. In the above example, 54-9698, this would be the two digit year of 54.
Next is the serial number. If the number is less than six digits, it must be left zero padded to become six. Thus 9698 becomes 009698. The year and serial number are combined, removing any dashes, spaces, or other characters and becomes 54009698.
Following is maximumRecords=1, indicating we only expect one record back. That’s all we’ll get back with a single LCCN anyway, so this will work fine for our needs.
The final parameter is recordSchema=mods. The API supports several formats.
| Record Schema | Description | Notes |
|---|---|---|
| dc | Dublin Core (bibliographic records) | Brings back just the basics (Name, author, etc) |
| mads | MADS (authority records) | Brief, not a lot of info |
| mods | MODS (bibliographic records) | Very readable XML schema, most info |
| marcxml | MARCXML – the default schema | Abbreviated schema, not readable |
| opacxml | MARCXML (wth holdings attached) | As above with a bit more info |
You are welcome to experiment with different formats, but for this module we’ll be using mods. It provides the most information, and is in XML. XML is very easy to read, and it works great with PowerShell.
ISBN and Library of Congress
It is possible to use the Library of Congress to look up the ISBN. In my testing though, the interface provided by OpenLibrary provided more data. Thus we’ll be using it for looking up ISBNs in this module.
We’ll use the LCCN API for books where we only have the LCCN.
See Also
The ArcaneBooks Project – An Introduction
ArcaneBooks – ISBN Overview, PowerShell, and the Simple OpenLibrary ISBN API
ArcaneBooks – PowerShell and the Advanced OpenLibrary ISBN API
Conclusion
In this document we covered the basics of the LCCN as well as the web API provided by the Library of Congress. Understanding this information is important when we integrate the call into our PowerShell code.