EXTRAODINARY PHOTOSHOP TEXT EFFECTS 12 Feb 2011 4:37 PM (14 years ago)

In this post, I’ve collected 10 of the very best and most extravagant tutorials for working with type. After working through a few of the most appealing looking ones to you, you should have more than a few ideas for creating your own, unique effects!
Read more
1. cool-looking, Splashing Ocean Text Effect with Lightning Background in Photoshop.Tutorial


Tutorial


Tutorial


I have posted up all the tutorial links. ENJOY =)
Before proceed the 5,6 and 8 tutorial, you need to have 3DS MAX installed. All the best to you!


%22%3ERead%20more%3C/a%3E%3Cbr%20/%3E%3Cdiv%3E%3Cbr%20/%3E%3Cbr%20/%3E1.%20cool-looking,%20Splashing%20Ocean%20Text%20Effect%20with%20Lightning%20Background%20in%20Photoshop.%3Ca%20href%3D%22http://www.psdvault.com/text-effects/design-an-awesome-splashing-ocean-text-effect-with-lightning-background-in-photoshop/%22%3E%3Cspan%3ETutorial%3C/span%3E%3C/a%3E%3Cbr%20/%3E%3Cbr%20/%3E%3Cdiv%3E%3Cimg%20src%3D%22http://www.problogdesign.com/wp-content/uploads/2010/02/text-tuts-04.jpg%22%20alt%3D%22%22%20/%3E%3Cbr%20/%3E%3Cbr%20/%3E%3Cdiv%3E2.%20create%20an%20elegant%20text%20effect.%3Ca%20href%3D%22http://wegraphics.net/blog/tutorials/photoshop/how-to-create-a-simple-and-elegant-text-effect/%22%3ETutorial%3C/a%3E%3Cbr%20/%3E%3C/div%3E%3Cbr%20/%3E%3Cimg%20src%3D%22http://www.problogdesign.com/wp-content/uploads/2010/02/text-tuts-08.jpg%22%20alt%3D%22%22%20/%3E%3Cbr%20/%3E%3Cbr%20/%3E%3Cdiv%3E3.%20make%20a%20regular%20text%20look%20like%20it%20has%20been%20painted%20or%20printed%20on%20wood%20%20using%20different%20text%20effects.%20This%20is%20a%20great%20way%20to%20give%20your%20text%20that%20%20natural%20look.%20This%20can%20be%20applied%20to%20any%20solid%20shape,%20text,%20images,%20%20logos,%20etc.%3Cbr%20/%3E%3Ca%20href%3D%22http://www.denisdesigns.com/blog/2010/01/create-realistic-type-on-wood/%22%3E%3Cspan%3ETutorial%3C/span%3E%3C/a%3E%3Cbr%20/%3E%3C/div%3E%3Cbr%20/%3E%3Cimg%20src%3D%22http://www.problogdesign.com/wp-content/uploads/2010/02/text-tuts-09.jpg%22%20alt%3D%22%22%20/%3E%3Cbr%20/%3E%3Cbr%20/%3E%3Cdiv%3E4.%20created%20using%20different%20techniques%20to%20create%20a%20soft%20background%20with%20glowing%20jellyfish.%3Ca%20href%3D%22http://photoshop.kingtutz.com/2010/02/09/jelly-fish-delight-photoshop-tutorial/%22%3E%3Cspan%3ETutorial%3C/span%3E%3C/a%3E%3C/div%3E%3Cbr%20/%3E%3Cimg%20src%3D%22http://www.problogdesign.com/wp-content/uploads/2010/02/text-tuts-13.jpg%22%20alt%3D%22%22%20/%3E%3Cbr%20/%3E%3Cbr%20/%3E%3Cdiv%3E5.%20create%20a%20killer%203D%20Poster%20Design%20with%203DS%20Max%20%26amp;%20Photoshop.%3Ca%20href%3D%22http://www.gomediazine.com/tutorials/tutorial-killer-3d-poster-design-with-3ds-max-photoshop/%22%3E%3Cspan%3ETutorial%3C/span%3E%3C/a%3E%3C/div%3E%3Cbr%20/%3E%3Cimg%20src%3D%22http://www.problogdesign.com/wp-content/uploads/2010/02/text-tuts-17.jpg%22%20alt%3D%22%22%20/%3E%3Cbr%20/%3E%3Cbr%20/%3E%3Cdiv%3E6.%20create%20a%20good%203D%20type%20explosion%20with%20Adobe%20Illustrator,%20Cinema%204D%20and%20Adobe%20Photoshop%20using%20basic%20tools%20to%20make%20this%20artwork.%3Ca%20href%3D%22http://abduzeedo.com/reader-tutorial-extinction-chanito%22%3E%3Cspan%3ETutorial%3C/span%3E%3C/a%3E%3Cbr%20/%3E%3Cbr%20/%3E%3C/div%3E%3Cimg%20src%3D%22http://www.problogdesign.com/wp-content/uploads/2010/02/text-tuts-19.jpg%22%20alt%3D%22%22%20/%3E%3Cbr%20/%3E%3Cbr%20/%3E%3Cdiv%3E7.%20learn%20how%20to%20create%20a%20candy%20cane%20like%20text%20effect%20with%20the%20help%20of%20some%20simple%20Photoshop%20techniques.%3Cbr%20/%3E%3Ca%20href%3D%22http://www.tutorial9.net/photoshop/basic-candy-cane-text-effect-in-photoshop/%22%3E%3Cspan%3ETutorial%3C/span%3E%3C/a%3E%3Cbr%20/%3E%3C/div%3E%3Cbr%20/%3E%3Cimg%20src%3D%22http://www.problogdesign.com/wp-content/uploads/2010/02/text-tuts-21.jpg%22%20alt%3D%22%22%20/%3E%3Cbr%20/%3E%3Cbr%20/%3E%3Cdiv%3E8.%20you%20will%20go%20over%20various%20techniques%20you%20may%20haven%E2%80%99t%20seen%20before,%20as%20well%20%20as%20a%20bulk%20of%20techniques%20that%20may%20be%20new%20to%20you.%20After%20you%20have%20%20completed%20this%20intense%20walk%20though,%20you%20will%20be%20able%20to%20explore%20even%20%20more%20new%20ways%20of%20creating%20typefaces%20as%20well%20as%20other%20types%20of%20ideas.%3Ca%20href%3D%22http://www.gomediazine.com/tutorials/3d-typography-photoshop/%22%3E%3Cspan%3ETutorial%3C/span%3E%3C/a%3E%3C/div%3E%3Cbr%20/%3E%3Cimg%20src%3D%22http://www.problogdesign.com/wp-content/uploads/2010/02/text-tuts-26.jpg%22%20alt%3D%22%22%20/%3E%3Cbr%20/%3E%3Cbr%20/%3E%3Cdiv%3E9.%20we%20are%20going%20to%20create%20the%20mosaic%20background%20and%20a%20cool%20radioactive%20%20looking%20text,%20combine%20this%20two%20elements%20and%20you%20will%20get%20an%20amazing%20%20desktop%20wallpaper.%3Ca%20href%3D%22http://bogdan-pop.com/tutorial-create-a-spectacular-sf-looking-wallpaper%22%3E%3Cspan%3ETutorial%3C/span%3E%3C/a%3E%3C/div%3E%3Cbr%20/%3E%3Cimg%20src%3D%22http://www.problogdesign.com/wp-content/uploads/2010/02/text-tuts-33.jpg%22%20alt%3D%22%22%20/%3E%3Cbr%20/%3E%3Cbr%20/%3E%3Cdiv%3E10.%20A%20great%20tutorial%20on%20creating%20Aurora%20Borealis%20typopgraphy%20wallpaper.%3Ca%20href%3D%22http://www.acuitydesigns.net/aurora-borealis-typopgraphy-wallpaper-photoshop-tutorial/%22%3E%3Cspan%3ETutorial%3C/span%3E%3C/a%3E%3C/div%3E%3Cbr%20/%3E%3Cimg%20src%3D%22http://www.problogdesign.com/wp-content/uploads/2010/02/text-tuts-34.jpg%22%20alt%3D%22%22%20/%3E%3Cbr%20/%3E%3C/div%3E%3Cbr%20/%3EI%20have%20posted%20up%20all%20the%20tutorial%20links.%20ENJOY%20%3D)%3Cbr%20/%3EBefore%20proceed%20the%205,6%20and%208%20tutorial,%20you%20need%20to%20have%203DS%20MAX%20installed.%20All%20the%20best%20to%20you!%3Cbr%20/%3E%3C/div%3E)


Lose your weight in 30min! 10 Feb 2011 9:14 PM (14 years ago)

This tutorial you will learn to trim you body weight within the few steps by using the LIQUIFY tool in PHOTOSHOP. The Liquify filter may be one of the most commonly used filters in Photoshop’s arsenal. The Liquify filter allows us to distort the pixels in a given image without losing quality. Some designers are a bit intimidated by the Liquify filter, others may use in improperly. Today, we will explain the features of this very powerful filter in detail so you can use it in your work.
Read more
Drag the background layer to the new layer icon to duplicate the layer so you have some pixels that you can ‘work on’ safely.
Now go to Filter: Liquify.


Now grab the Freeze Mask tool and go ahead and paint to freeze the areas that are around the area that you are going to work on. Freezing anything (in red) will not allow those pixels to be liquefied. This is a great tool so you can get more accurate and precision weight-loss areas.
Here I’m not focusing on this neck first but rather covering up and freezing the entire areas surrounding the small edge of each face/chinside as shown. This will allow me to only work on these specific areas.
Now grab the Shift Pixels tool. Use the bracket keys to get just the right brush size, making sure it’s not bigger than the area that you have already freezemasked.
Now with your Shift Pixels tool  you’re going to carefully nudge/nip the edge of the face in. This is digital surgery at it’s fastest.
Now repeat the same process for the other side, carefully clicking and dragging it slightly in.
Result
Pardon my editing, enjoy ;-)

Photoshop CS5 Extended 10 Feb 2011 7:23 PM (14 years ago)

 Photoshop CS5 Extended version is available for download now!
85MB (Installer)
Virus free! Enjoy
Hotfile
Download
%3Cbr%20/%3EVirus%20free!%20Enjoy%3Cbr%20/%3E%3Cbr%20/%3EHotfile%3Cbr%20/%3E%3Cbr%20/%3E%3Ca%20href%3D%22http://hotfile.com/dl/103391213/7594657/Photoshop_CS5_Portable.rar.html%22%3E%3Cspan%3EDownload%3C/span%3E%3C/a%3E)
Hotfile premium account sold here 10 Feb 2011 4:08 AM (14 years ago)
![]() You can buy HOTFILE premium account from me now. don't hesitate and drop me a mesg
You can buy HOTFILE premium account from me now. don't hesitate and drop me a mesg
chenchun3030@gmail.com![]()
![]()
"Red Packet from NUFFNANG" in year 2011 10 Feb 2011 3:21 AM (14 years ago)
 Happy Rabbit year! May this the rabbit bring you more luck, prosperity, good health and wealthy!
 Read More
Nuffnang keep their promises and i had received their first cheque during chinese new year,this may considered my biggest angpow among all.
You all must be curious what is the figure i had earned from Nuffnang so far right? but i can tell it is more than RM50 ~LOL
By the way, from this time i will update my blog frequently and recent i have some prepared PS tutorials, hope you guys stay up with all the upcoming tutorials on this blog. Happy 2011 and Happy chinese new year.
%22%3ERead%20More%3C/a%3E%3Cbr%20/%3E%3Cdiv%3E%3Cbr%20/%3E%3Cbr%20/%3ENuffnang%20keep%20their%20promises%20and%20i%20had%20received%20their%20first%20cheque%20during%20chinese%20new%20year,this%20may%20considered%20my%20biggest%20angpow%20among%20all.%3Cbr%20/%3E%3Cbr%20/%3EYou%20all%20must%20be%20curious%20what%20is%20the%20figure%20i%20had%20earned%20from%20Nuffnang%20so%20far%20right?%20but%20i%20can%20tell%20it%20is%20more%20than%20RM50%20~LOL%3Cbr%20/%3E%3Cbr%20/%3EBy%20the%20way,%20from%20this%20time%20i%20will%20update%20my%20blog%20frequently%20and%20recent%20i%20have%20some%20prepared%20PS%20tutorials,%20hope%20you%20guys%20stay%20up%20with%20all%20the%20upcoming%20tutorials%20on%20this%20blog.%20Happy%202011%20and%20Happy%20chinese%20new%20year.%3Cbr%20/%3E%3Cbr%20/%3E%3C/div%3E)
Merry Christmas and Happy 2011 30 Dec 2010 9:35 AM (14 years ago)

 Kenzo was here to wish all my readers have a happy 2011 and SMILE with me all the time~ love you all!
 I had realized my previous post is on 5th Oct! feel guilty of never update any new contents to my readers and to this blog! Anyway! was here to wish all the reader and myself a happy 2011! i will try my very best to update as many as i can!! ALL THE BEST!
 OooLALA!! Can you see my updates? Speechless.....

Penny Auction 9 Oct 2010 3:36 PM (14 years ago)
 "Penny Auction"? It ignited my curiosity!
 Actually it 's nothing special about the site but the auction price is really attracted your attention!
First of all, Every auction start from price RM0.01, and every bid rise RM0.01.
the hottest Iphone4 in town only cost RM62.25! Everyone is effortable to pay for it! but what actually the story behind the auction?
1. Is it scam? Honestly, no 100% secure while dealing on the web!
2. The hoster earned alot? I do agree with this..... => every bid the cheapest is RM1.35 and the highest is RM3. Iphone4 cost RM62.25=6225XRM1.35=RM8403.75+(62.25) if hoster sold 10 items? $_$y
3. Penny Auction definitely is a gambling, don't bid it for fun unless you're going to grab the items!(if i am rich i will grab it directly from the shop) =P
%20if%20hoster%20sold%2010%20items?%20$_$y%3Cbr%20/%3E%3Cbr%20/%3E3.%20Penny%20Auction%20definitely%20is%20a%20gambling,%20don't%20bid%20it%20for%20fun%20unless%20you're%20going%20to%20grab%20the%20items%EF%BC%81(if%20i%20am%20rich%20i%20will%20grab%20it%20directly%20from%20the%20shop)%20%3DP)
Spend some minutes on this IQ test 16 Sep 2010 5:36 AM (14 years ago)
 Test your IQ here
It's based on Raven's Advanced Progressive Matrices and this test is using symbol so no language barrier...
You have 40 minutes to answer 39 questions. GOOOOD LUCK guys!
post the result in here ^^
this is my result =)
%3Cbr%20/%3E%3Cbr%20/%3E%3Cbr%20/%3E%3Ca%20href%3D%22https://blogger.googleusercontent.com/img/b/R29vZ2xl/AVvXsEi9spOuGYb2lKVZVYjUjxoIABEa6Q-scWLt8drbx3uHBf2Mx1FOtmF4ZTGVuxp7YORgVdw1mlKd7z4rIhcLqckGyXCW65t_Pfg9wJAD4xXFJc2x85aNL37nWQevy-9_-Os6VlSpvqshF10/s1600/Untitled.jpg%22%3E%3Cimg%20style%3D%22display:%20block;%20margin:%200px%20auto%2010px;%20text-align:%20center;%20cursor:%20pointer;%20width:%20400px;%20height:%20253px;%22%20src%3D%22https://blogger.googleusercontent.com/img/b/R29vZ2xl/AVvXsEi9spOuGYb2lKVZVYjUjxoIABEa6Q-scWLt8drbx3uHBf2Mx1FOtmF4ZTGVuxp7YORgVdw1mlKd7z4rIhcLqckGyXCW65t_Pfg9wJAD4xXFJc2x85aNL37nWQevy-9_-Os6VlSpvqshF10/s400/Untitled.jpg%22%20alt%3D%22%22%20id%3D%22BLOGGER_PHOTO_ID_5517034026595402354%22%20border%3D%220%22%20/%3E%3C/a%3E)


Can you finish 5 bowls of noodles in 10 mins? 13 Sep 2010 1:31 AM (14 years ago)


It is Sushi king promotion again!!
Seriously, it's "EAT FOR FREE" written on the promotion banner up there!
which mean we can eat all noodles without paying 1sen? It's a good deal~
After i looked clearly to the banner, "CHALLENGE THIS"
WHAT? finish all the 5 bowls in 10min? do you DARE to challenge it?

The things “MUST" know about Streamyx 12 Sep 2010 10:46 PM (14 years ago)
 Streamyx is the main fixed-line ISP (Internet service provider) in Malaysia.
What problem with our Streamyx ADSL services?
Question 1: Do you understand what the difference between Megabyte (MB) and Megabit (Mb)?
Generally, most of the PC user do not aware the difference between MB and Mb. They are look-a-like for most of the PC user. Therefore when you browse through streamyx website, promotion brochure or even application form, RM88 package download spend is 1 Mb, commonly subscriber first impression is Mb is the definition for Megabyte. Although under the term and condition section, the Mb is clearly Defined as Megabit, but how many PC user or subscriber understand how is work, what did it try to tell and “what is the actual transfer rate of 1 Mb”. Subscriber always think that they can download file at the speed of one Megabyte per second.
Technically, Mb is short for Megabit and is 1,000,000 bits. Mb commonly usually expresses the rate at which data is transferred, for example, “10/100 Mbps” represent 10 or 100 Megabits per second, the common speed of a standard network card. MB is short for Megabyte. A MB is a common measurement used with computer storage media. A Megabyte is equal to 1,048,576 bytes or 1,048 kilobytes.
So what is the relation between MB and Mb? Put it simple, 1 Megabyte equivalent to 1,000,000 bits which is equal to 125,000 bytes or 125 kilobytes.
When you subscribe for Steamyx ADSL services, 1 Mb is not Megabyte but Megabit, therefore you maximum download spend is 125 kilobytes per second. My question is did you aware of this? Have you been informed during sign up?
I don’t know about you, but I was not informed during application. Confusion tactic had been used due to our lack of PC knowledge, low awareness and most important our ignorant.
Question 2: Is Streamyx Throttling Internet Connection?
I had found a cool online tool, this is a Google's new online tools that will diagnose your network connection. Here's a quick walk-through on how to make the best of them.Google's broadband test tools are located at Measurementlab.net. On that page, you'll see an first icon that says "Users: Test Your Internet Connection". Click that, and then you'll be taken to a page where there are three tests available.
This is the my first torrent test result, you can locate any other diagnoses you want from the Measurementlab.net.
Question 3:Bad ISP?
Bad ISPs
"The following is a list of internet service provider (ISPs) that are known to cause trouble for bit torrent clients or other P2P clients and the reason why. If you are using one of the following ISPs, please consider finding a new, better one. If your ISP is not on the list and you have reason to believe they are shaping traffic"
source Wiki.Vuze
Question 4: Ranking?
%20in%20Malaysia.%3Cbr%20/%3EWhat%20problem%20with%20our%20Streamyx%20ADSL%20services?%3Cbr%20/%3E%3Cbr%20/%3E%3Cspan%3EQuestion%201%3C/span%3E:%20Do%20you%20understand%20what%20the%20difference%20between%20Megabyte%20%20(MB)%20and%20Megabit%20(Mb)?%3Cbr%20/%3E%3Cbr%20/%3EGenerally,%20most%20of%20the%20PC%20user%20do%20not%20aware%20the%20difference%20between%20MB%20%20and%20Mb.%20They%20are%20look-a-like%20for%20most%20of%20the%20PC%20user.%20Therefore%20when%20you%20%20browse%20through%20streamyx%20website,%20promotion%20brochure%20or%20even%20application%20%20form,%20RM88%20package%20download%20spend%20is%201%20Mb,%20commonly%20subscriber%20first%20%20impression%20is%20Mb%20is%20the%20definition%20for%20Megabyte.%20Although%20under%20the%20term%20%20and%20condition%20section,%20the%20Mb%20is%20clearly%20Defined%20as%20Megabit,%20but%20how%20%20many%20PC%20user%20or%20subscriber%20understand%20how%20is%20work,%20what%20did%20it%20try%20to%20%20tell%20and%20%E2%80%9Cwhat%20is%20the%20actual%20transfer%20rate%20of%201%20Mb%E2%80%9D.%20Subscriber%20always%20%20think%20that%20they%20can%20download%20file%20at%20the%20speed%20of%20one%20Megabyte%20per%20%20second.%3Cbr%20/%3E%3Cbr%20/%3ETechnically,%20Mb%20is%20short%20for%20Megabit%20and%20is%201,000,000%20bits.%20Mb%20commonly%20%20usually%20expresses%20the%20rate%20at%20which%20data%20is%20transferred,%20for%20example,%20%20%E2%80%9C10/100%20Mbps%E2%80%9D%20represent%2010%20or%20100%20Megabits%20per%20second,%20the%20common%20speed%20%20of%20a%20standard%20network%20card.%20MB%20is%20short%20for%20Megabyte.%20A%20MB%20is%20a%20common%20%20measurement%20used%20with%20computer%20storage%20media.%20A%20Megabyte%20is%20equal%20to%20%201,048,576%20bytes%20or%201,048%20kilobytes.%3Cbr%20/%3E%3Cbr%20/%3ESo%20what%20is%20the%20relation%20between%20MB%20and%20Mb?%20Put%20it%20simple,%201%20Megabyte%20%20equivalent%20to%201,000,000%20bits%20which%20is%20equal%20to%20125,000%20bytes%20or%20125%20%20kilobytes.%3Cbr%20/%3E%3Cbr%20/%3EWhen%20you%20subscribe%20for%20Steamyx%20ADSL%20services,%201%20Mb%20is%20not%20Megabyte%20but%20%20Megabit,%20therefore%20you%20maximum%20download%20spend%20is%20125%20kilobytes%20per%20%20second.%20My%20question%20is%20did%20you%20aware%20of%20this?%20Have%20you%20been%20informed%20%20during%20sign%20up?%3Cbr%20/%3E%3Cbr%20/%3EI%20don%E2%80%99t%20know%20about%20you,%20but%20I%20was%20not%20informed%20during%20application.%20%20Confusion%20tactic%20had%20been%20used%20due%20to%20our%20lack%20of%20PC%20knowledge,%20low%20%20awareness%20and%20most%20important%20our%20ignorant.%3Cbr%20/%3E%3Cbr%20/%3E%3Cspan%3EQuestion%202%3C/span%3E:%20%3Cspan%3EIs%20Streamyx%20Throttling%20Internet%20Connection?%3Cbr%20/%3E%3C/span%3EI%20had%20found%20a%20cool%20online%20tool,%20this%20is%20a%20Google's%20new%20online%20tools%20that%20will%20diagnose%20your%20network%20connection.%20Here's%20a%20quick%20walk-through%20on%20how%20to%20make%20the%20best%20of%20them.Google's%20broadband%20test%20tools%20are%20located%20at%20%3Ca%20href%3D%22http://www.measurementlab.net/%22%3EMeasurementlab.net%3C/a%3E.%20%20On%20that%20page,%20you'll%20see%20an%20first%20icon%20that%20says%20%22Users:%20Test%20Your%20%20Internet%20Connection%22.%20Click%20that,%20and%20then%20you'll%20be%20taken%20to%20a%20page%20where%20there%20are%20three%20tests%20available.%3Cbr%20/%3E%3Cbr%20/%3EThis%20is%20the%20my%20first%20torrent%20test%20result,%20you%20can%20locate%20any%20other%20diagnoses%20you%20want%20from%20the%20Measurementlab.net.%3Cbr%20/%3E%3Cbr%20/%3E%3Ca%20href%3D%22https://blogger.googleusercontent.com/img/b/R29vZ2xl/AVvXsEh5FR3kejVTIu3s0zms6uNP_6VPpmDcnkazadbbw3f8IAOT8JwuY5CsLiWIBBKSgj3Apk1ZEXIFH5oVs2WyfPK85OOAckqdWutBlOBr19kDhElI81QMcJ17WxEO__DEntr6BDnfBOz-utQ/s1600/Untitled2.jpg%22%3E%3Cimg%20style%3D%22display:%20block;%20margin:%200px%20auto%2010px;%20text-align:%20center;%20cursor:%20pointer;%20width:%20400px;%20height:%20218px;%22%20src%3D%22https://blogger.googleusercontent.com/img/b/R29vZ2xl/AVvXsEh5FR3kejVTIu3s0zms6uNP_6VPpmDcnkazadbbw3f8IAOT8JwuY5CsLiWIBBKSgj3Apk1ZEXIFH5oVs2WyfPK85OOAckqdWutBlOBr19kDhElI81QMcJ17WxEO__DEntr6BDnfBOz-utQ/s400/Untitled2.jpg%22%20alt%3D%22%22%20id%3D%22BLOGGER_PHOTO_ID_5516281381245422722%22%20border%3D%220%22%20/%3E%3C/a%3E%3Cbr%20/%3E%3Cspan%3EQuestion%203%3C/span%3E:Bad%20ISP?%3Cbr%20/%3E%3Cbr%20/%3E%3Ca%20href%3D%22http://wiki.vuze.com/w/Bad_ISPs%23Malaysia%22%3EBad%20ISP%3C/a%3E%3Ca%20href%3D%22http://wiki.vuze.com/w/Bad_ISPs%23Malaysia%22%3Es%3C/a%3E%3Cbr%20/%3E%3Cbr%20/%3E%22The%20following%20is%20a%20list%20of%20%3Cspan%3Einternet%20service%20provider%3C/span%3E%3Cspan%3E%20(IS%3C/span%3E%3Cspan%3EPs)%3C/span%3E%20that%20are%20known%20to%20cause%20trouble%20for%20%3Cspan%3Ebit%20torren%3C/span%3Et%20%20clients%20or%20other%20%3Cspan%3EP2P%3C/span%3E%20clients%20and%20the%20reason%20why.%20If%20you%20are%20using%20one%20%20of%20the%20following%20ISPs,%20please%20consider%20finding%20a%20new,%20better%20one.%20If%20%20your%20ISP%20is%20not%20on%20the%20list%20and%20you%20have%20reason%20to%20believe%20they%20are%20%20shaping%20traffic%22%3Cbr%20/%3E%3Cbr%20/%3E%3Cspan%3Esource%20Wiki.Vuze%3C/span%3E%3Cbr%20/%3E%3Cbr%20/%3E%3Ca%20href%3D%22https://blogger.googleusercontent.com/img/b/R29vZ2xl/AVvXsEhSDkdXjJ2rmmlrQGQXUZrLtSz3XSU2RDUekfgdRKhGzWLkdAgYpu2iqZhq_Ohd1pEaNg8vQj7WeUk4h54qDfJCXScFkdYYGnmGLM_0c8dI3cU9zpfXeqnpml8VLrnMueQ8QYRfpcyVF3I/s1600/Untitled2.jpg%22%3E%3Cimg%20style%3D%22display:%20block;%20margin:%200px%20auto%2010px;%20text-align:%20center;%20cursor:%20pointer;%20width:%20400px;%20height:%2055px;%22%20src%3D%22https://blogger.googleusercontent.com/img/b/R29vZ2xl/AVvXsEhSDkdXjJ2rmmlrQGQXUZrLtSz3XSU2RDUekfgdRKhGzWLkdAgYpu2iqZhq_Ohd1pEaNg8vQj7WeUk4h54qDfJCXScFkdYYGnmGLM_0c8dI3cU9zpfXeqnpml8VLrnMueQ8QYRfpcyVF3I/s400/Untitled2.jpg%22%20alt%3D%22%22%20id%3D%22BLOGGER_PHOTO_ID_5516285558263685282%22%20border%3D%220%22%20/%3E%3C/a%3E%3Cbr%20/%3E%3Cbr%20/%3E%3Cspan%3EQuestion%204%3C/span%3E:%20Ranking%EF%BC%9F%3Cbr%20/%3E%3Cbr%20/%3E%3Cspan%3E%3Ca%20href%3D%22https://blogger.googleusercontent.com/img/b/R29vZ2xl/AVvXsEg0dgK8xB2BwwYU0Rqzk31L3M-6wiqq3YAe6itAHr9ctTMNiYpCK60KP0cylH_rdATlaQIrAIPZUVofETrWhH41umX5VE4Sja9qSy9uFFgC7CnrL93x-DRXjGY3CJt-2uKMdAT05amnyOI/s1600/Untitled.jpg%22%3E%3Cimg%20style%3D%22display:%20block;%20margin:%200px%20auto%2010px;%20text-align:%20center;%20cursor:%20pointer;%20width:%20400px;%20height:%20299px;%22%20src%3D%22https://blogger.googleusercontent.com/img/b/R29vZ2xl/AVvXsEg0dgK8xB2BwwYU0Rqzk31L3M-6wiqq3YAe6itAHr9ctTMNiYpCK60KP0cylH_rdATlaQIrAIPZUVofETrWhH41umX5VE4Sja9qSy9uFFgC7CnrL93x-DRXjGY3CJt-2uKMdAT05amnyOI/s400/Untitled.jpg%22%20alt%3D%22%22%20id%3D%22BLOGGER_PHOTO_ID_5516281865015631522%22%20border%3D%220%22%20/%3E%3C/a%3E%3C/span%3E)
Nike.com.my contain TROJAN 27 Jul 2010 6:19 PM (14 years ago)
 I was found something interesting as title, recently i feel free to get myself to shop around online and looking something new ( i have no time to shop) this is the only way for me to shop, what a pitiful. Anyway, i am looking a NIKE sport wear, this will going to replace my old/spoiled sport shoe! today is a right time to shop around and look around the NIKE stores online!
WHAT? once i accessing the page! this is what i found from NIKE.com.my! fed up~
the Anti virus was blocked the access and also displaying a message to inform the trojan is trying to attack my computer! i think NIKE should take note of this >_<
THANKS to my anti virus done a great job!
%20this%20is%20the%20only%20way%20for%20me%20to%20shop,%20what%20a%20pitiful.%20Anyway,%20i%20am%20looking%20a%20NIKE%20sport%20wear,%20this%20will%20going%20to%20replace%20my%20old/spoiled%20sport%20shoe!%20today%20is%20a%20right%20time%20to%20shop%20around%20and%20look%20around%20the%20NIKE%20stores%20online!%3Cbr%20/%3E%3Cbr%20/%3EWHAT?%20once%20i%20accessing%20the%20page!%20this%20is%20what%20i%20found%20from%20NIKE.com.my!%20fed%20up~%3Cbr%20/%3E%3Cbr%20/%3E%3Ca%20href%3D%22https://blogger.googleusercontent.com/img/b/R29vZ2xl/AVvXsEjCAfStLRpvpgU5TM1f_RMTYV04hMc3OJAP_UOOONyOrsDRvLhCig8hURag0II7NMhWcOSLNCtfEZb619kx783Dji3IYd2h-o7id53IAO5hnfGPsJoWzDrl2rd5cdgvHs4fXwQvrLerUpE/s1600/Nike.JPG%22%3E%3Cimg%20style%3D%22display:%20block;%20margin:%200px%20auto%2010px;%20text-align:%20center;%20cursor:%20pointer;%20width:%20400px;%20height:%20300px;%22%20src%3D%22https://blogger.googleusercontent.com/img/b/R29vZ2xl/AVvXsEjCAfStLRpvpgU5TM1f_RMTYV04hMc3OJAP_UOOONyOrsDRvLhCig8hURag0II7NMhWcOSLNCtfEZb619kx783Dji3IYd2h-o7id53IAO5hnfGPsJoWzDrl2rd5cdgvHs4fXwQvrLerUpE/s400/Nike.JPG%22%20alt%3D%22%22%20id%3D%22BLOGGER_PHOTO_ID_5498775453857687762%22%20border%3D%220%22%20/%3E%3C/a%3E%3Cbr%20/%3Ethe%20Anti%20virus%20was%20blocked%20the%20access%20and%20also%20displaying%20a%20message%20to%20inform%20the%20trojan%20is%20trying%20to%20attack%20my%20computer!%20i%20think%20NIKE%20should%20take%20note%20of%20this%20%3E_%3C%3Cbr%20/%3E%3Cbr%20/%3ETHANKS%20to%20my%20anti%20virus%20done%20a%20great%20job!)
MAKE UP is powerful than photoshop!? 2 Jul 2010 8:53 PM (14 years ago)
Recent i just linked a video clip from facebook and i realized it's meaningful and it also relate to photoshop too.Well, I'm a boy doesn't know about makeup and cosmetics...I just love to watch a girl makeup. WHY? am i abnormal?! NOPE!
Makeup just like photoshop , it will goes to every layer and step to reach the final result.Different make up will get in different result. I just feel it's amazing and awesome! Let me analyze what i am unable to do it in photoshop BUT makeup DO!
let watch this before continue...
photoshop able to edit easily in:
1. remove the acne, wrinkles, spots and etc....
2. Turn to fair skin and look layered.
3. Brightness, contrast and saturation adjustment
4. Face adjustment example chin, nose and etc....
BUT
1. The most important part of the Makeup is the eyes LIKE drawing eyes line,eyelashes and etc
BUT i have no ideas to do it by using photoshop after i had watched the video clip!
The only 1 weakness and also the important weakness. Maybe it able to do it by photoshop and maybe not? Anyway! HONOR goes to makeup! =)
I'm back! 2 Jul 2010 2:18 AM (14 years ago)
I've been away for a month (and sometimes a bit lazy) i cannot lay my blog down and leave. Therefore! today i going to update my blog and revive it again! SORRY guys!
Do you ever watch the titanic film on 1997? i think everyone should know the film right?....
I'm looking some "love song"on youtube today (i'm looking some of the sentimental songs to play during the night) and i found the song "My heart will go on" by Celine Dion.
That is not the exact video playing on the youtube instead of those pictures combining all in together to form a video. all these pictures are black and white, and it reminded me the historical of titanic!
i finally i look at this picture and i feel surprise! HOW BIG is the TITANIC!

I think no one will know the mysterious of Titanic except the one ever read through the history of Titanic....
anyway! If you are interested to know more about Titanic click here
%20i%20cannot%20lay%20my%20blog%20down%20and%20leave.%20Therefore!%20today%20i%20going%20to%20update%20my%20blog%20and%20revive%20it%20again!%20SORRY%20guys!%3Cbr%20/%3E%3Cbr%20/%3EDo%20you%20ever%20watch%20the%20titanic%20film%20on%201997?%20i%20think%20everyone%20should%20know%20the%20film%20right?....%3Cbr%20/%3EI'm%20looking%20some%20%22love%20song%22on%20youtube%20today%20(i'm%20looking%20some%20of%20the%20sentimental%20songs%20to%20play%20during%20the%20night)%20and%20i%20found%20the%20song%20%22My%20heart%20will%20go%20on%22%20by%20Celine%20Dion.%3Cbr%20/%3E%3Cbr%20/%3EThat%20is%20not%20the%20exact%20video%20playing%20on%20the%20youtube%20instead%20of%20those%20pictures%20combining%20all%20in%20together%20to%20form%20a%20video.%20all%20these%20pictures%20are%20black%20and%20white,%20and%20it%20reminded%20me%20the%20historical%20of%20titanic!%3Cbr%20/%3E%3Cbr%20/%3Ei%20finally%20i%20look%20at%20this%20picture%20and%20i%20feel%20surprise!%20HOW%20BIG%20is%20the%20TITANIC!%3Cbr%20/%3E%3Cbr%20/%3E%3Cdiv%3E%3Ca%20href%3D%22http://upload.wikimedia.org/wikipedia/commons/a/ac/En_size_titanic.svg%22%3E%3Cimg%20style%3D%22width:%20468px;%20height:%20150px;%22%20alt%3D%22File:En%20size%20titanic.svg%22%20src%3D%22http://upload.wikimedia.org/wikipedia/commons/thumb/a/ac/En_size_titanic.svg/800px-En_size_titanic.svg.png%22%20/%3E%3C/a%3E%3Cbr%20/%3E%3Cbr%20/%3E%3Cdiv%3E%3Cspan%3E%3Cspan%20title%3D%22%22%3EThe%20ship%20can%20%20accommodate%203%20Airbus%EF%BC%81Amazing!%3Cbr%20/%3EI%20think%20%3C/span%3E%3C/span%3E%3Cspan%3E%3Cspan%20title%3D%22%22%3Eno%20one%20will%20know%20the%20%20mysterious%3C/span%3E%3C/span%3E%20of%20Titanic%20except%20the%20one%20ever%20read%20through%20the%20history%20of%20Titanic....%3Cbr%20/%3E%3Cspan%3E%3Cspan%20title%3D%22%22%3E%3Cbr%20/%3Eanyway!%20%3C/span%3E%3C/span%3E%3Cspan%3E%3Cspan%20title%3D%22%22%3EIf%20you%20are%20interested%20%20to%20know%20more%20about%20Titanic%20%3Ca%20href%3D%22http://kenzo-nameless.blogspot.com/If%2520you%2520are%2520interested%2520to%2520know%2520more%2520about%22%3E%3Cspan%3Eclick%20here%3C/span%3E%3C/a%3E%3C/span%3E%3C/span%3E%3C/div%3E%3C/div%3E)
Cover Story: Road tax 29 May 2010 11:33 PM (14 years ago)
you all must be curious what actually the prices of road tax for the sport cars like Ferrari, Lamborghini, Aston Martin and etc! All these cars are the rich man's toys! Besides we rarely saw these cars on the street in Malaysia. so here i post so of the photos and let's you guys have a look!
Note: the resources are from Google


Lamborghini Murchielago LP-640
")

RM30,391? =_=" per year?

Porsche Panamera!
%22%20src%3D%22http://kereta.info/wp-content/uploads/2010/01/Lamborghini-Murcielago-LP-640-2-400x300.jpg%22%20alt%3D%22%22%20width%3D%22400%22%20height%3D%22300%22%20/%3E%3C/p%3ELamborghini%20Murchielago%20worth%20RM17,862%3Cbr%20/%3E%3Cbr%20/%3E%3Cdiv%3E%3Cimg%20style%3D%22width:%20413px;%20height:%20309px;%22%20src%3D%22http://i671.photobucket.com/albums/vv71/e_one_01/24826_356811592168_724127168_361746.jpg%22%20alt%3D%22%22%20onload%3D%22NcodeImageResizer.createOn(this);%22%20border%3D%220%22%20/%3E%3Cbr%20/%3E%3Cbr%20/%3ERM30,391?%20%3D_%3D%22%20per%20year?%3Cbr%20/%3E%3C/div%3E%3Cbr%20/%3E%3Cdiv%3E%3Cimg%20style%3D%22width:%20447px;%20height:%20335px;%22%20src%3D%22http://i671.photobucket.com/albums/vv71/e_one_01/24826_356810737168_724127168_361746.jpg%22%20alt%3D%22%22%20onload%3D%22NcodeImageResizer.createOn(this);%22%20border%3D%220%22%20/%3E%3Cbr%20/%3E%3Cbr%20/%3EPorsche%20Panamera!%3Cbr%20/%3E%3Cbr%20/%3E%3Cdiv%3EWhy%20this%20road%20tax%20is%20much%20costly%20than%20the%20previous%20two%20models%20and%20it%20is%20only%204.8L%20compare%20the%20Ferrari%20is%204.3L%20and%20Lamborghini?%20Because%20this%20car%20is%20registered%20by%20company's%20instead%20of%20personal's%20name.%20By%20the%20way,%20if%20this%20car%20is%20registered%20by%20personal's%20name%20is%20RM10,257%20%3D)%3Cbr%20/%3E%3C/div%3E%3C/div%3E)
Amber Chia's first exclusive foetal ultrasound VIDEO! 27 May 2010 9:11 PM (14 years ago)
 The Amber Chia's first exclusive foetal untrasound PICTURES released by ohmyWTF!
so credit goes to ohmywtf! By the way! This time i'm going to release the VIDEO (Top secret)
see what had the part 1 of ohmywtf posted previously!!!
 Seriously~ this is a little bit too much but i still like it so much! haha
Many thanks to Ohmywtf!
The baby is so adorable! wonder this baby is guy/girl? i can 100% say it's a guy! This is the EXCLUSIVE video to you guys!
%3Cbr%20/%3E%3Cbr%20/%3Esee%20what%20had%20the%20part%201%20of%20%3Cspan%3Eohmywtf%3C/span%3E%20posted%20previously!!!%3Cbr%20/%3E%3Cbr%20/%3E%3Ca%20href%3D%22https://blogger.googleusercontent.com/img/b/R29vZ2xl/AVvXsEiAxiXWf0MJGghHijIidItsncJzGY9QGROacqbzzR_lYb3yks8TaFv40WlLxmZf1Yf7DUzlFUXa-9MIPFxkvJOGnmFQoiSHxK5F9MCojbMaj8oAiuMNSfRF8rSipURgWI8plIYJSuSESts/s1600/thumbs+up.jpg%22%3E%3Cimg%20style%3D%22display:%20block;%20margin:%200px%20auto%2010px;%20text-align:%20center;%20cursor:%20pointer;%20width:%20400px;%20height:%20263px;%22%20src%3D%22https://blogger.googleusercontent.com/img/b/R29vZ2xl/AVvXsEiAxiXWf0MJGghHijIidItsncJzGY9QGROacqbzzR_lYb3yks8TaFv40WlLxmZf1Yf7DUzlFUXa-9MIPFxkvJOGnmFQoiSHxK5F9MCojbMaj8oAiuMNSfRF8rSipURgWI8plIYJSuSESts/s400/thumbs+up.jpg%22%20alt%3D%22%22%20id%3D%22BLOGGER_PHOTO_ID_5474320808512668066%22%20border%3D%220%22%20/%3E%3C/a%3E%3Cbr%20/%3E%3Ca%20href%3D%22https://blogger.googleusercontent.com/img/b/R29vZ2xl/AVvXsEhRUvQWFD_tgAckzT9oHR8wLsBez15eSlxYy-jPhK8OB5DgMhhOA73sW9ADryaHyby9PdMUNjzTkexB4ZJXOL8_Ugr9V97t3ElkzEvpsJMdFQZnWOxRhDKWTdIb0AATfyDbF_3RppVE7jI/s1600/victory.jpg%22%3E%3Cimg%20style%3D%22display:%20block;%20margin:%200px%20auto%2010px;%20text-align:%20center;%20cursor:%20pointer;%20width:%20400px;%20height:%20263px;%22%20src%3D%22https://blogger.googleusercontent.com/img/b/R29vZ2xl/AVvXsEhRUvQWFD_tgAckzT9oHR8wLsBez15eSlxYy-jPhK8OB5DgMhhOA73sW9ADryaHyby9PdMUNjzTkexB4ZJXOL8_Ugr9V97t3ElkzEvpsJMdFQZnWOxRhDKWTdIb0AATfyDbF_3RppVE7jI/s400/victory.jpg%22%20alt%3D%22%22%20id%3D%22BLOGGER_PHOTO_ID_5474320623095821554%22%20border%3D%220%22%20/%3E%3C/a%3ESeriously~%20%20this%20is%20a%20little%20bit%20too%20much%20but%20i%20still%20like%20it%20so%20much!%20haha%3Cbr%20/%3E%3Cbr%20/%3E%3Ca%20href%3D%22https://blogger.googleusercontent.com/img/b/R29vZ2xl/AVvXsEgtpJnHjU9DVhZhcYrf6UD5V4b6PTqgq6Bkqx0VqWsbCLbJkbjSYJAkwZLAmpXh4O_On7SNLySYcX44sreMytnb0hfTxTbf1UyJK5thQ_aDDGzmS-kfc9W51NIoXicW1ThpPmaV_g_T2yw/s1600/middle+finger+up.jpg%22%3E%3Cimg%20style%3D%22display:%20block;%20margin:%200px%20auto%2010px;%20text-align:%20center;%20cursor:%20pointer;%20width:%20400px;%20height:%20263px;%22%20src%3D%22https://blogger.googleusercontent.com/img/b/R29vZ2xl/AVvXsEgtpJnHjU9DVhZhcYrf6UD5V4b6PTqgq6Bkqx0VqWsbCLbJkbjSYJAkwZLAmpXh4O_On7SNLySYcX44sreMytnb0hfTxTbf1UyJK5thQ_aDDGzmS-kfc9W51NIoXicW1ThpPmaV_g_T2yw/s400/middle+finger+up.jpg%22%20alt%3D%22%22%20id%3D%22BLOGGER_PHOTO_ID_5474320920652910034%22%20border%3D%220%22%20/%3E%3C/a%3E%3Cbr%20/%3EMany%20%20thanks%20to%20%3Cspan%3EOhmywtf%3C/span%3E!%3Cbr%20/%3E%3Cbr%20/%3EThe%20%20baby%20is%20so%20adorable!%20wonder%20this%20baby%20is%20guy/girl?%20i%20can%20100%25%20say%20it's%20a%20%20guy!%20This%20is%20the%20EXCLUSIVE%20video%20to%20you%20guys!%3Cbr%20/%3E%3Cbr%20/%3E%3Cdiv%3E%3Cbr%20/%3E%3C/div%3E)
Yutorial: Worn, Torn Photo Edges Effect In Photoshop 26 May 2010 7:35 PM (14 years ago)
Step 1: Duplicate The Background Layer
With our image newly opened in Photoshop, let's begin by duplicating the Background layer. Go up to the Layer menu in the Menu Bar at the top of the screen, choose New, and then choose Layer via Copy. Or, for a faster way to duplicate a layer, press the keyboard shortcut Ctrl+J (Win) / Command+J (Mac):

If we look in the Layers panel, we can see that our document now contains two layers. The original Background layer sits on the bottom, while our newly added copy of the Background layer, which Photoshop has automatically named "Layer 1", sits above it:

Step 2: Add Extra Canvas Space
Let's give ourselves a bit more room to work by adding a little extra canvas space around the image. Go up to the Image menu at the top of the screen and choose Canvas Size:

This brings up Photoshop's Canvas Size dialog box. I'm going to add an extra 100 pixels around the image by entering 100 for both the Width and Height options in the center of the dialog box and making sure the measurement type is set to pixels for both. Also make sure the Relative option is checked so the extra space is added to the existing canvas, otherwise we'll be changing the canvas size to 100 x 100 pixels, which isn't what we want. Click the center square in the Anchor grid so that the extra space is added evenly around all edges of the canvas:

Click OK when you're done to exit out of the Canvas Size dialog box. If we look at the image in the document window, we can see that we now have extra space around the image. We'll be trimming away the extra space when we're finished creating the torn edges effect. This is simply to give us some extra room to work with the Eraser Tool, which we'll be using in a moment:

Step 3: Add A New Blank Layer Between The Two Existing Layers
With "Layer 1" selected in the Layers panel (it should be highlighted in blue), hold down your Ctrl (Win) / Command (Mac) key and click on the New Layer icon at the bottom of the Layers panel:
Normally, Photoshop adds new layers directly above the currently selected layer, but by holding down the Ctrl / Command key as we click on the New Layer icon, we tell Photoshop to add the new layer below the selected layer. We now have a new blank layer named "Layer 2" sitting between the Background layer and "Layer 1".

Step 4: Fill The New Layer With White
Go up to the Edit menu at the top of the screen and choose Fill:

This brings up Photoshop's Fill dialog box, which we can use to fill a layer or a selection with color. Choose White for the Use option in the Contents section at the top of the dialog box:

Click OK when you're done to exit out of the dialog box. Photoshop fills the new layer with white, although we can't actually see it in the document window since the image on "Layer 1" above it is blocking the new layer from view. However, if we look at the layer preview thumbnail for "Layer 2" in the Layers panel, we can see that the thumbnail is now filled with white, which tells us that the layer itself is filled with white:

We're ready to begin creating the torn edges effect with the Eraser Tool. We'll do that next!
Step 5: Select "Layer 1"
We're ready to begin creating the torn edges effect, but first, we need to make sure we're working on the correct layer. At the moment, we have "Layer 2" selected, which we know because "Layer 2" is highlighted in blue in the Layers panel. We need to be working on the image on "Layer 1", so click on "Layer 1" to make it the currently active layer:

Step 6: Select The Eraser Tool
Select Photoshop's Eraser Tool from the Tools panel. You can also quickly select the Eraser Tool by pressing the letter E on your keyboard:

Step 7: Select The 100 Rough Round Bristle Brush
We can use any of Photoshop's brushes with the Eraser Tool, just as we could if we were using the actual Brush Tool. Click on the Brushes panel toggle icon in the Options Bar at the top of the screen:
This opens the Brushes panel. Click on the menu icon in the top right corner of the Brushes panel to bring up a list of menu options for the panel. I'm using Photoshop CS4 here. In earlier versions of Photoshop, the menu icon looks like a small arrow. When the menu appears, select Large List:

This changes how the brushes are displayed in the Brushes panel, making it easier to see exactly which brush we're selecting. With the brushes now displayed in the Large List format, scroll down to the bottom of the list and click on the 100 Rough Round Bristle brush to select it:

If you want to switch back to the way the brushes were displayed originally, click on the Brushes panel's menu icon and select Small Thumbnail from the list.
Click again on the Brushes panel toggle icon in the Options Bar once you've chosen the brush to close out of the Brushes panel.
Step 8: Erase Around The Edges Of The Image
Let's begin by creating our initial torn edges effect along the left side of the image. I say "initial" because once we've worked our way around the entire image once, we're going to go back around a second time, but we'll get to that later. Position the Eraser Tool so that it's in the top left corner of the document with only about 25-30% of the brush extending in to the image. The rest of the brush should be outside of the image in the white space we added back in the beginning of the tutorial. Click once, then with your mouse button still held down, drag a short brush stroke down along the upper left edge of the image. You'll see sections of the edge being erased away as you drag, creating the beginning of our torn edges effect:

As we can see in the screenshot above, the initial brush stroke didn't completely remove the initial straight edge. There's still a faint part of it visible, and that's due to the shape of the bristle brush we're using. You'll probably need to go back over the same area two or three times before the straight edge is completely gone.
Continue working your way down the left side of the image by clicking and dragging out short brush strokes, always keeping 70-75% of the brush shape outside of the image in the white area so we don't erase too much of the edge. If you make a mistake and need to undo your last brush stroke, press Ctrl+Z (Win) / Command+Z (Mac) to undo it, or press Ctrl+Alt+Z (Win) / Command+Option+Z (Mac) repeatedly to undo multiple brush strokes:

If you find that the default brush size is too large for your image, you can change the size of the brush on the fly with the left and right bracket keys. Press the left bracket key ( [ ) to make the brush smaller, or press the right bracket key ( ] ) to make it larger.
Once you reach the bottom left corner of the photo, continue moving around the rest of the image until you're back in the top left corner where you began. When you're done, your edges should look something like this:

Step 9: Duplicate The Layer
Now that we have our initial torn edges effect, we need to make a copy of the layer. With "Layer 1" selected in the Layers panel, press Ctrl+J (Win) / Command+J (Mac) to quickly duplicate it. We now have a copy of the layer, which Photoshop has appropriately named "Layer 1 copy", at the top of the Layers panel. Normally, we should be renaming layers to avoid seeing names like "Layer 1 copy", but since this effect is fairly simple and we have all the layers we need at this point, we'll leave them with their default names to save time:

Step 10: Turn The Top Layer Off
Click on the top layer's visibility icon (also known as the "eyeball") to temporarily turn the layer off and hide it from view in the document window so we can see the original "Layer 1" below it:
Step 11: Select "Layer 1"
With the top layer now hidden from view temporarily, click once again on "Layer 1" in the Layers panel to select it:

Step 12: Add A Color Overlay Layer Style
With "Layer 1" selected, click on the Layer Styles icon at the bottom of the Layers panel and choose Color Overlay from the list that appears:

This brings up Photoshop's Layer Style dialog box set to the Color Overlay options in the middle column. By default, Photoshop sets the color of the overlay to red, and your photo will suddenly be filled with red in the document window. To change the color, click on the color swatch:

Photoshop's Color Picker will appear. Choose a light gray from the Color Picker, then click OK to exit out of it. Your photo should now be filled with light gray in the document window:

Step 13: Add An Inner Glow Layer Style
Don't close out of the Layer Style dialog box just yet. We still have a couple more layer styles to add. Click directly on the words Inner Glow on the left side of the dialog box. Don't simply click inside the checkbox to the left of the words. We need to click directly on the words themselves to access the options for the Inner Glow style:

The Inner Glow options now appear in the center of the Layer Style dialog box. Even though the name of the style is Inner Glow, we're going to change the glow to a shadow so we can use it to darken the edges around the photo a little bit.
First, to change the style from a glow to a shadow, change the Blend Mode option at the top of the dialog box from Screen to Multiply. Then click on the small color swatch directly below the word "Noise" to change the color of the style. By default, it's set to yellow. When you click on the color swatch, Photoshop's Color Picker will appear, just as it did when we changed the color of the Color Overlay style a moment ago. Select black from the Color Picker, then click OK to exit out of it.
Lower the Opacity down to around 10% so the shadow is very subtle. Finally, increase the Size of the shadow to around 24 px (pixels):

Your image should now look similar to this:

Step 14: Add A Drop Shadow
Click directly on the words Drop Shadow at the top of the list of layer styles on the left of the dialog box. Again, we need to click directly on the words themselves to access the options for the Drop Shadow:

The Drop Shadow options will appear in the center column of the Layer Style dialog box. Lower the Opacity of the shadow down to around 30% so it's much less intense than it is with the default opacity setting of 75%. Then set the Angle of the shadow to 120° if it isn't set to that already:

Click OK when you're done to exit out of the Layer Style dialog box. Here's my image after applying the drop shadow:

Step 15: Select The Top Layer And Turn It Back On
Click on the top layer in the Layers panel ("Layer 1 copy") to select it, then click on the layer visibility icon on the left of the layer to turn the layer back on so it's visible again inside the document window. The photo will once again appear and will block the gray-filled image that we were just working on from view:

Step 16: Erase Parts Of The Edges On The Top Layer To Reveal The Layer Below
With the top layer selected, go back around the edges of the image with the Eraser Tool using short brush strokes, just as we did initially on "Layer 1", to remove more of the edge. Remember to keep most of the brush shape outside of the image so that no more than 25-30% of it extends into the image. As parts of the edge are erased, the light gray image below it is revealed, creating the illusion that the photo itself has worn off around the edges and only the back layer of the paper remains:

Again, you can change the size of the brush if needed by pressing the left bracket key ( [ ) to make it smaller or the right bracket key ( ] ) to make it larger. If you make a mistake, press Ctrl+Z (Win) / Command+Z (Mac) to undo the last area you erased, or press Ctrl+Alt+Z (Win) / Command+Option+Z (Mac) to undo multiple brush strokes.
Here, after working my way around the edges of the photo once again, is my final "worn, torn photo edges" effect:

Step 17: Trim Away The Extra Canvas Space (Optional)
If you want to remove the extra canvas space we added earlier, go up to the Image menu at the top of the screen and choose Trim:

This brings up the Trim dialog box. Select the Top Left Pixel Color option. Since the pixel in the top left corner of the document is white, Photoshop will trim away all of the white area around the image. Make sure the Top, Bottom, Left, and Right options are selected in the bottom half of the dialog box, then click OK to exit out of it, at which point Photoshop will trim away the extra canvas space we added:

And there we have it!
Cover story: 15 Things You Didn’t Know About Steve Jobs 22 May 2010 8:00 PM (14 years ago)

Source: OnlineSchools.org

tutorial: Worn, Torn Photo Edges Effect In Photoshop preview 21 May 2010 8:15 PM (14 years ago)
Good news! currently i just saw lot of plain uploaded photos on everywhere. so planned to make a tutorial that able to make your photos look interesting. So here's the torn edges effect we'll be creating:

Harley Davidson 19 May 2010 6:39 PM (14 years ago)
 I believe no one will not know the name of "Harley Davidson". It is a super bike maker from US.
Is That a ghost rider?
However,this bike is awarded by "America chopper" and it costed RM300K and above! let me show you....
I'm proud-ed of my friend, because he is the part of the design on this bike!
Does this bike cool for you?


Tutorial: A recovery 14 May 2010 2:44 AM (14 years ago)

 As a lost of cause significant loss of wrong. It is my unlucky day....So i want this experience into a lesson and will named it as "Recovery".
When all your data and your favorite pictures disappear in the moment is very painful. so i would like to make a tutorial based on my true experience. Hope it helps the needy.
This will occur in each of us,is that when you remove your data and pictures accidentally from your hard drive. so here we go and recover all the information step by step. =)
Do you guys see the small little icon shown in the left corner on the top there? This is the one of my favorite recovery software.Before i am going to enter the tutorial, i will briefly explain some recovery software which included freeware and shareware (Purchase).
For freeware you can get it easily get it from download.com

download.com is a famous and biggest download site, it will redirect to the specify mirrors and start downloading. So that it can be more concentrated, the user can easily found the software they want.
from the picture shown in the bottom here, you can see a red triangle box out there. It lets you choose the license type you want.

In my bad day, i had tried out 2 shareware and some of the freeware. I will put aside the freeware and start explaining these 2 softwares.


The O&O SOFTWARE
You can choose either one to recovery back your hard drive.For features, i would said O&O is much more powerful than Easeus and it cost higher than Easeus as well.
What i like about Easeus is because it is easy to use.
Okay! first of all, this is what i need you to do before you start your recovery.
1. You need a large partition or external hard drive (It will be large amount of size after recovering)
2. After recovering, DO NOT save the files to the recovery partition or hard drive.
3. Before you going to recover your current hard drive, DO NOT modify any sectors of it ( example copy files on it)
the first look of the EASEUS data recovery wizard

A simple and user friendly interface for EASEUS, there are 3 options.
1. Deleted file recovery
2. Completely Recovery
3. Partition Recovery
# In here we will select the second option which is Completely Recovery.

Select a partition/ hard drive you want to recover, so i will select my D to recover.

Can you see the " Remaining Time"? This will depends on your hard drive size, and mine is 120G. it needs 2:21 to fully recover the whole hard drive. ( Hard drive recovery is a time consuming progress) make sure you do when you are ready for it.
Now i can sit down and have my drink and baoz...hahah =)

Finally! DONE!
You can select the all the files you want to recover back.
GOD BLESS, i had recovered all my data back like old without any corrupted files in it. Hope you get this result too!! ALL THE BEST! =)
# For those who want the software please let me know. Have a nice day =)


Cover Story: ChurpChurp Part2 4 May 2010 11:30 PM (14 years ago)
 I had mentioned about the Churpchurp part one in my previous entries. In part one it just a simple briefing and some Q&A about Churpchurp.If you still don't know about ChurpChurp you can refer back my part one.
Okay guys, what i'm going to talk about in part two? actually not much....i want to share some basic experiences and for those with twitter but yet register with ChurpChurp! so this is the right time and chance to start enjoy this program. Register
At the very begin i'm not really familiar with how ChurpChurp works and not really trusted on it. i had forgotten which day the Nuffnang was introduce ChurpChurp on their site! Since that day i had changed my point of views toward ChurpChurp and start to enjoy the benefit of ChurpChurp right now.
Once you had registered and you will see this pending tweets interface on you dashboard
"Once a advertisement assigned to you, you will see it on your pending tweets. as well as your mailbox.
From now you can start generate you own tweet and submit it to ChurpChurp for approval. Once approved, your tweet will be published to your twitter. Simple and easy right!"
so this is my earning so far..
BUT RM100 to get paid...but it's a good starting! GO GO GO!

Tutorial: HDR effects in 5 easy steps 2 May 2010 10:20 PM (14 years ago)
 High dynamic range imaging (HDR) is a set of techniques that allows a greater dynamic range of exposures (the range of values between light and dark areas) than normal digital imaging techniques. The intention of HDR is to accurately represent the wide range of intensity levels found in real scenes ranging from direct sunlight to shadows. This method was developed to produce a high dynamic range image from a set of photographs taken with a range of exposures.
source: Wikipedia
By right, to create HDR, you need at least 3 different exposures of a same photo, but in this tutorial, I'll be showing you how to create HDR from a single image in just 5 easy steps!
Step 1
First of all, open any photo that you want to convert to HDR. I'll using one of my Butterfly Park Photoshoot photo.
Step 2
go to Image> Adjustments> Shadow/Highlights. Set the "Shadow" and "Highlights" amount to "50%"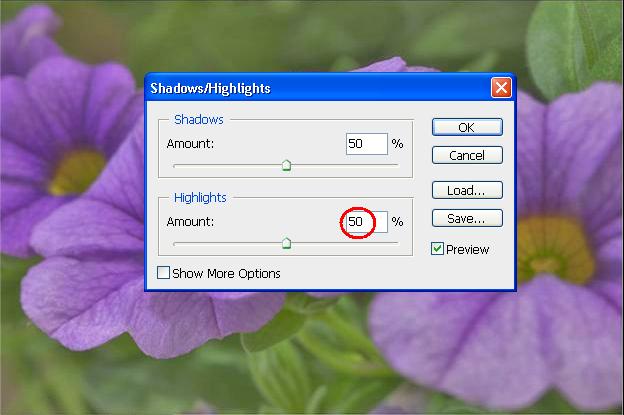
Step 3
Duplicate a new layer and this will be name it.
so in here i named "backgroud copy"
Step 4
Go to Image>Adjustments>Desaturate or (Image>Adjustments>Black&White)
Step 5
After that change the layer blending to "Hard Light".
Final result
Sample
