Shark Pencil Pouches 27 Jun 2017 9:02 AM (7 years ago)
 Hi Everyone! It has been so long since I posted. I hope everyone is doing well (and that someone might still be out there to read this! lol) I thought I would dust off the blog and share some projects I have made lately. Unfortunately for my paper crafting readers, I have not been making anything paper crafting related. I seem to have moved on in my hobbies to sewing and quilting and am absolutely loving it!

I made these little shark pencil pouches for two of my sons' birthdays. They turned out so cute! I used a tutorial found here. They were so much fun to sew! My daughter and my youngest son want one as well. I'm going to have to make some more!

I made this patchwork shark first. I love the look of patchwork. With this pattern, it did make it more difficult assembling the shark because of the additional layers, but it turned out really cute! I used Wishes fabric line from Sweetwater (Moda) for the patchwork fabrics.

After making the patchwork shark, I wanted to make another one without the patchwork to see if it would make it easier to assemble. It made it so much easier! I love patchwork, but I would skip it with this pattern. I used a grey fabric from the Happy Go Lucky line by Bonnie and Camille (Moda).

I used some white thread on the button eyes and love how it makes them look more like eyes. The red fabric and white zippers look great with the mouth as well.

Sorry I don't have any great photos of the pouches. I took these with my phone and they just aren't up to the quality of a dslr camera.
Thanks so much for stopping by!
Niki


%20%26nbsp;I%20thought%20I%20would%20dust%20off%20the%20blog%20and%20share%20some%20projects%20I%20have%20made%20lately.%20%26nbsp;Unfortunately%20for%20my%20paper%20crafting%20readers,%20I%20have%20not%20been%20making%20anything%20paper%20crafting%20related.%20%26nbsp;I%20seem%20to%20have%20moved%20on%20in%20my%20hobbies%20to%20sewing%20and%20quilting%20and%20am%20absolutely%20loving%20it!%3Cbr%20/%3E%0A%3Cbr%20/%3E%0A%3Cdiv%3E%0A%3Ca%20href%3D%22https://blogger.googleusercontent.com/img/b/R29vZ2xl/AVvXsEgNPPSDOdjHRIeQV7_C4Si_XRgfCSccX-uuUNc9ntUerD-RYcMD1fj4Kt1sVtuaxIMaJA1UqI7hFjPtjiZO7TrinUvVwJeZ7IBRKAlRfWl3IV-ynG8wNpSPGS_Kb27DMD555FydUMWTT3Xq/s1600/IMG_20160616_154511.jpg%22%20imageanchor%3D%221%22%3E%3Cimg%20border%3D%220%22%20data-original-height%3D%221018%22%20data-original-width%3D%221000%22%20height%3D%22640%22%20src%3D%22https://blogger.googleusercontent.com/img/b/R29vZ2xl/AVvXsEgNPPSDOdjHRIeQV7_C4Si_XRgfCSccX-uuUNc9ntUerD-RYcMD1fj4Kt1sVtuaxIMaJA1UqI7hFjPtjiZO7TrinUvVwJeZ7IBRKAlRfWl3IV-ynG8wNpSPGS_Kb27DMD555FydUMWTT3Xq/s640/IMG_20160616_154511.jpg%22%20width%3D%22628%22%20/%3E%3C/a%3E%3C/div%3E%0A%3Cbr%20/%3E%0AI%20made%20these%20little%20shark%20pencil%20pouches%20for%20two%20of%20my%20sons'%20birthdays.%20%26nbsp;They%20turned%20out%20so%20cute!%20%26nbsp;I%20used%20a%20tutorial%20found%20%3Ca%20href%3D%22http://www.patchworkposse.com/shark-pencil-case-tutorial/%22%3Ehere%3C/a%3E.%20%26nbsp;They%20were%20so%20much%20fun%20to%20sew!%20%26nbsp;My%20daughter%20and%20my%20youngest%20son%20want%20one%20as%20well.%20%26nbsp;I'm%20going%20to%20have%20to%20make%20some%20more!%3Cbr%20/%3E%0A%3Cbr%20/%3E%0A%3Cdiv%3E%0A%3Ca%20href%3D%22https://blogger.googleusercontent.com/img/b/R29vZ2xl/AVvXsEiqEtibpeZAkkzSTpiZLoEhG90twAzuT718ETd7Tt-zltzutBk2_r7fRe07uB-pIi1J4Jd4jHMicQSuolJEw2cxic0KXRb0-uH_YimwlA0dSpmOJEvfUKuatFiW6gR1jsCQyAeBD4e1NMHZ/s1600/IMG_20160616_110416.jpg%22%20imageanchor%3D%221%22%3E%3Cimg%20border%3D%220%22%20data-original-height%3D%221000%22%20data-original-width%3D%221000%22%20height%3D%22640%22%20src%3D%22https://blogger.googleusercontent.com/img/b/R29vZ2xl/AVvXsEiqEtibpeZAkkzSTpiZLoEhG90twAzuT718ETd7Tt-zltzutBk2_r7fRe07uB-pIi1J4Jd4jHMicQSuolJEw2cxic0KXRb0-uH_YimwlA0dSpmOJEvfUKuatFiW6gR1jsCQyAeBD4e1NMHZ/s640/IMG_20160616_110416.jpg%22%20width%3D%22640%22%20/%3E%3C/a%3E%3C/div%3E%0A%3Cbr%20/%3E%0AI%20made%20this%20patchwork%20shark%20first.%20%26nbsp;I%20love%20the%20look%20of%20patchwork.%20%26nbsp;With%20this%20pattern,%20it%20did%20make%20it%20more%20difficult%20assembling%20the%20shark%20because%20of%20the%20additional%20layers,%20but%20it%20turned%20out%20really%20cute!%20%26nbsp;I%20used%20Wishes%20fabric%20line%20from%20Sweetwater%20(Moda)%20for%20the%20patchwork%20fabrics.%3Cbr%20/%3E%0A%3Cbr%20/%3E%0A%3Cdiv%3E%0A%3Ca%20href%3D%22https://blogger.googleusercontent.com/img/b/R29vZ2xl/AVvXsEiMwZqv9NXJDtn2wDLrGgsMPyns8PmmAc2Z-zDoliTr7xyZZeCuO6Obvsft7NjegUM3QUw2kFqf8oVOHRrEWTWNdxk8JuR2F9cH32UQwFjKyNMz1Ynbc74T85LbPfycfjlOpvXEtUwHeE3J/s1600/IMG_20160616_152434.jpg%22%20imageanchor%3D%221%22%3E%3Cimg%20border%3D%220%22%20data-original-height%3D%22953%22%20data-original-width%3D%221000%22%20height%3D%22608%22%20src%3D%22https://blogger.googleusercontent.com/img/b/R29vZ2xl/AVvXsEiMwZqv9NXJDtn2wDLrGgsMPyns8PmmAc2Z-zDoliTr7xyZZeCuO6Obvsft7NjegUM3QUw2kFqf8oVOHRrEWTWNdxk8JuR2F9cH32UQwFjKyNMz1Ynbc74T85LbPfycfjlOpvXEtUwHeE3J/s640/IMG_20160616_152434.jpg%22%20width%3D%22640%22%20/%3E%3C/a%3E%3C/div%3E%0A%3Cbr%20/%3E%0AAfter%20making%20the%20patchwork%20shark,%20I%20wanted%20to%20make%20another%20one%20without%20the%20patchwork%20to%20see%20if%20it%20would%20make%20it%20easier%20to%20assemble.%20%26nbsp;It%20made%20it%20so%20much%20easier!%20%26nbsp;I%20love%20patchwork,%20but%20I%20would%20skip%20it%20with%20this%20pattern.%20%26nbsp;I%20used%20a%20grey%20fabric%20from%20the%20Happy%20Go%20Lucky%20line%20by%20Bonnie%20and%20Camille%20(Moda).%3Cbr%20/%3E%0A%3Cbr%20/%3E%0A%3Cdiv%3E%0A%3Ca%20href%3D%22https://blogger.googleusercontent.com/img/b/R29vZ2xl/AVvXsEid3UXC3ZZtP7MHzY_JsxjGpI9lIKQe_s7x5yqMd95i8TsR4gn35BWulY1iNx6h1EweFDuvgv_yzRPDW2mE1PEVRWe3_FBZdrTRubN1OLZikcS3hgAnMVrlM57UDESsh_LfAqbvuliwuFLi/s1600/IMG_20160616_153222.jpg%22%20imageanchor%3D%221%22%3E%3Cimg%20border%3D%220%22%20data-original-height%3D%22858%22%20data-original-width%3D%221000%22%20height%3D%22548%22%20src%3D%22https://blogger.googleusercontent.com/img/b/R29vZ2xl/AVvXsEid3UXC3ZZtP7MHzY_JsxjGpI9lIKQe_s7x5yqMd95i8TsR4gn35BWulY1iNx6h1EweFDuvgv_yzRPDW2mE1PEVRWe3_FBZdrTRubN1OLZikcS3hgAnMVrlM57UDESsh_LfAqbvuliwuFLi/s640/IMG_20160616_153222.jpg%22%20width%3D%22640%22%20/%3E%3C/a%3E%3C/div%3E%0A%3Cbr%20/%3E%0AI%20used%20some%20white%20thread%20on%20the%20button%20eyes%20and%20love%20how%20it%20makes%20them%20look%20more%20like%20eyes.%20%26nbsp;The%20red%20fabric%20and%20white%20zippers%20look%20great%20with%20the%20mouth%20as%20well.%3Cbr%20/%3E%0A%3Cbr%20/%3E%0A%3Cdiv%3E%0A%3Ca%20href%3D%22https://blogger.googleusercontent.com/img/b/R29vZ2xl/AVvXsEgc6HZJprIHo-a4C7YlG76PJ_1cByJ4QHXKILBbgKF0FMWbToFHozkQechZ5H-XS09_Fu6Yf3oUrPbkxMXXs-7cxXklHhyphenhyphenAV6awxabYkAFXzl8KFppwuU8LcgCwaGjQluUsWM0cXACpKPbr/s1600/IMG_20160616_155518.jpg%22%20imageanchor%3D%221%22%3E%3Cimg%20border%3D%220%22%20data-original-height%3D%221000%22%20data-original-width%3D%221000%22%20height%3D%22640%22%20src%3D%22https://blogger.googleusercontent.com/img/b/R29vZ2xl/AVvXsEgc6HZJprIHo-a4C7YlG76PJ_1cByJ4QHXKILBbgKF0FMWbToFHozkQechZ5H-XS09_Fu6Yf3oUrPbkxMXXs-7cxXklHhyphenhyphenAV6awxabYkAFXzl8KFppwuU8LcgCwaGjQluUsWM0cXACpKPbr/s640/IMG_20160616_155518.jpg%22%20width%3D%22640%22%20/%3E%3C/a%3E%3C/div%3E%0A%3Cbr%20/%3E%0ASorry%20I%20don't%20have%20any%20great%20photos%20of%20the%20pouches.%20%26nbsp;I%20took%20these%20with%20my%20phone%20and%20they%20just%20aren't%20up%20to%20the%20quality%20of%20a%20dslr%20camera.%3Cbr%20/%3E%0A%3Cbr%20/%3E%0AThanks%20so%20much%20for%20stopping%20by!%3Cbr%20/%3E%0ANiki%3Cbr%20/%3E%0A%3Cbr%20/%3E)


Half Square Triangle Quilt 9 Jun 2016 3:50 PM (8 years ago)


%20%26nbsp;I%20finally%20sewed%20again%20today%20for%20the%20first%20time%20in%20the%20new%20house.%20%26nbsp;My%20son%20requested%20a%20quilt%20for%20his%20birthday%20later%20this%20month.%20%26nbsp;So,%20I'm%20finally%20getting%20back%20to%20it.%20%26nbsp;I've%20really%20missed%20it.%20%26nbsp;I%20love%20seeing%20my%20kids%20curled%20up%20under%20one%20of%20the%20quilts%20I've%20made%20or%20using%20something%20else%20that%20I've%20made%20for%20them.%20%26nbsp;I'm%20not%20sure%20how%20often%20I%20will%20post%20here,%20but%20I%20do%20post%20more%20frequently%20over%20on%20Instagram%20if%20you%20would%20like%20to%20follow%20me%20there.%3C/div%3E%0A%3Cbr%20/%3E%0A%3Cbr%20/%3E%0A%3Cdiv%3E%0A%3Ca%20href%3D%22https://blogger.googleusercontent.com/img/b/R29vZ2xl/AVvXsEiEmZCUYsl7iKwaWSjp4pH_QD5E6qhEEj1jtkzTzLSCkvya43IoKVwT-ed1CAXimQX8LgRuQ-9smuj7rewCvBHNR7rSJT1YpDiJrBmGqWDStAWuSgEcyDZkZEeLQO3To8n69tGNOD8aloVG/s1600/Screenshot_2016-06-09-16-34-43.png%22%20imageanchor%3D%221%22%3E%3Cimg%20border%3D%220%22%20height%3D%22640%22%20src%3D%22https://blogger.googleusercontent.com/img/b/R29vZ2xl/AVvXsEiEmZCUYsl7iKwaWSjp4pH_QD5E6qhEEj1jtkzTzLSCkvya43IoKVwT-ed1CAXimQX8LgRuQ-9smuj7rewCvBHNR7rSJT1YpDiJrBmGqWDStAWuSgEcyDZkZEeLQO3To8n69tGNOD8aloVG/s640/Screenshot_2016-06-09-16-34-43.png%22%20width%3D%22355%22%20/%3E%3C/a%3E%3C/div%3E%0A%3Cdiv%3E%0A%3Ca%20href%3D%22http://www.instagram.com/nikilovestosew/%22%3EClick%20here%3C/a%3E%20to%20go%20to%20my%20page!%3C/div%3E%0A%3Cdiv%3E%0A%3Cbr%20/%3E%3C/div%3E%0A%3Cdiv%3E%0A%3Ca%20href%3D%22https://blogger.googleusercontent.com/img/b/R29vZ2xl/AVvXsEgx4XY05sYqYvrva2E7E4W7mGqPSvH6f-7uMQl2pXbP2eA6-5GHRLSSnNDtc_nJYksF-UwhFt_lKq0SsIqXDLm8csi0OJx_lTcp1Zij9saYJ282mNDSBax2rbRDY3Z6VLiIpbu7qziPiWec/s1600/IMG_20150706_170901.jpg%22%20imageanchor%3D%221%22%3E%3Cimg%20border%3D%220%22%20height%3D%22640%22%20src%3D%22https://blogger.googleusercontent.com/img/b/R29vZ2xl/AVvXsEgx4XY05sYqYvrva2E7E4W7mGqPSvH6f-7uMQl2pXbP2eA6-5GHRLSSnNDtc_nJYksF-UwhFt_lKq0SsIqXDLm8csi0OJx_lTcp1Zij9saYJ282mNDSBax2rbRDY3Z6VLiIpbu7qziPiWec/s640/IMG_20150706_170901.jpg%22%20width%3D%22640%22%20/%3E%3C/a%3E%3C/div%3E%0A%3Cdiv%3E%0A%3Cbr%20/%3E%3C/div%3E%0A%3Cdiv%3E%0AI%20don't%20have%20any%20new%20creations%20to%20share,%20but%20I%20thought%20I%20would%20share%20this%20quilt%20I%20made%20last%20year%20that%20I%20never%20shared%20here.%20%26nbsp;I%20had%20decided%20to%20try%20my%20hand%20at%20half%20square%20triangles%20and%20they%20were%20really%20not%20too%20hard.%20%26nbsp;I%20didn't%20follow%20a%20pattern,%20but%20I%20started%20with%205%20inch%20squares%20and%20after%20sewing%20and%20trimming,%20they%20are%203.5%20inches.%20%26nbsp;(Just%20in%20case%20anyone%20needs%20that...)%3C/div%3E%0A%3Cdiv%3E%0A%3Cbr%20/%3E%3C/div%3E%0A%3Cdiv%3E%0A%3Ca%20href%3D%22https://blogger.googleusercontent.com/img/b/R29vZ2xl/AVvXsEj4DZ_z6FHJo29OaZXVKHB783m1Ge1SniaC76QNi1TSJd4OXEW60nJb3h0EPUrKDWYt0DZ1rbBHSarcqlPqO1cOW4XXhdCPvWNx8URCCbAme4RRoC9kZ7BiWBfjUeagdHewXmpeVNiNXEzf/s1600/IMG_20150706_171104.jpg%22%20imageanchor%3D%221%22%3E%3Cimg%20border%3D%220%22%20height%3D%22640%22%20src%3D%22https://blogger.googleusercontent.com/img/b/R29vZ2xl/AVvXsEj4DZ_z6FHJo29OaZXVKHB783m1Ge1SniaC76QNi1TSJd4OXEW60nJb3h0EPUrKDWYt0DZ1rbBHSarcqlPqO1cOW4XXhdCPvWNx8URCCbAme4RRoC9kZ7BiWBfjUeagdHewXmpeVNiNXEzf/s640/IMG_20150706_171104.jpg%22%20width%3D%22640%22%20/%3E%3C/a%3E%3C/div%3E%0A%3Cdiv%3E%0AI%20used%20some%20older%20fabric%20that%20I%20had%20in%20my%20stash%20from%20Riley%20Blake%20called%20Scoot.%20%26nbsp;%3C/div%3E%0A%3Cdiv%3E%0A%3Cbr%20/%3E%3C/div%3E%0A%3Cdiv%3E%0AI%20have%20been%20debating%20if%20I%20should%20sell%20a%20bunch%20of%20my%20stamps.%20%26nbsp;I'm%20just%20not%20sure%20at%20this%20point%20if%20I%20am%20going%20to%20use%20them%20again.%20%26nbsp;There%20are%20some%20I%20want%20to%20keep,%20but%20some%20I%20know%20I%20won't%20use%20again%20even%20though%20I%20love%20the%20companies.%20%26nbsp;I%20just%20don't%20know%20if%20I%20have%20enough%20readers%20anymore%20(or%20any%20.%20.%20.%20)%20to%20sell%20them%20here%20on%20my%20blog.%20%26nbsp;Anyone%20have%20any%20tips%20they%20want%20to%20share%20if%20you've%20sold%20off%20a%20lot%20of%20paper%20crafting%20stuff?%20%26nbsp;Many%20of%20the%20stamps%20are%20discontinued%20so%20I%20would%20have%20to%20be%20able%20to%20post%20photos%20of%20them%20because%20I%20don't%20remember%20the%20names%20of%20the%20stamps%20anymore.%3C/div%3E%0A%3Cdiv%3E%0A%3Cbr%20/%3E%3C/div%3E%0A%3Cdiv%3E%0AAnyway,%20hope%20everyone%20is%20having%20a%20great%20summer!%20%26nbsp;My%20kiddos%20had%20their%20last%20day%20of%20school%20today!%3C/div%3E%0A%3Cdiv%3E%0ANiki%20:)%3C/div%3E%0A%3Cdiv%3E%0A%3C/div%3E)
One Hour Basket 4 Dec 2015 10:58 AM (9 years ago)
 It's hard to believe how quickly this year has gone by. It seems like my children are growing so quickly. We are busy getting ready to move to a new house and put our house up for sale. (We seem to have a record of only moving when it is snowing and bad weather. What is up with that?!) Anyway, with Christmas quickly approaching and life completely hectic, I have been missing being crafty. Moving all my craft supplies makes me really want to create some me time to get to create again. Maybe someday soon....
Anyway, I thought I would pop back on the blog (in case someone out there still happens to check in) and share some things I created last spring before life got even more in the way. I discovered this wonderful tutorial for creating one hour baskets. They are perfect for storing fabric and so many other things. I created a couple and hope to make more some time.

This was the second basket I made and by far my favorite. (Sorry the photos are not the best. They were all taken with my phone and posted on my Instagram feed.) It features some of my favorite fabrics from designer Atsuko Matsuyama. I designed it using some patchwork squares and some Essex linen. I love how it turned out. If you decide to make a one hour basket and want to use patchwork, here are the dimensions I used. I used 2 1/2 inch squares for my patchwork. Then, I cut the top piece of linen 2 inches by the width in the pattern and the bottom linen 5 inches by the width in the pattern. When sewn together, it leaves you with a 10 1/2 x 16 1/2 inch piece like the pattern calls for. Then I added a piece of batting and scrap fabric behind my patchwork before quilting the squares. I did not quilt through the inner lining.
Hope everyone is having a wonderful holiday season!
Niki
%20%26nbsp;Anyway,%20with%20Christmas%20quickly%20approaching%20and%20life%20completely%20hectic,%20I%20have%20been%20missing%20being%20crafty.%20%26nbsp;Moving%20all%20my%20craft%20supplies%20makes%20me%20really%20want%20to%20create%20some%20me%20time%20to%20get%20to%20create%20again.%20%26nbsp;Maybe%20someday%20soon....%3Cbr%20/%3E%0A%3Cbr%20/%3E%0AAnyway,%20I%20thought%20I%20would%20pop%20back%20on%20the%20blog%20(in%20case%20someone%20out%20there%20still%20happens%20to%20check%20in)%20and%20share%20some%20things%20I%20created%20last%20spring%20before%20life%20got%20even%20more%20in%20the%20way.%20%26nbsp;I%20discovered%20this%20wonderful%20tutorial%20for%20creating%20%3Ca%20href%3D%22http://kelbysews.blogspot.com/2015/03/1-hour-basket-tutorial.html%22%20target%3D%22_blank%22%3Eone%20hour%20baskets%3C/a%3E.%20%26nbsp;They%20are%20perfect%20for%20storing%20fabric%20and%20so%20many%20other%20things.%20%26nbsp;I%20created%20a%20couple%20and%20hope%20to%20make%20more%20some%20time.%3Cbr%20/%3E%0A%3Cbr%20/%3E%0A%3Cdiv%3E%0A%3Ca%20href%3D%22https://blogger.googleusercontent.com/img/b/R29vZ2xl/AVvXsEhw6y9us6viTMhWYpLOdXjj0JrXcLc3iKjAvTRAVhHB8BLk04m2rSHTSn2xiu9X_q4enGBTdgl77sGFiiHkhIUO_8eNm_jSbyLkJdWCJM19LYLxdxzlBamMJOTVzU-rtgH2MIUjoFADEy8P/s1600/409.jpg%22%20imageanchor%3D%221%22%3E%3Cimg%20border%3D%220%22%20height%3D%22640%22%20src%3D%22https://blogger.googleusercontent.com/img/b/R29vZ2xl/AVvXsEhw6y9us6viTMhWYpLOdXjj0JrXcLc3iKjAvTRAVhHB8BLk04m2rSHTSn2xiu9X_q4enGBTdgl77sGFiiHkhIUO_8eNm_jSbyLkJdWCJM19LYLxdxzlBamMJOTVzU-rtgH2MIUjoFADEy8P/s640/409.jpg%22%20width%3D%22640%22%20/%3E%3C/a%3E%3C/div%3E%0A%3Cbr%20/%3E%0AThis%20was%20the%20second%20basket%20I%20made%20and%20by%20far%20my%20favorite.%20%26nbsp;%20(Sorry%20the%20photos%20are%20not%20the%20best.%20%26nbsp;They%20were%20all%20taken%20with%20my%20phone%20and%20posted%20on%26nbsp;%3Ca%20href%3D%22https://instagram.com/happycrafterscottage/%22%20target%3D%22_blank%22%3Emy%20Instagram%20feed%3C/a%3E.)%26nbsp;%26nbsp;%26nbsp;It%20features%20some%20of%20my%20favorite%20fabrics%20from%20designer%20Atsuko%20Matsuyama.%20%26nbsp;I%20designed%20it%20using%20some%20patchwork%20squares%20and%20some%20Essex%20linen.%20%26nbsp;I%20love%20how%20it%20turned%20out.%20%26nbsp;If%20you%20decide%20to%20make%20a%20one%20hour%20basket%20and%20want%20to%20use%20patchwork,%20here%20are%20the%20dimensions%20I%20used.%20%26nbsp;I%20used%202%201/2%20inch%20squares%20for%20my%20patchwork.%20%26nbsp;Then,%20I%20cut%20the%20top%20piece%20of%20linen%202%20inches%20by%20the%20width%20in%20the%20pattern%20and%20the%20bottom%20linen%205%20inches%20by%20the%20width%20in%20the%20pattern.%20%26nbsp;When%20sewn%20together,%20it%20leaves%20you%20with%20a%2010%201/2%20x%2016%201/2%20inch%20piece%20like%20the%20pattern%20calls%20for.%20%26nbsp;Then%20I%20added%20a%20piece%20of%20batting%20and%20scrap%20fabric%20behind%20my%20patchwork%20before%20quilting%20the%20squares.%20%26nbsp;I%20did%20not%20quilt%20through%20the%20inner%20lining.%3Cbr%20/%3E%0A%3Cbr%20/%3E%0AHope%20everyone%20is%20having%20a%20wonderful%20holiday%20season!%3Cbr%20/%3E%0ANiki)
Birthday Gifts 12 May 2015 9:09 AM (9 years ago)


Patchwork Quilt 26 Mar 2015 12:29 PM (10 years ago)


Paper crafters might recognize the fabric. It's October Afternoon's Sidewalk line that was released as fabric through Riley Blake. It's always been a favorite of mine since I love October Afternoon.

I chose a bold fabric (also from the Sidewalks line) for the back of the quilt. I love how it brings out the red in the patchwork.

I decided to use this black fabric for my binding. I'm not sure who makes it. I saw it at my local quilt shop and thought it was perfect to help the colors in the front really stand out.
I haven't been blogging much for quite a while now. It seems I've lost the desire to paper craft much. I am loving sewing and quilting. I think after paper crafting for almost 9 years, it's been fun learning something new. I've even been debating selling a bunch of my stamps. I'm not sure I'm ready yet, though. I love stamps and card making still, but just have not had the desire to do it. Anyway, I do update my Instagram feed now and then if you'd like to follow me over there to see what I'm up to.
Have a great weekend!
Niki
%20for%20the%20back%20of%20the%20quilt.%20%26nbsp;I%20love%20how%20it%20brings%20out%20the%20red%20in%20the%20patchwork.%3Cbr%20/%3E%0A%3Cbr%20/%3E%0A%3Cdiv%3E%0A%3Ca%20href%3D%22https://blogger.googleusercontent.com/img/b/R29vZ2xl/AVvXsEju2jj-JSktXPpzk8wDyGJenSTOuuqk7Ady-XImyMdxYwzq6UW1Gv-aS_k1Nx1JRxrwSqtRKsJyWxDaXTLetdrdi5GBHLkCikfiKr0AZdVYSHNxQ-BzPulKieKEmuVo0R4r0cNmPuUIyKxj/s1600/IMG_1292copy.jpg%22%20imageanchor%3D%221%22%3E%3Cimg%20border%3D%220%22%20height%3D%22426%22%20src%3D%22https://blogger.googleusercontent.com/img/b/R29vZ2xl/AVvXsEju2jj-JSktXPpzk8wDyGJenSTOuuqk7Ady-XImyMdxYwzq6UW1Gv-aS_k1Nx1JRxrwSqtRKsJyWxDaXTLetdrdi5GBHLkCikfiKr0AZdVYSHNxQ-BzPulKieKEmuVo0R4r0cNmPuUIyKxj/s1600/IMG_1292copy.jpg%22%20width%3D%22640%22%20/%3E%3C/a%3E%3C/div%3E%0A%3Cbr%20/%3E%0AI%20decided%20to%20use%20this%20black%20fabric%20for%20my%20binding.%20%26nbsp;I'm%20not%20sure%20who%20makes%20it.%20%26nbsp;I%20saw%20it%20at%20my%20local%20quilt%20shop%20and%20thought%20it%20was%20perfect%20to%20help%20the%20colors%20in%20the%20front%20really%20stand%20out.%3Cbr%20/%3E%0A%3Cbr%20/%3E%0AI%20haven't%20been%20blogging%20much%20for%20quite%20a%20while%20now.%20%26nbsp;It%20seems%20I've%20lost%20the%20desire%20to%20paper%20craft%20much.%20%26nbsp;%20I%20am%20loving%20sewing%20and%20quilting.%20%26nbsp;I%20think%20after%20paper%20crafting%20for%20almost%209%20years,%20it's%20been%20fun%20learning%20something%20new.%20%26nbsp;I've%20even%20been%20debating%20selling%20a%20bunch%20of%20my%20stamps.%20%26nbsp;I'm%20not%20sure%20I'm%20ready%20yet,%20though.%20%26nbsp;I%20love%20stamps%20and%20card%20making%20still,%20but%20just%20have%20not%20had%20the%20desire%20to%20do%20it.%20%26nbsp;Anyway,%20%26nbsp;I%20do%20update%20%3Ca%20href%3D%22https://instagram.com/happycrafterscottage/%22%20target%3D%22_blank%22%3Emy%20Instagram%20feed%3C/a%3E%20now%20and%20then%20if%20you'd%20like%20to%20follow%20me%20over%20there%20to%20see%20what%20I'm%20up%20to.%20%3Cbr%20/%3E%0A%3Cbr%20/%3E%0AHave%20a%20great%20weekend!%3Cbr%20/%3E%0ANiki)
mini quilts for stuffed animals 9 Mar 2015 10:25 AM (10 years ago)
 Hi Everyone! Long time, no posting from me. Hope everyone has been doing well! I have gotten all my paper crafting supplies organized in my desk, but haven't had a chance to create anything. Something about 4 kids keeping one really busy. lol Anyway, I did have some little mini quilts that I created last fall for my children for their stuffed animals. (They average about 14 3/4 x 16 3/4 inches.) I've been wanting to learn how to quilt so these small little quilts were perfect for practicing. Be sure to scroll down to see them all. (I think the last one is my favorite.) :)

I created this first mini quilt for my oldest using some mini charms from Moda's Road 15 fabric line. The border, binding, and back fabrics on all the mini quilts were all from my local fabric shop.

This mini quilt was for my youngest. The mini charm pack is from Moda's Milk, Cow, Kitchen line.

This one is for my middle boy and used a mini charm pack from Moda's Bartholo-Meow's Reef.

I love the backing fabric on this one. It reminds me of waves in the sea.

This last mini quilt was for my daughter. I absolutely love Moda's Miss Kate line from Bonnie & Camille. (Love all the Bonnie & Camille fabric lines, actually!)

I used a cute little heart fabric on the back. I followed Amy's amazing Beginning Quilting Series as a guide when making all the quilts.
Happy Crafting!
Niki
%20%26nbsp;I've%20been%20wanting%20to%20learn%20how%20to%20quilt%20so%20these%20small%20little%20quilts%20were%20perfect%20for%20practicing.%20%26nbsp;Be%20sure%20to%20scroll%20down%20to%20see%20them%20all.%20%26nbsp;(I%20think%20the%20last%20one%20is%20my%20favorite.)%20%26nbsp;:)%3Cbr%20/%3E%0A%3Cbr%20/%3E%0A%3Cdiv%3E%0A%3Ca%20href%3D%22https://blogger.googleusercontent.com/img/b/R29vZ2xl/AVvXsEh1EIanz-B8khDFqLb-Ck0bQx9ibutTSl1Wb1wUME4irSbB5dhSMAr8dQucYnFgCG4ZJCKgRbof2bc5vm_E3GVwzhbiw_O-rlS4i41Oiw4NmyYvnabyMDf3PKQt3WC-FTsDnfWkgTKCYXa9/s1600/IMG_0040copy.jpg%22%20imageanchor%3D%221%22%3E%3Cimg%20border%3D%220%22%20src%3D%22https://blogger.googleusercontent.com/img/b/R29vZ2xl/AVvXsEh1EIanz-B8khDFqLb-Ck0bQx9ibutTSl1Wb1wUME4irSbB5dhSMAr8dQucYnFgCG4ZJCKgRbof2bc5vm_E3GVwzhbiw_O-rlS4i41Oiw4NmyYvnabyMDf3PKQt3WC-FTsDnfWkgTKCYXa9/s1600/IMG_0040copy.jpg%22%20height%3D%22640%22%20width%3D%22547%22%20/%3E%3C/a%3E%3C/div%3E%0A%3Cbr%20/%3E%0AI%20created%20this%20first%20mini%20quilt%20for%20my%20oldest%20using%20some%20mini%20charms%20from%20Moda's%20Road%2015%20fabric%20line.%20%26nbsp;The%20border,%20binding,%20and%20back%20fabrics%20on%20all%20the%20mini%20quilts%20were%20all%20from%20my%20local%20fabric%20shop.%3Cbr%20/%3E%0A%3Cbr%20/%3E%0A%3Cdiv%3E%0A%3Ca%20href%3D%22https://blogger.googleusercontent.com/img/b/R29vZ2xl/AVvXsEjpL7-Ggtv2k3EezyVrnlj8JGj_qpTPNqRvfKk_1neV5y3LqrphxIcYrA-kS0uwZjGk3p4IKWcnugF8FIjxhOHA7upYxibHSLcNdx3fgchmhKJi3ISm_k1icEW5n9IXMsFVcD2MwjPNqDgx/s1600/IMG_0042copy.jpg%22%20imageanchor%3D%221%22%3E%3Cimg%20border%3D%220%22%20src%3D%22https://blogger.googleusercontent.com/img/b/R29vZ2xl/AVvXsEjpL7-Ggtv2k3EezyVrnlj8JGj_qpTPNqRvfKk_1neV5y3LqrphxIcYrA-kS0uwZjGk3p4IKWcnugF8FIjxhOHA7upYxibHSLcNdx3fgchmhKJi3ISm_k1icEW5n9IXMsFVcD2MwjPNqDgx/s1600/IMG_0042copy.jpg%22%20height%3D%22640%22%20width%3D%22546%22%20/%3E%3C/a%3E%3C/div%3E%0A%3Cbr%20/%3E%0AThis%20mini%20quilt%20was%20for%20my%20youngest.%20%26nbsp;The%20mini%20charm%20pack%20is%20from%20Moda's%20Milk,%20Cow,%20Kitchen%20line.%3Cbr%20/%3E%0A%3Cbr%20/%3E%0A%3Cdiv%3E%0A%3Ca%20href%3D%22https://blogger.googleusercontent.com/img/b/R29vZ2xl/AVvXsEjkI-mmM6A_DD4YJltxNRc-hvCaTBz_CCg7ImJgQHjnQ8znVxuOZY_EsyxxcegT-rvAig0-a_jiZRsGf0HWdTAeOC7eBRMH7P8EzBX4j5CVm8rhc3KAjXqc6R02enOzb5Kq2qBknzPxLsPf/s1600/IMG_0045copy.jpg%22%20imageanchor%3D%221%22%3E%3Cimg%20border%3D%220%22%20src%3D%22https://blogger.googleusercontent.com/img/b/R29vZ2xl/AVvXsEjkI-mmM6A_DD4YJltxNRc-hvCaTBz_CCg7ImJgQHjnQ8znVxuOZY_EsyxxcegT-rvAig0-a_jiZRsGf0HWdTAeOC7eBRMH7P8EzBX4j5CVm8rhc3KAjXqc6R02enOzb5Kq2qBknzPxLsPf/s1600/IMG_0045copy.jpg%22%20height%3D%22640%22%20width%3D%22518%22%20/%3E%3C/a%3E%3C/div%3E%0A%3Cbr%20/%3E%0AThis%20one%20is%20for%20my%20middle%20boy%20and%20used%20a%20mini%20charm%20pack%20from%20Moda's%20Bartholo-Meow's%20Reef%3Cspan%3E%3Cspan%3E.%3C/span%3E%3C/span%3E%3Cbr%20/%3E%0A%3Cspan%3E%3Cspan%3E%3Cbr%20/%3E%3C/span%3E%3C/span%3E%0A%3Cbr%20/%3E%0A%3Cdiv%3E%0A%3Ca%20href%3D%22https://blogger.googleusercontent.com/img/b/R29vZ2xl/AVvXsEgr6jrEQ9Jf_qJrGs_o4TP05LIRLid329NI-FqR0Phc-9bqdNjMkWV7T84owgHiwX-05P7OkQhXaVkxEjOpd5K2zqVAciLgs2i0Tme0o5pvLzhrDQDg2h_QmquHINaNdLkr39rGJJR2JO19/s1600/IMG_0046copy.jpg%22%20imageanchor%3D%221%22%3E%3Cimg%20border%3D%220%22%20src%3D%22https://blogger.googleusercontent.com/img/b/R29vZ2xl/AVvXsEgr6jrEQ9Jf_qJrGs_o4TP05LIRLid329NI-FqR0Phc-9bqdNjMkWV7T84owgHiwX-05P7OkQhXaVkxEjOpd5K2zqVAciLgs2i0Tme0o5pvLzhrDQDg2h_QmquHINaNdLkr39rGJJR2JO19/s1600/IMG_0046copy.jpg%22%20height%3D%22466%22%20width%3D%22640%22%20/%3E%3C/a%3E%3C/div%3E%0A%3Cbr%20/%3E%0AI%20love%20the%20backing%20fabric%20on%20this%20one.%20%26nbsp;It%20reminds%20me%20of%20waves%20in%20the%20sea.%20%3Cbr%20/%3E%0A%3Cbr%20/%3E%0A%3Cdiv%3E%0A%3Ca%20href%3D%22https://blogger.googleusercontent.com/img/b/R29vZ2xl/AVvXsEhgK5mbcdLgxJQ1iCBq1hNyUMahWV7TnOvwxh_iXsi4diChyphenhyphenD_cXAdJxE5-tnOMPkh_aEjjWEonpCUytZt3vuj3dXBzNiaFWKaBz_i_DUBxU6Bkaq94KijgZ8Dg2z_y8GFUtKFSjnWBaAep/s1600/IMG_0047copy.jpg%22%20imageanchor%3D%221%22%3E%3Cimg%20border%3D%220%22%20src%3D%22https://blogger.googleusercontent.com/img/b/R29vZ2xl/AVvXsEhgK5mbcdLgxJQ1iCBq1hNyUMahWV7TnOvwxh_iXsi4diChyphenhyphenD_cXAdJxE5-tnOMPkh_aEjjWEonpCUytZt3vuj3dXBzNiaFWKaBz_i_DUBxU6Bkaq94KijgZ8Dg2z_y8GFUtKFSjnWBaAep/s1600/IMG_0047copy.jpg%22%20height%3D%22640%22%20width%3D%22524%22%20/%3E%3C/a%3E%3C/div%3E%0A%3Cbr%20/%3E%0AThis%20last%20mini%20quilt%20was%20for%20my%20daughter.%20%26nbsp;I%20absolutely%20love%20Moda's%20Miss%20Kate%20line%20from%20Bonnie%20%26amp;%20Camille.%20%26nbsp;(Love%20all%20the%20Bonnie%20%26amp;%20Camille%20fabric%20lines,%20actually!)%3Cbr%20/%3E%0A%3Cbr%20/%3E%0A%3Cdiv%3E%0A%3Ca%20href%3D%22https://blogger.googleusercontent.com/img/b/R29vZ2xl/AVvXsEgzKOHaWoxfGRtAUQfAbBc7IBZ2tsxUh-e2_xEHBuxMuoF4EeLK-OCQ4UWql1K0wSXgAS0t5Hty4U65uxoLEuPTSBQHBBbGwCmGt22rtC6VzWS0mMYsS2XIjULTmXXY2NAi0kG9mmrP2MeS/s1600/IMG_0049copy.jpg%22%20imageanchor%3D%221%22%3E%3Cimg%20border%3D%220%22%20src%3D%22https://blogger.googleusercontent.com/img/b/R29vZ2xl/AVvXsEgzKOHaWoxfGRtAUQfAbBc7IBZ2tsxUh-e2_xEHBuxMuoF4EeLK-OCQ4UWql1K0wSXgAS0t5Hty4U65uxoLEuPTSBQHBBbGwCmGt22rtC6VzWS0mMYsS2XIjULTmXXY2NAi0kG9mmrP2MeS/s1600/IMG_0049copy.jpg%22%20height%3D%22604%22%20width%3D%22640%22%20/%3E%3C/a%3E%3C/div%3E%0A%3Cbr%20/%3E%0AI%20used%20a%20cute%20little%20heart%20fabric%20on%20the%20back.%20%26nbsp;I%20followed%20%3Ca%20href%3D%22http://www.diaryofaquilter.com/p/beginning-quilting-series.html%22%20target%3D%22_blank%22%3EAmy's%20amazing%20Beginning%20Quilting%20Series%3C/a%3E%20as%20a%20guide%20when%20making%20all%20the%20quilts.%3Cbr%20/%3E%0A%3Cbr%20/%3E%0AHappy%20Crafting!%3Cbr%20/%3E%0ANiki)
a little sewing 12 Jan 2015 9:41 AM (10 years ago)
 Hi Everyone! Thanks for the comments on my last post. I know bringing my craft desk back out of storage is probably a lot more exciting for me than it is for you! lol My husband did make my desk for me. He made it about 7 years ago. (It's hard to believe it's been that long ago already!)
I haven't been creating anything for months now, but I did do some sewing last fall (and some quilting I'll share in another post). I made some little wallets for my kids, but I didn't get a photo of them before they were whisked off to be played with. I also made a couple mini pillows for my youngest two sons for their stuffed animals. My oldest son and my daughter sewed their own little pillows and stuffed them. They've practiced sewing a little bit here and there and always really enjoy it.

I was needing a pincushion for when I'm sewing so I made this little patchwork pincushion. I love the look of patchwork quilts and pincushions. They just make me happy. :) This little pincushion is about 3 x 3 inches.

Another sewing project from last fall was these pillow cases. My older three children picked out the fabric at the quilt shop and I whipped these up for them. (Sorry for the slightly blurry photo. I took it on my phone.)
%20%3Cbr%20/%3E%0A%3Cbr%20/%3E%0AI%20haven't%20been%20creating%20anything%20for%20months%20now,%20but%20I%20did%20do%20some%20sewing%20last%20fall%20(and%20some%20quilting%20I'll%20share%20in%20another%20post).%20%26nbsp;I%20made%20some%20little%20wallets%20for%20my%20kids,%20but%20I%20didn't%20get%20a%20photo%20of%20them%20before%20they%20were%20whisked%20off%20to%20be%20played%20with.%20%26nbsp;I%20also%20made%20a%20couple%20mini%20pillows%20for%20my%20youngest%20two%20sons%20for%20their%20stuffed%20animals.%20%26nbsp;My%20oldest%20son%20and%20my%20daughter%20sewed%20their%20own%20little%20pillows%20and%20stuffed%20them.%20%26nbsp;They've%20practiced%20sewing%20a%20little%20bit%20here%20and%20there%20and%20always%20really%20enjoy%20it.%3Cbr%20/%3E%0A%3Cbr%20/%3E%0A%3Cdiv%3E%0A%3Ca%20href%3D%22https://blogger.googleusercontent.com/img/b/R29vZ2xl/AVvXsEg5Og-cLJljwwi6y7KOYKqGJFHvC_M8IMv76KYVba05wqUiOPUE-tHVlp4lQuown2KRyMwKdI4Rru_w-zPSA6O3z6IIz_I6VmBx5qaRzwKe3g1bg6yPjPjBx5NvN_wD8o601Fs4urcN2pDD/s1600/IMG_0052copy.jpg%22%20imageanchor%3D%221%22%3E%3Cimg%20border%3D%220%22%20src%3D%22https://blogger.googleusercontent.com/img/b/R29vZ2xl/AVvXsEg5Og-cLJljwwi6y7KOYKqGJFHvC_M8IMv76KYVba05wqUiOPUE-tHVlp4lQuown2KRyMwKdI4Rru_w-zPSA6O3z6IIz_I6VmBx5qaRzwKe3g1bg6yPjPjBx5NvN_wD8o601Fs4urcN2pDD/s1600/IMG_0052copy.jpg%22%20height%3D%22316%22%20width%3D%22320%22%20/%3E%3C/a%3E%3C/div%3E%0A%3Cbr%20/%3E%0A%3Cdiv%3E%0A%3C/div%3E%0A%3Cbr%20/%3E%0AI%20was%20needing%20a%20pincushion%20for%20when%20I'm%20sewing%20so%20I%20made%20this%20little%20patchwork%20pincushion.%20%26nbsp;I%20love%20the%20look%20of%20patchwork%20quilts%20and%20pincushions.%20%26nbsp;They%20just%20make%20me%20happy.%20%26nbsp;:)%20%26nbsp;This%20little%20pincushion%20is%20about%203%20x%203%20inches.%3Cbr%20/%3E%0A%3Cbr%20/%3E%0A%3Cdiv%3E%0A%3Ca%20href%3D%22https://blogger.googleusercontent.com/img/b/R29vZ2xl/AVvXsEgpE64YvffZsgZn7B1VvxZ9h9gAV_8N5-Cpd_c15B9LwZv4VLsLE-k3soUORQB_Ga4ROsHf1c8qtl-gIcNc0UxXF1ROPOxOaAZH2wsz5MyczsoiybYfu5pRafgGYnV_2EMpyvjWebM2fsK6/s1600/20140724_123023COPY.jpg%22%20imageanchor%3D%221%22%3E%3Cimg%20border%3D%220%22%20src%3D%22https://blogger.googleusercontent.com/img/b/R29vZ2xl/AVvXsEgpE64YvffZsgZn7B1VvxZ9h9gAV_8N5-Cpd_c15B9LwZv4VLsLE-k3soUORQB_Ga4ROsHf1c8qtl-gIcNc0UxXF1ROPOxOaAZH2wsz5MyczsoiybYfu5pRafgGYnV_2EMpyvjWebM2fsK6/s1600/20140724_123023COPY.jpg%22%20height%3D%22360%22%20width%3D%22640%22%20/%3E%3C/a%3E%3C/div%3E%0A%3Cbr%20/%3E%0AAnother%20sewing%20project%20from%20last%20fall%20was%20these%20pillow%20cases.%20%26nbsp;My%20older%20three%20children%20picked%20out%20the%20fabric%20at%20the%20quilt%20shop%20and%20I%20whipped%20these%20up%20for%20them.%20%26nbsp;(Sorry%20for%20the%20slightly%20blurry%20photo.%20%26nbsp;I%20took%20it%20on%20my%20phone.))
Happy News 11 Jan 2015 1:45 PM (10 years ago)

Guess what my husband brought out of storage for me? My craft desk! I'm going to be busy this week purging supplies I don't need anymore and organizing everything. I'm really excited to have it back!


Dreaming of a White Christmas 20 Oct 2014 1:54 PM (10 years ago)
 Hi Everyone! Hope you are all having a great Fall! I think Christmas will be here before we know it! Still working on my husband to get my craft desk back. (Things have been really busy.) I do, however, have another card to share with you! :)

I used the adorable Teddy with Robin image from Lili of the Valley on my card. I paired it with some patterned papers from Maja Design's It's Christmas Time line and added some flowers and gold filigree corners from Wild Orchid Crafts. The leaves are some old ones I had in my stash from Prima, I think.

I colored the image with copic markers and added some glitter to my snow after I was done coloring. The sentiment is from the Christmas Grungy Sentiments set.

I used another piece of pattern paper from Maja Designs for the inside of my card and kept it nice and simple. I'm playing along with Lili of the Valley's current challenge which is Anything Goes.
Have a wonderful week! Thanks so much for stopping by!
Niki :)
%20%26nbsp;I%20do,%20however,%20have%20another%20card%20to%20share%20with%20you!%20%26nbsp;:)%3Cbr%20/%3E%0A%3Cdiv%3E%0A%3C/div%3E%0A%3Cbr%20/%3E%0A%3Cdiv%3E%0A%3C/div%3E%0A%3Cdiv%3E%0A%3Ca%20href%3D%22https://blogger.googleusercontent.com/img/b/R29vZ2xl/AVvXsEjUHO-TRkAdSjjsrgqiJVLAD5M7q3OtOoXreIYkSztNFVeiYwETBnYIIFfbpOkTeR5e-G1rB239dAG20wXbcbs61jXZBrjY12S4O3tcMmY8xz8M38GE5e5v908xArd3zzaZI8SaQCyCY2b_/s1600/IMG_6819.JPG%22%20imageanchor%3D%221%22%3E%3Cimg%20border%3D%220%22%20src%3D%22https://blogger.googleusercontent.com/img/b/R29vZ2xl/AVvXsEjUHO-TRkAdSjjsrgqiJVLAD5M7q3OtOoXreIYkSztNFVeiYwETBnYIIFfbpOkTeR5e-G1rB239dAG20wXbcbs61jXZBrjY12S4O3tcMmY8xz8M38GE5e5v908xArd3zzaZI8SaQCyCY2b_/s1600/IMG_6819.JPG%22%20height%3D%22640%22%20width%3D%22601%22%20/%3E%3C/a%3E%3C/div%3E%0A%3Cbr%20/%3E%0AI%20used%20the%20adorable%20%3Ca%20href%3D%22http://www.liliofthevalley.co.uk/acatalog/Stamp_-_Teddy_with_Robin.html%22%20target%3D%22_blank%22%3ETeddy%20with%20Robin%3C/a%3E%20image%20from%20Lili%20of%20the%20Valley%20on%20my%20card.%20%26nbsp;I%20paired%20it%20with%20some%20patterned%20papers%20from%20%3Ca%20href%3D%22http://www.thefunkiejunkie.com/Maja_Design_6x6_Scrapbook_Paper_Pad_It_s_Christ_p/majachristmas6.htm%22%20target%3D%22_blank%22%3EMaja%20Design's%20It's%20Christmas%20Time%20line%3C/a%3E%20and%20added%20some%20flowers%20and%20gold%20filigree%20corners%20from%20Wild%20Orchid%20Crafts.%20%26nbsp;The%20leaves%20are%20some%20old%20ones%20I%20had%20in%20my%20stash%20from%20Prima,%20I%20think.%3Cbr%20/%3E%0A%3Cbr%20/%3E%0A%3Cdiv%3E%0A%3Ca%20href%3D%22https://blogger.googleusercontent.com/img/b/R29vZ2xl/AVvXsEh5FrFtvbzrV9zTzbunS_auA_FUnSHjHLR2lY2HGadTDl3EYy6W_3FLF2ratbHOExeTtdy5eY3_9EKh6M_X9Qy-pil4fbIf6WRa-s4yw0V6jngtyKBtaL5rMr-AEn_1Z8uJuIXjeeU_UXlD/s1600/IMG_6821.JPG%22%20imageanchor%3D%221%22%3E%3Cimg%20border%3D%220%22%20src%3D%22https://blogger.googleusercontent.com/img/b/R29vZ2xl/AVvXsEh5FrFtvbzrV9zTzbunS_auA_FUnSHjHLR2lY2HGadTDl3EYy6W_3FLF2ratbHOExeTtdy5eY3_9EKh6M_X9Qy-pil4fbIf6WRa-s4yw0V6jngtyKBtaL5rMr-AEn_1Z8uJuIXjeeU_UXlD/s1600/IMG_6821.JPG%22%20height%3D%22508%22%20width%3D%22640%22%20/%3E%3C/a%3E%3C/div%3E%0A%3Cbr%20/%3E%0AI%20colored%20the%20image%20with%20copic%20markers%20and%20added%20some%20glitter%20to%20my%20snow%20after%20I%20was%20done%20coloring.%20%26nbsp;The%20sentiment%20is%20from%20the%20%3Ca%20href%3D%22http://www.liliofthevalley.co.uk/acatalog/Set_33-_Christmas_Grungy_Messages.html%22%20target%3D%22_blank%22%3EChristmas%20Grungy%20Sentiments%20%3C/a%3Eset.%3Cbr%20/%3E%0A%3Cbr%20/%3E%0A%3Cdiv%3E%0A%3Ca%20href%3D%22https://blogger.googleusercontent.com/img/b/R29vZ2xl/AVvXsEjOSkCy-cxEw6b9wtsvvg_9o1e2pbUFPLG9oC0lA2MuTP3g37esRkDfWzuiVIqa3WcXAJVSTrX7K4I-R7rBHt5iaFf0hibEYGAkVt1m-Jk-qtsMW0vgJignYELB81ODAgIuVrAKTCI3T4j-/s1600/IMG_6829.JPG%22%20imageanchor%3D%221%22%3E%3Cimg%20border%3D%220%22%20src%3D%22https://blogger.googleusercontent.com/img/b/R29vZ2xl/AVvXsEjOSkCy-cxEw6b9wtsvvg_9o1e2pbUFPLG9oC0lA2MuTP3g37esRkDfWzuiVIqa3WcXAJVSTrX7K4I-R7rBHt5iaFf0hibEYGAkVt1m-Jk-qtsMW0vgJignYELB81ODAgIuVrAKTCI3T4j-/s1600/IMG_6829.JPG%22%20height%3D%22620%22%20width%3D%22640%22%20/%3E%3C/a%3E%3C/div%3E%0A%3Cbr%20/%3E%0AI%20used%20another%20piece%20of%20pattern%20paper%20from%20Maja%20Designs%20for%20the%20inside%20of%20my%20card%20and%20kept%20it%20nice%20and%20simple.%20%26nbsp;I'm%20playing%20along%20with%20Lili%20of%20the%20Valley's%20current%20challenge%20which%20is%20%3Ca%20href%3D%22http://ideastoinspire.blogspot.com/p/challenge.html%22%20target%3D%22_blank%22%3EAnything%20Goes%3C/a%3E.%3Cbr%20/%3E%0A%3Cbr%20/%3E%0AHave%20a%20wonderful%20week!%20%26nbsp;Thanks%20so%20much%20for%20stopping%20by!%3Cbr%20/%3E%0ANiki%20:)%3Cbr%20/%3E%0A%3Cbr%20/%3E)
new blog banner 6 Oct 2014 4:10 PM (10 years ago)


%20%26nbsp;I%20think%20it%20will%20work%20for%20now%20at%20least.%20%26nbsp;Sorting%20through%20card%20photos%20really%20made%20me%20want%20to%20make%20cards%20again%20more.%20%26nbsp;I%20was%20thinking%20today%20that%20I%20need%20to%20convince%20my%20husband%20to%20bring%20my%20craft%20desk%20back%20from%20storage.%20lol%26nbsp;%3C/div%3E%0A%3Cdiv%3E%0A%3Cbr%20/%3E%3C/div%3E%0A%3Cdiv%3E%0AHappy%20Crafting!%3C/div%3E%0A%3Cdiv%3E%0ANiki%3C/div%3E)
moments filled with wonder 3 Oct 2014 8:00 PM (10 years ago)


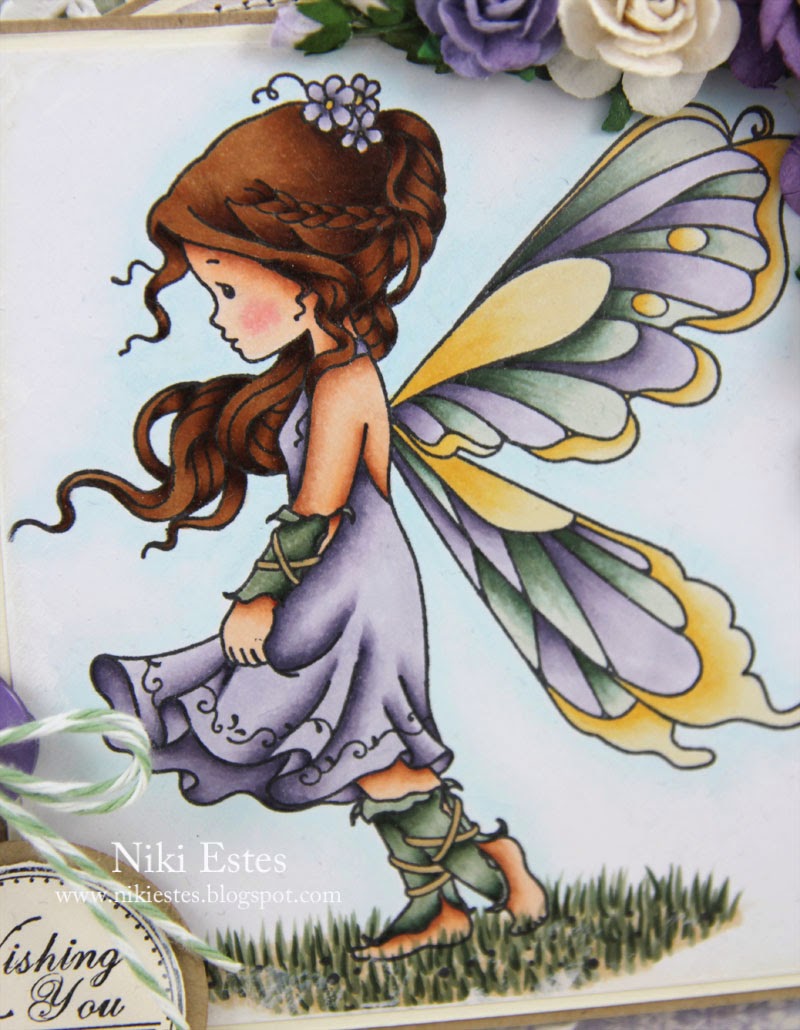
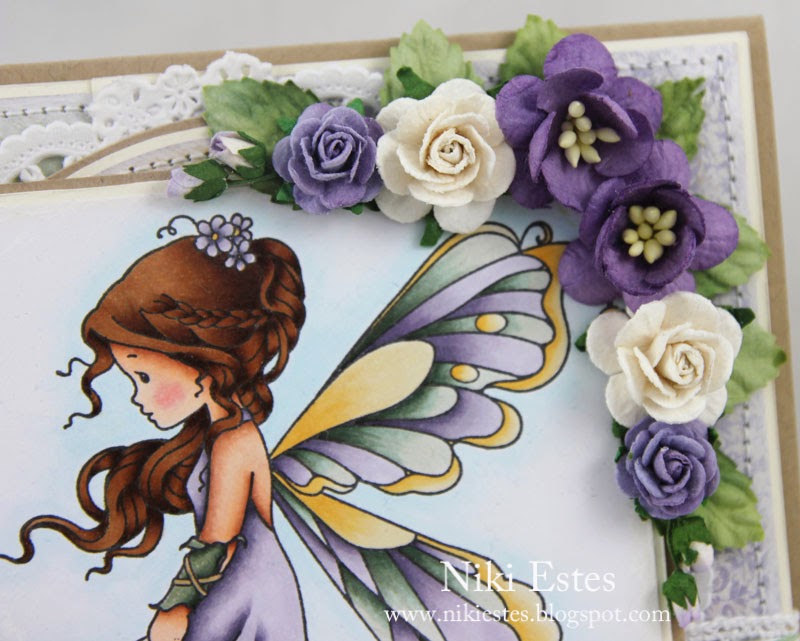

The metal filigree corner was originally silver. I embossed it using some Frantage from Stupendous. It's a thick embossing powder with some glitter in it. I simply dabbed my filigree corner on an embossing pad and then in the embossing powder. I heated the filigree corner (held with craft tweezers) from underneath so that the embossing powder did not blow away before it melted.

Niki :)
%3Cbr%20/%3E%0A%3Cbr%20/%3E%0A%3Cbr%20/%3E%0A%3Cdiv%3E%0A%3Ca%20href%3D%22https://blogger.googleusercontent.com/img/b/R29vZ2xl/AVvXsEg_8OhWGW5da3l7a51hUyJ8j73tPnpgcfVUgBAZtyCWRBTQ5PFgtKRWy4eYnW5ocHxZWsMFH5p8T1EXXMHB0AgatjcfEHNdnf4k1Z1L54YhR1431S5aKNohBB0TioSR5qtZJoNWAoe7AUde/s1600/IMG_6569.JPG%22%20imageanchor%3D%221%22%3E%3Cimg%20border%3D%220%22%20src%3D%22https://blogger.googleusercontent.com/img/b/R29vZ2xl/AVvXsEg_8OhWGW5da3l7a51hUyJ8j73tPnpgcfVUgBAZtyCWRBTQ5PFgtKRWy4eYnW5ocHxZWsMFH5p8T1EXXMHB0AgatjcfEHNdnf4k1Z1L54YhR1431S5aKNohBB0TioSR5qtZJoNWAoe7AUde/s1600/IMG_6569.JPG%22%20/%3E%3C/a%3E%3C/div%3E%0A%3Cbr%20/%3E%0A%3Cdiv%3E%0A%3C/div%3E%0AFor%20my%20card,%20I%20used%20the%20gorgeous%20Silver%20Fairy%20image%20from%20Wee%20Stamps.%20%26nbsp;(You%20can%20buy%20the%20image%20in%20its%20digital%20form%20from%20%3Ca%20href%3D%22http://www.weestamps.com/?page_id%253D27%22%20target%3D%22_blank%22%3EWee%20Stamps%20here%3C/a%3E%20and%20as%20a%20rubber%20stamp%20from%20%3Ca%20href%3D%22http://www.whimsystamps.com/index.php?main_page%253Dproduct_info%2526cPath%253D19_42%2526products_id%253D1384%22%20target%3D%22_blank%22%3EWhimsy%20Stamps%20here%3C/a%3E.)%20%26nbsp;Sylvia's%20images%20are%20always%20some%20of%20my%20all%20time%20favorites%20and%20I%20just%20love%20this%20image.%20%26nbsp;The%20sentiment%20is%20from%20the%20%3Ca%20href%3D%22http://www.whimsystamps.com/index.php?main_page%253Dproduct_info%2526cPath%253D19_3%2526products_id%253D1016%22%20target%3D%22_blank%22%3EMagical%20Mini%20Letter%20Seals%3C/a%3E%20sentiment%20set%20from%20Whimsy%20Stamps.%20%26nbsp;I%20used%20some%20patterned%20papers%20from%20Maja%20Designs.%3Cbr%20/%3E%0A%3Cbr%20/%3E%0A%3Cdiv%3E%0A%3Ca%20href%3D%22https://blogger.googleusercontent.com/img/b/R29vZ2xl/AVvXsEia7luWuJqb1rtagP1JTwTayhQGSgTuJAS5r-mwE00Gqf76VfL5WkC6bcGFDnScJ8A9l1DLNBgssyzoGdWgaFTemskihmJ4BDvT5sSUPFKmBS-I05HlCaJ6KAdIbn_asSxDrWiRaumVeASD/s1600/IMG_6578.JPG%22%20imageanchor%3D%221%22%3E%3Cimg%20border%3D%220%22%20src%3D%22https://blogger.googleusercontent.com/img/b/R29vZ2xl/AVvXsEia7luWuJqb1rtagP1JTwTayhQGSgTuJAS5r-mwE00Gqf76VfL5WkC6bcGFDnScJ8A9l1DLNBgssyzoGdWgaFTemskihmJ4BDvT5sSUPFKmBS-I05HlCaJ6KAdIbn_asSxDrWiRaumVeASD/s1600/IMG_6578.JPG%22%20/%3E%3C/a%3E%3C/div%3E%0A%3Cbr%20/%3E%0A%3Cdiv%3E%0A%3C/div%3E%0AI%20colored%20the%20image%20with%20copic%20markers.%20%26nbsp;(Sorry,%20I%20didn't%20write%20the%20colors%20down%20this%20time.)%20%26nbsp;I%20added%20some%20white%20paint%20to%20the%20edges%20of%20my%20cardstocks,%20image,%20and%20sentiment.%3Cbr%20/%3E%0A%3Cbr%20/%3E%0A%3Cdiv%3E%0A%3Ca%20href%3D%22https://blogger.googleusercontent.com/img/b/R29vZ2xl/AVvXsEjsLbjR34b8IQWU4fG9vglsmBV3DkP3BTk-3vBEPy8LZ49Qhf6qiKIGC4Z5fiGhJZc-05o_fbzTDbfVyjSUAWmT25aOsX2GYBttKeJmw-Xx2GntDNeGUS5nLINaWG1gzKz7SB12etAAKATs/s1600/IMG_6582.JPG%22%20imageanchor%3D%221%22%3E%3Cimg%20border%3D%220%22%20src%3D%22https://blogger.googleusercontent.com/img/b/R29vZ2xl/AVvXsEjsLbjR34b8IQWU4fG9vglsmBV3DkP3BTk-3vBEPy8LZ49Qhf6qiKIGC4Z5fiGhJZc-05o_fbzTDbfVyjSUAWmT25aOsX2GYBttKeJmw-Xx2GntDNeGUS5nLINaWG1gzKz7SB12etAAKATs/s1600/IMG_6582.JPG%22%20/%3E%3C/a%3E%3C/div%3E%0A%3Cbr%20/%3E%0A%3Cdiv%3E%0A%3C/div%3E%0ALots%20of%20beautiful%20flowers%20from%20Wild%20Orchid%20Crafts%20along%20with%20some%20leaves%20I%20had%20in%20my%20stash.%20%26nbsp;Twine,%20button,%20crocheted%20lace,%20and%20doilies%20all%20from%20my%20stash%20as%20well.%3Cbr%20/%3E%0A%3Cbr%20/%3E%0A%3Cdiv%3E%0A%3Ca%20href%3D%22https://blogger.googleusercontent.com/img/b/R29vZ2xl/AVvXsEiiV6TlvQ10wloe2GTOOKK-mAbzD5AhibqkRQ4v6GAzRaoOeZ0RMfi5PvYhGPp0F1TsqqdqLji1WB9rLUSGFb5psKZS3VG2q1nkicRMHTyRKDib4OdH3sebAGY7sSyT7a9KRvgjCEsgm0ho/s1600/IMG_6572.JPG%22%20imageanchor%3D%221%22%3E%3Cimg%20border%3D%220%22%20src%3D%22https://blogger.googleusercontent.com/img/b/R29vZ2xl/AVvXsEiiV6TlvQ10wloe2GTOOKK-mAbzD5AhibqkRQ4v6GAzRaoOeZ0RMfi5PvYhGPp0F1TsqqdqLji1WB9rLUSGFb5psKZS3VG2q1nkicRMHTyRKDib4OdH3sebAGY7sSyT7a9KRvgjCEsgm0ho/s1600/IMG_6572.JPG%22%20/%3E%3C/a%3E%3C/div%3E%0A%3Cbr%20/%3E%0AThe%20metal%20filigree%20corner%20was%20originally%20silver.%20%26nbsp;I%20embossed%20it%20using%20some%20Frantage%20from%20Stupendous.%20%26nbsp;It's%20a%20thick%20embossing%20powder%20with%20some%20glitter%20in%20it.%20%26nbsp;I%20simply%20dabbed%20my%20filigree%20corner%20on%20an%20embossing%20pad%20and%20then%20in%20the%20embossing%20powder.%20%26nbsp;I%20heated%20the%20filigree%20corner%20(held%20with%20craft%20tweezers)%20from%20underneath%20so%20that%20the%20embossing%20powder%20did%20not%20blow%20away%20before%20it%20melted.%3Cbr%20/%3E%0A%3Cbr%20/%3E%0A%3Cdiv%3E%0A%3C/div%3E%0A%3Cdiv%3E%0A%3Ca%20href%3D%22https://blogger.googleusercontent.com/img/b/R29vZ2xl/AVvXsEh-CVuKrmI0XZx278YYiAZTSFI5v-JmawURI-6wbyGQSenfCDVdALEFYBKOYg2mxS5a6rMj5tSUFcvmBAlJRAYbtHn2xv1LfIKJelrGPIChDnB9KWlMx8cFXcu0QzveAM9boV_quJJmvy_g/s1600/IMG_6570.JPG%22%20imageanchor%3D%221%22%3E%3Cimg%20border%3D%220%22%20src%3D%22https://blogger.googleusercontent.com/img/b/R29vZ2xl/AVvXsEh-CVuKrmI0XZx278YYiAZTSFI5v-JmawURI-6wbyGQSenfCDVdALEFYBKOYg2mxS5a6rMj5tSUFcvmBAlJRAYbtHn2xv1LfIKJelrGPIChDnB9KWlMx8cFXcu0QzveAM9boV_quJJmvy_g/s1600/IMG_6570.JPG%22%20/%3E%3C/a%3E%3C/div%3E%0A%3Cbr%20/%3E%0A%3Cdiv%3E%0A%3C/div%3E%0AThanks%20so%20much%20for%20stopping%20by%20and%20have%20fun%20on%20the%20World%20Card%20Making%20Day%20hop!%20%26nbsp;I%20know%20there%20is%20going%20to%20be%20lots%20of%20amazing%20inspiration%20shared!%20%26nbsp;You%20can%20see%20all%20the%20links%20%3Ca%20href%3D%22http://www.blenza.com/linkies/links.php?owner%253Dhollyann14%2526postid%253D04Aug2014%2526meme%253Diow%22%20target%3D%22_blank%22%3Ehere%20in%20the%20World%20Card%20Making%20Day%20blog%20hop%3C/a%3E.%3Cbr%20/%3E%0A%3Cbr%20/%3E%0ANiki%20:)%3Cbr%20/%3E%0A%3Cbr%20/%3E%0A%3Cbr%20/%3E)
more bags 24 Jul 2014 2:38 PM (10 years ago)
 I am back again, but to share something this time instead of pestering you all for ideas. :) I finished the bags for my older children last week, but didn't get a chance to take photos. They had to use them right away so they aren't quite as crisp as they were when I finished them, but they are being put lovingly to use and that's more important any way.

My daughter chose a pretty pink fabric for the handles and lining and a burgundy floral pattern with some pretty pink flowers for the outside fabric. I used Amy's Easy Fat Quarter Bag tutorial again for both bags.

It's hard to believe she is 8 already. She's my tomboy who still loves pink and some girly things, but she can definitely keep up with the boys. I guess that comes from being surrounded by brothers. Although I've never really been too girly and I have 3 sisters. So, who knows . . .

My oldest son loves ambulances, fire trucks, police cards, helicopters, etc. Pretty much anything with flashing lights and sirens. This fabric I found was perfect for him. We paired it with a navy blue for the straps and the lining is the same as the outer fabric.

He's already 10 years old and growing up so quickly. He was still excited about his bag, though. I love seeing how they are all excited to use them.

J had to sneak in the photo with his bag again so he wouldn't feel left out. lol

And Baby T had to help with photos again, too. Not sure what it is about hanging the bags on a door knob to snap a photo of them, but it makes them irresistible. :)
Hope you all have a great weekend! We are off to go camping!
Niki
%20%26nbsp;I%20finished%20the%20bags%20for%20my%20older%20children%20last%20week,%20but%20didn't%20get%20a%20chance%20to%20take%20photos.%20%26nbsp;They%20had%20to%20use%20them%20right%20away%20so%20they%20aren't%20quite%20as%20crisp%20as%20they%20were%20when%20I%20finished%20them,%20but%20they%20are%20being%20put%20lovingly%20to%20use%20and%20that's%20more%20important%20any%20way.%3Cbr%20/%3E%0A%3Cdiv%3E%0A%3C/div%3E%0A%3Cbr%20/%3E%0A%3Cdiv%3E%0A%3Ca%20href%3D%22https://blogger.googleusercontent.com/img/b/R29vZ2xl/AVvXsEhHICALT_NOmnsXYz1mr-VsjjRW0UXcWpqk-nmrVC5EVnIHjj0eHGAdzMMjw9UA-Feh0uw4Q7Lj1Zsr579ZEFtV3YANWaF3W-uCbqU1r_CtU0B7qyEEuw-KKV_aYZUIAr9hiUhyruvGHTTN/s1600/IMG_9591COPY.jpg%22%20imageanchor%3D%221%22%3E%3Cimg%20border%3D%220%22%20src%3D%22https://blogger.googleusercontent.com/img/b/R29vZ2xl/AVvXsEhHICALT_NOmnsXYz1mr-VsjjRW0UXcWpqk-nmrVC5EVnIHjj0eHGAdzMMjw9UA-Feh0uw4Q7Lj1Zsr579ZEFtV3YANWaF3W-uCbqU1r_CtU0B7qyEEuw-KKV_aYZUIAr9hiUhyruvGHTTN/s1600/IMG_9591COPY.jpg%22%20height%3D%22640%22%20width%3D%22442%22%20/%3E%3C/a%3E%3C/div%3E%0A%3Cbr%20/%3E%0AMy%20daughter%20chose%20a%20pretty%20pink%20fabric%20for%20the%20handles%20and%20lining%20and%20a%20burgundy%20floral%20pattern%20with%20some%20pretty%20pink%20flowers%20for%20the%20outside%20fabric.%20%26nbsp;I%20used%20%3Ca%20href%3D%22http://www.diaryofaquilter.com/2012/07/easy-fat-quarter-bag-tutorial.html%22%20target%3D%22_blank%22%3EAmy's%20Easy%20Fat%20Quarter%20Bag%20tutorial%3C/a%3E%20again%20for%20both%20bags.%3Cbr%20/%3E%0A%3Cbr%20/%3E%0A%3Cdiv%3E%0A%3Ca%20href%3D%22https://blogger.googleusercontent.com/img/b/R29vZ2xl/AVvXsEjpr8HJOj1xpyaAglovC5NwI9v6hE2fAEAO8kOHCVQh3eRu3FVzabBzUre5ngnKUTxas2CV8ukSvEr3AV1Rin7Fwom57T5PVfxcXvPMxS2Xx74PbKHGSppm75h3Y5cFcCQB0_meRJ-8n20K/s1600/IMG_9584COPY.jpg%22%20imageanchor%3D%221%22%3E%3Cimg%20border%3D%220%22%20src%3D%22https://blogger.googleusercontent.com/img/b/R29vZ2xl/AVvXsEjpr8HJOj1xpyaAglovC5NwI9v6hE2fAEAO8kOHCVQh3eRu3FVzabBzUre5ngnKUTxas2CV8ukSvEr3AV1Rin7Fwom57T5PVfxcXvPMxS2Xx74PbKHGSppm75h3Y5cFcCQB0_meRJ-8n20K/s1600/IMG_9584COPY.jpg%22%20height%3D%22640%22%20width%3D%22384%22%20/%3E%3C/a%3E%3C/div%3E%0A%3Cbr%20/%3E%0AIt's%20hard%20to%20believe%20she%20is%208%20already.%20%26nbsp;She's%20my%20tomboy%20who%20still%20loves%20pink%20and%20some%20girly%20things,%20but%20she%20can%20definitely%20keep%20up%20with%20the%20boys.%20%26nbsp;I%20guess%20that%20comes%20from%20being%20surrounded%20by%20brothers.%20%26nbsp;Although%20I've%20never%20really%20been%20too%20girly%20and%20I%20have%203%20sisters.%20%26nbsp;So,%20who%20knows%20.%20.%20.%3Cbr%20/%3E%0A%3Cbr%20/%3E%0A%3Cdiv%3E%0A%3Ca%20href%3D%22https://blogger.googleusercontent.com/img/b/R29vZ2xl/AVvXsEiA94gTTli0y8DYqYnoPyCt_3AfgNGxGzCBRQ6TfrvmsFynSpnS8Oy3Y6nybupH4OVEpZLh4wDldNLvvIDROz4OsrPx-RP58TqK2HzmLAMfM2ifR9oCYEo1rfMZhXO4O3UTOrJicOcuZ0lS/s1600/IMG_9594COPY.jpg%22%20imageanchor%3D%221%22%3E%3Cimg%20border%3D%220%22%20src%3D%22https://blogger.googleusercontent.com/img/b/R29vZ2xl/AVvXsEiA94gTTli0y8DYqYnoPyCt_3AfgNGxGzCBRQ6TfrvmsFynSpnS8Oy3Y6nybupH4OVEpZLh4wDldNLvvIDROz4OsrPx-RP58TqK2HzmLAMfM2ifR9oCYEo1rfMZhXO4O3UTOrJicOcuZ0lS/s1600/IMG_9594COPY.jpg%22%20height%3D%22640%22%20width%3D%22416%22%20/%3E%3C/a%3E%3C/div%3E%0A%3Cbr%20/%3E%0AMy%20oldest%20son%20loves%20ambulances,%20fire%20trucks,%20police%20cards,%20helicopters,%20etc.%20%26nbsp;Pretty%20much%20anything%20with%20flashing%20lights%20and%20sirens.%20%26nbsp;This%20fabric%20I%20found%20was%20perfect%20for%20him.%20%26nbsp;We%20paired%20it%20with%20a%20navy%20blue%20for%20the%20straps%20and%20the%20lining%20is%20the%20same%20as%20the%20outer%20fabric.%3Cbr%20/%3E%0A%3Cbr%20/%3E%0A%3Cdiv%3E%0A%3Ca%20href%3D%22https://blogger.googleusercontent.com/img/b/R29vZ2xl/AVvXsEg6sDrJv_-0FUGgQUm8MCQa-Gxsdy64Pt2ei-AK_dGrCYcTPlXkWvJwvAAwHXIPAjwFTWARPgQPVlTwrf7opkZcZOBTjpUZDOm6Qp29yIjqciiqarnkA7-T0c0gWxptdqfEzvdKzbu1dRty/s1600/IMG_9586COPY.jpg%22%20imageanchor%3D%221%22%3E%3Cimg%20border%3D%220%22%20src%3D%22https://blogger.googleusercontent.com/img/b/R29vZ2xl/AVvXsEg6sDrJv_-0FUGgQUm8MCQa-Gxsdy64Pt2ei-AK_dGrCYcTPlXkWvJwvAAwHXIPAjwFTWARPgQPVlTwrf7opkZcZOBTjpUZDOm6Qp29yIjqciiqarnkA7-T0c0gWxptdqfEzvdKzbu1dRty/s1600/IMG_9586COPY.jpg%22%20height%3D%22640%22%20width%3D%22370%22%20/%3E%3C/a%3E%3C/div%3E%0A%3Cbr%20/%3E%0AHe's%20already%2010%20years%20old%20and%20growing%20up%20so%20quickly.%20%26nbsp;He%20was%20still%20excited%20about%20his%20bag,%20though.%20%26nbsp;I%20love%20seeing%20how%20they%20are%20all%20excited%20to%20use%20them.%20%3Cbr%20/%3E%0A%3Cbr%20/%3E%0A%3Cdiv%3E%0A%3Ca%20href%3D%22https://blogger.googleusercontent.com/img/b/R29vZ2xl/AVvXsEhrG1b9atkcwAsKAjaKUOqvx40kk7hiQjfnfMQTwPiS86iJqenJkMyxlVWzo3Et4JIH4RwVmaCb-cczWUgwLstt5Fq0fBx8EZtqNTl9pMFg-m8avIbhdVERUzNuJTBeU4tVOYzUNfxCSBNo/s1600/IMG_9588COPY.jpg%22%20imageanchor%3D%221%22%3E%3Cimg%20border%3D%220%22%20src%3D%22https://blogger.googleusercontent.com/img/b/R29vZ2xl/AVvXsEhrG1b9atkcwAsKAjaKUOqvx40kk7hiQjfnfMQTwPiS86iJqenJkMyxlVWzo3Et4JIH4RwVmaCb-cczWUgwLstt5Fq0fBx8EZtqNTl9pMFg-m8avIbhdVERUzNuJTBeU4tVOYzUNfxCSBNo/s1600/IMG_9588COPY.jpg%22%20height%3D%22640%22%20width%3D%22426%22%20/%3E%3C/a%3E%3C/div%3E%0A%3Cbr%20/%3E%0AJ%20had%20to%20sneak%20in%20the%20photo%20with%20his%20bag%20again%20so%20he%20wouldn't%20feel%20left%20out.%20%26nbsp;lol%3Cbr%20/%3E%0A%3Cbr%20/%3E%0A%3Cdiv%3E%0A%3Ca%20href%3D%22https://blogger.googleusercontent.com/img/b/R29vZ2xl/AVvXsEhgXWcpVjUpKuAeovUm5z-_RyO5Iv1fM9yL-s_5FtalD1b6CBIYTKa7ho6pcR7NRmxafKbmkcy5qsMYg35LPo-O2rv6cvXo-fJa-cwjgdAL9dMv8_ITiEIDX5T8rK3AMtVkWQdGGuqUxXKr/s1600/IMG_9596COPY.jpg%22%20imageanchor%3D%221%22%3E%3Cimg%20border%3D%220%22%20src%3D%22https://blogger.googleusercontent.com/img/b/R29vZ2xl/AVvXsEhgXWcpVjUpKuAeovUm5z-_RyO5Iv1fM9yL-s_5FtalD1b6CBIYTKa7ho6pcR7NRmxafKbmkcy5qsMYg35LPo-O2rv6cvXo-fJa-cwjgdAL9dMv8_ITiEIDX5T8rK3AMtVkWQdGGuqUxXKr/s1600/IMG_9596COPY.jpg%22%20height%3D%22640%22%20width%3D%22426%22%20/%3E%3C/a%3E%3C/div%3E%0A%3Cbr%20/%3E%0AAnd%20Baby%20T%20had%20to%20help%20with%20photos%20again,%20too.%20%26nbsp;Not%20sure%20what%20it%20is%20about%20hanging%20the%20bags%20on%20a%20door%20knob%20to%20snap%20a%20photo%20of%20them,%20but%20it%20makes%20them%20irresistible.%20%26nbsp;:)%3Cbr%20/%3E%0A%3Cbr%20/%3E%0AHope%20you%20all%20have%20a%20great%20weekend!%20%26nbsp;We%20are%20off%20to%20go%20camping!%3Cbr%20/%3E%0ANiki)
new love 16 Jul 2014 6:18 AM (10 years ago)
 I went to an estate sale recently and came across an antique sewing machine. I didn't really know anything about it so I came home and researched it a little bit. It turns out the machine was a Singer Featherweight 221. It seemed to be in pretty good condition. So, I went back up to the estate sale and talked to the family more about it. The owner's kids told me they only ever remembered her using it 4 times. Long story short, it came home with me that day.

Isn't it so pretty!?!? It's in beautiful shape. It has a few light scratches, but nothing too major. The decals are all pretty sharp with only a light rub in one spot. My husband oiled it, polished it, and checked the wiring. I got a kit from April 1930's to give it a tune up. I researched the serial number and it was made in February 1952.

Yesterday, I figured out how to thread the top stitched and the fill the bobbin. I also figured out how to adjust the tension on the bobbin and the machine. It's all a learning experience for me because I haven't sewn that much before except on cards.
I've been wanting to do some sewing and learn how to quilt for quite a while now. Finding this beauty was just the push I needed. I took my kiddos to the fabric store last week and they each picked out a couple fat quarters to create some bags and some other fabric for pillowcases. They want to learn, too, especially my daughter so I thought pillowcases would be a good place to start.

Today, I sewed my first project on the machine. It sews like a dream! I'm a perfectionist and a novice when it comes to sewing so I love that I can control the speed so easily. I've never used my larger machine that much because it sews too quickly for me. I used Amy's Easy Fat Quarter Bag Tutorial to create this bag with some fat quarters my middle son chose at the fabric store. Her tutorial was really easy to follow and I love how it turned out!

This was the fabric that J picked. I tried to talk him into another color/design for the inside, but he loved the green and that's all he wanted. :)

(He's getting to be such a big boy. We celebrated his 4th birthday the end of June. Where does time go?! He is seriously one of the sweetest little boys ever.)

I think he really likes it. lol It's filled with trains now and the older two are anxiously awaiting their bags. I wasn't able to get started on their bags. I had a little one needing me.

The littlest one really wanted to help when I was taking a few photos. He reallllly wanted that bag! He's crawling and standing by things and into everything! lol It's amazing how quickly they grow and change.

I love his little pudgy legs and arms. It's so cute seeing a tiny, little person standing up and he's so proud of himself.


I may be a tad more than impartial, but that little adorable face just makes me happy. He is such a cutie and such a blessing (like all of our children have been). I'm really trying to soak in every minute of the baby years. They go by so quickly.
Have a great week!
Niki

happiness in the little things 13 Mar 2014 8:32 AM (11 years ago)
 Hi Everyone! Thanks so much for your sweet comments about the last card I posted. I love hearing from all of you! I'm back to share another card today. We've been passing around lots of fun germs in our house so I'm a little later than planned getting this up.

For this card, I used the pretty Miss Mary Contrary image from illustrator Elisabeth Bell (available through Whimsy Stamps). I used some papers from Maja Designs. (Love their papers!)

I colored the image with copic markers. After assembling my card, I added lots of flowers from Wild Orchid Crafts. The vine/leaf die under the flowers is the Vine Die set.

I used a sentiment from the Magical Mini Letter Seals sentiment set. I use this set so much!
I've been gathering ideas for homeschooling my preschooler. Anyone have any great sites or insight to share?
Hope you all have a wonderful weekend!
Niki
.%26nbsp;%20I%20used%20some%20papers%20from%20Maja%20Designs.%26nbsp;%20(Love%20their%20papers!)%3Cbr%20/%3E%0A%3Cbr%20/%3E%0A%3Cdiv%3E%0A%3Ca%20href%3D%22https://blogger.googleusercontent.com/img/b/R29vZ2xl/AVvXsEiVwUDIHSxjoiFHvHfZoWO6dhhs42ZQNyEo5a9IldI20Vmv5D9BqcGQjTzuY2nVtM82N70U0Rb6b2TvBaUoUJcunnF8BUTFr3LkUG23ZQfyqbxRSFhLcfeHdVT_jSU4H2bwaW0-IrlvY_sV/s1600/IMG_8418.JPG%22%20imageanchor%3D%221%22%3E%3Cimg%20border%3D%220%22%20src%3D%22https://blogger.googleusercontent.com/img/b/R29vZ2xl/AVvXsEiVwUDIHSxjoiFHvHfZoWO6dhhs42ZQNyEo5a9IldI20Vmv5D9BqcGQjTzuY2nVtM82N70U0Rb6b2TvBaUoUJcunnF8BUTFr3LkUG23ZQfyqbxRSFhLcfeHdVT_jSU4H2bwaW0-IrlvY_sV/s1600/IMG_8418.JPG%22%20height%3D%22640%22%20width%3D%22466%22%20/%3E%3C/a%3E%3C/div%3E%0A%3Cbr%20/%3E%0AI%20colored%20the%20image%20with%20copic%20markers.%26nbsp;%20After%20assembling%20my%20card,%20I%20added%20lots%20of%20flowers%20from%20Wild%20Orchid%20Crafts.%26nbsp;%20The%20vine/leaf%20die%20under%20the%20flowers%20is%20the%20%3Ca%20href%3D%22http://www.whimsystamps.com/index.php?main_page%253Dproduct_info%2526cPath%253D30%2526products_id%253D1336%22%20target%3D%22_blank%22%3EVine%20Die%3C/a%3E%20set.%3Cbr%20/%3E%0A%3Cbr%20/%3E%0A%3Cdiv%3E%0A%3Ca%20href%3D%22https://blogger.googleusercontent.com/img/b/R29vZ2xl/AVvXsEg0kcG-3SiuWjU4QS_W8xQO69UsnllJAjyIRBM3qsQd6xFKvYDdVa5haw2tjkWdYJrtRVx9hxQe7fC91tTSqaMmbTRjke_aN5OXBIrZIOMrZ1xLum5nh0gPwd5EH9Myyrt3ZRR7O3h6JQRA/s1600/IMG_8422.JPG%22%20imageanchor%3D%221%22%3E%3Cimg%20border%3D%220%22%20src%3D%22https://blogger.googleusercontent.com/img/b/R29vZ2xl/AVvXsEg0kcG-3SiuWjU4QS_W8xQO69UsnllJAjyIRBM3qsQd6xFKvYDdVa5haw2tjkWdYJrtRVx9hxQe7fC91tTSqaMmbTRjke_aN5OXBIrZIOMrZ1xLum5nh0gPwd5EH9Myyrt3ZRR7O3h6JQRA/s1600/IMG_8422.JPG%22%20height%3D%22320%22%20width%3D%22311%22%20/%3E%3C/a%3E%3C/div%3E%0A%3Cbr%20/%3E%0AI%20used%20a%20sentiment%20from%20the%20%3Ca%20href%3D%22http://www.whimsystamps.com/index.php?main_page%253Dproduct_info%2526cPath%253D19_3%2526products_id%253D1016%22%20target%3D%22_blank%22%3EMagical%20Mini%20Letter%20Seals%3C/a%3E%20sentiment%20set.%26nbsp;%20I%20use%20this%20set%20so%20much!%3Cbr%20/%3E%0A%3Cbr%20/%3E%0A%3Cbr%20/%3E%0AI've%20been%20gathering%20ideas%20for%20homeschooling%20my%20preschooler.%26nbsp;%20Anyone%20have%20any%20great%20sites%20or%20insight%20to%20share?%3Cbr%20/%3E%0A%3Cbr%20/%3E%0AHope%20you%20all%20have%20a%20wonderful%20weekend!%26nbsp;%20%3Cbr%20/%3E%0ANiki)
all you need is love 5 Mar 2014 9:04 AM (11 years ago)
 It's been a long time since I posted. Life has been busy with family and kids and I haven't been papercrafting for quite a while now. I do have some cards to share that I created recently for Whimsy Stamps. I can't be on a design team right now with things being so hectic, but I had a chance to guest design for Whimsy and am excited to get to create a few cards. I still love it when I get time to create. It just seems to be hard to fit it in lately.

Anyway, my first card features the adorable Penguin Proud Parents image from Crissy Armstrong. Such an adorable image! My patterned papers are from October Afternoon's Silent Night collection. The die I used behind the image is the Double Scallop Doily Die.

I colored the image with copic markers. (Sorry, I didn't write them down this time.) Then, I added some Snow Writer from Deco Art under the image. Love the look it adds.

The sentiment is from the All You Need is Love sentiment set released from Whimsy in January.
I hope you've all been having a great winter. Lots of snow off an on here. I'm ready for spring. :)
Have a great day!
Niki
%26nbsp;%20Then,%20I%20added%20some%20Snow%20Writer%20from%20Deco%20Art%20under%20the%20image.%26nbsp;%20Love%20the%20look%20it%20adds.%3Cbr%20/%3E%0A%3Cbr%20/%3E%0A%3Cdiv%3E%0A%3Ca%20href%3D%22https://blogger.googleusercontent.com/img/b/R29vZ2xl/AVvXsEiiD1WYZ0QBrMLG3FsjZvREHaodjyQH-K5m3qd3Z965IVwmK74Z7jtN1wyTpJS1vvsIS3ddoxt8bufWrFiNVNk0xQmOzrdHYDF0lKGHZpaEHMtg3QXnoP1gG2mGDnpwwG_BNpRQcazl4HlZ/s1600/IMG_8414.JPG%22%20imageanchor%3D%221%22%3E%3Cimg%20border%3D%220%22%20src%3D%22https://blogger.googleusercontent.com/img/b/R29vZ2xl/AVvXsEiiD1WYZ0QBrMLG3FsjZvREHaodjyQH-K5m3qd3Z965IVwmK74Z7jtN1wyTpJS1vvsIS3ddoxt8bufWrFiNVNk0xQmOzrdHYDF0lKGHZpaEHMtg3QXnoP1gG2mGDnpwwG_BNpRQcazl4HlZ/s1600/IMG_8414.JPG%22%20height%3D%22290%22%20width%3D%22320%22%20/%3E%3C/a%3E%3C/div%3E%0A%3Cbr%20/%3E%0AThe%20sentiment%20is%20from%20the%20%3Ca%20href%3D%22http://www.whimsystamps.com/index.php?main_page%253Dproduct_info%2526cPath%253D19_75%2526products_id%253D2973%22%20target%3D%22_blank%22%3EAll%20You%20Need%20is%20Love%3C/a%3E%20sentiment%20set%20released%20from%20Whimsy%20in%20January.%3Cbr%20/%3E%0A%3Cbr%20/%3E%0AI%20hope%20you've%20all%20been%20having%20a%20great%20winter.%26nbsp;%20Lots%20of%20snow%20off%20an%20on%20here.%26nbsp;%20I'm%20ready%20for%20spring.%20:)%3Cbr%20/%3E%0A%3Cbr%20/%3E%0AHave%20a%20great%20day!%3Cbr%20/%3E%0ANiki)
Birthday Wishes 21 Nov 2013 8:32 AM (11 years ago)
 Hi Everyone! Can you believe Thanksgiving is next week?! I don't know where the month is going. Things have been really hectic lately and I haven't had a chance to stamp or create a card for a couple weeks now. I do still have a few cards left in my drafts that I haven't shared, though.

I made this card for my son's 10th birthday last month. I love this little Surprise! image from Lili of the Valley. It works great for feminine and masculine cards. (I shared a feminine card last month using this image.) I'm afraid I can't remember what papers I used on this card. I think they were from My Mind's Eye.

The image was colored with copic markers and the sentiment is from the Vintage Sentiments - Occasions stamp set. I finished the card off with some green twine, red buttons, and cork stars. I love the texture the cork adds.
Have a great rest of the week!
Niki
%26nbsp;%20I'm%20afraid%20I%20can't%20remember%20what%20papers%20I%20used%20on%20this%20card.%26nbsp;%20I%20think%20they%20were%20from%20My%20Mind's%20Eye.%3Cbr%20/%3E%0A%3Cbr%20/%3E%0A%3Cdiv%3E%0A%3Ca%20href%3D%22https://blogger.googleusercontent.com/img/b/R29vZ2xl/AVvXsEgEIAIBTC5b6uvJHg0eyaN-QY9QtGN1o_xzRfGlgFOJ7WbmmeZ2Zchktm7Qzi9di8NujUtQGL2nmMATky0qqQYRenmhF7QK8_Ue6wZIvralxSeqhFGmZv5yJ9Kdht_p5qlYb9j-RjESiNyX/s1600/IMG_6816.JPG%22%20imageanchor%3D%221%22%3E%3Cimg%20border%3D%220%22%20src%3D%22https://blogger.googleusercontent.com/img/b/R29vZ2xl/AVvXsEgEIAIBTC5b6uvJHg0eyaN-QY9QtGN1o_xzRfGlgFOJ7WbmmeZ2Zchktm7Qzi9di8NujUtQGL2nmMATky0qqQYRenmhF7QK8_Ue6wZIvralxSeqhFGmZv5yJ9Kdht_p5qlYb9j-RjESiNyX/s640/IMG_6816.JPG%22%20height%3D%22640%22%20width%3D%22509%22%20/%3E%3C/a%3E%3C/div%3E%0A%3Cbr%20/%3E%0AThe%20image%20was%20colored%20with%20copic%20markers%20and%20the%20sentiment%20is%20from%20the%20%3Ca%20href%3D%22http://www.liliofthevalley.co.uk/acatalog/Set_30_-_Vintage_Sentiments_-_Occasions.html%22%20target%3D%22_blank%22%3EVintage%20Sentiments%20-%20Occasions%3C/a%3E%20stamp%20set.%26nbsp;%20I%20finished%20the%20card%20off%20with%20some%20green%20twine,%20red%20buttons,%20and%20cork%20stars.%26nbsp;%20I%20love%20the%20texture%20the%20cork%20adds.%3Cbr%20/%3E%0A%3Cbr%20/%3E%0AHave%20a%20great%20rest%20of%20the%20week!%3Cbr%20/%3E%0ANiki)
Snowy Village 16 Nov 2013 1:16 PM (11 years ago)
 Hi Everyone! Hope you're all having a great weekend. The weather here is icky, cold, and snowy. Perfect day to stay in, watch a movie, and play monopoly. :)

I have a little CAS card to share with you today using the Snowy Village image from SP & Company. It was release week this week and this image is one of the new stamps available now. I also used a sentiment from the Holiday Insides set. My patterned paper is from the Echo Park Reflections Christmas paper pad. You can also find that fun woodgrain cardstock in the store along with the blue lagoon button.
Have a happy weekend and thanks so much for stopping by!
Niki :)
%3Cbr%20/%3E%0A%3Cbr%20/%3E%0A%3Cdiv%3E%0A%3Ca%20href%3D%22https://blogger.googleusercontent.com/img/b/R29vZ2xl/AVvXsEg7PzE0afQuW6pzvlXjGaOcx2kXwWuvP6IBFtzAyTyUCg9qkrEVQepOuIMsJ-6UZ0N_24vmzOZWhwq8moLguYZmF2QUWdlCCNr6tTzJjsygWz96RtCQdTUCU61pMvuZGZlDXSz1ntqpiVpH/s1600/IMG_7216.JPG%22%20imageanchor%3D%221%22%3E%3Cimg%20border%3D%220%22%20src%3D%22https://blogger.googleusercontent.com/img/b/R29vZ2xl/AVvXsEg7PzE0afQuW6pzvlXjGaOcx2kXwWuvP6IBFtzAyTyUCg9qkrEVQepOuIMsJ-6UZ0N_24vmzOZWhwq8moLguYZmF2QUWdlCCNr6tTzJjsygWz96RtCQdTUCU61pMvuZGZlDXSz1ntqpiVpH/s1600/IMG_7216.JPG%22%20/%3E%3C/a%3E%3C/div%3E%0A%3Cbr%20/%3E%0AI%20have%20a%20little%20CAS%20card%20to%20share%20with%20you%20today%20using%20the%20%3Ca%20href%3D%22http://spandcompany.com/store/index.php?main_page%253Dproduct_info%2526cPath%253D161_174%2526products_id%253D3539%22%20target%3D%22_blank%22%3ESnowy%20Village%3C/a%3E%20image%20from%20SP%20%26amp;%20Company.%26nbsp;%20It%20was%20release%20week%20this%20week%20and%20this%20image%20is%20one%20of%20the%20new%20stamps%20available%20now.%26nbsp;%20I%20also%20used%20a%20sentiment%20from%20the%20%3Ca%20href%3D%22http://spandcompany.com/store/index.php?main_page%253Dproduct_info%2526cPath%253D161_79%2526products_id%253D1841%22%20target%3D%22_blank%22%3EHoliday%20Insides%3C/a%3E%20set.%26nbsp;%20My%20patterned%20paper%20is%20from%20the%20%3Ca%20href%3D%22http://spandcompany.com/store/index.php?main_page%253Dproduct_info%2526cPath%253D28_237_208%2526products_id%253D3423%22%20target%3D%22_blank%22%3EEcho%20Park%20Reflections%20Christmas%20paper%20pad%3C/a%3E.%26nbsp;%20You%20can%20also%20find%20that%20fun%20%3Ca%20href%3D%22http://spandcompany.com/store/index.php?main_page%253Dproduct_info%2526cPath%253D30_251%2526products_id%253D3619%22%20target%3D%22_blank%22%3Ewoodgrain%20cardstock%3C/a%3E%20in%20the%20store%20along%20with%20the%20%3Ca%20href%3D%22http://spandcompany.com/store/index.php?main_page%253Dproduct_info%2526cPath%253D165%2526products_id%253D3325%22%20target%3D%22_blank%22%3Eblue%20lagoon%20button%3C/a%3E.%3Cbr%20/%3E%0A%3Cbr%20/%3E%0AHave%20a%20happy%20weekend%20and%20thanks%20so%20much%20for%20stopping%20by!%3Cbr%20/%3E%0ANiki%20:))
Happy Holidays to You and Yours 7 Nov 2013 5:51 PM (11 years ago)
 Hi Everyone! We've been busy passing around some lovely germs so I haven't had much time to create cards, but I have a few saved in drafts still. Today, I thought I would share a holiday card with you using an adorable Wee Stamps image.

I used the cute Angelica image from Wee Stamps. You can get it digitally here from Wee Stamps or as a rubber stamp from Whimsy Stamps here. I used a sentiment from Whimsy Stamps' Holiday Mini Postage Stamps set.
I love traditional red and green Christmas colors, but also like to add in a little blue now and then for a less traditional color combo. I chose some patterned papers from the Life in the Country paper pad from Maja Design. It's not a Christmas paper pad, but I think the colors and patterns work well still. I buy my Maja Designs paper pads from the Funkie Junkie Boutique.
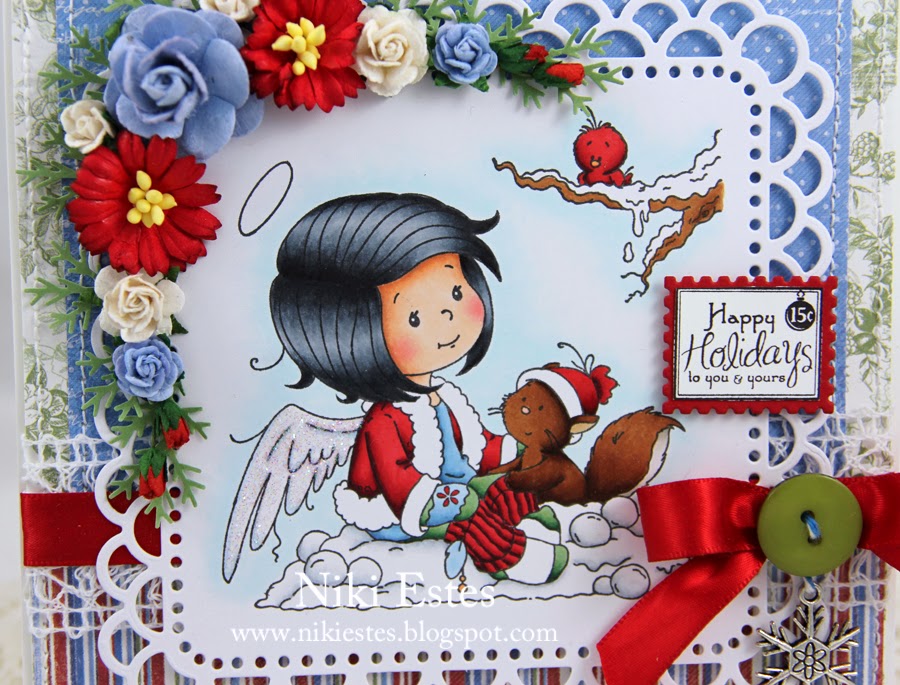
I colored the image with copic markers. (Sorry I didn't write them down this time.) The image was die cut with using the Double Scalloped Square Doily die and the die used with the sentiment is the Mini Postage Stamp die.

I added some stardust stickles to the angel's wings. (Sorry the color is a little off in this photo.) I added lots of flowers from Wild Orchid Crafts.

The crocheted lace is from May Arts and the satin ribbon, button, and snowflake charm were in my stash. I'm playing along with the Wild Orchid Craft's Ribbon and Lace challenge. I'm also playing along with The Ribbon Girl challenge which is to use Stripes on our cards.
The weather here has turned off cold and we've been getting a lot of snow and rain showers. I think our warm weather is gone until spring now. I don't know if I'm ready for that. Oh well, more time to spend with the kiddos watching movies, playing games, and just hanging out.
Hope you all have a great weekend!
Niki
%26nbsp;%20The%20image%20was%20die%20cut%20with%20using%20the%20%3Ca%20href%3D%22http://www.whimsystamps.com/index.php?main_page%253Dproduct_info%2526cPath%253D30%2526products_id%253D2019%22%20target%3D%22_blank%22%3EDouble%20Scalloped%20Square%20Doily%20die%3C/a%3E%20and%20the%20die%20used%20with%20the%20sentiment%20is%20the%20%3Ca%20href%3D%22http://www.whimsystamps.com/index.php?main_page%253Dproduct_info%2526cPath%253D30%2526products_id%253D919%22%20target%3D%22_blank%22%3EMini%20Postage%20Stamp%20die%3C/a%3E.%3Cbr%20/%3E%0A%3Cdiv%3E%0A%3C/div%3E%0A%3Cbr%20/%3E%0A%3Cdiv%3E%0A%3Ca%20href%3D%22https://blogger.googleusercontent.com/img/b/R29vZ2xl/AVvXsEjmZcDxLYySWQKrYgUMgj4JSRm5AMJMvSdZ3sINmeHtKCrzURZO2G0USMBVUkRJEWa-J94obary-6d8PuLlKSo-DLTmMB4qDVVHZDHQQJ2aMX6clgdljJjT6vr3rffpUx58Qin5fxFHyCD4/s1600/IMG_6839.JPG%22%20imageanchor%3D%221%22%3E%3Cimg%20border%3D%220%22%20src%3D%22https://blogger.googleusercontent.com/img/b/R29vZ2xl/AVvXsEjmZcDxLYySWQKrYgUMgj4JSRm5AMJMvSdZ3sINmeHtKCrzURZO2G0USMBVUkRJEWa-J94obary-6d8PuLlKSo-DLTmMB4qDVVHZDHQQJ2aMX6clgdljJjT6vr3rffpUx58Qin5fxFHyCD4/s400/IMG_6839.JPG%22%20height%3D%22400%22%20width%3D%22365%22%20/%3E%3C/a%3E%3C/div%3E%0A%3Cbr%20/%3E%0AI%20added%20some%20stardust%20stickles%20to%20the%20angel's%20wings.%26nbsp;%20(Sorry%20the%20color%20is%20a%20little%20off%20in%20this%20photo.)%26nbsp;%20I%20added%20lots%20of%20flowers%20from%20%3Ca%20href%3D%22http://www.wildorchidcrafts.com/%22%20target%3D%22_blank%22%3EWild%20Orchid%20Crafts%3C/a%3E.%3Cbr%20/%3E%0A%3Cbr%20/%3E%0A%3Cdiv%3E%0A%3Ca%20href%3D%22https://blogger.googleusercontent.com/img/b/R29vZ2xl/AVvXsEhbzqQN1tYiYStxkLK3jShhXx7s1OedBdqxrHBimhokY-mdycHnA3eKs5kiLsSNPh-5tuZHzU3YEF-c073P3hZ9Bx_FzS7x_uw-2N38VC908Bf5ueN80UFV002npc8POud8KCWFs7-jrqIM/s1600/IMG_6837.JPG%22%20imageanchor%3D%221%22%3E%3Cimg%20border%3D%220%22%20src%3D%22https://blogger.googleusercontent.com/img/b/R29vZ2xl/AVvXsEhbzqQN1tYiYStxkLK3jShhXx7s1OedBdqxrHBimhokY-mdycHnA3eKs5kiLsSNPh-5tuZHzU3YEF-c073P3hZ9Bx_FzS7x_uw-2N38VC908Bf5ueN80UFV002npc8POud8KCWFs7-jrqIM/s400/IMG_6837.JPG%22%20height%3D%22362%22%20width%3D%22400%22%20/%3E%3C/a%3E%3C/div%3E%0A%3Cbr%20/%3E%0AThe%20crocheted%20lace%20is%20from%20May%20Arts%20and%20the%20satin%20ribbon,%20button,%20and%20snowflake%20charm%20were%20in%20my%20stash.%26nbsp;%20I'm%20playing%20along%20with%20the%20%3Ca%20href%3D%22http://wildorchidchallenge.blogspot.com/2013/11/challenge-89ribbons-and-lace.html%22%20target%3D%22_blank%22%3EWild%20Orchid%20Craft's%20Ribbon%20and%20Lace%20challenge%3C/a%3E.%26nbsp;%20I'm%20also%20playing%20along%20with%20%3Ca%20href%3D%22http://ribbongirls.blogspot.com/2013/11/november-card-challenge.html%22%20target%3D%22_blank%22%3EThe%20Ribbon%20Girl%20challenge%20which%20is%20to%20use%20Stripes%3C/a%3E%20on%20our%20cards.%3Cbr%20/%3E%0A%3Cbr%20/%3E%0AThe%20weather%20here%20has%20turned%20off%20cold%20and%20we've%20been%20getting%20a%20lot%20of%20snow%20and%20rain%20showers.%26nbsp;%20I%20think%20our%20warm%20weather%20is%20gone%20until%20spring%20now.%26nbsp;%20I%20don't%20know%20if%20I'm%20ready%20for%20that.%26nbsp;%20Oh%20well,%20more%20time%20to%20spend%20with%20the%20kiddos%20watching%20movies,%20playing%20games,%20and%20just%20hanging%20out.%3Cbr%20/%3E%0A%3Cbr%20/%3E%0AHope%20you%20all%20have%20a%20great%20weekend!%3Cbr%20/%3E%0ANiki)
Snowman Poop and Fun News 3 Nov 2013 1:54 PM (11 years ago)
 Hi Everyone! I have some fun news to share. I've been invited to join the design team over at SP & Company. Samantha offers some really cute stamps from illustrators Tina Wenke and Gill Roberts along with lots of sentiment stamps and other paper crafting goodies. I'm really excited to be working with Tina and Gill's designs again. Thanks so much to Samantha for the opportunity to work with her company! You can meet the rest of the design team over on the SP & Company blog.

Every week, the design team plays along with a new theme. This week's theme is Handmade Gifts & Gift Tags. I used the Snowman & Snowdog image for my tags along with sentiments from the Forest Friends Winter Post stamp set and the Silly Holiday Treats stamp set.

I colored the white snow with a white prismacolor pencil and the rest of the tag was colored with these copic markers.
hat/vest: W4, W6, W8, W10
reds: R24, R27, R46, R89
browns: E27, E29
buttons: YR23
nose: YR16
greens: G43, G46, G28
blues: B93, B95, B97, B99
Hope you all have a great week!
Niki

Best Witches to you! 30 Oct 2013 6:44 PM (11 years ago)
 Quick post from me tonight as I'm not feeling well. I have one last Halloween card to share and figure I better get it posted since Halloween is tomorrow! I always seem to be last minute with my Halloween cards for some reason.

I used the adorable Little Witch image from SP & Company for my card. I just love Tina Wenke's illustrations! The patterned papers are from October Afternoon's Witch Hazel line and the sentiment comes with the Halloween Girl stamp.

I colored the image with these copic markers:
skin: E000, E00, E11, E13, R00, R20
blacks: w3 w4, w5, w6, w8, w10
oranges: YR15, YR16, YR18
yellow: Y15
purples: V93, V95, V99
browns: E31, E33, E37
Have a Happy Halloween!
Niki

Because You're Wonderful 29 Oct 2013 7:10 PM (11 years ago)
 Hi Everyone! Quick post tonight to share a card I created while playing along with a couple challenges.


hair: E42, E43, E44, E47, E49


I love to visit other crafter's blogs to see what they're creating. Leave me a comment so I can come visit. I love hearing from my readers. :)
Have a great day!
Niki
%3C/div%3E%0A%3Cdiv%3E%0Ashoes:%20E23,%20E25,%20E27,%20E29%3C/div%3E%0A%3Cdiv%3E%0Agrass:%20G40,%20G43,%20G46,%20E33,%20W5%3C/div%3E%0A%3Cdiv%3E%0Asky:%20BG000,%20BG01%3C/div%3E%0A%3Cdiv%3E%0A%3Cbr%20/%3E%3C/div%3E%0A%3Cdiv%3E%0A%3Ca%20href%3D%22https://blogger.googleusercontent.com/img/b/R29vZ2xl/AVvXsEi4zT8lMun3YrvvD8-4v0K8FZabU0ao1HhJAOisoT84YQkaaKtGZMCRY3G5JyUJ8EbbrVDp0pxegXrt3FQxO9G2tF7hAGBT87rSOjqoDUeKzhbwOeT4CqxSSTy7AcTGm8TclQJL8UoMKewF/s1600/IMG_7098.JPG%22%20imageanchor%3D%221%22%3E%3Cimg%20border%3D%220%22%20src%3D%22https://blogger.googleusercontent.com/img/b/R29vZ2xl/AVvXsEi4zT8lMun3YrvvD8-4v0K8FZabU0ao1HhJAOisoT84YQkaaKtGZMCRY3G5JyUJ8EbbrVDp0pxegXrt3FQxO9G2tF7hAGBT87rSOjqoDUeKzhbwOeT4CqxSSTy7AcTGm8TclQJL8UoMKewF/s1600/IMG_7098.JPG%22%20/%3E%3C/a%3E%3C/div%3E%0A%3Cdiv%3E%0A%3Cbr%20/%3E%3C/div%3E%0A%3Cdiv%3E%0AI%20used%20a%20Sakura%20Gelly%20Roll%20pen%20to%20add%20some%20shine%20to%20her%20wings%20and%20added%20a%20bunch%20of%20flowers%20from%20Wild%20Orchid%20Crafts.%3C/div%3E%0A%3Cdiv%3E%0A%3Cbr%20/%3E%3C/div%3E%0A%3Cdiv%3E%0A%3Ca%20href%3D%22https://blogger.googleusercontent.com/img/b/R29vZ2xl/AVvXsEhU5PTio6uEg2cHbGJe0L1jrdWr6g6E63ExqRVbCD27C0EqqrUX0fvVA0vlC9FPdnSwSstU9VqVWekhOSUQNlcsV2pcs5Bplt8XfW_OXLcfuSlGP2lmlSKlcxEbF_sQUiS6jUDWEkYLBRUr/s1600/IMG_7100.JPG%22%20imageanchor%3D%221%22%3E%3Cimg%20border%3D%220%22%20src%3D%22https://blogger.googleusercontent.com/img/b/R29vZ2xl/AVvXsEhU5PTio6uEg2cHbGJe0L1jrdWr6g6E63ExqRVbCD27C0EqqrUX0fvVA0vlC9FPdnSwSstU9VqVWekhOSUQNlcsV2pcs5Bplt8XfW_OXLcfuSlGP2lmlSKlcxEbF_sQUiS6jUDWEkYLBRUr/s1600/IMG_7100.JPG%22%20/%3E%3C/a%3E%3C/div%3E%0A%3Cdiv%3E%0A%3Cbr%20/%3E%3C/div%3E%0A%3Cdiv%3E%0AFinished%20it%20off%20with%20some%20crocheted%20lace,%20pink%20ribbon,%20burgundy%20button,%20and%20a%20butterfly%20charm.%26nbsp;%26nbsp;%3C/div%3E%0A%3Cdiv%3E%0A%3Cbr%20/%3E%3C/div%3E%0A%3Cdiv%3E%0A%3Ca%20href%3D%22https://blogger.googleusercontent.com/img/b/R29vZ2xl/AVvXsEhnWBPtDN6PqT6a1CoywmAMkKVtmIdkJmPFlsxozSOtZs9eU5IjKjQPhhwJZO3DBo2N96oqWt1c0Wxo0QhgtC-MQ_nN3z1FHEvp3hzi7q1UXPUWnQrKo_nVg9sALRAQ85TyWEsta4BWdqma/s1600/CLP-63.jpg%22%20imageanchor%3D%221%22%3E%3Cimg%20border%3D%220%22%20src%3D%22https://blogger.googleusercontent.com/img/b/R29vZ2xl/AVvXsEhnWBPtDN6PqT6a1CoywmAMkKVtmIdkJmPFlsxozSOtZs9eU5IjKjQPhhwJZO3DBo2N96oqWt1c0Wxo0QhgtC-MQ_nN3z1FHEvp3hzi7q1UXPUWnQrKo_nVg9sALRAQ85TyWEsta4BWdqma/s320/CLP-63.jpg%22%20height%3D%22320%22%20width%3D%22320%22%20/%3E%3C/a%3E%3C/div%3E%0A%3Cdiv%3E%0A%3Cbr%20/%3E%3C/div%3E%0A%3Cdiv%3E%0AI'm%20playing%20along%20with%20this%20month's%20%3Ca%20href%3D%22http://clpchallenge.blogspot.com/2013/10/clp-63-octobers-sketch-challenge.html%22%20target%3D%22_blank%22%3ECLP%20sketch%20challenge%3C/a%3E%20and%20the%20%3Ca%20href%3D%22http://ideastoinspire.blogspot.com/p/challenge.html%22%20target%3D%22_blank%22%3ELili%20of%20the%20Valley%20Anything%20Goes%20challenge%3C/a%3E.%20%3C/div%3E%0A%3Cbr%20/%3E%0AI%20love%20to%20visit%20other%20crafter's%20blogs%20to%20see%20what%20they're%20creating.%26nbsp;%20Leave%20me%20a%20comment%20so%20I%20can%20come%20visit.%26nbsp;%20I%20love%20hearing%20from%20my%20readers.%26nbsp;%20:)%26nbsp;%20%3Cbr%20/%3E%0A%3Cbr%20/%3E%0AHave%20a%20great%20day!%3Cbr%20/%3E%0ANiki%3Cbr%20/%3E%0A%3Cbr%20/%3E)
My Little Monster 28 Oct 2013 3:53 PM (11 years ago)
 It's hard to believe Halloween is just around the corner. I finally had the chance last week to create a Halloween card. I don't usually make very many of them, but I like to give them to my kids and I needed a couple more.

When I saw this adorable Little Monster image from SP & Company, I knew I had to color him. He's absolutely adorable! The image is from illustrator Tina Wenke. I've always loved her images (she illustrated for Stampavie when I designed for them).
I paired the image with some patterned papers from October Afternoon's Witch Hazel line and added a little black twine and an orange button.

The image was colored with these copic markers:
skin: E000, E00, E11, E13
hair: E33, E37
shoes: YR15, YR16, YR18, 00, C1, C3
costume: BG70, custom marker (3/4 BG70 & 1/4 BG72), BG72, BG75, BG78, G40, G43, G46, G28, Y21, YR30, custom marker (3/4 YR30 & 1/4 YR31), YR31, Y23, YR12, YR15, YR16, YR18
bag: E51, E53, E55, B91, E25, YR15
Thanks so much for stopping by! Have a great week!
Niki
.%3Cbr%20/%3E%0A%3Cbr%20/%3E%0AI%20paired%20the%20image%20with%20some%20patterned%20papers%20from%20October%20Afternoon's%20Witch%20Hazel%20line%20and%20added%20a%20little%20black%20twine%20and%20an%20orange%20button.%3Cbr%20/%3E%0A%3Cbr%20/%3E%0A%3Cdiv%3E%0A%3Ca%20href%3D%22https://blogger.googleusercontent.com/img/b/R29vZ2xl/AVvXsEiOPGh4aNNLdohiYVBLUBWhCTM2eIYcLy2M7fJPanTf7jukj6V3lM1sPeaAcCI6pBOYdiJ8q-Wio-QUEN5E5rz_6RUZ8CoJl9VYf71t6d72NuD4uJvIxOGM-RlHDjG0MOeaY7Aj84eRa8xT/s1600/IMG_7082.JPG%22%20imageanchor%3D%221%22%3E%3Cimg%20border%3D%220%22%20src%3D%22https://blogger.googleusercontent.com/img/b/R29vZ2xl/AVvXsEiOPGh4aNNLdohiYVBLUBWhCTM2eIYcLy2M7fJPanTf7jukj6V3lM1sPeaAcCI6pBOYdiJ8q-Wio-QUEN5E5rz_6RUZ8CoJl9VYf71t6d72NuD4uJvIxOGM-RlHDjG0MOeaY7Aj84eRa8xT/s1600/IMG_7082.JPG%22%20/%3E%3C/a%3E%3C/div%3E%0A%3Cbr%20/%3E%0AThe%20image%20was%20colored%20with%20these%20copic%20markers:%3Cbr%20/%3E%0Askin:%20E000,%20E00,%20E11,%20E13%3Cbr%20/%3E%0Ahair:%20E33,%20E37%3Cbr%20/%3E%0Ashoes:%20YR15,%20YR16,%20YR18,%2000,%20C1,%20C3%3Cbr%20/%3E%0Acostume:%20BG70,%20custom%20marker%20(3/4%20BG70%20%26amp;%201/4%20BG72),%20BG72,%20BG75,%20BG78,%20G40,%20G43,%20G46,%20G28,%20Y21,%20YR30,%20custom%20marker%20(3/4%20YR30%20%26amp;%201/4%20YR31),%20YR31,%20Y23,%20YR12,%20YR15,%20YR16,%20YR18%3Cbr%20/%3E%0Abag:%20E51,%20E53,%20E55,%20B91,%20E25,%20YR15%3Cbr%20/%3E%0A%3Cbr%20/%3E%0AThanks%20so%20much%20for%20stopping%20by!%26nbsp;%20Have%20a%20great%20week!%3Cbr%20/%3E%0ANiki)
Time to Party! 18 Oct 2013 9:05 AM (11 years ago)


My son's birthday party is coming up this weekend. I was working on a card for him (which I will share later) and had two of these images stamped. The image is from Lili of the Valley and is called Surprise! I decided to play around with one of the images and try my had at the dotted background that I often seen other bloggers doing. I'm not so sure I'm very good at it, but it was fun as something different to try.
I wanted to tone down the patterned papers (Atlantic paper pad from Studio Calico) that I chose so I painted them with white acrylic paint (slightly watered down) and let them dry before assembling my card.

dog: E23, E25, E27, E29, E21
cake: R30, R32, YR20, YR21, E23, E25, E27
candles: BG11, BG13, W7, Y17, YR15
ground: E31
background: W0, W1, W3, W5, W7

The flowers and filigree corner are all from Wild Orchid Crafts. The sentiment is from Lili of the Valley's Mixed Circular Sentiments set.

Again, the charm was purchased on ebay. I'm playing along with a few challenges: the current Ribbon Girl challenge which is Anything Goes as long as
you use a Lili of the Valley image, the A Creative Romance challenge which is Pink, and the current Lili of the Valley challenge which is Anything Goes.
It's my oldest son's birthday party this weekend. I can't believe he is going to be 10 already! Time really does fly once you start having kids. It doesn't even seem possible. Fun times to be had with family.
I hope you all have a great weekend, too!
Niki
%20and%20had%20two%20of%20these%20images%20%0Astamped.%26nbsp;%20The%20image%20is%20from%20Lili%20of%20the%20Valley%20and%20is%20called%20%3Ca%20href%3D%22http://www.liliofthevalley.co.uk/acatalog/Stamp_-_Surprise_.html%22%20target%3D%22_blank%22%3ESurprise!%3C/a%3E%26nbsp;%20I%20decided%20to%20play%20around%20with%20one%20of%20the%20images%20and%20try%20my%20had%20at%20the%20dotted%20background%20that%20I%20often%20seen%20other%20bloggers%20doing.%26nbsp;%20I'm%20not%20so%20sure%20I'm%20very%20good%20at%20it,%20but%20it%20was%20fun%20as%20something%20different%20to%20try.%3Cbr%20/%3E%0A%3Cbr%20/%3E%0AI%20wanted%20to%20tone%20down%0A%20the%20patterned%20papers%20(Atlantic%20paper%20pad%20from%20Studio%20Calico)%20that%20I%20chose%20so%20I%20painted%20them%20with%20white%20acrylic%20%0Apaint%20(slightly%20watered%20down)%20and%20let%20them%20dry%20before%20assembling%20my%20card.%3Cbr%20/%3E%0A%3Cbr%20/%3E%0A%3Cdiv%3E%0A%3Ca%20href%3D%22https://blogger.googleusercontent.com/img/b/R29vZ2xl/AVvXsEiydXSZ2DU2XXKPrjRrBXuQFx5eYex5mLoqCHl2XVaVOHlWX5tmcIuqSdGPh-1XdwdEUo7gIe1Eaulc25ZTNPjtt8EiETDxOC02QtbrJB97PvPi53Wb80lD4lGaYYSkPu-GvnSLm_y-dZKq/s1600/IMG_6802.JPG%22%20imageanchor%3D%221%22%3E%3Cimg%20border%3D%220%22%20src%3D%22https://blogger.googleusercontent.com/img/b/R29vZ2xl/AVvXsEiydXSZ2DU2XXKPrjRrBXuQFx5eYex5mLoqCHl2XVaVOHlWX5tmcIuqSdGPh-1XdwdEUo7gIe1Eaulc25ZTNPjtt8EiETDxOC02QtbrJB97PvPi53Wb80lD4lGaYYSkPu-GvnSLm_y-dZKq/s1600/IMG_6802.JPG%22%20/%3E%3C/a%3E%3C/div%3E%0A%3Cbr%20/%3E%0A%3Cdiv%3E%0A%3C/div%3E%0AAnyway,%20the%20image%20was%20colored%20with%20copic%20markers.%26nbsp;%20Here%20are%20the%20colors%20I%20used:%3Cbr%20/%3E%0Adog:%20E23,%20E25,%20E27,%20E29,%20E21%3Cbr%20/%3E%0Acake:%20R30,%20R32,%20YR20,%20YR21,%20E23,%20E25,%20E27%3Cbr%20/%3E%0Acandles:%20BG11,%20BG13,%20W7,%20Y17,%20YR15%3Cbr%20/%3E%0Aground:%20E31%3Cbr%20/%3E%0Abackground:%20W0,%20W1,%20W3,%20W5,%20W7%3Cbr%20/%3E%0A%3Cbr%20/%3E%0A%3Cdiv%3E%0A%3Ca%20href%3D%22https://blogger.googleusercontent.com/img/b/R29vZ2xl/AVvXsEhZFkx7rcxh3rw0RDdsHhUsbptG9cK1FaJwTsVQqkwMLFZmh9YYpJ53slarUpqR08v_tCf4GPok5iVBXfVIjtTAUoded2vUTFlYtMTjSEbozyZ-avu39MS4d2SJOKvWT-8Obp_zJ8dQNLc4/s1600/IMG_6801.JPG%22%20imageanchor%3D%221%22%3E%3Cimg%20border%3D%220%22%20src%3D%22https://blogger.googleusercontent.com/img/b/R29vZ2xl/AVvXsEhZFkx7rcxh3rw0RDdsHhUsbptG9cK1FaJwTsVQqkwMLFZmh9YYpJ53slarUpqR08v_tCf4GPok5iVBXfVIjtTAUoded2vUTFlYtMTjSEbozyZ-avu39MS4d2SJOKvWT-8Obp_zJ8dQNLc4/s1600/IMG_6801.JPG%22%20/%3E%3C/a%3E%3C/div%3E%0A%3Cdiv%3E%0A%3C/div%3E%0A%3Cbr%20/%3E%0AThe%20flowers%20and%20filigree%20corner%20are%20all%20from%20Wild%20Orchid%20Crafts.%26nbsp;%20The%20sentiment%20is%20from%20Lili%20of%20the%20Valley's%20%3Ca%20href%3D%22http://www.liliofthevalley.co.uk/acatalog/Mixed_Circular_Sentiments.html%22%20target%3D%22_blank%22%3EMixed%20Circular%20Sentiments%3C/a%3E%20set.%3Cbr%20/%3E%0A%3Cbr%20/%3E%0A%3Cdiv%3E%0A%3Ca%20href%3D%22https://blogger.googleusercontent.com/img/b/R29vZ2xl/AVvXsEgP6CFXudQazVP7rPlPnUJD8scKMnp3zgXnK0Px7bEAOGRX_v-0OJNZTvcHDlPF6zi8V9gccPQ1-xjbt3jQekvdylMQKtcABClccmUwjGXC-quHSnSCb9WMOhXcMUGD6_kalkcS9gcJyV81/s1600/IMG_6799.JPG%22%20imageanchor%3D%221%22%3E%3Cimg%20border%3D%220%22%20src%3D%22https://blogger.googleusercontent.com/img/b/R29vZ2xl/AVvXsEgP6CFXudQazVP7rPlPnUJD8scKMnp3zgXnK0Px7bEAOGRX_v-0OJNZTvcHDlPF6zi8V9gccPQ1-xjbt3jQekvdylMQKtcABClccmUwjGXC-quHSnSCb9WMOhXcMUGD6_kalkcS9gcJyV81/s1600/IMG_6799.JPG%22%20/%3E%3C/a%3E%3C/div%3E%0A%3Cdiv%3E%0A%3C/div%3E%0A%3Cbr%20/%3E%0AAgain,%20the%20charm%20was%20purchased%20on%20ebay.%26nbsp;%20I'm%20playing%20along%20with%20a%20few%20challenges:%20the%20current%20%3Ca%20href%3D%22http://ribbongirls.blogspot.com/2013/10/october-lovely-lili-challenge.html%22%20target%3D%22_blank%22%3ERibbon%20Girl%20challenge%20which%20is%20%3C/a%3EAnything%20Goes%20as%20long%20as%3Cbr%20/%3E%0Ayou%20use%20a%20Lili%20of%20the%20Valley%20image,%20the%20%3Ca%20href%3D%22http://acreativeromance.blogspot.com/2013/10/pink.html%22%20target%3D%22_blank%22%3EA%20Creative%20Romance%20challenge%20which%20is%20%3C/a%3EPink,%20and%20the%20current%20%3Ca%20href%3D%22http://ideastoinspire.blogspot.com/p/challenge.html%22%20target%3D%22_blank%22%3ELili%20of%20the%20Valley%20challenge%20which%20is%20%3C/a%3EAnything%20Goes.%3Cbr%20/%3E%0A%3Cbr%20/%3E%0AIt's%20my%20oldest%20son's%20birthday%20party%20this%20weekend.%26nbsp;%20I%20can't%20believe%20he%20is%20going%20to%20be%2010%20already!%26nbsp;%20Time%20really%20does%20fly%20once%20you%20start%20having%20kids.%26nbsp;%20It%20doesn't%20even%20seem%20possible.%26nbsp;%20Fun%20times%20to%20be%20had%20with%20family.%3Cbr%20/%3E%0A%3Cbr%20/%3E%0AI%20hope%20you%20all%20have%20a%20great%20weekend,%20too!%3Cbr%20/%3E%0ANiki)
bundle of joy 14 Oct 2013 3:30 PM (11 years ago)
 Hi Everyone! Hope you all had a good weekend! It was rainy here so we just hung out and watched a couple movies. I even managed to work on a couple cards. Today, I thought I would share a card I started before the baby was born and finally got finished a week or so ago.

This adorable image is from Wee Stamps and is called Angie. (You can purchase it as a rubber stamp at Whimsy Stamps here or as a digital stamp from Wee Stamps here.) Sylvia's images are always some of my favorite images and I've been pulling them out again to play. The sentiment is from Whimsy's Welcome Baby Sentiments set.
The gorgeous paper I used is from a Swedish company called Maja Design. These papers are from the Vintage Summer Basics paper pad. The patterns and papers in their collections are just beautiful! I bought mine from the Funkie Junkie Boutique. Quick shipping and great customer service!

I colored the image with copic markers. (Sorry I didn't write them down.) I've been using cork accents a lot in my scrapbooking because I love the texture it adds. I found a pad of self adhesive 6x6 cork from Die Cuts with a View. It is thin enough to die cut and punch. That is what I used for the frame around the image.
The flowers are from Wild Orchid Crafts. I didn't have the color of rose buds I needed so I lightly colored some white rose buds with a copic marker.
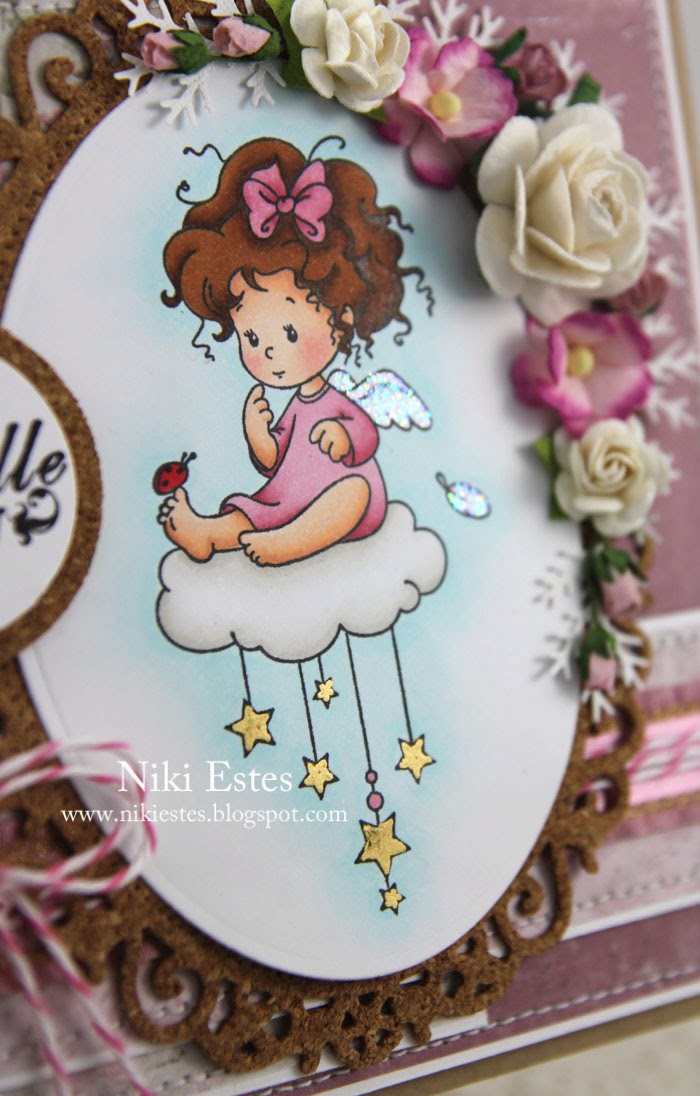
I used a gold paint pen to color the stars. I also added some stardust stickles to her wings and the loose feather.

I've had the ribbon in my stash for a really long time. It works perfect with the colors in the patterned papers. The little baby carriage charm was bought on ebay. Although it's a style I'm not sure I'm very good at, I'm playing along with Whimsy's monthly challenge which is Shabby Chic/Vintage.
Hope you all have a wonderful week! Thanks so much for stopping by and an extra thanks to those who leave comments. They always make my day!
Niki
%26nbsp;%20Sylvia's%20images%20are%20always%20some%20of%20my%20favorite%20images%20and%20I've%20been%20pulling%20them%20out%20again%20to%20play.%26nbsp;%20The%20sentiment%20is%20from%20Whimsy's%20%3Ca%20href%3D%22http://www.whimsystamps.com/index.php?main_page%253Dproduct_info%2526cPath%253D19_3%2526products_id%253D1017%22%20target%3D%22_blank%22%3EWelcome%20Baby%20Sentiments%3C/a%3E%20set.%3Cbr%20/%3E%0A%3Cbr%20/%3E%0AThe%20gorgeous%20paper%20I%20used%20is%20from%20a%20Swedish%20company%20called%20Maja%20Design.%26nbsp;%20These%20papers%20are%20from%20the%20Vintage%20Summer%20Basics%20paper%20pad.%26nbsp;%20The%20patterns%20and%20papers%20in%20their%20collections%20are%20just%20beautiful!%26nbsp;%20I%20bought%20mine%20from%20the%20%3Ca%20href%3D%22http://www.thefunkiejunkie.com/Pion_Design_s/1922.htm%22%20target%3D%22_blank%22%3EFunkie%20Junkie%20Boutique%3C/a%3E.%26nbsp;%20Quick%20shipping%20and%20great%20customer%20service!%3Cbr%20/%3E%0A%3Cbr%20/%3E%0A%3Cdiv%3E%0A%3Ca%20href%3D%22https://blogger.googleusercontent.com/img/b/R29vZ2xl/AVvXsEgYT7JtgKzfgrMPy3-z5NuiOCqkqW0jKoThkuvdtKrqiuXd4Jl7dxRi8av2u5ixXggPb42zT0Y5DKWbR1y8h0Vf_TOvVgHgEVvd3pd9uoeJFZCM9EwfYfojPZg6H3iX8KUShEy0YoI3liPH/s1600/IMG_6558.JPG%22%20imageanchor%3D%221%22%3E%3Cimg%20border%3D%220%22%20src%3D%22https://blogger.googleusercontent.com/img/b/R29vZ2xl/AVvXsEgYT7JtgKzfgrMPy3-z5NuiOCqkqW0jKoThkuvdtKrqiuXd4Jl7dxRi8av2u5ixXggPb42zT0Y5DKWbR1y8h0Vf_TOvVgHgEVvd3pd9uoeJFZCM9EwfYfojPZg6H3iX8KUShEy0YoI3liPH/s1600/IMG_6558.JPG%22%20/%3E%3C/a%3E%3C/div%3E%0A%3Cbr%20/%3E%0AI%20colored%20the%20image%20with%20copic%20markers.%26nbsp;%20(Sorry%20I%20didn't%20write%20them%20down.)%26nbsp;%20I've%20been%20using%20cork%20accents%20a%20lot%20in%20my%20scrapbooking%20because%20I%20love%20the%20texture%20it%20adds.%26nbsp;%20I%20found%20a%20pad%20of%20self%20adhesive%206x6%20cork%20from%20Die%20Cuts%20with%20a%20View.%26nbsp;%20It%20is%20thin%20enough%20to%20die%20cut%20and%20punch.%26nbsp;%20That%20is%20what%20I%20used%20for%20the%20frame%20around%20the%20image.%3Cbr%20/%3E%0A%3Cbr%20/%3E%0AThe%20flowers%20are%20from%20%3Ca%20href%3D%22http://www.wildorchidcrafts.com/%22%20target%3D%22_blank%22%3EWild%20Orchid%20Crafts%3C/a%3E.%26nbsp;%20I%20didn't%20have%20the%20color%20of%20rose%20buds%20I%20needed%20so%20I%20lightly%20colored%20some%20white%20rose%20buds%20with%20a%20copic%20marker.%3Cbr%20/%3E%0A%3Cbr%20/%3E%0A%3Cbr%20/%3E%0A%3Cdiv%3E%0A%3Ca%20href%3D%22https://blogger.googleusercontent.com/img/b/R29vZ2xl/AVvXsEgTMTA0tHhw4M-MM-WiwJku_tpzFRPp4IBnpEnWM0yCzu_qTH4shJmA4xPl1GdJKM8hF_p1IjddVIUsBZ4OzVZJcYZ-93WKwPRBEoGH9UX-9uifKKmTYu2o66aoplVgxHhLWkFGmq6s7OD2/s1600/IMG_6564.JPG%22%20imageanchor%3D%221%22%3E%3Cimg%20border%3D%220%22%20src%3D%22https://blogger.googleusercontent.com/img/b/R29vZ2xl/AVvXsEgTMTA0tHhw4M-MM-WiwJku_tpzFRPp4IBnpEnWM0yCzu_qTH4shJmA4xPl1GdJKM8hF_p1IjddVIUsBZ4OzVZJcYZ-93WKwPRBEoGH9UX-9uifKKmTYu2o66aoplVgxHhLWkFGmq6s7OD2/s1600/IMG_6564.JPG%22%20/%3E%3C/a%3E%3C/div%3E%0A%3Cbr%20/%3E%0AI%20used%20a%20gold%20paint%20pen%20to%20color%20the%20stars.%26nbsp;%20I%20also%20added%20some%20stardust%20stickles%20to%20her%20wings%20and%20the%20loose%20feather.%3Cbr%20/%3E%0A%3Cbr%20/%3E%0A%3Cdiv%3E%0A%3Ca%20href%3D%22https://blogger.googleusercontent.com/img/b/R29vZ2xl/AVvXsEj3yh7tKFSc_hrz-8YheA-mKY7vJEi0VBXMgll55_NlnGb_m1QlIwFNNHBC89EufQAOo19OdL6vEfpNExNaJJw9WUTrc_kEcq8iU7HET4yom2-GWU75Mbt27vfTj5iXQ1dZn79UYQBUqUbX/s1600/IMG_6561.JPG%22%20imageanchor%3D%221%22%3E%3Cimg%20border%3D%220%22%20src%3D%22https://blogger.googleusercontent.com/img/b/R29vZ2xl/AVvXsEj3yh7tKFSc_hrz-8YheA-mKY7vJEi0VBXMgll55_NlnGb_m1QlIwFNNHBC89EufQAOo19OdL6vEfpNExNaJJw9WUTrc_kEcq8iU7HET4yom2-GWU75Mbt27vfTj5iXQ1dZn79UYQBUqUbX/s1600/IMG_6561.JPG%22%20/%3E%3C/a%3E%3C/div%3E%0A%3Cbr%20/%3E%0AI've%20had%20the%20ribbon%20in%20my%20stash%20for%20a%20really%20long%20time.%26nbsp;%20It%20works%20perfect%20with%20the%20colors%20in%20the%20patterned%20papers.%26nbsp;%20The%20little%20baby%20carriage%20charm%20was%20bought%20on%20ebay.%26nbsp;%20Although%20it's%20a%20style%20I'm%20not%20sure%20I'm%20very%20good%20at,%20I'm%20playing%20along%20with%20Whimsy's%20monthly%20challenge%20which%20is%20%3Ca%20href%3D%22http://whimsyinspires.blogspot.com/2013/10/challenge-64-whimsy-stamps-theme-shabby.html%22%20target%3D%22_blank%22%3EShabby%20Chic/Vintage%3C/a%3E.%3Cbr%20/%3E%0A%3Cbr%20/%3E%0AHope%20you%20all%20have%20a%20wonderful%20week!%26nbsp;%20Thanks%20so%20much%20for%20stopping%20by%20and%20an%20extra%20thanks%20to%20those%20who%20leave%20comments.%26nbsp;%20They%20always%20make%20my%20day!%3Cbr%20/%3E%0A%3Cbr%20/%3E%0ANiki)
so special to me 10 Oct 2013 6:00 PM (11 years ago)
 Thanks so much for all your sweet comments on the last post. We have been truly blessed with all four of our children. It's amazing how quickly they grow up. Time just seems to be flying by. I wish I could slow it down just a little. :)

I created this card before our little one was born, but didn't get around to taking photos until this week. The image is from an old stamp set from Kanban called Big Hugs. (I heard the company went out of business, but another company may have bought them out. You can still find some of their sets on ebay and in a few online UK shops.) The sentiment came as part of the set.

Thanks so much for stopping by! Have a wonderful weekend!
Niki
so special to me card supplies:
Stamps: Big Hugs (Kanban)
Cardstock: X-Press It (Copic), red hot (MFT)
Patterned Paper: The Pier (Crate Paper)
Ink: Tuxedo Black Memento (Tsukineko)
Embellishments: twine
Copic Markers
skin: E000, E00, E11, E13, R00, R20
hair: E51, E53, E55, E57
shirt: R24, R27, R46, R89, B01, B02, B04, B06
dog: E33, E35, E37
background: YR30, custom marker (3/4 YR30 & 1/4 YR31)
%3Cbr%20/%3E%0A%3Cbr%20/%3E%0A%3Cdiv%3E%0A%3Ca%20href%3D%22https://blogger.googleusercontent.com/img/b/R29vZ2xl/AVvXsEja4jkspoARrDYDvV6jQJI2nxGbdZJlcbLldQXj-IRyFwk9VVA_mZvyFtqxJolKpgsA5T5GizIyEZV3hEqwp5XXy5_mGYAdEq5FjoKrsnyr73c73E-uDyL32STQNmpKZcDoDKh2nXYK1Tqb/s1600/IMG_6546.JPG%22%20imageanchor%3D%221%22%3E%3Cimg%20border%3D%220%22%20src%3D%22https://blogger.googleusercontent.com/img/b/R29vZ2xl/AVvXsEja4jkspoARrDYDvV6jQJI2nxGbdZJlcbLldQXj-IRyFwk9VVA_mZvyFtqxJolKpgsA5T5GizIyEZV3hEqwp5XXy5_mGYAdEq5FjoKrsnyr73c73E-uDyL32STQNmpKZcDoDKh2nXYK1Tqb/s1600/IMG_6546.JPG%22%20/%3E%3C/a%3E%3C/div%3E%0A%3Cbr%20/%3E%0AI%20created%20this%20card%20before%20our%20little%20one%20was%20born,%20but%20didn't%20get%20around%20to%20taking%20photos%20until%20this%20week.%26nbsp;%20The%20image%20is%20from%20an%20old%20stamp%20set%20from%20Kanban%20called%20Big%20Hugs.%26nbsp;%20(I%20heard%20the%20company%20went%20out%20of%20business,%20but%20another%20company%20may%20have%20bought%20them%20out.%26nbsp;%20You%20can%20still%20find%20some%20of%20their%20sets%20on%20ebay%20and%20in%20a%20few%20online%20UK%20shops.)%26nbsp;%20The%20sentiment%20came%20as%20part%20of%20the%20set.%3Cbr%20/%3E%0A%3Cbr%20/%3E%0A%3Cdiv%3E%0A%3Ca%20href%3D%22https://blogger.googleusercontent.com/img/b/R29vZ2xl/AVvXsEhV7-Uus5EjzSrZi0GN6yPhAPMbpMGGQY9Ss2yyNqYBkFKBeNmbiQUFouKqYRrSKPXndegqKnWwbnXKlqYSTzAF4kU7RgXDDZc6r1Qz8PH6P8F1yV_F9wI4mUCjyRn4fH6G74QWNUNVACzP/s1600/IMG_6550.JPG%22%20imageanchor%3D%221%22%3E%3Cimg%20border%3D%220%22%20src%3D%22https://blogger.googleusercontent.com/img/b/R29vZ2xl/AVvXsEhV7-Uus5EjzSrZi0GN6yPhAPMbpMGGQY9Ss2yyNqYBkFKBeNmbiQUFouKqYRrSKPXndegqKnWwbnXKlqYSTzAF4kU7RgXDDZc6r1Qz8PH6P8F1yV_F9wI4mUCjyRn4fH6G74QWNUNVACzP/s1600/IMG_6550.JPG%22%20/%3E%3C/a%3E%3C/div%3E%0A%3Cbr%20/%3E%0AThanks%20so%20much%20for%20stopping%20by!%26nbsp;%20Have%20a%20wonderful%20weekend!%3Cbr%20/%3E%0ANiki%3Cbr%20/%3E%0A%3Cbr%20/%3E%0A%3Cspan%3E%3Ci%3Eso%20special%20to%20me%20card%20supplies:%3C/i%3E%3C/span%3E%3Cbr%20/%3E%0A%3Cspan%3E%0A%3Ci%3EStamps:%20Big%20Hugs%20(Kanban)%3C/i%3E%3Cbr%20/%3E%0A%3Ci%3ECardstock:%20%3Ca%20href%3D%22http://www.shareasale.com/r.cfm?u%253D463739%2526b%253D199868%2526m%253D24698%2526afftrack%253D%2526urllink%253Dwww.simonsaysstamp.com/servlet/the-28095/Copic-BLENDING-CARD-X-dsh-Press/Detail%22%20target%3D%22_self%22%3EX-Press%20It%3C/a%3E%20(Copic),%20red%20hot%20(MFT)%3C/i%3E%3Cbr%20/%3E%0A%3Ci%3EPatterned%20Paper:%20The%20Pier%20(Crate%20Paper)%3C/i%3E%3Cbr%20/%3E%0A%3Ci%3EInk:%20%3Ca%20href%3D%22http://www.shareasale.com/r.cfm?u%253D463739%2526b%253D199868%2526m%253D24698%2526afftrack%253D%2526urllink%253Dwww.simonsaysstamp.com/servlet/the-12859/Tsukineko-Memento-Full-Size/Detail%22%20target%3D%22_self%22%3ETuxedo%20Black%20Memento%3C/a%3E%20(Tsukineko)%3C/i%3E%3Ci%3E%3Cbr%20/%3EEmbellishments:%20%3C/i%3E%3Ci%3Etwine%3C/i%3E%3Cbr%20/%3E%0A%3Ci%3E%3Ca%20href%3D%22http://www.shareasale.com/r.cfm?u%253D463739%2526b%253D199868%2526m%253D24698%2526afftrack%253D%2526urllink%253Dwww.simonsaysstamp.com/servlet/the-COPIC-Markers/Categories%22%20target%3D%22_self%22%3ECopic%20Markers%3C/a%3E%3C/i%3E%3C/span%3E%3Cbr%20/%3E%0A%3Cspan%3E%3Ci%3Eskin:%20E000,%20E00,%20E11,%20E13,%20R00,%20R20%3C/i%3E%3C/span%3E%3Cbr%20/%3E%0A%3Cspan%3E%3Ci%3Ehair:%20E51,%20E53,%20E55,%20E57%3C/i%3E%3C/span%3E%3Cbr%20/%3E%0A%3Cspan%3E%3Ci%3Eshirt:%20R24,%20R27,%20R46,%20R89,%20B01,%20B02,%20B04,%20B06%20%3C/i%3E%3C/span%3E%3Cbr%20/%3E%0A%3Cspan%3E%3Ci%3Edog:%20E33,%20E35,%20E37%3C/i%3E%3C/span%3E%3Cbr%20/%3E%0A%3Cspan%3E%3Ci%3Ebackground:%20YR30,%20custom%20marker%20(3/4%20YR30%20%26amp;%201/4%20YR31)%3C/i%3E%3C/span%3E)