Many airsoft BB gun users
take part in organized skirmishes - aka fake battles and survival scenarios. A
lot of people don’t believe in ‘playing’ with guns or allowing youngsters to
play with guns or take part in skirmish activities as they believe it’s setting
a bad example. However, using airsoft BB guns
and taking part in skirmishes can teach you a lot about being prepared and
surviving in any situation.
Honing your shooting skills
You may think that in real
life you will never need to know how to shoot a target, but at one point or
another, you may well need to be able to do so. Its one thing shooting targets at a shooting range; it’s completely another shooting a moving target during a
skirmish, which is why skirmishes are so useful when it comes to honing your
shooting skills. When it comes to surviving in the wilderness, being able to
shoot a moving target - ideally, at a distance away - is crucial. Proving that
skirmishes are an ideal way to do this, many police forces and military forces
use BB guns and skirmishes to help new recruits hone their shooting skills.
at a shooting range; it’s completely another shooting a moving target during a
skirmish, which is why skirmishes are so useful when it comes to honing your
shooting skills. When it comes to surviving in the wilderness, being able to
shoot a moving target - ideally, at a distance away - is crucial. Proving that
skirmishes are an ideal way to do this, many police forces and military forces
use BB guns and skirmishes to help new recruits hone their shooting skills.
Learning to work as part of
a team
Another important lesson
that skirmishes can teach you is working successfully as part of a team. If
you’re someone who watches survival films or war films even, then you will know
that when it comes to survival, teamwork is often crucial. Skirmishes teach you
how to not only look after yourself but also your team members, as well as how
to obey orders and do as you’re told. If you are put in a leading position,
skirmishes also teach you how to lead a team and determine who does what role
within it. When it comes to survival (and preparation), being a good delegate
is important - this is a skill that leading a skirmish team will allow you to
develop.
How to stay hidden
Just like in real wars, the
key to surviving when under attack is being able to stay hidden. Taking part in
skirmishes teaches you how to stay hidden by camouflaging yourself. It also
teaches you how to pick the opportune moment to reveal yourself and how to
determine when that is. Talking about careful thinking, it’s also crucial to
learn to use ammunition wisely, which is another key thing that skirmishes
teach you. You only have a certain amount of ammunition and have to learn to
make it last, if you’re going to survive, that is.
Adapting to different
environments
Last but not least,
skirmishes teach you how to successfully adapt to play in different
environments. Sometimes matches will be held outdoors in woodland areas other
times they will be held in indoor areas like old malls. If you’re going to
survive whatever is thrown at you, you need to know how to adapt to different
environments and use your airsoft skills successfully in each of them. They say
that practice makes perfect, so the more skirmishes in different environments
you compete in, the better.
Airsoft BB guns and
skirmishes can teach you a lot about being prepared and surviving anything,
from a Zombie apocalypse to a terrorist takeover.
Staying above the water line!
Riverwalker


We’ve all made mistakes before, but some of us are still making
mistakes that we don’t even realize we’re making. Our bug out bag is sitting in
the corner and we think we’re ready to go if anything were to happen, but
there’s really so much more you could be doing to be completely prepared. Here
are 6 things to start doing now.
1.) Gather your team
You might decide that turning your back on mankind and trying
to survive completely alone is the best idea, but there’s no way you can do it
all on your own. Find those closest to you who you trust and want to survive
and create a team. In the end of the world, having
others on your side will make your load lighter and chances of survival higher.
When you’ve assembled your team, figure out who is strong in what areas and
assign tasks. If you don’t have someone who is skilled in a certain area you
believe is vital, either find someone who is to join or have someone learn how
to do it.
2.) Learn new skills
Even the most prepared survivalist doesn’t know everything they
need to survive. Being skilled in all kinds of different areas will help you be
even more prepared for the worst. Skills like hunting, defense, building
shelter, and lifesaving techniques are important for every advanced prepper.
Taking online courses like ACLS recertification and canning classes make
learning new skills easy.
3.) Practice, Practice,
Practice
When a disaster comes, you don’t want to be running around like
a chicken with it’s head cut off. You want to be prepared for the worst, but
how do you do that? Practice. Get your team together and start
running through drills so everyone knows exactly what they need to do when the
dreaded day comes. Practicing won’t only help teach everyone what is expected
of them, but will help you figure out what areas still need to be prepped.
You’ll hit roadblocks in your practice run that you can fix before a disaster
hits and you’ll be that much more prepared.
4.) Take a breather
Take a minute to just think and relax. You don’t want to always
be uptight and worrying about what could go wrong. Being mentally stable is a
key to being a successful prepper. Not focusing on being prepared will help you
get back to the basics and figure out what is really important to you. Once you
get back to work, this will help you be refocused and know what areas need
work.
5.)Bug in
We all have our bug out plan, but what happens if we get
trapped in or it isn’t safe to go outside? You need to be prepared to bug in,
or stay in place and survive, and know when you should bug out or bug in.
Certain emergencies will require you to bug out and certain ones will require
you to bug in. Either way you should be prepared, but a lot of us only think
about bugging out. We don’t have the necessary supplies or plans to stay in
place. Create a plan for staying in place that includes security, shelter, communication,
and how you will get food once your supply runs out. Keep a stash of food close
by to be prepared to bug in. Here are some other tips for bugging in.
6.) Check your supplies
Things go bad and we don’t think about it. You don’t want to be
stuck in a disaster zone when nothing works. Checking all your supplies periodically will
avoid this disaster of it’s own. Make sure your car is still in good shape.
Check your food storage occasionally to make sure everything hasn’t expired.
The best tip I’ve heard when checking your supplies is check it all yourself.
You can’t just assume they will work when you need them and someone else might
not like some of your supplies. If you check everything, you’ll know it works
and you’ll know if it works for you.
We all make mistakes when we’re prepping for a disaster, but
there are some we can easily avoid. If you start implementing the above tips,
the day the world ends will go a lot smoother for you and your family.
Staying above the water line!
Riverwalker
There’s a new trend
emerging, but it’s not one that’ll have you visiting clothing stores. Natural
calamities are hitting places all over the world – occurring at a rate never
seen before. The chances of you being next are at the highest they’ve ever
been, and you best prepare. For this, you have the bug-out bag.
Bug-out bags should contain
everything you need for at least 72 hours of evacuation from a disaster site.
Keep that in mind when you go over the following list of essentials found in
every bug-out bag.
1. Water
Ah, the stuff of life.
Science says you can last weeks without food, but can die from dehydration in a
matter of days. Bring at least a liter for every day you expect to remain in
evacuation per person. In that case, have a minimum of three liters per person ready. Store your water in sturdy containers just to be safe, too.
If in case it turns out you hadn’t brought enough water, having water purification tablets ready should
do the trick.
2. Food
Canned goods and dehydrated
meals in plastic containers and paper
bags are ideal over fresh food for a lot of reasons. For one, they require
little to no preparation – something you probably won’t have the resources for
in an evacuation site. They also have a prolonged shelf life (or, in this case,
bag life), which you’ll need when you can’t access refrigeration. To add, the
cans could also be used for other purposes throughout your evacuation. Prepare
some food preparation instruments
like a knife, although that could easily be substituted by the more useful Swiss knife.
3. First Aid
Accidents can happen at any
time, and even more so when disaster strikes. Your bug-out bag should contain
basic first aid, including bandages,
povidone iodine, adhesives, tweezers,vitamin tablets
and your prescription medicines. Also
consider putting in some antibiotics
like cephalexin, ciprofloxacin and metronidazole. These handle all kinds of
nasty infections you’ll be prone to in an evacuation.Your bug-out bag should
also have some benadryl in case of
allergies. Not everyone may have these ready, so be open to sharing your aid
with strangers. Who knows? You may even find yourself on the receiving end.
Zip ties already have so
many functions in regular, everyday life, yet they prove even more useful for
evacuation purposes. These can be used to restrain objects in cases of strong
winds, restrain people in times of danger or panic, hold together different
materials to keep warm or expand your shelter, serve as a temporary tourniquet
when a proper one can’t be made – the list goes on.
5. Personal hygiene materials
Getting struck by disaster
is no excuse to let yourself go. Have the basics like tissue, soap, a toothbrush, and toothpaste. Bringing a razor serves both purposes of grooming and
self-defense.
6. Self-defense
Should supplies become
scarce or you encounter any danger (let’s hope not), you’ll be glad you packed
something to protect you and your loved ones with. Rifles are good for hunting
too in case food runs short.A .22 caliber rifle
seems to be the rifle of choice in this case.
7. Alternative power supply
When you’re bugging out,
chances are there won’t be a readily available power supply. It’s a good thing
technology has alternative, renewable solutions for generating electricity. Get
yourself a crank power charger or
even one that runs on solar power. The latter would, obviously, not be ideal in
a hurricane situation. More specifically, there are also emergency radios
available that run on crank power.
8. Fire-starter items
At home, you cook, warm up,
and need light. Evacuation is no different as these are essentials. There is,
after all, a reason the discovery of fire propelled human evolution. Pack some
waterproof matches, lighters, maybe even a can of butane. That last one will be
especially helpful in the case of a zombie apocalypse as it makes a good
makeshift fire bomb.
9. Light source
Again, no power means no
light, and that becomes an especially pronounced problem come night time. A torch with a hand crank is ideal, but
isn’t always available. Battery-powered should do just fine, but remember to
pack extra batteries in that case.
There are also some solar-powered lamps
available in the market. Most of these things can be found in the camping
section or appliance section of most department stores.
10. Clothes
Don’t bring your whole
wardrobe. Remember that a bug out bag is ideally good for only three days. Go
for smaller, lighter garments like your average t-shirts, shorts, and
the like. Extra underwear and socks are good, too. Should these run
out, you could rinse them out at a nearby water supply, but let’s not hope it
gets to that. And, make sure the water used for laundry isn’t meant for
drinking. Come on.
11. Shelter
Other than having shelter
for the sake of shelter, this also provides safety for you, your loved ones and
your belongings. You’ll also need to be well-rested to stay alert – of utter
importance in times of calamity. There are several compact tent variants for you to choose from. Also make sure you have on
you some tarp and ground pads.
12. Survival manual
There are some thing you
just can’t be too prepared for, and being prepared entails covering every possible
scenario. Survival manuals will provide the necessary know-how for sticky
situations and should your evacuation level up to a survival scenario.
The rule of thumb in packing
your bug-out bag is to expect for the best while preparing for the worst. You
know your area and its people better than any website, and should use that
knowledge in stocking up. Should disaster strike, you’ll find these items to be
more than useful for your evacuation.
Staying above the water line!
Riverwalker

Venturing into the mountains must be accomplished with caution. Mountain altitudes pose health risks to the human body. Simple guidelines help diminish the effects of altitude. With the proper preparation, time in the mountains can be safe and enjoyable.
Guidelines for diminishing the effects of altitude.
1. Hydration
At altitude, drinking plenty of water is crucial. The body loses increased amounts of water during respiration, exertion, and more frequent urination. In addition to water, utilize sport drinks and juices to hydrate while replacing lost electrolytes. Avoid using drinks that sabotage hydration such as caffeine and alcohol.
2. Rest
With less oxygen available in the thinner air, the body will labor to perform normal activities. Give the body time to adjust by resting and reducing normal physical activities by 50 percent. Take the opportunity to get a good nights rest. If necessary, sleep on your side, use a nasal saline spray, or descend to a lower elevation when sleeping.
Many people associate the effects of altitude sickness to a hangover/flu with symptoms such as headache, dizziness, nausea, poor appetite, fatigue, and shortness of breath. Following these guidelines will help diminish the effects of altitude on the body. If hydration and rest fail, descend to a lower elevation, as time is the only way for the body to successfully adjust to altitude.
Staying high above the water line!
Riverwalker

The
true costs of living off the grid are a lot more than you would imagine.
While the dream of being energy independent is a worthy goal, the costs
associated with off the grid living may not be a feasible solution. With
limited resources and even a more limited budget, the majority of people may be
better off using a hybrid solution.
While we often complain about the utility services we
receive, it is easy to forget that the costs for maintaining that service comes
at a higher price than we realize. When going totally off the grid, the
majority of these costs for maintenance and upkeep will shift from a utility
service to you. Having a backup system in place to in case your current
services are interrupted may be a better option. It is also important to
remember that sheltering in place will generally be your best option in all but
the most extreme circumstances.
The Hybrid Solution
While I would prefer to be totally off the grid, it is not
economically feasible in my case. Your income can severely limit monetary
resources to accomplish off the grid goals but can be done if you use a
combination of current resources with good backup options in place. The best
place to start is with satisfying your basic needs.
1.) Shelter
Normally your home will be the first and best option for
shelter. There is a chance that it may become temporarily uninhabitable due to
storm damage or other problems. While repairs are being made, even a simple
storage shed can solve your needs for temporary shelter. In my case, I have a
12 X 20 storage shed that has a simple solar setup (approximately $600) that
provides light and electricity independent of the grid. It also has a couple of
sleeping lofts and is well insulated. If necessary, in an emergency it could
act as a secondary shelter.
2.) Water
Water will be an absolute necessity. Drilling your own water
well may be impractical and extremely costly. It may also be prohibited by your
local utility. Fortunately, the simple collection of rainwater can solve most
of your water needs. A rainwater catchment system (approximately $500) combined
with a good filtration system can solve most of your water needs. In my case,
our monthly average of 3 inches of rainfall can completely fill all our water
storage barrels and provide us in excess of 500 gallons each month.
3.) Auxiliary Power
There is still a need for temporary power in order to keep
certain appliances properly functioning. Your refrigerator and freezer won’t
keep your food adequately without a continued source of power. In my case, I
keep a small portable gas generator (approximately $400 + fuel) to use for just
such an occasion. If a major power outage of any lengthy duration occurs, I can
keep my appliances functioning long enough to cook and eat the food items they
contain.
4.) Cooking
There are several other priorities that also need to be
addressed in order to have off the grid backup for your current utility
services. The easiest and probably the most affordable sources for heating and
cooking needs are propane and wood. Gas and charcoal grills or wood stoves are
affordable, require minimal maintenance and work extremely well in an off the
grid or emergency situation. Most people quite often have one or both already
available for use (I have both...can’t have too many backups).
5.) Heating
Small propane heaters ($200) can also provide emergency heat
if needed during colder weather and are usually extremely portable. Most can
even be used indoors with proper ventilation. You may even have a fireplace in
your home that can provide an auxiliary heat source.
You don’t have to live off grid but can use simple and low
cost options to provide alternatives to help you maintain your lifestyle in the
event of an emergency.
Got hybrid solution?
Staying above the water line!
Riverwalker

Summer temperatures in Texas can get a little warm. I love my
Tervis 
in the office, but it was just not convenient for my mountain bike. I decided to put the Camelbak Big Chill to the test.
For fun, I rounded up some of my other water bottles to get them in on the action. They were not all the same size bottles, so I used a 16 oz cup to place the same amount of ice in each bottle. I only placed ice in the bottles and just measured how long it took for the ice to melt in each bottle.
At the end of 1.5 hours, ice was still visible in all the bottles. The single wall stainless steel dropped first. Then, my basic water bottle melted. An hour later, my non insulated Nagalene and Stanley were done. Not surprisingly, the two insulated bottles were the only ones still with ice.
The Camelbak Big Chill made 4.5 hours before the ice had all melted. It gave out while the Tervis still had several ice cube remnants visible.
The test started at 11:00 AM and outside temperatures reached into the mid 90's. The Camelbak Big Chill will not replace my Tervis around the BBQ pit, but it will definitely be my companion on my mountain bike excursions. It might even replace my day hike water bottle.
Staying above the water line!
Riverwalker

Blade Length: 2 inches Weight: 19 oz. Overall Length:12.5 inches
Blade Length: 2.75 inches Weight: 24 oz. Overall Length:15.75 inches
Performed a quick field test on some oak firewood in the backyard. Smaller oak limbs(4-6 inches in diameter) were cut in half easily with both SOG axes. The largest piece(10-12 inches in diameter) the SOG Tomahawk was definitely easier, but the SOG Fasthawk did the job as well. In addition, I pruned some small limbs(4-6 inches in diameter) off trees. Again, I could not find a significant difference in performance between them.
I found the compact size of the SOG Fasthawk to be worth the slight sacrifice in performance over the SOG Tomahawk. The Fasthawk will be allocated to my EDC(Every Day Carry) and the Tomahawk will find a home in my BOB(Bug Out Bag.)
Staying above the water line!
Riverwalker
 Mother Nature offers a full spectrum of challenges on nearly every outing. Outdoor enthusiasts must prepare for possible obstacles or suffer the consequences.
A favorite is always water crossings. Don water shoes and splash around, or use trekking poles to help balance across rocks and logs? Always judge water crossings carefully as these can spell disaster if not done with care.
Weather dominates preparation for most trips. Always research the climate and patterns in the area visiting. Mountains require sunscreen and sunglasses due to higher elevations and increased sun exposure. However, a rain jacket was also packed to cover the common summer rain showers. Mother Nature blessed me on this outing with some free marble size hail along with the rain.
The Forest Service and volunteers do tremendous work in trail maintenance. However, one must always be ready for recent obstacles left by Mother Nature. Exercise caution in choosing to simply step over or go around.
Mother Nature can provide changing conditions on nearly a daily basis. Heavy rains from a previous day converted an easy trail into a rock hopping mud festival. Surprisingly, I enjoyed both.
Even Mother Nature's spectacular scenery offers interesting challenges. The mosquitoes in this area were so numerous that I can't believe they aren't visible in the photo. I'm glad the bug repellent kept them at bay while I snapped the photo.
Mother Nature creates the wonders that make outings worth the trip. With proper preparation and research, you can make sure your outing is enjoyable no matter what nature throws at you.
Staying above the water line!
Riverwalker

Abundant rainfall in the area has Gorman Falls flowing nicely. The area is protected by the Colorado Bend State Park, so visitors are limited in how close they can get to the falls. The Texas State Park does provide an area near the falls with great views.
Gorman Falls will make you think an underground cave has erupted to the surface. Water from Gorman Creek cascades 60 feet forming calcite deposits similar to caverns.
Colorado Bend State Park near Lampasas, Texas does offer several hiking trails including the 3 mile round trip Gorman Falls Trail. This trail does have many large limestone rocks which can make footing difficult at times.
As always, bring appropriate attire, footwear, and supplies. Leave the flip flops in the car.
Hiking to the water line!
Riverwalker

The solution for
the bug out bike has been delivered. The
unopened box sits waiting to be born into my gear. The Nashbar Single-Speed 29er Mountain Bike - MEDIUM is
a perfect fit for survival situations due to its simplicity, adaptability, and
affordability.
The single speed
is all about simplicity. The bug out
bike will take the headache out of bike gear maintenance. Don’t let the racket of a derailleur
compromise your stealth. This single
speed does not have shifters or any derailleur.
The mountain bike
is also built for adaptability. The
aluminum frame provides an efficient strength to weight ratio for additional
durability. The oversized 29er tires provide exceptional mobility over
obstacles on and off road.
Nashbar delivers
affordability for the bug out bike.
Finding a quality single speed mountain bike is like looking for
supplies after a devastating event. Usually,
all the inexpensive options are heavy and the quality options are overpriced or
unavailable. Nashbar delivers a
lightweight single speed at an affordable price tag usually around $400.
Go for the gear
that will have you counting down the days to a survival situation like it was
Christmas. Go for simplicity. Go for adaptability. Go for affordability. Go for the Nashbar Single-Speed 29er Mountain
bike.
Riding above the
water line.
Riverwalker

When
deciding upon a long term food storage product, it helps to sample the product
before purchasing a large quantity for your emergency pantry. This is a product
review of one of the long term food storage products available from www.valleyfoodstorage.com.
After
receiving a sample from Valley Food Storage, a test was conducted on the
various aspects that are important in a long term food storage product. The
sample food product tested was a package of “Enchilada Beans and Rice”.
Review
Results:
1.) Cost -
This product costs $11.95 for a 5 serving unit. This breaks down to about $2.39
a serving and is a reasonable price for a long term food storage product with
an extended shelf life. They also offer a variety of discounts on their site.
2.)
Packaging - The packaging is extremely sturdy and comes in a Mylar pouch that
is resealable. The pouch was easy to re-seal and maintained a good seal
afterwards. The left-over pouch can also be used as an emergency water
container or to carry other snack items.
3.)
Preparation - Prep time was roughly 20 minutes total and requires two cups of
boiling water. Cooking was a fairly easy process if you follow the cooking
directions on the package.
4.) Appearance
- The contents looked and smelled very appetizing.
5.) Taste &
Smell - When cooked, it had a pleasant aroma and the beans and rice were very
soft. One noted exception is that there were no enchiladas in the package.
“Enchilada flavored” would be a better description. Seasonings were well
balanced. This is important for a person that doesn’t like a large amount of
seasoning on their food.
All things
considered, this is a very good food storage product. After sampling a wide
variety of long term food storage products over the years, this item compares
very favorably with other similar long term food storage products.
Got long
term food storage?
Staying
above the water line!
Riverwalker

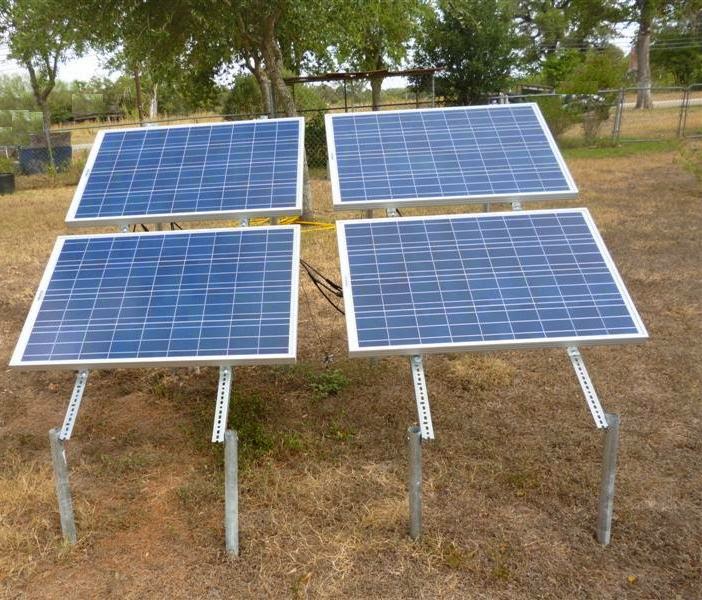
Pole-mounted Solar Panels
The conversion of my garage
to solar power is completed and hopefully it will lower my utility bill. It
took a while to get everything set up and working. My panels were pole mounted
in order to make it easier to service the solar panels.
A total of four 100 watt
solar panels were used to charge a battery bank of four 100 amp hour batteries.
Two inverters were used to furnish power. A 100 watt pure sine wave inverter
was used for lights and to power a small air compressor. An 1800 watt pure sine
wave inverter was set up to furnish power for my power saws. This covers the
majority of my power usage in the garage. I’ll also being running a fairly low
wattage heat lamp for the chickens in the winter.
A solar panel kit from Grape Solar  was used for this project and came with most of the necessary wiring, a
charge controller and an inverter. There is additional information posted in my product review. A separate grounding rod was installed on
the panels and the solar disconnect that was installed.
was used for this project and came with most of the necessary wiring, a
charge controller and an inverter. There is additional information posted in my product review. A separate grounding rod was installed on
the panels and the solar disconnect that was installed.
My grid-powered outlets are
still functional and can be used if my solar power system goes down for some reason but won’t
be used unless absolutely necessary. With the completion of this project, my
storage shed, greenhouse and garage are now on solar power.
Part Two will show my battery bank, solar disconnect and charge controller set-up.
Got solar-powered garage?
Staying above the water
line!
Riverwalker
Many times the greatest
threat to our survival is influenced by irrational fears. While there is some
basis to our fears, it is our understanding of those fears which will strongly
affect the outcome of our survival. Learning to cope with these fears requires
a basic knowledge of why we have developed an irrational response to threats to
our survival.
Many of us have a basic fear
of the darkness. This is due to a variety of factors from our own life
experiences. Tales of the boogeyman when we were young made us fearful of the
dark but had little or no foundation in the truth. It was simply a way parents
controlled unruly children but their actions also instilled a healthy respect
for the dangers that can be encountered in the dark. Many dangers of the dark
are real but many of the dangers are ones of our own making.
Simply put, darkness is the
absence of light. Thus the ability to conquer any fear begins with a thorough
understanding of that fear. This is important in order to develop ways to
conquer the darkness that will alleviate our fears. One of our most severe
shortcomings is our inability to see in the darkness. Our night vision is
extremely poor and pales in comparison to other creatures present in our world.
This creates problems when it becomes necessary for us to move about or perform
tasks in the darkness. Even the simple task of moving from one place to another
can create a dangerous situation. We risk injury from falling or tripping over
an object even in the safe confines of our home if we move about in the dark
unaided.
The darkness comprises
nearly half of our existence and it is necessary to deal with this fact. One of
the means to conquer a fear of the dark is to combat it with its opposite.
Light can banish the darkness and reduce our fears. A flashlight, a simple
candle or a roaring campfire can and will help to reduce your fear of the dark.
You have given yourself the means and ability to see things more clearly. Those
dangers which lurk in the dark have now been brought into the light and your
safety and well-being is increased.
The darkness can hide many
things. This is the reason a majority of predators; including the two-legged
variety, use the darkness to disguise their movements. The darkness can also be
your friend because it can hide your presence or activities if necessary. The
important thing is to use the qualities of darkness to your advantage to
increase your chances of survival.
The darkness is both friend
and foe. While we are basically creatures more accustomed to sunlight, it is
your actions and a rational response to the darkness that will ultimately
determine the outcome of your survival. Understanding our physical limitations
caused by darkness and using relevant actions to overcome them will prevent the
darkness from becoming your enemy.
Got dark?
Staying above the water
line!
Riverwalker
If you find yourself in a
survival situation, every person needs to be able to use what they have on hand
and take full advantages of what may be limited resources to satisfy their
needs. Each of your resources will have
unique advantages and disadvantages. Your main task should be to figure out how
to use these items to meet your needs and increase your chances of survival.
Here are some simple tips to remember when making DIY survival gear.
DIY Survival Gear Tips
1. Use only the minimum resources necessary.
Making DIY gear is a great
way to train yourself to find alternative uses for items to meet these needs.
It is important to keep things simple because this often makes things easier to
accomplish. It will also help to reduce the amount of your available resources
that will have to be used to make your goal a reality. The less hardware that
you need to accomplish your project will increase your ability to achieve a
successful outcome with limited resources.
2. Use your survival needs as a guide.
Need is a great motivator.
Combining a need with a little imagination can usually lead to a successful
project. In a survival situation, failure is not an option and simple solutions
often work best.
3. Limit your use of power tools and electricity.
Hand tools work even when
there is no power available. Try to design your DIY projects to minimize the
use of electricity and the need for power tools. If the grid goes down, hand
tools may be your only option to complete your project. You don’t want your
thinking to be dependent upon grid power that may not be available.
4. Keep your projects simple and uncomplicated.
Complexity can create more
problems than it solves. If you make your projects simple and uncomplicated,
other family members can assist in the creation and development of any survival
gear you may need. If a project is designed with simplicity in mind, you can
free up your time to work on other projects. Children and senior family members
can also contribute to the process of making needed survival items if you keep
things simple.
5. Remember the primary goal of your project.
Your goal should be to
create DIY projects that require minimal tools, no electricity, and minimum amounts
of hardware or resources. This will help you be better prepared.
Got DIY survival projects?
Staying above the water
line!
Riverwalker
Wishing a Merry Christmas to everyone!
Hope you have a safe and happy holiday.
RW
Survival can be an
impossible goal if we place undue burdens on our physical abilities. This is
often exemplified by our attempts to carry every possible item of survival gear
we own. The result is that we have created a scenario that will make the goal
of survival more difficult to achieve. The old saying “Know more. Carry less.”
is a good reminder that will help you avoid this problem. Mobility is directly
related to your survival.
Mobility is a key factor in
many survival situations. It allows you to remove yourself from dangerous and
life threatening situations. It allows you to search for needed shelter, food
or water. The inability to move can be the start of a process that will
ultimately eliminate any chances you may have had for survival.
Our bodies are remarkable
things and we often push ourselves to extreme limits even before we become
engaged in a survival situation. This is a dangerous approach that should be
avoided and physical limitations must be dealt with prior to finding ourselves
in a survival situation.
One of the most difficult
things to deal with in a survival situation is an injury. It will slow you down
or completely stop you in your tracks. Your chances of survival have almost
been completely eliminated. There are numerous examples of things that can be
avoided to safeguard against this problem.
A prime example of this is
the bug out bag. Carrying a heavy pack can lead to knee or back problems that
are a creation of our own making. Military personnel have had to deal with this
situation throughout history and many a battlefield was littered with abandoned
gear when their survival was at stake. Make sure you cut your body some slack
and carry a pack that doesn’t push the limits of your physical abilities before
its necessary. While a trained soldier may be able to carry 100 pounds of
equipment, it could be a deadly burden for someone without the proper physical
ability and training. Know more. Carry
less.
Another example of dangers
to your mobility is caused by the failure to treat simple injuries. A cut on
your hand or foot can cause a host of additional problems you won’t need. Take
the time to handle cuts, sprains, blisters and other minor injuries as quickly
as possible.
You can also adversely
affect your mobility by being improperly dressed. A good pair of shoes or boots
is of utmost importance. Many people have a hard time walking even a short
distance in their bare feet. Imagine what the effects on your mobility would be
if you found yourself with bare feet. The same goes for items such as gloves to
protect your hands and a good pair of pants to protect your legs. Don’t forget
to include a decent shirt and some sort of jacket appropriate for your weather
conditions.
Lee Mastroianni of the
Office of Naval Research summed it up very appropriately:
“The ability to move is
directly related to the ability to survive.”
Staying above the water
line!
Riverwalker
It pays to be
prepared for Christmas. Most people have a certain set of rituals
for the holidays. This usually includes buying and wrapping gifts, decorating
and buying a Christmas tree. These are time honored traditions, and they’re
fun, but they can also be hard on the environment. Fortunately, there are many
fun ways to celebrate a “Green Christmas” — one that is both environmentally
friendly and joyful. Let’s look at some of the best ways to prepare for
a green holiday season.
Send Emails Rather Than Paper Cards
While Christmas cards are a tradition, they also waste quite a bit of
paper between the card and envelope. Emails are not only more environmentally
friendly, they save you postage. You can get creative in your emails and
include nice holiday themed graphics or links to e-cards.
Gift Wrap Using Recycled Paper
You can either buy recycled
gift wrapping paper or repurpose paper you already have. You can
make your gift wrapping even greener by also using recycled bows, ribbons and
other decorative items. Another option is to wrap gifts in decorative gift bags
that can be reused.
Use a Live Christmas Tree
It may come as a surprise to some, but live
Christmas trees are better for the environment than
plastic ones. Plastic consumes many resources and creates quite a bit of waste
and pollution. The most sustainable type of tree is a live one in a pot. You
can either keep the tree in its pot or replant it after the Christmas season.
Use LED Lights on the Tree
When lighting up your Christmas tree, use LED lights, which are far more
energy efficient than other kinds. LED lights can last as long as 100,000
hours, which will get you through many holiday seasons! You should also
remember to turn the lights off while everyone is asleep. Christmas tree
lights, even LEDs, can actually hike up your monthly energy
bill in December, so this might also be a good time of year to
look into whether or not you can reduce your monthly energy costs by changing
service providers (see this website for more details).
Give Creative Gifts
There are many alternatives to buying gifts at the mall or ordering them
online. You could make gifts for people. If you are artistic you could create
paintings, sculptures or collages for people. If you are handy, you could make
items out of wood, metal or other materials. If you are good at sewing or
needlepoint, clothing, rugs or blankets all make great gifts. Another option is
to give experiences rather than physical objects. This might include yoga
classes, massages, spa treatments or gift certificates for a nice restaurant.
Buy “Green” Gifts
There are now many companies that make eco-friendly gifts, whether
clothing, jewelry, toys or home decor. You can also find creative and green
gifts at antique shops. Most of all, try to avoid toys and gadgets that
require batteries, which are an environmental
hazard when discarded.
Reduce Holiday
Driving
It’s easy to get into the habit of driving everywhere during the holiday
season. Between shopping, holiday parties and visits, people often consume
extra fuel during this time of year. Try to minimize this by doing more
carpooling. If you have friends, co-workers or family members attending the
same events, arrange to go together.
Buy in Bulk
It’s typical for people to stock up on food for holiday parties and
meals. When you go to the store, buy as many items in bulk as you can. This
includes not only food but also paper items such as paper towels and napkins.
This will save you money and cut down on the packaging used.
These are just a few of the ways that you can have a “Green Christmas”
this year. When you start thinking this way, you will probably come up with
more ideas of your own. It’s often more fun to have environmentally friendly
holidays, as you have to think creatively rather than simply do everything the
same old way.
Thanks to Beth for a great
guest post.
Staying above the water
line!
Riverwalker

Treasure Falls in Colorado
Staying above the water line!
Riverwalker

Many times you will find
yourself trying to hook up the utilities to your RV at dark thirty. Installing
an exterior light on your RV will make the task a lot simpler. It doesn’t
matter if you are boondocking or hooking up to a park space. You may find
yourself in the dark and fumbling around with a flashlight. An exterior light
will leave your hands free to make the process of getting things hooked up a
lot easier.
Using a $10 light from the
local tractor supply outlet and about 8 feet of two strand 12 volt wire is all
you need to accomplish this RV mod. The cover for the power cord was removed
and a wire was run from the 12 volt connections inside the RV. A small hole was then made in the side of the
RV for the wire after a suitable location for the light was determined. A piece
of coat hanger wire was then snaked behind the siding of the RV until it came
out at the side of the electrical cord cover opening. The wire was then hooked
to the 12 volt electrical wire and pulled through the hole. It was then a simple process of
hooking the wires to the light and mounting the base plate to the side of the
RV and installing the light cover.
The light included an on/off
switch and the cover was mounted with the switch in the down position. Even
though the switch was water resistant, mounting it where it was on the bottom
helps avoid rain hitting it directly.
It’s a quick and simple RV
mod that can be done in less than an hour.
Got RV mod?
Staying above the water
line!
Riverwalker

Piedra Falls
Piedra Falls is located about 30 miles north of Pagasoa Springs, Colorado in the San Juan National Forest. It's a leisurely hike of about 3/4 mile to get to the falls and makes a very pleasant day hike through the forest and along the middle fork of the Piedra River.
Trailhead
Start of the trail in the San Juan National Forest.
Further along the trail it gets a little rocky.
Back into the woods again.
A little shade along the way.
Trail gets rocky again.
Trail runs along the side of the Piedra River as you get closer to the falls.
There's a narrow spot between the rocks as you approach the basin of the falls.
The basin of the falls at the end of the trail.
Got day hike?
Staying above the water line!
Riverwalker

Chipmunks and Ground Squirrel
Here's a pic of a couple of chipmunks and a ground squirrel. It was brought to my attention that I had erroneously labeled a ground squirrel as a chipmunk in my previous post. As you can see in the above picture there is a noticeable difference in size and markings.
Got wildlife?
Staying above the water line!
Riverwalker

Golden Manteled Ground Squirrel
Got wildlife?
Staying above the water line!
Riverwalker

I happened to cross paths
with a black bear quite by accident on a recent trip to Colorado. It was quite sudden and totally unexpected on my
part as I had just left the trail head for one of the trails in Black Canyon. Apparently the bear noticed us first and had
already started moving away from my area. He quickly moved into a brushy area
and was gone from sight. I did manage to get a couple of quick pictures as the
bear moved away.
Black bears aren't normally
aggressive and will leave your area quickly unless they are provoked, feel cornered or are protecting young. Fortunately, this bear was probably intent on
his next meal of berries and only gave me a cursory glance before moving
quickly out of the area. The bear went into a brushy area and disappeared from
sight.
It’s a well known fact that Colorado is bear country and you should always be aware of
this fact. A safe distance from predators such as bears, wolves, and cougars is
normally about 100 yards (think the length of a football field). Any closer and
you may be putting yourself at risk of a serious situation. You can normally
approach other wildlife to within about 25 yards without any real concern. Most
animals usually won’t allow you to get even that close. The exception is snakes
who can normally strike from a distance equal to their length.
There is an excellent
brochure in PDF format available at Colorado.gov that contains a lot of useful
tips to help take adequate precautions when in bear country.
Here is a link to the
brochure:
Got bears?
Staying above the water
line!
Riverwalker

More High Places
Got higher elevation?
Staying above the water line!
Riverwalker


%20Shelter%3Co:p%3E%3C/o:p%3E%3C/span%3E%3C/b%3E%3C/div%3E%0A%3Cdiv%3E%0A%3Cbr%20/%3E%3C/div%3E%0A%3Cdiv%3E%0A%3Cspan%3ENormally%20your%20home%20will%20be%20the%20first%20and%20best%20option%20for%0Ashelter.%20There%20is%20a%20chance%20that%20it%20may%20become%20temporarily%20uninhabitable%20due%20to%0Astorm%20damage%20or%20other%20problems.%20While%20repairs%20are%20being%20made,%20even%20a%20simple%0Astorage%20shed%20can%20solve%20your%20needs%20for%20temporary%20shelter.%20In%20my%20case,%20I%20have%20a%0A12%20X%2020%20storage%20shed%20that%20has%20a%20simple%20solar%20setup%20(approximately%20$600)%20that%0Aprovides%20light%20and%20electricity%20independent%20of%20the%20grid.%20It%20also%20has%20a%20couple%20of%0Asleeping%20lofts%20and%20is%20well%20insulated.%20If%20necessary,%20in%20an%20emergency%20it%20could%0Aact%20as%20a%20secondary%20shelter.%3C/span%3E%3C/div%3E%0A%3Cdiv%3E%0A%3Cbr%20/%3E%3C/div%3E%0A%3Cdiv%3E%0A%3Cb%3E%3Cspan%3E2.)%20Water%3Co:p%3E%3C/o:p%3E%3C/span%3E%3C/b%3E%3C/div%3E%0A%3Cdiv%3E%0A%3Cbr%20/%3E%3C/div%3E%0A%3Cdiv%3E%0A%3Cspan%3EWater%20will%20be%20an%20absolute%20necessity.%20Drilling%20your%20own%20water%0Awell%20may%20be%20impractical%20and%20extremely%20costly.%20It%20may%20also%20be%20prohibited%20by%20your%0Alocal%20utility.%20Fortunately,%20the%20simple%20collection%20of%20rainwater%20can%20solve%20most%0Aof%20your%20water%20needs.%20A%20rainwater%20catchment%20system%20(approximately%20$500)%20combined%0Awith%20a%20good%20filtration%20system%20can%20solve%20most%20of%20your%20water%20needs.%20In%20my%20case,%0Aour%20monthly%20average%20of%203%20inches%20of%20rainfall%20can%20completely%20fill%20all%20our%20water%0Astorage%20barrels%20and%20provide%20us%20in%20excess%20of%20500%20gallons%20each%20month.%20%3C/span%3E%3C/div%3E%0A%3Cdiv%3E%0A%3Cbr%20/%3E%3C/div%3E%0A%3Cdiv%3E%0A%3Cb%3E%3Cspan%3E3.)%20Auxiliary%20Power%20%3Co:p%3E%3C/o:p%3E%3C/span%3E%3C/b%3E%3C/div%3E%0A%3Cdiv%3E%0A%3Cbr%20/%3E%3C/div%3E%0A%3Cdiv%3E%0A%3Cspan%3EThere%20is%20still%20a%20need%20for%20temporary%20power%20in%20order%20to%20keep%0Acertain%20appliances%20properly%20functioning.%20Your%20refrigerator%20and%20freezer%20won%E2%80%99t%0Akeep%20your%20food%20adequately%20without%20a%20continued%20source%20of%20power.%20In%20my%20case,%20I%0Akeep%20a%20small%20portable%20gas%20generator%20(approximately%20$400%20+%20fuel)%20to%20use%20for%20just%0Asuch%20an%20occasion.%20If%20a%20major%20power%20outage%20of%20any%20lengthy%20duration%20occurs,%20I%20can%0Akeep%20my%20appliances%20functioning%20long%20enough%20to%20cook%20and%20eat%20the%20food%20items%20they%0Acontain.%3C/span%3E%3C/div%3E%0A%3Cdiv%3E%0A%3Cbr%20/%3E%3C/div%3E%0A%3Cdiv%3E%0A%3Cb%3E%3Cspan%3E4.)%20Cooking%3Co:p%3E%3C/o:p%3E%3C/span%3E%3C/b%3E%3C/div%3E%0A%3Cdiv%3E%0A%3Cbr%20/%3E%3C/div%3E%0A%3Cdiv%3E%0A%3Cspan%3EThere%20are%20several%20other%20priorities%20that%20also%20need%20to%20be%0Aaddressed%20in%20order%20to%20have%20off%20the%20grid%20backup%20for%20your%20current%20utility%0Aservices.%20The%20easiest%20and%20probably%20the%20most%20affordable%20sources%20for%20heating%20and%0Acooking%20needs%20are%20propane%20and%20wood.%20Gas%20and%20charcoal%20grills%20or%20wood%20stoves%20are%0Aaffordable,%20require%20minimal%20maintenance%20and%20work%20extremely%20well%20in%20an%20off%20the%0Agrid%20or%20emergency%20situation.%20Most%20people%20quite%20often%20have%20one%20or%20both%20already%0Aavailable%20for%20use%20(I%20have%20both...can%E2%80%99t%20have%20too%20many%20backups).%20%3C/span%3E%3C/div%3E%0A%3Cdiv%3E%0A%3Cbr%20/%3E%3C/div%3E%0A%3Cdiv%3E%0A%3Cb%3E%3Cspan%3E5.)%20Heating%3Co:p%3E%3C/o:p%3E%3C/span%3E%3C/b%3E%3C/div%3E%0A%3Cdiv%3E%0A%3Cbr%20/%3E%3C/div%3E%0A%3Cdiv%3E%0A%3Cspan%3ESmall%20propane%20heaters%20($200)%20can%20also%20provide%20emergency%20heat%0Aif%20needed%20during%20colder%20weather%20and%20are%20usually%20extremely%20portable.%20Most%20can%0Aeven%20be%20used%20indoors%20with%20proper%20ventilation.%20You%20may%20even%20have%20a%20fireplace%20in%0Ayour%20home%20that%20can%20provide%20an%20auxiliary%20heat%20source.%3C/span%3E%3C/div%3E%0A%3Cdiv%3E%0A%3Cbr%20/%3E%3C/div%3E%0A%3Cdiv%3E%0A%3Cspan%3EYou%20don%E2%80%99t%20have%20to%20live%20off%20grid%20but%20can%20use%20simple%20and%20low%0Acost%20options%20to%20provide%20alternatives%20to%20help%20you%20maintain%20your%20lifestyle%20in%20the%0Aevent%20of%20an%20emergency.%3C/span%3E%3C/div%3E%0A%3Cdiv%3E%0A%3Cbr%20/%3E%3C/div%3E%0A%3Cdiv%3E%0A%3Cspan%3EGot%20hybrid%20solution?%3C/span%3E%3C/div%3E%0A%3Cdiv%3E%0A%3Cbr%20/%3E%3C/div%3E%0A%3Cdiv%3E%0A%3Cspan%3EStaying%20above%20the%20water%20line!%3C/span%3E%3C/div%3E%0A%3Cdiv%3E%0A%3Cbr%20/%3E%3C/div%3E%0A%3Cdiv%3E%0A%3Cspan%3E%3Cspan%3ERiverwalker%3C/span%3E%3Co:p%3E%3C/o:p%3E%3C/span%3E%3C/div%3E%0A%3Cbr%20/%3E%0A%3Cdiv%3E%0A%3Cbr%20/%3E%3C/div%3E)


%20were%20cut%20in%20half%20easily%20with%20both%20SOG%20axes.%20%26nbsp;The%20largest%20piece(10-12%20inches%20in%20diameter)%20the%20SOG%20Tomahawk%20was%20definitely%20easier,%20but%20the%20SOG%20Fasthawk%20did%20the%20job%20as%20well.%20%26nbsp;In%20addition,%20I%20pruned%20some%20small%20limbs(4-6%20inches%20in%20diameter)%20off%20trees.%20%26nbsp;Again,%20I%20could%20not%20find%20a%20significant%20difference%20in%20performance%20between%20them.%3C/div%3E%0A%3Cbr%20/%3E%0A%3Cdiv%3E%0A%3Ca%20href%3D%22https://blogger.googleusercontent.com/img/b/R29vZ2xl/AVvXsEhAbf-NEnoE-N9GiA6-oBbNgbbmYO2p9CT9Fke-Mm2NcAHwMU5VnrteUAiOwXtcn-ue76afiqqPQk59AwlxJm9JbuyrL-g9QwTquDeZ6XG4Sy4eCIQhqyiGLJeCnV5giNBv4rXUJPjSBXxx/s1600/SOG+Fasthawk+%252526+SOG+Tomahawk+2.JPG%22%20imageanchor%3D%221%22%3E%3Cimg%20border%3D%220%22%20height%3D%22240%22%20src%3D%22https://blogger.googleusercontent.com/img/b/R29vZ2xl/AVvXsEhAbf-NEnoE-N9GiA6-oBbNgbbmYO2p9CT9Fke-Mm2NcAHwMU5VnrteUAiOwXtcn-ue76afiqqPQk59AwlxJm9JbuyrL-g9QwTquDeZ6XG4Sy4eCIQhqyiGLJeCnV5giNBv4rXUJPjSBXxx/s320/SOG+Fasthawk+%252526+SOG+Tomahawk+2.JPG%22%20width%3D%22320%22%20/%3E%3C/a%3E%3C/div%3E%0A%3Cdiv%3E%0A%3Cbr%20/%3E%3C/div%3E%0A%3Cdiv%3E%0AI%20found%20the%20compact%20size%20of%20the%20SOG%20Fasthawk%20to%20be%20worth%20the%20slight%20sacrifice%20in%20performance%20over%20the%20SOG%20Tomahawk.%20%26nbsp;The%20Fasthawk%20will%20be%20allocated%20to%20my%20EDC(Every%20Day%20Carry)%20and%20the%20Tomahawk%20will%20find%20a%20home%20in%20my%20BOB(Bug%20Out%20Bag.)%3C/div%3E%0A%3Cdiv%3E%0A%3Cbr%20/%3E%3C/div%3E%0A%3Cdiv%3E%0A%3Cbr%20/%3E%3C/div%3E%0A%3Cdiv%3E%0AStaying%20above%20the%20water%20line!%3C/div%3E%0A%3Cdiv%3E%0A%3Cbr%20/%3E%3C/div%3E%0A%3Cdiv%3E%0A%3Cb%3E%3Ci%3E%3Cu%3E%3Cspan%3ERiverwalker%3C/span%3E%3C/u%3E%3C/i%3E%3C/b%3E%3C/div%3E%0A%3Cbr%20/%3E)


 The outdoors are full of adventure and spectacular scenery. Waterfalls shine as the inspiration to many of these excursions. This little waterfall kept me company while taking a break on the trail.


%20Cost%20-%0AThis%20product%20costs%20$11.95%20for%20a%205%20serving%20unit.%20This%20breaks%20down%20to%20about%20$2.39%0Aa%20serving%20and%20is%20a%20reasonable%20price%20for%20a%20long%20term%20food%20storage%20product%20with%0Aan%20extended%20shelf%20life.%20They%20also%20offer%20a%20variety%20of%20discounts%20on%20their%20site.%3Co:p%3E%3C/o:p%3E%3C/span%3E%3C/div%3E%0A%3Cdiv%3E%0A%3Cbr%20/%3E%3C/div%3E%0A%3Cdiv%3E%0A%3Cspan%3E2.)%0APackaging%20-%20The%20packaging%20is%20extremely%20sturdy%20and%20comes%20in%20a%20Mylar%20pouch%20that%0Ais%20resealable.%20The%20pouch%20was%20easy%20to%20re-seal%20and%20maintained%20a%20good%20seal%0Aafterwards.%20The%20left-over%20pouch%20can%20also%20be%20used%20as%20an%20emergency%20water%0Acontainer%20or%20to%20carry%20other%20snack%20items.%3Co:p%3E%3C/o:p%3E%3C/span%3E%3C/div%3E%0A%3Cdiv%3E%0A%3Cbr%20/%3E%3C/div%3E%0A%3Cdiv%3E%0A%3Cspan%3E3.)%0APreparation%20-%20Prep%20time%20was%20roughly%2020%20minutes%20total%20and%20requires%20two%20cups%20of%0Aboiling%20water.%20Cooking%20was%20a%20fairly%20easy%20process%20if%20you%20follow%20the%20cooking%0Adirections%20on%20the%20package.%3Co:p%3E%3C/o:p%3E%3C/span%3E%3C/div%3E%0A%3Cdiv%3E%0A%3Cbr%20/%3E%3C/div%3E%0A%3Cdiv%3E%0A%3Cspan%3E4.)%20Appearance%0A-%20The%20contents%20looked%20and%20smelled%20very%20appetizing.%3Co:p%3E%3C/o:p%3E%3C/span%3E%3C/div%3E%0A%3Cdiv%3E%0A%3Cbr%20/%3E%3C/div%3E%0A%3Cdiv%3E%0A%3Cspan%3E5.)%20Taste%20%26amp;%0ASmell%20-%20When%20cooked,%20it%20had%20a%20pleasant%20aroma%20and%20the%20beans%20and%20rice%20were%20very%0Asoft.%20One%20noted%20exception%20is%20that%20there%20were%20no%20enchiladas%20in%20the%20package.%0A%E2%80%9CEnchilada%20flavored%E2%80%9D%20would%20be%20a%20better%20description.%20Seasonings%20were%20well%0Abalanced.%20This%20is%20important%20for%20a%20person%20that%20doesn%E2%80%99t%20like%20a%20large%20amount%20of%0Aseasoning%20on%20their%20food.%3Co:p%3E%3C/o:p%3E%3C/span%3E%3C/div%3E%0A%3Cdiv%3E%0A%3Cbr%20/%3E%3C/div%3E%0A%3Cdiv%3E%0A%3Cspan%3EAll%20things%0Aconsidered,%20this%20is%20a%20very%20good%20food%20storage%20product.%20After%20sampling%20a%20wide%0Avariety%20of%20long%20term%20food%20storage%20products%20over%20the%20years,%20this%20item%20compares%0Avery%20favorably%20with%20other%20similar%20long%20term%20food%20storage%20products.%3Co:p%3E%3C/o:p%3E%3C/span%3E%3C/div%3E%0A%3Cdiv%3E%0A%3Cbr%20/%3E%3C/div%3E%0A%3Cdiv%3E%0A%3Cspan%3EGot%20long%0Aterm%20food%20storage?%3Co:p%3E%3C/o:p%3E%3C/span%3E%3C/div%3E%0A%3Cdiv%3E%0A%3Cbr%20/%3E%3C/div%3E%0A%3Cdiv%3E%0A%3Cspan%3EStaying%0Aabove%20the%20water%20line!%3Co:p%3E%3C/o:p%3E%3C/span%3E%3C/div%3E%0A%3Cdiv%3E%0A%3Cbr%20/%3E%3C/div%3E%0A%3Cdiv%3E%0A%3Cb%3E%3Ci%3E%3Cspan%3ERiverwalker%3Co:p%3E%3C/o:p%3E%3C/span%3E%3C/i%3E%3C/b%3E%3C/div%3E%0A%3Cdiv%3E%0A%3Cbr%20/%3E%3C/div%3E%0A%3Cbr%20/%3E%0A%3Cdiv%3E%0A%3Cbr%20/%3E%3C/div%3E)


.%20Any%20closer%20and%0Ayou%20may%20be%20putting%20yourself%20at%20risk%20of%20a%20serious%20situation.%20You%20can%20normally%0Aapproach%20other%20wildlife%20to%20within%20about%2025%20yards%20without%20any%20real%20concern.%20Most%0Aanimals%20usually%20won%E2%80%99t%20allow%20you%20to%20get%20even%20that%20close.%20The%20exception%20is%20snakes%0Awho%20can%20normally%20strike%20from%20a%20distance%20equal%20to%20their%20length.%3Co:p%3E%3C/o:p%3E%3C/span%3E%3C/div%3E%0A%3Cdiv%3E%0A%3Cbr%20/%3E%3C/div%3E%0A%3Cdiv%3E%0A%3Cspan%3EThere%20is%20an%20excellent%0Abrochure%20in%20PDF%20format%20available%20at%20Colorado.gov%20that%20contains%20a%20lot%20of%20useful%0Atips%20to%20help%20take%20adequate%20precautions%20when%20in%20bear%20country.%20%3Co:p%3E%3C/o:p%3E%3C/span%3E%3C/div%3E%0A%3Cdiv%3E%0A%3Cbr%20/%3E%3C/div%3E%0A%3Cdiv%3E%0A%3Cspan%3EHere%20is%20a%20link%20to%20the%0Abrochure:%3Co:p%3E%3C/o:p%3E%3C/span%3E%3C/div%3E%0A%3Cdiv%3E%0A%3Cbr%20/%3E%3C/div%3E%0A%3Cdiv%3E%0A%3Cspan%3E%3Ca%20href%3D%22http://www.colorado.gov/cs/Satellite?blobcol%253Durldata%2526blobheadername1%253DContent-Disposition%2526blobheadername2%253DContent-Type%2526blobheadervalue1%253Dinline;+filename%253D%2522Living+with+Bears+brochure.pdf%2522%2526blobheadervalue2%253Dapplication/pdf%2526blobkey%253Did%2526blobtable%253DMungoBlobs%2526blobwhere%253D1251853492897%2526ssbinary%253Dtrue%22%3ELiving%0Awith%20Bears.pdf%3C/a%3E%3Co:p%3E%3C/o:p%3E%3C/span%3E%3C/div%3E%0A%3Cdiv%3E%0A%3Cbr%20/%3E%3C/div%3E%0A%3Cdiv%3E%0A%3Cspan%3EGot%20bears?%3Co:p%3E%3C/o:p%3E%3C/span%3E%3C/div%3E%0A%3Cdiv%3E%0A%3Cbr%20/%3E%3C/div%3E%0A%3Cdiv%3E%0A%3Cspan%3EStaying%20above%20the%20water%0Aline!%3Co:p%3E%3C/o:p%3E%3C/span%3E%3C/div%3E%0A%3Cdiv%3E%0A%3Cbr%20/%3E%3C/div%3E%0A%3Cdiv%3E%0A%3Cb%3E%3Ci%3E%3Cspan%3ERiverwalker%3Co:p%3E%3C/o:p%3E%3C/span%3E%3C/i%3E%3C/b%3E%3C/div%3E%0A%3Cdiv%3E%0A%3Cbr%20/%3E%3C/div%3E%0A%3Cbr%20/%3E%0A%3Cdiv%3E%0A%3Cbr%20/%3E%3C/div%3E)

