Make Scales More Fun! 11 Mar 2022 7:01 AM (3 years ago)


Playing by ear: Top tips 30 Nov 2021 6:02 AM (3 years ago)

Guest post by Alex Bruce

Keep it simple
Chord types
Rhythm transcription
Improvised soloing / backing tracks
Jam!
5 Things Rock Guitarists Can Learn from Classical Guitarists 1 Oct 2021 5:42 AM (3 years ago)
Guest post by Alex Bruce What’s fascinating is to compare two styles that strike you as opposites. For example, Rock Guitar with its crowd surfing, soloing and distortion, and Classical Guitar - with its nylon strings, bow ties and sight reading. So, here’s a list of 5 things that Rock Guitarists can (and should) learn from Classical Guitarists: 1 - Learn To Read! OK, you don’t have to be taking sheet music on music stands up on stage at your band’s gigs, but you need to be able to write out a lead sheet for a band member or even more importantly, understand one that’s being presented to you. Whether you’re a hobbyist, performer, songwriter, teacher, jamming with friends, it doesn’t matter. It’s important to be able to read the basics of pitch and rhythm, and it’ll make you a more secure performer, and a faster learner. Go and do it! 2 - Posture Not Posing! Again, this doesn’t mean you should start playing your electric in a Classical Guitarist’s pose. It means you should look after your body and hands. Not bending your back right over, not developing wrist pains, but playing in a comfortable, sustainable position! Standing or sitting, you should have a straight back, and your feet on the floor. Position your elbow in such a way that your wrist isn’t having to bend dramatically to hold the Guitar’s neck. Your Guitar heroes might not always hold perfect posture for the hour they’re on stage, but if they’re putting in serious practice time (which they definitely are!) then they’re either in a good posture, or in regular physiotherapy! 3 - Cut The Noodles! OK this is a tricky one, because from Steve Vai’s 10 hour practice routine, to the great many of you who spend every spare minute on all things Guitar, plenty of Rock Guitarists are very dedicated to playing and improving. The point here is that the Classical Guitar’s approach brings with it certain associations, one of which is a generally higher opinion of dedicated practice! Plenty of us Rock Guitarists will happily noodle out Pentatonic licks in front of the TV for 3 hours at a time, but lack the discipline to spend just 10 minutes a day with the metronome and a new chord pattern. You should separate “Practice” (learning/working on new/difficult things) and “Playing” (Existing repertoire, noodling, jamming). 4 - Finish What You Started! In Classical Guitar, playing one section of a piece quite well, then blundering through the next section, then just stopping playing all together, short of the final section is unthinkable. In Rock Guitar, at all ability levels, we do the equivalent all the time. Whether you’re preparing for gigs, exams, personal enjoyment, jamming or anything else, learning a few songs from beginning to end is an extremely important, validating, much-overlooked skill to possess. It’s a Psychological barrier broken, a performance piece in the bank, and exactly what you’d need to do in any amateur or professional gig setup. 5 - Play Clean Not Cool! Rock Guitar’s cool, often aggressively played, energetic approach can be mistranslated and result in sloppy articulation or loose rhythm. What we perceive as a laid back approach to technique and accuracy from our Guitar heroes, is in fact such mastery of technique and accuracy that the performer has been able to also switch some focus to presence, persona and energy. There has to be steel in the walls! In Classical Guitar,- clean fretting, consistent picking, and economic finger usage all come first, not thrashing the strings or jumping around! (In fact, in Classical Guitar, they never seem to jump around at all! Maybe that’s something Classical Guitarists can learn from Rock Guitarists…but that’s a different list!) Get your playing clean and correct before you speed up/jump around/pick with your teeth/play behind your head (delete as appropriate). Alex Bruce writes for guitartricks.com which offers guitar lessons for beginners guitarz.blogspot.com:

Image by _Alicja_ from Pixabay
As a Guitar teacher, one hour I’m teaching Hendrix songs, and the next hour I’m helping someone prepare their Classical Guitar grade 4 exam pieces. The next day it might be Jazz and Blues, the following I’m teaching songwriters - From Punk band leaders to Folk ballad weavers. This kind of overview of aspiring Guitarists and Musical styles got me thinking about the Guitar playing discipline as a whole. What divides these styles? What unites them? And what can they learn from each other?
Beginner Guitarists - 5 Things You Should Know 1 Oct 2021 5:40 AM (3 years ago)
 guitarz.blogspot.com:
Guest post by Alex Bruce
 |
| Image by Valéria Rodrigues Valéria from Pixabay |
1 - Rapid Progress Is Around The Corner
- Beginner guitarist picks up the instrument
- Finds it challenging (obviously)
- Presumes they’re innately ‘not very good at it’ or it’s ‘too hard’
- Stops playing.
2 - Your Body Will Adapt
3 - Try Almost Everything
- When learning your first riffs, chord patterns and songs, there’s much to be learned from all the usual beginner guitar songs and styles, but don’t stop there. You might just find - if you turn your hand to beginners’ country guitar, or thrash metal, that you one - really enjoy it, and two - have a natural flair for it too.
- Of course you’re going to primarily take on beginner level material, and rightly so. It’s important you follow the well-worn paths that have led so many guitarists to advanced levels, success and creative fulfilment. However, trying to play more complex, advanced bits of material gives you an insight into what’s to come, may make you learn something new, is good inspiration, and great fun. Don’t be afraid to try these things once in a while. It’s not about mastery, it’s about testing yourself.
4 - Don’t Avoid Things
5 - Acquire The Tools You Need
- Guitar (the obvious one)
- A pick
- A tuner or tuning app
- A capo
- A cable and amplifier if playing electric guitar
- Spare strings
Something Strange Came Out Of The Skies 8 Nov 2020 6:45 AM (4 years ago)

I am delighted to be taking pre-orders for the brand new Spurious Transients album, our very first to be released as a vinyl LP (and on Sky Blue coloured vinyl too!)...
"Something Strange Came Out Of The Skies" is a documentary soundtrack concept album using genuine eyewitness testimony to tell the story of "The Welsh Triangle" UFO phenomena of 1977.
Journey through bizarre tales of UFO sightings and close encounters via songs, musical soundtrack and spoken word content, taking in a variety of musical styles through psychedelia and dub to trip hop and ambient electronics.

A very limited quantity of the LP are available with a 12" square fine art print on 300gsm matte board PLUS a 12-page A4 full colour "UFO zine" complete with lyrics, sleeve notes, UFO newspaper cuttings and articles!
For your 10% discount code, what item of "flying" crockery is synonymous with the term UFO?
Expected release date of physical product: 15 January 2021
Now available to pre-order at: spurioustransients.bandcamp.com
%20used%20on%20the%20album.%20I'll%20go%20over%20all%20that%20in%20more%20detail%20in%20a%20follow-up%20post.%3Cbr%20/%3E%3Cbr%20/%3EI%20am%20delighted%20to%20be%20taking%20pre-orders%20for%20the%20brand%20new%20Spurious%20Transients%20album,%20our%20very%20first%20to%20be%20released%20as%20a%20vinyl%20LP%20(and%20on%20Sky%20Blue%20coloured%20vinyl%20too!)...%3Cp%3E%3C/p%3E%3Cp%3E%22Something%20Strange%20Came%20Out%20Of%20The%20Skies%22%20is%20a%20documentary%20soundtrack%20concept%20album%20using%20genuine%20eyewitness%20testimony%20to%20tell%20the%20story%20of%20%22The%20Welsh%20Triangle%22%20UFO%20phenomena%20of%201977.%3C/p%3E%3Cp%3EJourney%20through%20bizarre%20tales%20of%20UFO%20sightings%20and%20close%20encounters%20via%20songs,%20musical%20soundtrack%20and%20spoken%20word%20content,%20taking%20in%20a%20variety%20of%20musical%20styles%20through%20psychedelia%20and%20dub%20to%20trip%20hop%20and%20ambient%20electronics.%3C/p%3E%3Cdiv%3E%3Ca%20href%3D%22https://blogger.googleusercontent.com/img/b/R29vZ2xl/AVvXsEi9_XwWvzeXMJ49_BDwz9hA03CzflZv23M2x3scBGByO5C0wSnoOiNN_ltH2oCa__yCzMNPtCd2CV6fRA01W33btyJ0s3LYp852YB2v_gQsZQ8YW9AvZ3Cwfb3dRICv41Srp7Ll/s1000/Something+Strange+basic+cover+1000px.jpg%22%3E%3Cimg%20border%3D%220%22%20data-original-height%3D%221000%22%20data-original-width%3D%221000%22%20height%3D%22320%22%20src%3D%22https://blogger.googleusercontent.com/img/b/R29vZ2xl/AVvXsEi9_XwWvzeXMJ49_BDwz9hA03CzflZv23M2x3scBGByO5C0wSnoOiNN_ltH2oCa__yCzMNPtCd2CV6fRA01W33btyJ0s3LYp852YB2v_gQsZQ8YW9AvZ3Cwfb3dRICv41Srp7Ll/s320/Something+Strange+basic+cover+1000px.jpg%22%20/%3E%3C/a%3E%3C/div%3E%3Cp%3E%3C/p%3E%3Cp%3EA%20very%20limited%20quantity%20of%20the%20LP%20are%20available%20with%20a%2012%22%20square%20fine%20art%20print%20on%20300gsm%20matte%20board%20PLUS%20a%2012-page%20A4%20full%20colour%20%22UFO%20zine%22%20complete%20with%20lyrics,%20sleeve%20notes,%20UFO%20newspaper%20cuttings%20and%20articles!%3C/p%3E%3Cp%3EFor%20your%2010%25%20discount%20code,%20what%20item%20of%20%22flying%22%20crockery%20is%20synonymous%20with%20the%20term%20UFO?%3C/p%3E%3Cp%3EExpected%20release%20date%20of%20physical%20product:%2015%20January%202021%3C/p%3E%3Cp%3ENow%20available%20to%20pre-order%20at:%26nbsp;%26nbsp;%3Cb%3E%3Ca%20href%3D%22http://spurioustransients.bandcamp.com%22%3Espurioustransients.bandcamp.com%3C/a%3E%3C/b%3E%3C/p%3E%0A%3Cbr%20/%3E%0A%3Cbr%20/%3E%0A%3Cbr%20/%3E%0A%3Cbr%20/%3E%3Cbr%20/%3E%3Cspan%3E%3C/span%3E%3Cdiv%3E%7B%7B%20Guitarz%20-%20guitarz.blogspot.com%20%7D%7D%3C/div%3E)
5 Weird Guitars from Craigslist! 22 Apr 2019 11:21 AM (5 years ago)

Hi there. My name is Billy and I’m a writer with Guitartricks.com, where we teach people how to play guitar online! I’m a huge fan of looking for weird, interesting guitars, and one of the best places to do it is on Craigslist.
Craigslist is home to a number of interesting guitars. Here are some that I came across that are entirely unique and unlike anything I’ve ever seen in person. Some of these guitars are custom-built, others aren’t guitars at all but instead, use leftover guitar bodies and parts. Check them out!


© 2019, Guitarz - The Original Guitar Blog - the blog that goes all the way to 11!
Please read our photo and content policy.
Very strange Precision and Jazz Bass headless conversions listed on eBay 6 Feb 2019 1:20 AM (6 years ago)


Here are an odd pair of basses I saw listed in separate auctions from the same seller on eBay. As you can clearly see they are strangely tweaked Fender designs, namely a Jazz Bass and a P-Bass, both bizarrely converted to headless instruments. Well I say headless, but each has a mini-headstock which acts as a string anchor. The mini-headstock in itself is not inelegant; however at the other end of each instrument is a strange protuberance (a butt-stock, perhaps?) carrying the tuners. Surely there could have been a neater way of doing this, e.g using a Steinberger-style bridge with integral tuners. Also note that it would be impossible to stand up either of these basses while not being used without the right kind of guitar stand. As for getting a case to fit...
I'm guessing that these are one-off custom jobs. Judging by the photographs the conversion and finish on each has been carried out very competently. My only questions are Why? and Who will these appeal to?
EBay UK links for these two:
Both are listed with starting prices of £199 (UKP).
More photos of each:


G L Wilson
© 2019, Guitarz - The Original Guitar Blog - the blog that goes all the way to 11!
Please read our photo and content policy.
Burns Weill RP2G Super Streamline bass guitar from 1959 30 Oct 2018 12:11 PM (6 years ago)


Burns Weill RP2G bass
This is a very rare bass made in 1959 by Jim Burns and Henry Weill. The body, neck etc., were designed and made by Jim Burns and all the electrics and pickups within the scratchplate were designed and made by Henry Weill.
This particular bass came from the collection of Mark Griffiths - bass player for The Shadows. It was sold in auction some time ago along with many other guitars and basses owned by Mark Griffiths. I did not manage to buy it then but a while ago I contacted the buyer and managed to purchase it.
It is totally original apart from the fact that it had been refinished in the past - possibly when Mark owned it.
It is a very rare bass regardless of previous owners and its actually the only one I have come across. It has two pickups with volume, tone and blend controls plus a pickup selector switch and two-way switch - all working well, and it is a very nice playing bass with a lovely neck, quite narrow but very playable with twenty-two frets with red dot markers and a scale of thirty inches.Currently listed on eBay UK with a Buy It Now price of £950.
G L Wilson
© 2018, Guitarz - The Original Guitar Blog - the blog that goes all the way to 11!
Please read our photo and content policy.

The Piglet guitar build project, part 15 6 Oct 2018 6:20 AM (6 years ago)

 |
| The Piglet in action on-stage with Red & The Hogweeds at a festival in a field somewhere in Wales. That's me on the Flying V bass, by the way. |
For the record, the guitar performs well and is a great stage instrument. Audiences seem to like it as well. It gets pointed at quite a lot, photos taken, etc, and is the cause of a few double-takes! Which is all good promotion for the band.
 |
| At The Garage in Swansea |
 |
| At The Parrot in Carmarthen |
 |
| Landed Fest, near Llandrindod Wells, Wales |

 |
| The Piglet, on its stand |

G L Wilson
© 2018, Guitarz - The Original Guitar Blog - the blog that goes all the way to 11!
Please read our photo and content policy.
Rare Fender Acoustic Jazzmaster JZM Deluxe 22 Sep 2018 4:44 PM (6 years ago)


Love it or hate it, Fender makes acoustic versions of their electric icons. I'm not a big fan, but I understand the appeal. That said, I have some love for this abomination. It's got a "so ugly it's cool" thing going on.
I'll have to do some research and find out just exactly how rare this JZM Deluxe really is.
R.W. Haller
© 2018, Guitarz - The Original Guitar Blog - the blog that goes all the way to 11!
Please read our photo and content policy.

The Piglet guitar build project, part 12 16 Aug 2018 5:56 AM (6 years ago)


Following on from part 11, with the artwork now applied, the piglet was ready to be clear coated. I tried hanging the guitar body up to spray it but I found that the Rustoleum clear spray that I was using didn't want to come out in a mist like the colours I'd used had, and thus it was causing lots of drips. I then lay the body flat on a piece of polysterene to spray the front, but when it had dried I discovered a clear rectangular imprint of where the polystyrene block had been positioned on the back, and so I had to sandpaper away the offending shape before re-spraying once again. I had a problem in that I wanted to spray the guitar body lying flat, but I didn't want to have to rest it on top of anything, so I came up with the idea of cantilevering the body over thin air, which effectively meant very carefully clamping the makeshift handle (screwed to the body in the neck pocket) to my workbench (see photo above).

Here we see the piglet in the sunshine after having had several coats of clear applied and having been left to dry and harden for a couple of days.

I couldn't help attaching the neck and positioning some key components upon the body so as to get a better idea of what the finished guitar is going to look like.

Here we see the piglet out in the sunlight again, but now the body has been wet and dry sanded through the grits and has been buffed up to a nice shiny surface using rubbing compound. Unfortunately in this photo we don't really get an idea of the smoothness of the finish.

However this photo of the back of the guitar gives a much better impression of the smoothness of the finish.

And on this later photo taken inside the conservatory you can clearly see reflections from the windows on the surface of the piggy.

I spent a few days getting the headstock sorted out with a logo and a clearcoat. My first attempt was a failure - probably because I didn't spray an initial clear coat onto the surface before applying the water slide transfer - so I ended up stripping it back again and doing it all over again. Clear coat, then apply the transfer, then three more clear coats and leave a couple of days to harded before sanding and shining up using more of that magic rubbing compound. And, as you'll notice in the photo above, I also mounted the machine heads.

Again, with the neck in place, here's how the piggy is looking.
All that is left to do now is the final assembly. I'm going to wait a few days before doing this as I need a helping hand from my partner in crime on this venture, as we're going to be doing things such as positioning the bridge and lining it up accurately. Two heads are much better than one when doing important fine measurements.
Hopefully this little piggy will be ready for our next batch of gigs.
G L Wilson
© 2018, Guitarz - The Original Guitar Blog - the blog that goes all the way to 11!
Please read our photo and content policy.
The Piglet guitar build project, part 5 16 Aug 2018 5:56 AM (6 years ago)


After a few hours I removed the clamps, so I could remove the piece of scrap backing and ensure it wasn't going to be permanently glued to the guitar body seeing as glue had been dripping down onto it. Having cleared away excess glue, I re-clamped the body and will leave it for another day.
G L Wilson
© 2018, Guitarz - The Original Guitar Blog - the blog that goes all the way to 11!
Please read our photo and content policy.
,%20having%20first%20wrapped%20clingfilm%20around%20the%20base%20of%20the%20neck%20to%20protect%20it%20from%20glue.%20Then%20after%20clamping%20all%20around%20the%20body%20(why%20do%20there%20never%20seem%20to%20be%20enough%20clamps?),%20I%20removed%20the%20neck.%3Cbr%20/%3E%0A%3Cbr%20/%3E%0AAfter%20a%20few%20hours%20I%20removed%20the%20clamps,%20so%20I%20could%20remove%20the%20piece%20of%20scrap%20backing%20and%20ensure%20it%20wasn't%20going%20to%20be%20permanently%20glued%20to%20the%20guitar%20body%20seeing%20as%20glue%20had%20been%20dripping%20down%20onto%20it.%20Having%20cleared%20away%20excess%20glue,%20I%20re-clamped%20the%20body%20and%20will%20leave%20it%20for%20another%20day.%3Cbr%20/%3E%0A%3Cbr%20/%3E%0A%3Cb%3EG%20L%20Wilson%3C/b%3E%3Cbr%20/%3E%0A%3Cbr%20/%3E%0A%3Cspan%3E%C2%A9%202018,%20%3Ca%20href%3D%22http://guitarz.blogspot.com/%22%3E%3Ci%3EGuitarz%3C/i%3E%3C/a%3E%20-%20The%20%3Ci%3EOriginal%3C/i%3E%20Guitar%20Blog%20-%20%20the%20blog%20that%20goes%20all%20the%20way%20to%2011!%3Cbr%20/%3E%0A%3Ca%20href%3D%22http://guitarz.blogspot.com/p/the-small-print-copyright-issues-use-of.html%22%3EPlease%20read%20our%20photo%20and%20content%20policy.%3C/a%3E%3C/span%3E%3Cdiv%3E%7B%7B%20Guitarz%20-%20guitarz.blogspot.com%20%7D%7D%3C/div%3E)
The Piglet guitar build project, part 7 16 Aug 2018 5:56 AM (6 years ago)


I had to fill it in with woodfiller and sand it back three times before I was happy with the smoothness of that area, but at last today - a couple of days later than intended - I was ready to begin spray painting.


We'll see what it looks like in the morning.
G L Wilson
© 2018, Guitarz - The Original Guitar Blog - the blog that goes all the way to 11!
Please read our photo and content policy.
.%3Cbr%20/%3E%0A%3Cbr%20/%3E%0AI%20had%20to%20fill%20it%20in%20with%20woodfiller%20and%20sand%20it%20back%20%3Ci%3Ethree%20times%3C/i%3E%20before%20I%20was%20happy%20with%20the%20smoothness%20of%20that%20area,%20but%20at%20last%20today%20-%20a%20couple%20of%20days%20later%20than%20intended%20-%20I%20was%20ready%20to%20begin%20spray%20painting.%3Cbr%20/%3E%0A%3Cbr%20/%3E%0A%3Cdiv%3E%0A%3Ca%20href%3D%22https://blogger.googleusercontent.com/img/b/R29vZ2xl/AVvXsEg3AENGdfz0oyz96quQjg3EwhMii6yZ39Be6P8G7uEfAvlgyPnfgNlWYHkx527n7ppXKVPEX7W-KFqLExhNtGge9n7qp1GUTIWRzWgFGttVYGn4bnann5Gl9oHGm_cLdYkqB2LD/s1600/IMG_20180501_163306.jpg%22%20imageanchor%3D%221%22%3E%3Cimg%20border%3D%220%22%20data-original-height%3D%22912%22%20data-original-width%3D%221600%22%20height%3D%22364%22%20src%3D%22https://blogger.googleusercontent.com/img/b/R29vZ2xl/AVvXsEg3AENGdfz0oyz96quQjg3EwhMii6yZ39Be6P8G7uEfAvlgyPnfgNlWYHkx527n7ppXKVPEX7W-KFqLExhNtGge9n7qp1GUTIWRzWgFGttVYGn4bnann5Gl9oHGm_cLdYkqB2LD/s640/IMG_20180501_163306.jpg%22%20width%3D%22640%22%20/%3E%3C/a%3E%3C/div%3E%0A%26nbsp;I'm%20using%20rattle%20cans%20for%20the%20whole%20finishing%20process,%20beginning%20here%20with%20a%20white%20primer.%3Cbr%20/%3E%0A%3Cbr%20/%3E%0A%3Cdiv%3E%0A%3Ca%20href%3D%22https://blogger.googleusercontent.com/img/b/R29vZ2xl/AVvXsEj7Y5DTpojvmdW9N060N6REG0I6PtZI2d4V1ODAje24h-JyWJmS9oqHHBIFfNXUfVbDZ0j9Jq1WNktPzss_5MZ2nKPICuy4hj1REJxKJpIu31DImro7BxrqzdeOpx-f16LqfzM4/s1600/IMG_20180501_163456.jpg%22%20imageanchor%3D%221%22%3E%3Cimg%20border%3D%220%22%20data-original-height%3D%22912%22%20data-original-width%3D%221600%22%20height%3D%22364%22%20src%3D%22https://blogger.googleusercontent.com/img/b/R29vZ2xl/AVvXsEj7Y5DTpojvmdW9N060N6REG0I6PtZI2d4V1ODAje24h-JyWJmS9oqHHBIFfNXUfVbDZ0j9Jq1WNktPzss_5MZ2nKPICuy4hj1REJxKJpIu31DImro7BxrqzdeOpx-f16LqfzM4/s640/IMG_20180501_163456.jpg%22%20width%3D%22640%22%20/%3E%3C/a%3E%3C/div%3E%0AFirst%20coat%20done,%20front%20and%20back.%20Having%20let%20it%20dry%20I%20noticed%20that%20the%20initial%20coat%20had%20brought%20up%20the%20grain%20in%20the%20plywood%20forming%20both%20front%20and%20back,%20so%20I%20sanded%20the%20whole%20thing%20again%20until%20getting%20a%20silky%20smooth%20finish%20and%20after%20cleaning%20away%20the%20dust%20I%20have%20re-sprayed.%3Cbr%20/%3E%0A%3Cbr%20/%3E%0AWe'll%20see%20what%20it%20looks%20like%20in%20the%20morning.%3Cbr%20/%3E%0A%3Cbr%20/%3E%0A%3Cb%3EG%20L%20Wilson%3C/b%3E%3Cbr%20/%3E%0A%3Cbr%20/%3E%0A%3Cspan%3E%C2%A9%202018,%20%3Ca%20href%3D%22http://guitarz.blogspot.com/%22%3E%3Ci%3EGuitarz%3C/i%3E%3C/a%3E%20-%20The%20%3Ci%3EOriginal%3C/i%3E%20Guitar%20Blog%20-%20%20the%20blog%20that%20goes%20all%20the%20way%20to%2011!%3Cbr%20/%3E%0A%3Ca%20href%3D%22http://guitarz.blogspot.com/p/the-small-print-copyright-issues-use-of.html%22%3EPlease%20read%20our%20photo%20and%20content%20policy.%3C/a%3E%3C/span%3E%3Cdiv%3E%7B%7B%20Guitarz%20-%20guitarz.blogspot.com%20%7D%7D%3C/div%3E)
The Piglet guitar build project, part 11 16 Aug 2018 5:56 AM (6 years ago)


Picking up from where we left off last time, here I have painted in the outline of the piglet, using the carbon lines as a guide. Finally we're getting to see what this little piggy is going to look like, and that it isn't just some weird random-shaped pink blob.

I couldn't resist putting the neck into the pocket to give a better idea of the proportions of the whole guitar.

After waiting several days for the dry rub-off decal paper I'd bought to arrive in the post, this morning I was busy printing off the more detailed parts of the pig's features.

I printed spare copies but try as I might I just couldn't get on with that decal paper. Today must have been the most frustrating part of this entire guitar build to date. I mean, I thought some of the sanding between coats of the finish was hard going, but this damned dry rub-off decal paper had me tearing my hair out.

Somehow, probably more through luck than judgement, I did manage to get three piece of transfer onto the guitar - one ear and both sets of trotters. I tried the snout and the eyes but after wasting about half a day and nearly half of my decal paper supply, I decided to abandon that approach and look for another method to realise the piggy's features.
Luckily I remembered that I still had some sheets of water-slide transfer paper. I had previously used some of this on a cigar box guitar build and recalled it being relatively easy to use. So I set the printer back to work, printing out the piglet's features all over again. It was just as well I'd bought and installed new printer cartridges, considering the amount of toner I was getting through.

Water-slide transfer paper requires being sprayed with a couple of coats of varnish before it can be applied, so while I was waiting for that to dry I set to work painting the various areas of shading around the outside of the pig's body so as to create a three-dimensional effect. Note the areas to the back of the legs, the belly, the jaw, the edges of the ears, etc.

Finally I got to apply those water-slide transfers and they went on very nicely indeed. It took me a few minutes arranging the pig's eyebrows so as to give him (her?) the correct friendly expression but I think I got it about right. It had started getting dark by the time this photo was taken, so it is a little pixellated, but I think you get the idea.
It's really taking shape now. Next job will be to start the clear-coating.
G L Wilson
© 2018, Guitarz - The Original Guitar Blog - the blog that goes all the way to 11!
Please read our photo and content policy.
The Piglet guitar build project, part 6 16 Aug 2018 5:56 AM (6 years ago)


At last it's beginning to look like a guitar boody. Here's the Piglet unclamped after the top has been glued on. I ended up giving it 48 hours in the end, so plenty of time to set and harden and form a tight bond. Because we had cut out the top separately from the rest there was some variance in the outline between the top and the rest of the guitar body, although of only around 1mm.


G L Wilson
© 2018, Guitarz - The Original Guitar Blog - the blog that goes all the way to 11!
Please read our photo and content policy.

The Piglet guitar build project, part 10 16 Aug 2018 5:56 AM (6 years ago)


Having painted the final coat of pink on the front of the guitar, leaving to dry for a few days and on removing the masking tape, I found that the line around the top where it had been masked off was mostly very sharp.

However, there were one or two areas where the pink had bled under the tape. Not a big problem, relatively easy to fix.

More annoying was that the pink spray paint had got right underneath the guitar and onto areas which I hadn't thought would be necessary to mask off.

This meant having to sand back the entire rear of the guitar again, which was a job I thought I'd already done for the last time.

After a light sanding of the pink paint on the front of the guitar, the piglet is ready to have the graphics applied.

Time to get out the original paper template (which I used to cut out the shape of the piglet earlier on in the project) and to tape it in position onto the front of the body.
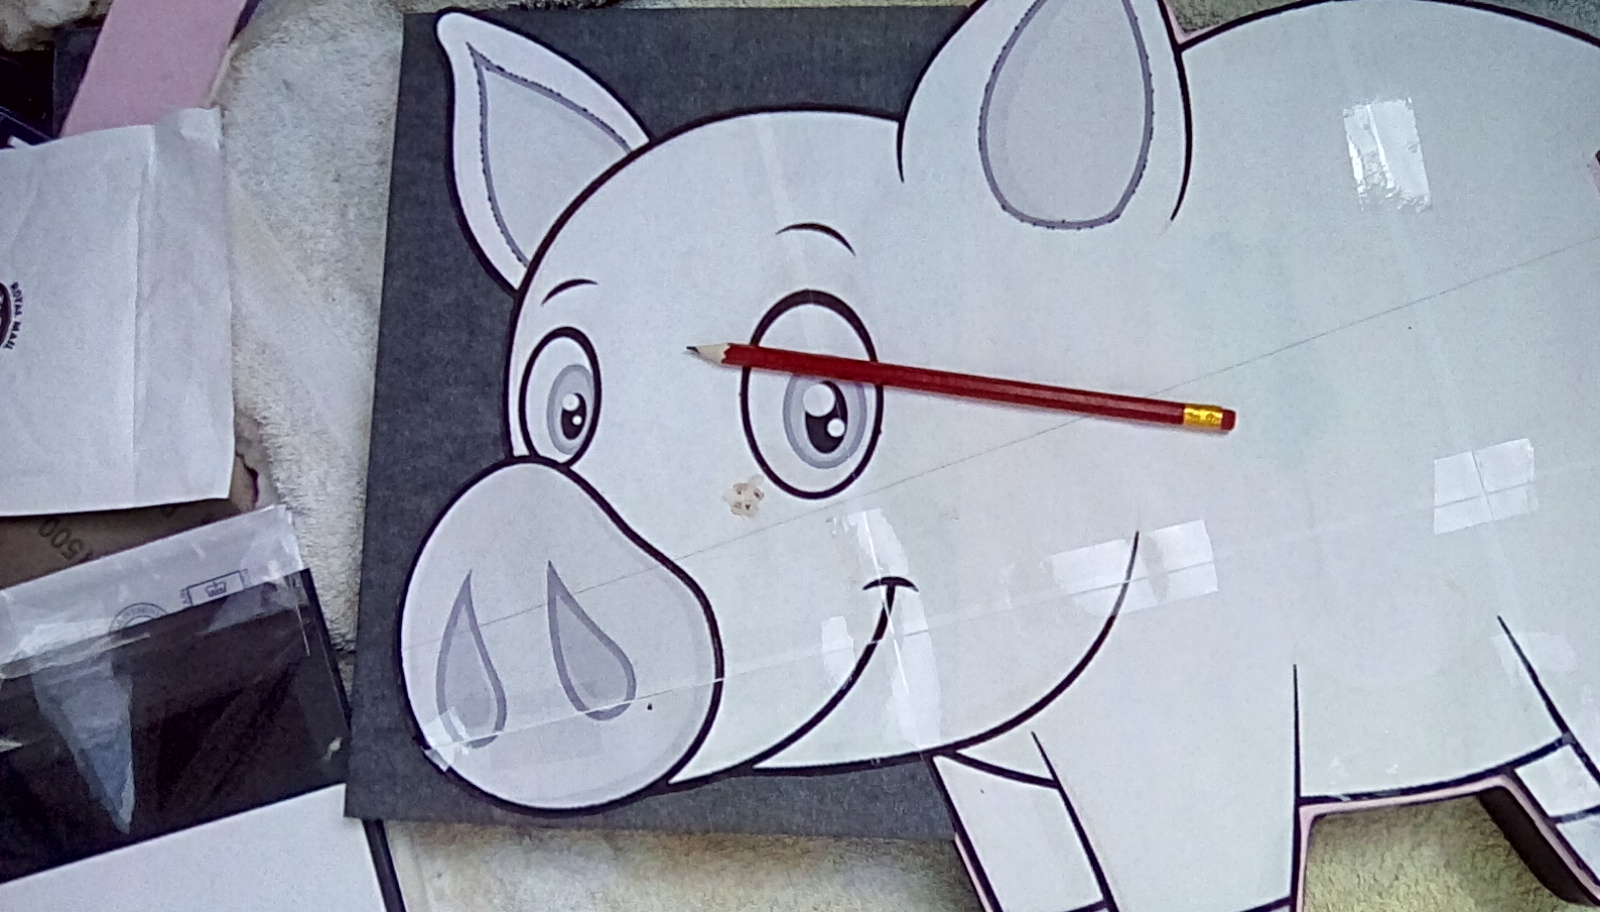
Then with a sheet of carbon paper placed beneath the template I used a pencil to trace the outline and features of the cartoon pig onto the body top.

Just checking the image is transferring correctly.

Here we see the finished transfer of the image.
Next up will be to paint in the outline. The eyes, ears, snout and trotters are going to be applied using dry rub off transfers, which I will align to the carbon markings pictured above.
G L Wilson
© 2018, Guitarz - The Original Guitar Blog - the blog that goes all the way to 11!
Please read our photo and content policy.
The Piglet guitar build project, part 9 16 Aug 2018 5:56 AM (6 years ago)


I really do want to crack on with this project now as we'd like to start using it for gigs soon. There's a festival we're playing in August at which we'd really like to have the guitar, so I'm hoping we can finish it within the next month.
G L Wilson
© 2018, Guitarz - The Original Guitar Blog - the blog that goes all the way to 11!
Please read our photo and content policy.
%20so%20as%20to%20keep%20those%20areas%20from%20getting%20sprayed%20pink.%0A%3Cbr%20/%3E%0A%3Cbr%20/%3E%0A%3Cdiv%3E%0A%3Ca%20href%3D%22https://blogger.googleusercontent.com/img/b/R29vZ2xl/AVvXsEjiUzXfdZWdkz1jKmwkAnL55XpIppXx3EUuNbH1wLflo5jApSoZkFtnpiQgG-G79IrGXDha9P_S-gUjEvxzMxTJOaAVsjBZiJCfDRF1bb8kC3qF2LMeRbRCETNud3aEfOmYYigQ/s1600/IMG_20180522_121919.jpg%22%20imageanchor%3D%221%22%3E%3Cimg%20border%3D%220%22%20data-original-height%3D%22912%22%20data-original-width%3D%221600%22%20height%3D%22364%22%20src%3D%22https://blogger.googleusercontent.com/img/b/R29vZ2xl/AVvXsEjiUzXfdZWdkz1jKmwkAnL55XpIppXx3EUuNbH1wLflo5jApSoZkFtnpiQgG-G79IrGXDha9P_S-gUjEvxzMxTJOaAVsjBZiJCfDRF1bb8kC3qF2LMeRbRCETNud3aEfOmYYigQ/s640/IMG_20180522_121919.jpg%22%20width%3D%22640%22%20/%3E%3C/a%3E%3C/div%3E%0AI%20figured%20the%20centre%20section%20of%20the%20back%20would%20be%20safe%20from%20overspray.%20I%20daresay%20some%20pink%20paint%20will%20bleed%20into%20the%20tape%20around%20the%20top%20edge%20of%20the%20guitar%20but%20I%20am%20hoping%20that%20I%20will%20be%20able%20to%20clean%20that%20up%20later.%0A%3Cbr%20/%3E%0A%3Cbr%20/%3E%0A%3Cdiv%3E%0A%3Ca%20href%3D%22https://blogger.googleusercontent.com/img/b/R29vZ2xl/AVvXsEiTIboZD4CvuCW1wHpEJIdNtbplJwy5ncOnLp43XnpXTrtnZONcX_sDFTXNKcXH6XgQoo0l5YkLMx7CWJLyURz4bk5xwFKkqdRei2sQSW0qCdmPXNsyQgJtbOwPbFFx5jVZ1Wtb/s1600/IMG_20180522_155627.jpg%22%20imageanchor%3D%221%22%3E%3Cimg%20border%3D%220%22%20data-original-height%3D%22912%22%20data-original-width%3D%221600%22%20height%3D%22364%22%20src%3D%22https://blogger.googleusercontent.com/img/b/R29vZ2xl/AVvXsEiTIboZD4CvuCW1wHpEJIdNtbplJwy5ncOnLp43XnpXTrtnZONcX_sDFTXNKcXH6XgQoo0l5YkLMx7CWJLyURz4bk5xwFKkqdRei2sQSW0qCdmPXNsyQgJtbOwPbFFx5jVZ1Wtb/s640/IMG_20180522_155627.jpg%22%20width%3D%22640%22%20/%3E%3C/a%3E%3C/div%3E%0AHere%20(above)%20is%20the%20piggy%20still%20wet%20with%20the%20first%20few%20layers%20of%20pink%20paint%20applied.%0A%3Cbr%20/%3E%0A%3Cbr%20/%3E%0A%3Cdiv%3E%0A%3Ca%20href%3D%22https://blogger.googleusercontent.com/img/b/R29vZ2xl/AVvXsEgsq8ok3LMaZhRRq2zfvkyHpL5M9ZymzlaVevB3eb4IAp1IjZLsHW1mSyr3f8eB7hyHi7YLCvEmO0uKiTK3ILmsH_j5OWnhqv4DlepWErXm0FVAUWN2_pCZSUYQh2RO_5v78_dQ/s1600/IMG_20180529_122826.jpg%22%20imageanchor%3D%221%22%3E%3Cimg%20border%3D%220%22%20data-original-height%3D%22578%22%20data-original-width%3D%221105%22%20height%3D%22334%22%20src%3D%22https://blogger.googleusercontent.com/img/b/R29vZ2xl/AVvXsEgsq8ok3LMaZhRRq2zfvkyHpL5M9ZymzlaVevB3eb4IAp1IjZLsHW1mSyr3f8eB7hyHi7YLCvEmO0uKiTK3ILmsH_j5OWnhqv4DlepWErXm0FVAUWN2_pCZSUYQh2RO_5v78_dQ/s640/IMG_20180529_122826.jpg%22%20width%3D%22640%22%20/%3E%3C/a%3E%3C/div%3E%0AAnd%20here%20it%20is%20again,%20after%20the%20first%20spaying%20had%20been%20allowed%20to%20dry%20for%20several%20days,%20then%20sanded%20back%20to%20a%20flat%20finish,%20and%20with%20the%20next%20coat%20of%20pink%20paint%20applied.%20It's%20building%20up%20quite%20a%20nice%20finish%20now,%20but%20I%20expect%20I'll%20give%20it%20another%20coat%20before%20sanding%20back%20to%20a%20matt%20finish%20and%20then%20applying%20the%20graphics.%0A%3Cbr%20/%3E%0A%3Cbr%20/%3E%0A%3Cdiv%3E%0A%3Ca%20href%3D%22https://blogger.googleusercontent.com/img/b/R29vZ2xl/AVvXsEh8fgPZ126C6aw0PKfPzlzlcUtd31qIPvJ5zNMmE1LH46bb4Q0MqOc4TAxA7C0X-kuV6Q3GgKh_qpkzkBC3J60PPBCcLVdyg1bEP4JSRGGh8ARFsjMUr5h7yLnG9xXH5s010sve/s1600/IMG_20180529_122607.jpg%22%20imageanchor%3D%221%22%3E%3Cimg%20border%3D%220%22%20data-original-height%3D%22674%22%20data-original-width%3D%221099%22%20height%3D%22392%22%20src%3D%22https://blogger.googleusercontent.com/img/b/R29vZ2xl/AVvXsEh8fgPZ126C6aw0PKfPzlzlcUtd31qIPvJ5zNMmE1LH46bb4Q0MqOc4TAxA7C0X-kuV6Q3GgKh_qpkzkBC3J60PPBCcLVdyg1bEP4JSRGGh8ARFsjMUr5h7yLnG9xXH5s010sve/s640/IMG_20180529_122607.jpg%22%20width%3D%22640%22%20/%3E%3C/a%3E%3C/div%3E%0ASpeaking%20of%20the%20graphics,%20my%20plan%20is%20to%20transfer%20the%20picture%20of%20the%20cartoon%20pig%20from%20my%20orignal%20template%20to%20the%20top%20of%20the%20guitar%20using%20carbon%20paper,%20and%20then%20to%20make%20the%20image%20permanent%20using%20paint%20pens%20and%20possibly%20also%20dry%20rub-off%20decal%20paper%20(for%20more%20detailed%20areas%20such%20as%20the%20nose,%20eyes,%20ears).%20The%20above%20photo%20shows%20a%20piece%20of%20scrap%20wood%20from%20the%20build%20-%20you%20can%20see%20where%20I've%20already%20made%20test%20drillings%20in%20it%20from%20earlier%20on%20in%20the%20build%20-%20and%20which%20I%20now%20have%20sprayed%20in%20the%20same%20piggy%20pink%20so%20as%20to%20test%20the%20set%20of%20paint%20pens%20that%20I%20have.%20As%20you%20can%20see,%20some%20colours%20work%20better%20than%20others.%20I%20have%20also%20clear-coated%20this%20test%20piece%20to%20ensure%20that%20there%20aren't%20going%20to%20be%20any%20issues%20with%20paints%20reacting%20with%20one%20another.%0A%3Cbr%20/%3E%0A%3Cbr%20/%3E%0AI%20really%20do%20want%20to%20crack%20on%20with%20this%20project%20now%20as%20we'd%20like%20to%20start%20using%20it%20for%20gigs%20soon.%20There's%20a%20festival%20we're%20playing%20in%20August%20at%20which%20we'd%20really%20like%20to%20have%20the%20guitar,%20so%20I'm%20hoping%20we%20can%20finish%20it%20within%20the%20next%20month.%0A%3Cbr%20/%3E%0A%3Cbr%20/%3E%0A%3Cb%3EG%20L%20Wilson%3C/b%3E%0A%3Cbr%20/%3E%0A%3Cbr%20/%3E%0A%3Cspan%3E%C2%A9%202018,%20%3Ca%20href%3D%22http://guitarz.blogspot.com/%22%3E%3Ci%3EGuitarz%3C/i%3E%3C/a%3E%20-%20The%20%3Ci%3EOriginal%3C/i%3E%20Guitar%20Blog%20-%20%20the%20blog%20that%20goes%20all%20the%20way%20to%2011!%3Cbr%20/%3E%0A%3Ca%20href%3D%22http://guitarz.blogspot.com/p/the-small-print-copyright-issues-use-of.html%22%3EPlease%20read%20our%20photo%20and%20content%20policy.%3C/a%3E%3C/span%3E%3Cdiv%3E%7B%7B%20Guitarz%20-%20guitarz.blogspot.com%20%7D%7D%3C/div%3E)
The Piglet guitar build project, part 8 16 Aug 2018 5:56 AM (6 years ago)

 |
| Applying the first coat of brown finish to the rear of the guitar |
 |
| The finished brown layer, which will still need clear coating |
 |
| The front of the piglet guitar awaiting its pink paint! |
G L Wilson
© 2018, Guitarz - The Original Guitar Blog - the blog that goes all the way to 11!
Please read our photo and content policy.
,%20and%20another%20time%20the%20paint%20formed%20%22wrinkles%22%20(maybe%20because%20of%20grease%20not%20cleaned%20away%20properly).%20On%20both%20occasions%20the%20finish%20had%20to%20be%20stripped%20back%20and%20re-applied.%3Cbr%20/%3E%0A%3Cbr%20/%3E%0A%3Ctable%20align%3D%22center%22%20cellpadding%3D%220%22%20cellspacing%3D%220%22%3E%3Ctbody%3E%0A%3Ctr%3E%3Ctd%3E%3Ca%20href%3D%22https://blogger.googleusercontent.com/img/b/R29vZ2xl/AVvXsEhdH91OtxpOcHSw25Cl499MsmffCbKJe9MRplXn3PtTHz5C42yFLzzCzSfyjkBWm8s8_Ha6F2MdF-zqtyAMDh89MLFmHSINBwchDO4IzQmTEZhUwy_qAQRm1HWsgIgVJbPQqI1h/s1600/IMG_20180519_181329_burst_02.jpg%22%20imageanchor%3D%221%22%3E%3Cimg%20border%3D%220%22%20data-original-height%3D%221224%22%20data-original-width%3D%22698%22%20height%3D%22640%22%20src%3D%22https://blogger.googleusercontent.com/img/b/R29vZ2xl/AVvXsEhdH91OtxpOcHSw25Cl499MsmffCbKJe9MRplXn3PtTHz5C42yFLzzCzSfyjkBWm8s8_Ha6F2MdF-zqtyAMDh89MLFmHSINBwchDO4IzQmTEZhUwy_qAQRm1HWsgIgVJbPQqI1h/s640/IMG_20180519_181329_burst_02.jpg%22%20width%3D%22364%22%20/%3E%3C/a%3E%3C/td%3E%3C/tr%3E%0A%3Ctr%3E%3Ctd%3EThe%20finished%20brown%20layer,%20which%20will%20still%20need%20clear%20coating%3C/td%3E%3C/tr%3E%0A%3C/tbody%3E%3C/table%3E%0A%3Ctable%20align%3D%22center%22%20cellpadding%3D%220%22%20cellspacing%3D%220%22%3E%3Ctbody%3E%0A%3Ctr%3E%3Ctd%3E%3Ca%20href%3D%22https://blogger.googleusercontent.com/img/b/R29vZ2xl/AVvXsEh9pGU9x8tSaJLe2uAZwilB4iu9Vh6Ksk9aMzFBGg_Nt62WjqvIlhkVOBzr7eA5KYB8cfM3hhe_MoSKkrNppfYOQf1eswPqt1JYGVjvwbVLWwzwHbWUaj8NNYYE_2hpWrM3cJMa/s1600/IMG_20180519_181319.jpg%22%20imageanchor%3D%221%22%3E%3Cimg%20border%3D%220%22%20data-original-height%3D%221377%22%20data-original-width%3D%22785%22%20height%3D%22640%22%20src%3D%22https://blogger.googleusercontent.com/img/b/R29vZ2xl/AVvXsEh9pGU9x8tSaJLe2uAZwilB4iu9Vh6Ksk9aMzFBGg_Nt62WjqvIlhkVOBzr7eA5KYB8cfM3hhe_MoSKkrNppfYOQf1eswPqt1JYGVjvwbVLWwzwHbWUaj8NNYYE_2hpWrM3cJMa/s640/IMG_20180519_181319.jpg%22%20width%3D%22364%22%20/%3E%3C/a%3E%3C/td%3E%3C/tr%3E%0A%3Ctr%3E%3Ctd%3EThe%20front%20of%20the%20piglet%20guitar%20awaiting%20its%20pink%20paint!%3C/td%3E%3C/tr%3E%0A%3C/tbody%3E%3C/table%3E%0ANext%20up:%20pink%20paint!%3Cbr%20/%3E%0A%3Cbr%20/%3E%0A%3Cb%3EG%20L%20Wilson%3C/b%3E%3Cbr%20/%3E%0A%3Cbr%20/%3E%0A%3Cspan%3E%C2%A9%202018,%20%3Ca%20href%3D%22http://guitarz.blogspot.com/%22%3E%3Ci%3EGuitarz%3C/i%3E%3C/a%3E%20-%20The%20%3Ci%3EOriginal%3C/i%3E%20Guitar%20Blog%20-%20%20the%20blog%20that%20goes%20all%20the%20way%20to%2011!%3Cbr%20/%3E%0A%3Ca%20href%3D%22http://guitarz.blogspot.com/p/the-small-print-copyright-issues-use-of.html%22%3EPlease%20read%20our%20photo%20and%20content%20policy.%3C/a%3E%3C/span%3E%3Cdiv%3E%7B%7B%20Guitarz%20-%20guitarz.blogspot.com%20%7D%7D%3C/div%3E)
The Piglet guitar build project, part 14 16 Aug 2018 5:56 AM (6 years ago)


Moving on to assembly, which meant much measuring...

...drilling of holes...

...and even more measuring!

In the picture above we are determining the optimum position for the bridge before screwing it into place permanently. I had created a crude but effective device from some offcuts which is effectively a temporary tailpiece clamped to the rear-end of the guitar. This allowed us to align the bridge with the outer E-strings in place and ensure that both were going to be the correct distance away from the edge of the neck. With the strings taut we were able to make precise movements to the placing of the brdge until happy with it and then we marked the positions of the five holes where it is to be screwed down.

Unfortunately mistakes will happen, and gettting confused about which holes we were drilling - the screw holes or the strings-through-body holes - we managed to drill one of the screw holes right through the body. A silly mistake but all part of the learning curve. We'll worry about disguising this later. (Hey, at least it's on the back of the guitar!) As you can see we also drilled the holes for the strings to pass through the body and for the ferrules to be inserted.

Next we mounted the electrics, which basically means the volume control and putting the pickup into position which will be screwed down more permanently once we have all the strings on so we can align up the pole-pieces. Thankfully the pickup routing allows for some movement to let us do this.

Gunner hard at work doing a preliminary set-up on the guitar; in this picture he's filing the nut slots.

Gunner commented on how easily the guitar intonated. Reckon all those precise measurements paid off.

Here I am having a little test play. First impressions are that it feels good.

We spent a while assessing the balance of the guitar before attaching the strap buttons. Hangs quite nicely on a strap. Is quite a heavy guitar, maybe 10lbs or so at a guess, but then it is quite big and is mainly solid poplar. Just as well I put in quite a few tone chambers or else it'd be heavier!

Here's a photo of where we've got to at the moment. It's not quite finished yet. The output jack is not yet wired up, and I still need to attend to the truss rod cover (I did have one but it split when trying to screw it into place). But we're allowing it to settle in for a while before giving it another set-up, just picking it up occasionally for a little unplugged play.
The next post should be the final one in this series. I hope to include some video footage.
G L Wilson
© 2018, Guitarz - The Original Guitar Blog - the blog that goes all the way to 11!
Please read our photo and content policy.
The Piglet guitar build project, part 13 16 Aug 2018 5:56 AM (6 years ago)


At the end of the previous installment I said that all there was left to do was the final assembly. However, I'd forgotten about installing the colour-changing LEDs in the eyes. Here in the photo we see the piggy undergoing eye surgery. I was incredibly nervous about this stage of the build because I'd be drilling through the decals beneath the clear coat finish and I was concerned about inadvertantly destroying the decals in the process.
The pupils in the eyes of the pig each have two small white discs, which I assume are meant to represent reflections. I took some time trying to decide which of the two I should install the LEDs in. I went for the lower "reflections" in the end as each of these discs is smaller than those uppermost, and are more in keeping with the size of the LEDs which have black rubber surrounds which would look weird against the white of the larger discs.
However, when I was putting some protective tape around the areas to be drilled (as seen above) I very nearly selected the upper white disc in one eye and the lower disc in the other. I was so glad that I caught my mistake because the pig would have ended up looking cross-eyed and it would have bugged me forever after.
The holes drilled were 6mm in diameter - easily big enough for the LEDs - but installing them with the black rubber surrounds in place was a complete nightmare. It was a very tight fit, and in the end I had to cut away some of the lugs of the surrounds so as to be able to squeeze them in.

At last the LEDs are in. Hurrah! They are colour-changing LEDs, not flashing because that would be annoying, but rather they slowly cycle through a range of colours. Above we see the piggy with a red glint in its eyes.

And here, above, we see the LEDs have turned green.

Here in this next couple of photos I am gluing the LEDs battery box to the cover plate. This is basically a Stratocaster-style tremolo spring cavity cover.

You'll see that I have drilled a hole in it to access the on-off switch for the LEDs.

Here's the cover screwed into place over the LED cavity. I'm aware that it'll be a bit of a pain to remove six screws in order to change the batteries and then of course put them all back again, but I'm hoping that the batteries don't need changing too often. If it does become a pain, I might have to devise a better system.
Finally in this installment, here's a video of the LED eyes doing their colour changing thing!
G L Wilson
© 2018, Guitarz - The Original Guitar Blog - the blog that goes all the way to 11!
Please read our photo and content policy.
Stunning Rare 1983 Burns Bandit Guitar 24 Jun 2018 12:22 AM (6 years ago)
guitarz.blogspot.com:


Sorry that I've not been here lately. Life has been busy, and that's good, but it leaves me little time to find cool guitars to share here.
This Burns Bandit needed to be showcased.
We've looked at the bandit a long time ago here but I had forgotten that the pickups were controlled with push-button selectors. I only remember this concept on late 1980s Ibanez guitars.
This Bandit is in great shape and it's the perfect shade of green.
The only thing keeping this rare beauty out of my hands is the listed price of over $5000 Canadian
R.W. Haller
© 2018, Guitarz - The Original Guitar Blog - the blog that goes all the way to 11!
Please read our photo and content policy.

Gibson Grabber Bass copy by Melody 5 Jun 2018 12:41 PM (6 years ago)


If any of you still regularly tune into Guitarz these days, you may have noticed that when I'm not posting about piglet-shaped guitars, that more often than not my attention will be on basses. There's a good reason for this as some might call me a "born again bassist". But yes, this is where my main interest lies as the bass is what I like playing the best.
Now, moving on to the matter in hand, although we have looked at the Gibson Grabber bass before on this blog, what we have here is a cheaper copy which I'd imagine was contemporaneous to the Gibson Grabber itself, produced between 1973 to 1983. (I can't imagine that copies were being produced after the real deal had ceased production, but you never know). My feelings are that this particular example would have been produced in the latter end of that period, probably more towards the beginning of the 1980s. This gut feeling is mainly based on the headstock logo, a stylised letter "M" which does have a distinct 1980s vibe to it and which replaced the "Melody Guitars" italic script as seen on earlier examples.


Of course, the Grabber was famous for - and named after - its single sliding pickup, which admittedly doesn't have a lot of travel, and on this copy the sliding pickup is all present and correct and seems to be working properly. In the above two photographs we see the pickup in its forward and rear positions respectively.
The metal pickup cover does appear that someone may have painted it at some point, or else removed paint from the upper surface which is now bare metal whereas the sides show scrappy black paintwork. The pickguard itself seems to be made out of... well, I want to call it bakelite; it has all the appearance and texture of that very dense black proto-plastic as famously used for the manufacture of 1950s-style dial telephones.

Here's that Flying V style headstock with the 1980s-style "M" for Melody logo.

The bass is very heavy. The neck and fingerboard are Maple, and I suspect that the body is likewise. The neck is chunky and highly reminiscent of a baseball bat. Scale length is a un-Gibson-like 34", but the fact that they were playing around with several bolt-on neck designs during that whole period was another un-Gibson-like characteristic. Underneath the cover (often removed and thrown away) the bridge is a 2-saddle affair reminiscent of the Fender '51 Precision/Tele-bass style.

But of course, this isn't a Gibson, it's a Melody.
Melody were actually an Italian guitar manufacturer, and had affiliation with Eko guitars. For some history the company, I couldn't tell it any better than FetishGuitars.com, so pop on over there and have a little read up!

However, this is one of Melody's later range of guitars and basses when they moved away from original designs and got onto the whole copy guitar bandwagon, that era of instrument production often erroneously referred to as "lawsuit" guitars. It's also highly doubtful that this is an Italian-made Melody. It's much more likely this is a Melody branded instrument originating in Japan (Dare I say "Matsumoku"? I don't know, but I have seem that name bandied about on forums discussing Melody guitars). Identical guitars and basses from the same production line would also have been badged up with other brand names. Grabber basses such as this were also offered with Aria, Avon, Cimar, MIA and Eagle branding.

I'm lucky to have been given this bass by a friend, a dealer who got it as part of a job-lot of guitars he was buying. It needs some cleaning and some TLC. The action isn't too horrendous and hopefully it can be tweaked to make it more playable. The pickup seems to work fine but I had trouble differentiating between the tone of the pickup in its different positions; admittedly I haven't trialled the bass properly through my gigging bass rig yet, I merely used a practice amp to check it was working. Pots are scratchy, but you'd expect that on an old instrument like this. The E-tuner is a bit dodgy too. If this bass looks like a keeper, I'll consider swapping the machine heads for something more modern and more reliable. (Note also, by the way, the different size screw-head on the rear of the tuners in the above photo. Looks like some tinkering has taken place).

And of course, the finish could be cleaned up as well, which shouldn't be too great a problem.
All in all, a very interesting piece, and very nice for a freebie.
G L Wilson
© 2018, Guitarz - The Original Guitar Blog - the blog that goes all the way to 11!
Please read our photo and content policy.
Julian Cope's Squier "Fake Fender" Jazz Bass listed for sale on eBay UK 20 May 2018 12:35 AM (6 years ago)


I'm a big fan of Julian Cope, so when I saw this listing on eBay UK for his "Fake Fender" Jazz Bass (actually a re-badged Squier circa 2004), it made me sit up and take notice.
To quote from the auction listing:
Here for auction is a bizarre experimental Squier Jazz bass from about 2004/5. The item was inherited by singer/author Julian Cope, who removed the original pick-ups and added several different types during his years of ownership. Why? The body of the bass is so heavy that it works well as a platform for whatever is installed. Cope recorded the bass with its variety of pick-ups, then also added genuine Fender 50’s-style anodyzed gold aluminium scratch-plate, plus genuine Fender pick-up covers.
Thereafter, the bass was abandoned as a musical instrument and the pick-ups were removed. The item became a focal point for Cope’s press photos during 2008 (see main photo). A genuine Fender waterslide decal was added to the newly painted gold headstock, and the body was coated with the kind of hellish glitter (in the style of the mid-60s Irish Showbands) that sparkles in the sun, whilst a chrome iron cross was installed in place of the original neck plate.


I'll post the final price when it sells. Note, it's for UK bidders only.
EDIT: It eventually sold for £313.36. I was so tempted to bid myself, but had to ask myself, realistically do I need another bass right now?
G L Wilson
© 2018, Guitarz - The Original Guitar Blog - the blog that goes all the way to 11!
Please read our photo and content policy.
Hoyer shortscale bass, a genuine relic from the late 1960s/1970s 1 May 2018 12:48 AM (6 years ago)


Ah, damn! I think I would have bid on this eBay UK listing for a vintage Hoyer solidbody shortscale bass had I seen the auction in time. It's a German-made instrument with one of those laminated necks which seemed to be popular on lower priced instruments of that era, and with a nice P-Bass meets Telecaster vibe going on too.
The seller listed this with a starting price of £100 and it eventually sold for £180
G L Wilson
© 2018, Guitarz - The Original Guitar Blog - the blog that goes all the way to 11!
Please read our photo and content policy.

Hamilton Custom Guitars: another example 27 Apr 2018 10:47 AM (6 years ago)


There has been a lot of interest in this 2013 post about this Hamilton Custom Guitar. Mark Natola contacted us to say that he is a Hamilton owner too, having recently bought a beaten-up example via Craig's List.
Mark has very kindly emailed the several photos of his Hamilton Custom Guitar that you see here. He tells us that:
...the head stock was broken when I bought it. In addition, the fret board was splitting away from the neck and the pick guard was broken in several places. Other than that, it was in fine shape, 😊.
I brought it to a luthier who removed the fret board, cleaned up the neck, glued the fret board back on and replaced the frets. He repaired the head stock based on the “Made for Raymond” photo posted on the blog. In the mean time, I had a new pick guard made based on the metal shielding found below the original pick guard. We decided to stick with the original pickup and pots as they could not be replaced. I took the bridge apart and soaked and scrubbed the chrome parts with naval jelly. They cleaned up very well. The tuning keys were also soaked and cleaned in the same manner. Finally, I made a conscious decision to keep the original laquer finish, which is checked from age. Consequently, when the head stock was repaired it was necessary to stain it using a stain similar to the body color. My guitar had a “Made for Corinne” signature, however part of the name was missing due to the damage to the headstock. We decided to remove that and leave the Hamilton Custom intact.
I have now seen several guitars and it looks like there are subtle variations in the plate below the bridge. I can send more images later if you are interested.


Mark goes on add:
...it would seem as there are at least five of these floating around including mine.I wonder if the white one on Pinterest is the same one as owned by the father of Thomas who commented on our original blog post?
- There is "Made for Raymond".
- Mine, formerly "Made for Corrine"
- A white one I saw posted on Pintrest a while back, without an inscription as far as I can tell
- One mentioned on this blog that was bought in Boston, with case and mid 60's sheet music
Am I missing any?
- One mentioned in recent post by guy from Long Island whose father chromed the hardware.
If anyone else has any more information or photos of Hamilton Custom guitars, please contact us!
G L Wilson
© 2018, Guitarz - The Original Guitar Blog - the blog that goes all the way to 11!
Please read our photo and content policy.
