Kids' Christmas Party - Painted Canvas Ornament Idea Tutorial 2 Dec 2016 7:45 AM (8 years ago)


- mini canvases 3" x 4" (I found these in packs of 10 at JoAnn's)
- 1/8" painters masking tape
- tiny eye screws / hooks
- acrylic paints in assorted colors
- paint brushes


%3C/li%3E%0A%3Cli%3E1/8%22%20painters%20masking%20tape%3C/li%3E%0A%3Cli%3Etiny%20eye%20screws%20/%20hooks%3C/li%3E%0A%3Cli%3Eacrylic%20paints%20in%20assorted%20colors%3C/li%3E%0A%3Cli%3Epaint%20brushes%3C/li%3E%0A%3C/ul%3E%0A%3Cdiv%3E%0A%3Ca%20href%3D%22https://blogger.googleusercontent.com/img/b/R29vZ2xl/AVvXsEhwd1HwxFcULla_Ke7dibCQ-t4VZhGkCSepUpKW8k49Yb2NPm2KRSe4nR8Wt5797e_oRS0In68i1nlarqYC5cyCSuW7dhPUOlY_dl_05LxBMyfM0PS2urmp_eSSK9K1QvPTpEEDGF9kOv0/s1600/christmas-ornament-art-paint-kids.jpg%22%20imageanchor%3D%221%22%3E%3Cimg%20border%3D%220%22%20height%3D%22221%22%20src%3D%22https://blogger.googleusercontent.com/img/b/R29vZ2xl/AVvXsEhwd1HwxFcULla_Ke7dibCQ-t4VZhGkCSepUpKW8k49Yb2NPm2KRSe4nR8Wt5797e_oRS0In68i1nlarqYC5cyCSuW7dhPUOlY_dl_05LxBMyfM0PS2urmp_eSSK9K1QvPTpEEDGF9kOv0/s320/christmas-ornament-art-paint-kids.jpg%22%20width%3D%22320%22%20/%3E%3C/a%3E%3C/div%3E%0AThe%20first%20step%20is%20to%20mask%20off%20a%20pattern%20of%20your%20choosing.%20Everywhere%20you%20put%20the%20tape,%20will%20end%20up%20white:%3Cbr%20/%3E%0A%3Cdiv%3E%0A%3Ca%20href%3D%22https://blogger.googleusercontent.com/img/b/R29vZ2xl/AVvXsEh9_kxyaUGAiPNZScZtR_i1eCucJunaGIFG5XthkYLPftJN8PLRlpHFDaIXrl5zJuU0yzYTV_CUx5F-Eohkh-eO-8yr1n3d8kj6O9YoY-CHO04Po_fU6dUpuBbhfr3Hn8azHD5SUEtZ_qM/s1600/christmas-party-craft-kids-idea.jpg%22%20imageanchor%3D%221%22%3E%3Cimg%20border%3D%220%22%20height%3D%22267%22%20src%3D%22https://blogger.googleusercontent.com/img/b/R29vZ2xl/AVvXsEh9_kxyaUGAiPNZScZtR_i1eCucJunaGIFG5XthkYLPftJN8PLRlpHFDaIXrl5zJuU0yzYTV_CUx5F-Eohkh-eO-8yr1n3d8kj6O9YoY-CHO04Po_fU6dUpuBbhfr3Hn8azHD5SUEtZ_qM/s320/christmas-party-craft-kids-idea.jpg%22%20width%3D%22320%22%20/%3E%3C/a%3E%3C/div%3E%0A%3Cdiv%3E%0AThen%20paint!%20You%20can%20paint%20each%20section%20a%20color%20or%20some%20random%20design:%3C/div%3E%0A%3Cdiv%3E%0A%3Ca%20href%3D%22https://blogger.googleusercontent.com/img/b/R29vZ2xl/AVvXsEgyHF9fZc0gm21unTpSfxjZRyoEXJCnkfY-vkjkjdBYiyXDkC4fTnPmNMx6YKLAAr6pLIe5m0SpVu_1V1kHn49JYdPsi8VKr2D_vhTPPXqLev6gXtYp3AVhDhBQ8F_qx83ZmXQLlJbhbGQ/s1600/christmas-ornament-art-kids-idea.jpg%22%20imageanchor%3D%221%22%3E%3Cimg%20border%3D%220%22%20height%3D%22299%22%20src%3D%22https://blogger.googleusercontent.com/img/b/R29vZ2xl/AVvXsEgyHF9fZc0gm21unTpSfxjZRyoEXJCnkfY-vkjkjdBYiyXDkC4fTnPmNMx6YKLAAr6pLIe5m0SpVu_1V1kHn49JYdPsi8VKr2D_vhTPPXqLev6gXtYp3AVhDhBQ8F_qx83ZmXQLlJbhbGQ/s320/christmas-ornament-art-kids-idea.jpg%22%20width%3D%22320%22%20/%3E%3C/a%3E%3C/div%3E%0A%3Cdiv%3E%0ALet%20the%20paint%20dry.%26nbsp;%3C/div%3E%0A%3Cdiv%3E%0A%3Ca%20href%3D%22https://blogger.googleusercontent.com/img/b/R29vZ2xl/AVvXsEihwgL1nRqsohtgI7dQPc3kw_hrRLoSc-X1NJrkBMaSo7ZY6m_R-qk-e9HRymRh6jVgHIl0q3ydwzSVWOjMPPe9SHd7Bm-xHB_2bSoqgpCeIjbMohqkMc2DK6wrdR5maO0If2sEkV4fouQ/s1600/christmas-ornament-art-kids-idea-party.jpg%22%20imageanchor%3D%221%22%3E%3Cimg%20border%3D%220%22%20height%3D%22320%22%20src%3D%22https://blogger.googleusercontent.com/img/b/R29vZ2xl/AVvXsEihwgL1nRqsohtgI7dQPc3kw_hrRLoSc-X1NJrkBMaSo7ZY6m_R-qk-e9HRymRh6jVgHIl0q3ydwzSVWOjMPPe9SHd7Bm-xHB_2bSoqgpCeIjbMohqkMc2DK6wrdR5maO0If2sEkV4fouQ/s320/christmas-ornament-art-kids-idea-party.jpg%22%20width%3D%22226%22%20/%3E%3C/a%3E%3C/div%3E%0A%3Cdiv%3E%0ARemove%20the%20painter's%20tape.%3C/div%3E%0A%3Cdiv%3E%0A%3Ca%20href%3D%22https://blogger.googleusercontent.com/img/b/R29vZ2xl/AVvXsEjqaRx6nArd-kOwwV1kH2awzvdGq3cHeMyzf5DejhJKkzrxoPLw0Z3eSJ31T63_-jfJAUlKvz117AwQvwos3gfAgI19QrN3GdnJRS3Q-mObWI6J0-fcPVmAg4bsj4A_2SNLHPAMwKomynQ/s1600/christmas-ornament-craft-kids-idea.jpg%22%20imageanchor%3D%221%22%3E%3Cimg%20border%3D%220%22%20height%3D%22293%22%20src%3D%22https://blogger.googleusercontent.com/img/b/R29vZ2xl/AVvXsEjqaRx6nArd-kOwwV1kH2awzvdGq3cHeMyzf5DejhJKkzrxoPLw0Z3eSJ31T63_-jfJAUlKvz117AwQvwos3gfAgI19QrN3GdnJRS3Q-mObWI6J0-fcPVmAg4bsj4A_2SNLHPAMwKomynQ/s320/christmas-ornament-craft-kids-idea.jpg%22%20width%3D%22320%22%20/%3E%3C/a%3E%3C/div%3E%0AAnd%20voila!%3Cbr%20/%3E%0A%3Cdiv%3E%0A%3Ca%20href%3D%22https://blogger.googleusercontent.com/img/b/R29vZ2xl/AVvXsEhHbUPU0sNXY06arWyZ81qL6K_4cSyh8LSyM0yx4d5db35rQBtNybhsIxfK7CuoXWPGZWgmrH1AQx7epAme6lGxT56V7pAAiU5zxvdHJpu6cCSrzJKYayGuzu2RxS2j-kLO-YQ4j2Xww0U/s1600/christmas-kids-party-craft-ornament-idea.jpg%22%20imageanchor%3D%221%22%3E%3Cimg%20border%3D%220%22%20height%3D%22236%22%20src%3D%22https://blogger.googleusercontent.com/img/b/R29vZ2xl/AVvXsEhHbUPU0sNXY06arWyZ81qL6K_4cSyh8LSyM0yx4d5db35rQBtNybhsIxfK7CuoXWPGZWgmrH1AQx7epAme6lGxT56V7pAAiU5zxvdHJpu6cCSrzJKYayGuzu2RxS2j-kLO-YQ4j2Xww0U/s320/christmas-kids-party-craft-ornament-idea.jpg%22%20width%3D%22320%22%20/%3E%3C/a%3E%3C/div%3E%0AWhen%20they%20are%20dry,%20screw%20in%20the%20eye%20hook%20so%20you%20can%20hang%20it%20on%20your%20tree.%20Add%20a%20thin%20satin%20ribbon,%20too,%20if%20you%20like.%20Here%20are%20some%20of%20the%20boys%20having%20fun%20working%20on%20theirs:%3Cbr%20/%3E%0A%3Cdiv%3E%0A%3Ca%20href%3D%22https://blogger.googleusercontent.com/img/b/R29vZ2xl/AVvXsEj2e69SblfgGJV4D7pX6Dmptg0_MgmcWcy3s_xU0qzvWqjXI5UYo20jBmw3LxJczHNwnfBhGLSMKkXc6T2P2th8Ex3xYJXw1TmpGYU26KPDUvEUVIw0V3rQxHVrLxWqFaOlzjnC85qRZr4/s1600/christmas-kids-party-craft-idea.jpg%22%20imageanchor%3D%221%22%3E%3Cimg%20border%3D%220%22%20height%3D%22172%22%20src%3D%22https://blogger.googleusercontent.com/img/b/R29vZ2xl/AVvXsEj2e69SblfgGJV4D7pX6Dmptg0_MgmcWcy3s_xU0qzvWqjXI5UYo20jBmw3LxJczHNwnfBhGLSMKkXc6T2P2th8Ex3xYJXw1TmpGYU26KPDUvEUVIw0V3rQxHVrLxWqFaOlzjnC85qRZr4/s320/christmas-kids-party-craft-idea.jpg%22%20width%3D%22320%22%20/%3E%3C/a%3E%3C/div%3E%0ABoth%20the%20girls%20and%20boys%20were%20excited%20to%20make%20a%20painted%20canvas%20creation!%20Yay!%20A%20treasured%20Christmas%20keepsake!)


Christian Altered Book Art with Scripture 24 May 2016 5:41 AM (8 years ago)
 My daughter and I created our first altered book art projects! She wanted to enter a local contest celebrating Book Month in April.


Decorating with Sea Glass 5 Apr 2016 3:40 PM (9 years ago)
 We LOVE to collect sea glass! Whenever we head to the beach, we're always on the lookout.

Not too long ago we were blessed to find ourselves on the west coast of Italy. Walking along the sea from Rapallo to Portofino past many rocky beaches, we couldn't resist to stop for sea glass. In a matter of minutes we had found more and larger pieces than in the previous five years of gathering on our west coast! [I don't know if that is the case always or it was due to heavy rains that had churned up the coast prior to our arrival.] Regardless, the kids especially were giddy with excitement at the overabundance of treasure at our fingertips! We laughed as we tossed the "tiny" specimens back – only selecting the grandest for keepsakes – but how those "tiny" pieces might have been considered precious and large back in CA. :-)

%3Cbr%20/%3E%0A%3Cdiv%3E%0A%3Ca%20href%3D%22https://blogger.googleusercontent.com/img/b/R29vZ2xl/AVvXsEh3kHUy2Vqwr91ZHoqM6iee3-xfgp99bS2hIMfN5rJD44AY1GrdvN7SKRo7OaLCQWqgJWt5JGSTNpKai42LHIdQDNqz4twePL-SZnmTJqP0IJXgoWDy5Q4uEYQl2-Yo6rfODtZGdrwBFkg/s1600/bedroom-seaglass-decorating.jpg%22%20imageanchor%3D%221%22%3E%3Cimg%20border%3D%220%22%20height%3D%22240%22%20src%3D%22https://blogger.googleusercontent.com/img/b/R29vZ2xl/AVvXsEh3kHUy2Vqwr91ZHoqM6iee3-xfgp99bS2hIMfN5rJD44AY1GrdvN7SKRo7OaLCQWqgJWt5JGSTNpKai42LHIdQDNqz4twePL-SZnmTJqP0IJXgoWDy5Q4uEYQl2-Yo6rfODtZGdrwBFkg/s320/bedroom-seaglass-decorating.jpg%22%20width%3D%22320%22%20/%3E%3C/a%3E%3C/div%3E%0AOur%20original%20collection%20being%20enjoyed%20in%20my%20daughter's%20bedroom.)
Easter Egg Stuffer Ideas for Little Ones 22 Mar 2016 6:00 AM (9 years ago)
 Ages ago when my daughter's first Easter came along she was almost one. We were excited newbie parents and wanted her to have the excitement of "hunting" for and opening Easter eggs. Of course - these things are really more about our excitement than theirs at that age, right? Well, I wasn't going to give my precious firstborn candy! Tee hee! The first thing that popped into my mind was animal crackers.

This post is JUST IN CASE, you've got little ones or toddlers and don't want to have their teeth full of sugary jelly beans either. Goldfish would be a nice treat, too, if your child doesn't eat them on an hourly basis and would consider them fun to find inside. Something not too sugary; simple and fun for a little tot. Of course, as they get older chocolate is really the best choice given its nutritional value. Wink. Wink. Or mints or money are also safe Easter egg stuffing choices. Please share your ideas in the comments!
AND please type "Easter" in the search bar on the right to see my more inspirational Christ-focused Easter celebration ideas! Happy Easter - Christ is risen!

Customized Hat Boxes for a Baby Room 10 Mar 2016 9:44 AM (9 years ago)
 Throwback Thursday! Here are some paper maché hat boxes I decorated for my daughter's baby room ages ago, and that I featured in my book Inspirational Home:


The pink box has a decoupaged tissue paper cover in a coordinating pink and brown polka dot. I printed "May the Lord's face shine upon you and bless you" from Numbers 6:24-25, on pink paper and wrapped horizontally around the sides. A pink ribbon tied simply is the finishing touch!


Kids Christmas Tree Party Treat Tutorial 19 Dec 2015 5:00 AM (9 years ago)


And then they loaded them up with their choice of sprinkles! Voila!

Letter Nail Head Art Project 5 Nov 2015 6:00 AM (9 years ago)
 A little afternoon project – easy contemporary letter crafts:


)
Celebrate Jesus' Resurrection 28 Mar 2015 2:07 PM (10 years ago)
 Easter is coming up. Here's
little table idea for your gatherings I first designed and posted in 2008!!
Easter is coming up. Here's
little table idea for your gatherings I first designed and posted in 2008!!

"He is not here: for he is risen, as he said. Come, see the place where the Lord lay." ~ Matthew 28:6
Tutorial:
• Cut out 3 inch egg shapes from patterned paper using decorative edged scissors.
• Print or write various phrases on coordinating solid colored paper.
• Cut out in circles.
• Punch a hole through each and string together with matching ribbon. I used: "Hosanna!" "Happy Easter!" and "He is Risen!"
Enjoy! And remember, you can always use the search bar on my site sidebar to find other Christian holiday ideas - 7 years worth of ideas!

Kids' Photo Ornament Keepsake Craft Tutorial 16 Dec 2014 8:38 AM (10 years ago)


%3C/div%3E%0A%3Cdiv%3E%0A%E2%80%A2%20glitter%20glue%20pens%20(assorted%20colors)%3C/div%3E%0A%3Cdiv%3E%0A%E2%80%A2%20thin%20hanging%20ribbon%3C/div%3E%0A%3Cdiv%3E%0A%3Ca%20href%3D%22https://blogger.googleusercontent.com/img/b/R29vZ2xl/AVvXsEhqbd3G80QaHWTrkZTA0VQpYYtWBfTJqy9n0Xv7sLiPdamoqs4VJpq6TbD5qtJsCf4ECKvLzsrP_S97G1lcFqQOmSSx3MPQ37pzT10eoklg9qvFmlBmN78ioV060bzDgxDHg04fa3dBBKk/s1600/Christmas-kids-photo-keepsake.jpg%22%20imageanchor%3D%221%22%3E%3Cimg%20border%3D%220%22%20src%3D%22https://blogger.googleusercontent.com/img/b/R29vZ2xl/AVvXsEhqbd3G80QaHWTrkZTA0VQpYYtWBfTJqy9n0Xv7sLiPdamoqs4VJpq6TbD5qtJsCf4ECKvLzsrP_S97G1lcFqQOmSSx3MPQ37pzT10eoklg9qvFmlBmN78ioV060bzDgxDHg04fa3dBBKk/s1600/Christmas-kids-photo-keepsake.jpg%22%20height%3D%22228%22%20width%3D%22320%22%20/%3E%3C/a%3E%3C/div%3E%0A%3Cdiv%3E%0AStep%201:%20screw%20in%20one%20eye%20hook%20to%20the%20rim/side%20of%20each%20wood%20disk.%26nbsp;%3C/div%3E%0A%3Cdiv%3E%0AStep%202:%20ask%20each%20child%20to%20draw%20a%20picture,%20create%20a%20design%20or%20write%20something%20on%20one%20side%20of%20the%20disk%20with%20the%20Sharpie%20pens.%20There!%E2%80%93You're%20capturing%20their%20artwork,%20too!%3C/div%3E%0A%3Cdiv%3E%0A%3Ca%20href%3D%22https://blogger.googleusercontent.com/img/b/R29vZ2xl/AVvXsEjGe1uTLkCOK0QvE0Espj7Eb15510_fKP9ImES77IoGAXoH_Ygun0d-xnla7X3HE_KcfnBdfu3i_oZQgX7BDVlkl0kR34ad6ROLUEz1yGZGDF7CC6FagTuKJtT84-UBJRco_XhCyihLW50/s1600/Christmas-kids-photo-keepsakes.jpg%22%20imageanchor%3D%221%22%3E%3Cimg%20border%3D%220%22%20src%3D%22https://blogger.googleusercontent.com/img/b/R29vZ2xl/AVvXsEjGe1uTLkCOK0QvE0Espj7Eb15510_fKP9ImES77IoGAXoH_Ygun0d-xnla7X3HE_KcfnBdfu3i_oZQgX7BDVlkl0kR34ad6ROLUEz1yGZGDF7CC6FagTuKJtT84-UBJRco_XhCyihLW50/s1600/Christmas-kids-photo-keepsakes.jpg%22%20height%3D%22232%22%20width%3D%22320%22%20/%3E%3C/a%3E%3C/div%3E%0A%3Cdiv%3E%0AStep%203:%20cut%20the%20child's%20photo%20in%20a%20circle%20just%20a%20touch%20smaller%20than%20the%20wood%20disk.%20%3Ci%3E(The%20disks%20I%20bought%20at%20Michael's%20were%20assorted%20sizes.)%3C/i%3E%3C/div%3E%0A%3Cdiv%3E%0AStep%204:%20brush%20decoupage%20glue%20onto%20the%20reverse%20side%20of%20the%20disk%20and%20adhere%20the%20photo.%3C/div%3E%0A%3Cdiv%3E%0AStep%205:%20let%20dry%20for%20a%20couple%20minutes.%3C/div%3E%0A%3Cdiv%3E%0AStep%206:%20decorate%20and%20hide%20the%20photo%20edge%20with%20glitter%20glue.%3C/div%3E%0A%3Cdiv%3E%0AStep%207:%20string%20ribbon%20for%20hanging%3C/div%3E%0A%3Cdiv%3E%0A%3Ca%20href%3D%22https://blogger.googleusercontent.com/img/b/R29vZ2xl/AVvXsEizIkOWNtFFSNnsM1z2eFnWb9Tuvem4Htzd6CCSXwGrbSoIf_NeAB6n59i5CKY1hwaKef39zTIdmrNti6F6i8RO-GSRIYfxnhKgIjZv5rfs3xuONzNcIMv9n_Hv9eJTte84M3RhwuN9Quc/s1600/Christmas-kids-photo-ornament.jpg%22%20imageanchor%3D%221%22%3E%3Cimg%20border%3D%220%22%20src%3D%22https://blogger.googleusercontent.com/img/b/R29vZ2xl/AVvXsEizIkOWNtFFSNnsM1z2eFnWb9Tuvem4Htzd6CCSXwGrbSoIf_NeAB6n59i5CKY1hwaKef39zTIdmrNti6F6i8RO-GSRIYfxnhKgIjZv5rfs3xuONzNcIMv9n_Hv9eJTte84M3RhwuN9Quc/s1600/Christmas-kids-photo-ornament.jpg%22%20height%3D%22320%22%20width%3D%22250%22%20/%3E%3C/a%3E%3C/div%3E%0AThere%20you%20go%20%E2%80%93%20a%20cute%20keepsake%20ornament%20for%202014%20with%20your%20child's%20face%20and%20art!)
Making Christmas Meaningful 8 Dec 2014 9:26 AM (10 years ago)


%3C/div%3E%0A%3Cdiv%3E%0A%3Ca%20href%3D%22https://blogger.googleusercontent.com/img/b/R29vZ2xl/AVvXsEi64oG99etb8VuVTlVFHr2eNTrk3-a34lZWqGi5526uStCksOYASrEkhMfhrGL2a2pns5Lr9rGR3iTRXJiQ2EZK6Yrez5m4KYp5C_agwhkMxPurE73FAV8Cc4Us9WWee2Y75O_1hhmNuf8/s1600/Christmas2014-nativities-mangers.jpg%22%20imageanchor%3D%221%22%3E%3Cimg%20border%3D%220%22%20src%3D%22https://blogger.googleusercontent.com/img/b/R29vZ2xl/AVvXsEi64oG99etb8VuVTlVFHr2eNTrk3-a34lZWqGi5526uStCksOYASrEkhMfhrGL2a2pns5Lr9rGR3iTRXJiQ2EZK6Yrez5m4KYp5C_agwhkMxPurE73FAV8Cc4Us9WWee2Y75O_1hhmNuf8/s1600/Christmas2014-nativities-mangers.jpg%22%20height%3D%22264%22%20width%3D%22320%22%20/%3E%3C/a%3E%3C/div%3E%0A%3Cdiv%3E%0A%3Cbr%20/%3E%3C/div%3E%0A%3Cbr%20/%3E%0A%3Cdiv%3E%0A%3Cbr%20/%3E%3C/div%3E%0A%3Cdiv%3E%0A%3Cbr%20/%3E%3C/div%3E%0A%3Cbr%20/%3E)
Enjoying Summer Roses 29 Jul 2014 7:00 AM (10 years ago)
 Bringing some of God's beautiful creations indoors:


Wall Art Canvases & Photo Frames 22 Jul 2014 6:00 AM (10 years ago)
 Black and white photos floating in framed glass ...


My Favorite Two Easter Projects 19 Apr 2014 7:57 AM (11 years ago)
 "Jesus" Easter eggs:

Candle decor symbolic of the sinless Jesus and His sacrifice for us:

For other Easter decorating and craft ideas, including fun kids' projects browse my previous Easter holiday posts.


Kids' Christmas Craft Party 2013 20 Dec 2013 9:29 AM (11 years ago)


Plus, games, prizes and a white elephant exchange - WooHoo! Let's party!
%3Cbr%20/%3E%0A%26nbsp;Plus,%20games,%20prizes%20and%20a%20white%20elephant%20exchange%20-%20WooHoo!%20Let's%20party!%3Cbr%20/%3E%0A%3Cdiv%3E%0A%3C/div%3E%0A%3Cbr%20/%3E)
Please Pray for Saeed 3 Dec 2013 9:07 PM (11 years ago)


Fill a Shoebox for Operation Christmas Child 18 Nov 2013 8:00 AM (11 years ago)
 It's that time of year!


Thanksgiving Paper Craft - Indian Corn for Fall 12 Nov 2013 6:00 AM (11 years ago)
 In a festive fall mood the other day, the kids and I did some paper crafting:


Rubik's Cube Birthday Party - Part 2 8 Oct 2013 6:00 AM (11 years ago)
 If one of your kids or family members are in a Rubik's Cube phase, here are some more ideas from my son's recent birthday party. (for the cake and other party ideas see my first party post here.)


%3Cbr%20/%3E%0A%3Cdiv%3E%0A%3Ca%20href%3D%22https://blogger.googleusercontent.com/img/b/R29vZ2xl/AVvXsEhq49O_G_NsTUNp4QIJssVD8sbVQK30K42OvOhijBInbLr_S8BULYvntlFnbzpq-3mdPCMaV_31W3Tl1xxc9qbAlTHGtkLZb596fhNJuiFpShAAviEZgFbcXdkxyd6lqcLb_w_jdccOsr4/s1600/birthday-rubiks-cube-pinatas.jpg%22%20imageanchor%3D%221%22%3E%3Cimg%20border%3D%220%22%20height%3D%22309%22%20src%3D%22https://blogger.googleusercontent.com/img/b/R29vZ2xl/AVvXsEhq49O_G_NsTUNp4QIJssVD8sbVQK30K42OvOhijBInbLr_S8BULYvntlFnbzpq-3mdPCMaV_31W3Tl1xxc9qbAlTHGtkLZb596fhNJuiFpShAAviEZgFbcXdkxyd6lqcLb_w_jdccOsr4/s320/birthday-rubiks-cube-pinatas.jpg%22%20width%3D%22320%22%20/%3E%3C/a%3E%3C/div%3E%0A%26nbsp;%3Cspan%3EThe%20centerpiece%20of%20the%20fiesta%20was%20this%20homemade%20pinata%20I%20made.%3C/span%3E%3Cbr%20/%3E%0A%3Cdiv%3E%0A%3Ca%20href%3D%22https://blogger.googleusercontent.com/img/b/R29vZ2xl/AVvXsEhh81y83WuE6MjBMWXVUJSBu-td3E5hHKvxB50gqKIUWkQW5XRTiuUXIwO4fRLIJ0Fx5zZMSb5MidXVMT5eBQYlUKqXoKK6pLpHrhfTjK6l_K8JMWiNZPvdxIKS20WAlcS6yZIYTrmFjvE/s1600/birthday-rubiks-cube-pinata.jpg%22%20imageanchor%3D%221%22%3E%3Cimg%20border%3D%220%22%20height%3D%22320%22%20src%3D%22https://blogger.googleusercontent.com/img/b/R29vZ2xl/AVvXsEhh81y83WuE6MjBMWXVUJSBu-td3E5hHKvxB50gqKIUWkQW5XRTiuUXIwO4fRLIJ0Fx5zZMSb5MidXVMT5eBQYlUKqXoKK6pLpHrhfTjK6l_K8JMWiNZPvdxIKS20WAlcS6yZIYTrmFjvE/s320/birthday-rubiks-cube-pinata.jpg%22%20width%3D%22138%22%20/%3E%3C/a%3E%3C/div%3E%0A%3Cdiv%3E%0AAssorted%20Rubik's%20Cube%20puzzles%20decorated%20the%20lunch%20table:%3C/div%3E%0A%3Cdiv%3E%0A%3Ca%20href%3D%22https://blogger.googleusercontent.com/img/b/R29vZ2xl/AVvXsEjsrarU-b0L1Y8Vsm-Xsk_BXG8NKH1OBAZn4p974K5tqQ3GPnGFwkHgLGcVVhvMOWzOxmcKJ2bNGrYYpjxURnXn4xPclI6_wDUA_PD3R1YFzJuUwYBbNDBojQd806U8d2ASQFlhrTSzerg/s1600/rubiks-cube-party-ideas.jpg%22%20imageanchor%3D%221%22%3E%3Cimg%20border%3D%220%22%20height%3D%22288%22%20src%3D%22https://blogger.googleusercontent.com/img/b/R29vZ2xl/AVvXsEjsrarU-b0L1Y8Vsm-Xsk_BXG8NKH1OBAZn4p974K5tqQ3GPnGFwkHgLGcVVhvMOWzOxmcKJ2bNGrYYpjxURnXn4xPclI6_wDUA_PD3R1YFzJuUwYBbNDBojQd806U8d2ASQFlhrTSzerg/s320/rubiks-cube-party-ideas.jpg%22%20width%3D%22320%22%20/%3E%3C/a%3E%3C/div%3E%0A%3Cdiv%3E%0APaper%20cubes%20that%20coordinated%20with%20the%20invites%20hung%20from%20the%20lights:%3C/div%3E%0A%3Cdiv%3E%0A%3Ca%20href%3D%22https://blogger.googleusercontent.com/img/b/R29vZ2xl/AVvXsEja7NELffJ8NHkFLnmupTxL_qdut_qAmXFASOC6wjtknr8EJbkjUM_AHwyHPj_lgh1Hy8OcgjTzEFsZMG20OOuXioJTWHWfRYrMnbBonot64aWwtKC48vpXqR8Kt2emEhLggKf3oA5eCvM/s1600/rubiks-cube-party-decorations.jpg%22%20imageanchor%3D%221%22%3E%3Cimg%20border%3D%220%22%20height%3D%22320%22%20src%3D%22https://blogger.googleusercontent.com/img/b/R29vZ2xl/AVvXsEja7NELffJ8NHkFLnmupTxL_qdut_qAmXFASOC6wjtknr8EJbkjUM_AHwyHPj_lgh1Hy8OcgjTzEFsZMG20OOuXioJTWHWfRYrMnbBonot64aWwtKC48vpXqR8Kt2emEhLggKf3oA5eCvM/s320/rubiks-cube-party-decorations.jpg%22%20width%3D%22256%22%20/%3E%3C/a%3E%3C/div%3E%0A%26nbsp;The%20first%20activity%20after%20my%20son's%20kids%20arrived%20was%20a%20contest%20to%20melt%20a%20frozen%20popsicle%20the%20fastest.%20Here's%20a%20group%20of%20them%20holding%20theirs%20against%20the%20hot%20patio:%3Cbr%20/%3E%0A%3Cdiv%3E%0A%3Ca%20href%3D%22https://blogger.googleusercontent.com/img/b/R29vZ2xl/AVvXsEiNJY3a8TlVpx-uwFbVbQ29I-CjfGjkYbyc62xOYA3PAQw0F_T-vueZsMjr-1IapU853FvDJMYwgSQLnEeIGr3jAkU4FGuZvCfgRI07M8BYWNDZZ9yt0bpZEr1Js4gqwcDaXZkJJ-NI_NY/s1600/rubiks-cube-party-summer-games.jpg%22%20imageanchor%3D%221%22%3E%3Cimg%20border%3D%220%22%20height%3D%22197%22%20src%3D%22https://blogger.googleusercontent.com/img/b/R29vZ2xl/AVvXsEiNJY3a8TlVpx-uwFbVbQ29I-CjfGjkYbyc62xOYA3PAQw0F_T-vueZsMjr-1IapU853FvDJMYwgSQLnEeIGr3jAkU4FGuZvCfgRI07M8BYWNDZZ9yt0bpZEr1Js4gqwcDaXZkJJ-NI_NY/s320/rubiks-cube-party-summer-games.jpg%22%20width%3D%22320%22%20/%3E%3C/a%3E%3C/div%3E%0A%26nbsp;And%20first%20place%20goes%20to:%3Cbr%20/%3E%0A%3Cdiv%3E%0A%3Ca%20href%3D%22https://blogger.googleusercontent.com/img/b/R29vZ2xl/AVvXsEjTBjsgMVjulpOVl-Bcy09qyezBpxLVIq1Mtw2zGZWQa3fI8pvl2Tsg2VSpq5IK1ii4QpXzMc8woDmA2oU0T6x3IY5yxS8PzOTJkAxxVz34LNHouGrp2J_PNxZeB9AkjnZJ5IOCgQAGId4/s1600/rubiks-cube-party-games.jpg%22%20imageanchor%3D%221%22%3E%3Cimg%20border%3D%220%22%20height%3D%22320%22%20src%3D%22https://blogger.googleusercontent.com/img/b/R29vZ2xl/AVvXsEjTBjsgMVjulpOVl-Bcy09qyezBpxLVIq1Mtw2zGZWQa3fI8pvl2Tsg2VSpq5IK1ii4QpXzMc8woDmA2oU0T6x3IY5yxS8PzOTJkAxxVz34LNHouGrp2J_PNxZeB9AkjnZJ5IOCgQAGId4/s320/rubiks-cube-party-games.jpg%22%20width%3D%22187%22%20/%3E%3C/a%3E%3C/div%3E%0A%3Cdiv%3E%0ANext%20we%20formed%20two%20teams%20and%20did%20a%20relay%20of%20filling%20a%20bucket%20using%20a%20sponge%20and%20water:%3C/div%3E%0A%3Cdiv%3E%0A%3Ca%20href%3D%22https://blogger.googleusercontent.com/img/b/R29vZ2xl/AVvXsEgOuoqyMaiQqT4VDaQ9t3zjhjYP2cYRBp42SivwSnYf2evcLaRNyVU1y7U4cmUmiJaop6JSSWyimHw-2Qiq2vU3t55r-MrW8IIq9rPqO-3yTqX3G2olY1IQYd6N-WD4dwZIOqNoYKyv-PA/s1600/rubiks-cube-summer-party-games.jpg%22%20imageanchor%3D%221%22%3E%3Cimg%20border%3D%220%22%20height%3D%22158%22%20src%3D%22https://blogger.googleusercontent.com/img/b/R29vZ2xl/AVvXsEgOuoqyMaiQqT4VDaQ9t3zjhjYP2cYRBp42SivwSnYf2evcLaRNyVU1y7U4cmUmiJaop6JSSWyimHw-2Qiq2vU3t55r-MrW8IIq9rPqO-3yTqX3G2olY1IQYd6N-WD4dwZIOqNoYKyv-PA/s320/rubiks-cube-summer-party-games.jpg%22%20width%3D%22320%22%20/%3E%3C/a%3E%3C/div%3E%0AThen%20we%20were%20ready%20to%20jump%20in%20the%20pool%20for%20more%20racing%20games:%3Cbr%20/%3E%0A%3Cdiv%3E%0A%3Ca%20href%3D%22https://blogger.googleusercontent.com/img/b/R29vZ2xl/AVvXsEgULToI5gRLdVrii6rrhvmdcgN0o1E9OX7zOiRHnWd8tAJKqEBYEfaApSdy2PYGEhYFnd49qYGyQbQf8NaNCoZXaSja2pGw14Uu6HvrRSlBwpubVkIXxY0rQWQwBmL6tyT7W4D-DbIZvt8/s1600/birthday-rubiks-cube-games.jpg%22%20imageanchor%3D%221%22%3E%3Cimg%20border%3D%220%22%20height%3D%22293%22%20src%3D%22https://blogger.googleusercontent.com/img/b/R29vZ2xl/AVvXsEgULToI5gRLdVrii6rrhvmdcgN0o1E9OX7zOiRHnWd8tAJKqEBYEfaApSdy2PYGEhYFnd49qYGyQbQf8NaNCoZXaSja2pGw14Uu6HvrRSlBwpubVkIXxY0rQWQwBmL6tyT7W4D-DbIZvt8/s320/birthday-rubiks-cube-games.jpg%22%20width%3D%22320%22%20/%3E%3C/a%3E%3C/div%3E%0AWooHoo!%20%26nbsp;Thanks%20for%20stopping%20by!!%3Cbr%20/%3E%0A%3Cbr%20/%3E)
Fall Roses on Display 30 Sep 2013 9:00 AM (11 years ago)
 The cool air of September is making my rose bushes bloom magnificently! We had to steal a vaseful from the hidden sides to bring indoors to enjoy.

A shallow rustic candle vase is transformed with a bit of brown and pink satin ribbon. Mmmmmm - they smell fabulous!

Free Printable: Apothecary Bottle Label 23 Sep 2013 7:00 AM (11 years ago)
 "A cheerful heart is good medicine." ~ Proverb 17:22


Rubik's Cube Boy Birthday Party! 11 Sep 2013 7:16 PM (11 years ago)
 We recently celebrated my son's 7th birthday with a colorful Rubik's Cube themed kid party.


%20Frost%20with%20chocolate%20and%20spray%20black.%3Cbr%20/%3E%3Cdiv%3E%0A%3C/div%3E%0A%3Cdiv%3E%0A%3C/div%3E%0A%3Cdiv%3E%0A%3C/div%3E%0A%3Cdiv%3E%0A%3C/div%3E%0A%3Cdiv%3E%0A%3C/div%3E%0A%3Cdiv%3E%0A%3C/div%3E%0A%3Cdiv%3E%0A%3Ca%20href%3D%22https://blogger.googleusercontent.com/img/b/R29vZ2xl/AVvXsEiJeMz13ExF6qbZ-XMlliAKZ8xi_7dY6Xr-TuBha0l2FKd1AwmbhOQMFbP7weVusk0eB-6ayk8W53McSP_8vAFf0WOATec_Nh-IMpmyQfK7a1797atIh32q_yruj-96hBdQOHgovH3fOFQ/s1600/birthday-rubiks-cube-cake.jpg%22%20imageanchor%3D%221%22%3E%3Cimg%20border%3D%220%22%20height%3D%22240%22%20src%3D%22https://blogger.googleusercontent.com/img/b/R29vZ2xl/AVvXsEiJeMz13ExF6qbZ-XMlliAKZ8xi_7dY6Xr-TuBha0l2FKd1AwmbhOQMFbP7weVusk0eB-6ayk8W53McSP_8vAFf0WOATec_Nh-IMpmyQfK7a1797atIh32q_yruj-96hBdQOHgovH3fOFQ/s320/birthday-rubiks-cube-cake.jpg%22%20width%3D%22320%22%20/%3E%3C/a%3E%3C/div%3E%0AThen%20simply%20sort%20out%20M%26amp;M's%20by%20color%20and%20set%20into%20your%20pattern%20of%20choice.%20Here's%20a%20photo%20of%20the%20cake%20table.%20The%20Rubik's%20Cube%20birthday%20cake%20is%20surrounded%20by%20the%20kids'%20favors.%3Cbr%20/%3E%3Cdiv%3E%0A%3Ca%20href%3D%22https://blogger.googleusercontent.com/img/b/R29vZ2xl/AVvXsEi3tK7S-bI3heaHHPhJ2vpoCOjOSKuqJPAOEmW3-xf2SoA2ml-NoMv79UU3buLGlfrY1Qsciq9VBBNayXORnkEwJDyJ-ZpxARNz5jxTGPIOjyWj4NLYPh5xHZ9mhulzOI5VdgM2ZYI2TVc/s1600/birthday-rubiks-cube-cakes.jpg%22%20imageanchor%3D%221%22%3E%3Cimg%20border%3D%220%22%20height%3D%22192%22%20src%3D%22https://blogger.googleusercontent.com/img/b/R29vZ2xl/AVvXsEi3tK7S-bI3heaHHPhJ2vpoCOjOSKuqJPAOEmW3-xf2SoA2ml-NoMv79UU3buLGlfrY1Qsciq9VBBNayXORnkEwJDyJ-ZpxARNz5jxTGPIOjyWj4NLYPh5xHZ9mhulzOI5VdgM2ZYI2TVc/s320/birthday-rubiks-cube-cakes.jpg%22%20width%3D%22320%22%20/%3E%3C/a%3E%3C/div%3E%0AThe%202x2%20Rubik's%20Cube%20thank%20you%20gifts%20for%20the%20boys:%3Cbr%20/%3E%3Cdiv%3E%0A%3Ca%20href%3D%22https://blogger.googleusercontent.com/img/b/R29vZ2xl/AVvXsEibxr8ZLBQ06vkeS1RL_1g2h6NF3DmQ75kAMaGYYxqFZHRyhx1lMadACuO6EGeGlgUpaYb83vGRuept0z0b6l7vGEXmZeYsFFKA_b8ive5y98nwt2CoFUPtvmjpnWrBbeen5mduEkJ4NBo/s1600/birthday-rubiks-cube-favors.jpg%22%20imageanchor%3D%221%22%3E%3Cimg%20border%3D%220%22%20height%3D%22320%22%20src%3D%22https://blogger.googleusercontent.com/img/b/R29vZ2xl/AVvXsEibxr8ZLBQ06vkeS1RL_1g2h6NF3DmQ75kAMaGYYxqFZHRyhx1lMadACuO6EGeGlgUpaYb83vGRuept0z0b6l7vGEXmZeYsFFKA_b8ive5y98nwt2CoFUPtvmjpnWrBbeen5mduEkJ4NBo/s320/birthday-rubiks-cube-favors.jpg%22%20width%3D%22261%22%20/%3E%3C/a%3E%3C/div%3E%0A%26nbsp;Personalized%20drinks%20for%20the%20kids:%3Cbr%20/%3E%0A%3Cdiv%3E%0A%3Ca%20href%3D%22https://blogger.googleusercontent.com/img/b/R29vZ2xl/AVvXsEi8Xr2rKTROJ5eN3aWX_nZe4R9fboJ03rQjFk7zA295b7SUpuOduPIXUf-54Re5r9In_Ix1LDaX8ZuoGj-V5XxyynZiitBfMsOUaaYwcGN1PkJyz9711R1mAOMJYYNcVm_TFJJImISjFV4/s1600/birthday-rubiks-cube-drinklabels.jpg%22%20imageanchor%3D%221%22%3E%3Cimg%20border%3D%220%22%20height%3D%22191%22%20src%3D%22https://blogger.googleusercontent.com/img/b/R29vZ2xl/AVvXsEi8Xr2rKTROJ5eN3aWX_nZe4R9fboJ03rQjFk7zA295b7SUpuOduPIXUf-54Re5r9In_Ix1LDaX8ZuoGj-V5XxyynZiitBfMsOUaaYwcGN1PkJyz9711R1mAOMJYYNcVm_TFJJImISjFV4/s320/birthday-rubiks-cube-drinklabels.jpg%22%20width%3D%22320%22%20/%3E%3C/a%3E%3C/div%3E%0A%26nbsp;More%20birthday%20party%20fun%20next%20time!%3Cbr%20/%3E%0A%3Cbr%20/%3E)
Summer Fun Recipe - Fairy Fudge 11 Jul 2013 5:00 AM (11 years ago)
 Ahhhhh! Summer!! My favorite season! Lots of time for relaxing, swimming, reading, biking and playing. Also, the kids and I are taking advantage of our free time to create, explore, discover and experiment. We tried a recipe in my daughter's Usborne Fairy Cooking book this week:

Ingredients:
• 16 oz. powdered sugar
• 4 oz. large marshmallows
• 2 tablespoons milk
• 1/2 cup unsalted butter
• 1/2 teaspoon of vanilla
• food colouring
• small cutters
• small sweets for decorating
Instructions:
1. Sift sugar through a sieve into a large bowl. Make a small hollow in the middle of the sugar with a spoon.
2. Using clean scissors, cut the marshmallows in half and put them in a small pan. Add the milk, butter and vanilla
3. Gently heat the pan. Stir the mixture with a wooden spoon until everything has just melted.
4. Pour the mixture into the hollow of the sugar. Mix everything together until it is smooth, then mix in a drop of food colouring

5. Leave the mixture to cool for 10 minutes, then make it into a flattened round shape. Then, wrap it in plastic food wrap
6. Put the fudge mixture in a fridge for three hours to go firm. Then, sprinkle a little powdered sugar on a clean work surface.
7. Roll out the fudge with a rolling pin until it is about 1/4 inch thick. Then, use the cutters to cut out lots of shapes
8. Squeeze the scraps into a ball, then roll out the ball and cut out more shapes. Then, decorate each shape with a sweet
%20Since%20this%20recipe%20is%20already%20readily%20available%20online,%20I'll%20post%20our%20version%20but%20it%20is%20%C2%A9Rebecca%20Gilpin%20and%20Catherine%20Atkinson.%20The%20book%20is%20really%20cute%20and%20from%20Scholastic,%20so%20support%20your%20school%20when%20it's%20back%20in%20session%20or%26nbsp;your%20local%20Usborne%20rep%26nbsp;and%20check%20out%20this%20neat%20kids'%20cookbook!%3Cbr%20/%3E%0A%3Cbr%20/%3E%0A%3Cspan%3EIngredients%3C/span%3E%3Cspan%3E:%3C/span%3E%3Cbr%20/%3E%0A%3Cspan%3E%E2%80%A2%2016%20oz.%20powdered%20sugar%3C/span%3E%3Cbr%20/%3E%0A%3Cspan%3E%E2%80%A2%204%20oz.%20large%20marshmallows%3C/span%3E%3Cbr%20/%3E%0A%3Cspan%3E%E2%80%A2%26nbsp;2%20tablespoons%20milk%3C/span%3E%3Cbr%20/%3E%0A%3Cspan%3E%E2%80%A2%26nbsp;1/2%20cup%20unsalted%20butter%3C/span%3E%3Cbr%20/%3E%0A%3Cspan%3E%E2%80%A2%26nbsp;1/2%20teaspoon%20of%20vanilla%3C/span%3E%3Cbr%20/%3E%0A%3Cspan%3E%E2%80%A2%26nbsp;food%20colouring%3C/span%3E%3Cbr%20/%3E%0A%3Cspan%3E%E2%80%A2%26nbsp;small%26nbsp;cutters%3C/span%3E%3Cbr%20/%3E%0A%3Cspan%3E%E2%80%A2%26nbsp;small%20sweets%20for%20decorating%3C/span%3E%3Cbr%20/%3E%0A%3Cspan%3E%3Cbr%20/%3E%3C/span%3E%0A%3Cspan%3EInstructions:%3C/span%3E%3Cbr%20/%3E%0A%3Cspan%3E1.%20Sift%20sugar%20through%20a%20sieve%20into%20a%20large%20bowl.%20Make%20a%20small%20hollow%20in%20the%20middle%20of%20the%20sugar%20with%20a%20spoon.%3C/span%3E%3Cbr%20/%3E%0A%3Cspan%3E2.%20Using%20clean%20scissors,%20cut%20the%20marshmallows%20in%20half%20and%20put%20them%20in%20a%20small%20pan.%20Add%20the%20milk,%20butter%20and%20vanilla%3C/span%3E%3Cbr%20/%3E%0A%3Cspan%3E3.%20Gently%20heat%20the%20pan.%20Stir%20the%20mixture%20with%20a%20wooden%20spoon%20until%20everything%20has%20just%20melted.%3C/span%3E%3Cbr%20/%3E%0A%3Cspan%3E4.%20Pour%20the%20mixture%20into%20%26nbsp;the%20hollow%20of%20the%20sugar.%20Mix%20everything%20together%20until%20it%20is%20smooth,%20then%20mix%20in%20a%20drop%20of%20food%20colouring%3C/span%3E%3Cbr%20/%3E%0A%3Cdiv%3E%0A%3Ca%20href%3D%22https://blogger.googleusercontent.com/img/b/R29vZ2xl/AVvXsEji-AansPGpvBtzCXCdgIxXBKlHRIABvIcGpXcbyk99_04Hmut2Sk3GLBHoFDw_3NsGO6soGh72uGgF2uwGxlA5EOH9Co8gaqigtLVtnObemlOzGwdRuMte5pVH_vmD1fOzyQmkHZ2und0/s540/recipe-fairy-fudge-kids.jpg%22%20imageanchor%3D%221%22%3E%3Cimg%20border%3D%220%22%20height%3D%22320%22%20src%3D%22https://blogger.googleusercontent.com/img/b/R29vZ2xl/AVvXsEji-AansPGpvBtzCXCdgIxXBKlHRIABvIcGpXcbyk99_04Hmut2Sk3GLBHoFDw_3NsGO6soGh72uGgF2uwGxlA5EOH9Co8gaqigtLVtnObemlOzGwdRuMte5pVH_vmD1fOzyQmkHZ2und0/s320/recipe-fairy-fudge-kids.jpg%22%20width%3D%22304%22%20/%3E%3C/a%3E%3C/div%3E%0A%3Cspan%3E%3Cbr%20/%3E%3C/span%3E%3Cspan%3E5.%20Leave%20the%20mixture%20to%20cool%20for%2010%20minutes,%20then%20make%20it%20into%20a%26nbsp;flattened%20round%20shape.%20Then,%20wrap%20it%20in%26nbsp;plastic%26nbsp;food%20wrap%3C/span%3E%3Cbr%20/%3E%0A%3Cspan%3E6.%20Put%20the%20fudge%20mixture%20in%20a%20fridge%20for%20three%20hours%20to%20go%20firm.%20Then,%26nbsp;sprinkle%20a%20little%20powdered%20sugar%20on%20a%20clean%20work%20surface.%3C/span%3E%3Cbr%20/%3E%0A%3Cspan%3E7.%20Roll%20out%20the%20fudge%26nbsp;with%26nbsp;a%20rolling%20pin%20until%20it%20is%20about%201/4%20inch%20thick.%20Then,%20use%20the%20cutters%20to%20cut%20out%20lots%20of%20shapes%3C/span%3E%3Cbr%20/%3E%0A%3Cspan%3E8.%20Squeeze%20the%20scraps%20into%20a%20ball,%20then%20roll%20out%20the%20ball%20and%20cut%20out%20more%20shapes.%20Then,%20decorate%20each%20shape%20with%20a%20sweet%3C/span%3E%3Cbr%20/%3E%0A%3Cdiv%3E%0A%3Cspan%3E%3Ci%3EStore%20in%20airtight%20container%20in%20refrigerator%20for%20up%20to%20one%20week.%3C/i%3E%3C/span%3E%3C/div%3E)
Happy 4th of July America!! 4 Jul 2013 10:51 AM (11 years ago)


Summer Fun - Around the World 2 Jul 2013 6:00 AM (11 years ago)


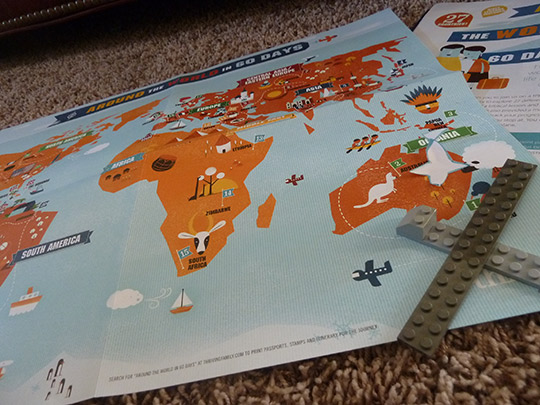

%20When%20we%20recently%20sat%20down%20to%20read%20the%20latest%20issue%20of%20Focus%20on%20the%20Family's%20Clubhouse%20Jr.%20we%20discovered%20this%20neat%20summer%20idea%20already%20put%20together%20for%20us!%3Cbr%20/%3E%0A%3Cdiv%3E%0A%3Ca%20href%3D%22https://blogger.googleusercontent.com/img/b/R29vZ2xl/AVvXsEiaXTB0lF9_k1nt29p7nD6sth9w-Xt3jTjYCaC7p1wK-VnI6RsqfiQsRQzGZxNjYtcNdUorXKlXk5OvuUFbXTcx8KIMq8KzUih-TDc_o0_27vVu5ghTxEYxxMiMn7e4VSLtvabqGWK_Olo/s1250/family-time-summer.tiff%22%20imageanchor%3D%221%22%3E%3Cimg%20border%3D%220%22%20height%3D%22320%22%20src%3D%22https://blogger.googleusercontent.com/img/b/R29vZ2xl/AVvXsEiaXTB0lF9_k1nt29p7nD6sth9w-Xt3jTjYCaC7p1wK-VnI6RsqfiQsRQzGZxNjYtcNdUorXKlXk5OvuUFbXTcx8KIMq8KzUih-TDc_o0_27vVu5ghTxEYxxMiMn7e4VSLtvabqGWK_Olo/s320/family-time-summer.tiff%22%20width%3D%22291%22%20/%3E%3C/a%3E%3C/div%3E%0A%3Cdiv%3E%0AYou%20can%20go%20to%20%3Ca%20href%3D%22http://www.thrivingfamily.com/Features/Magazine/2013/around-the-world-in-60-days.aspx%22%3EThriving%20Family%3C/a%3E%26nbsp;and%20get%20your%20own%20map,%20passport%20and%20travel%20guide%20to%20print%20out%20to%20do%20this%20with%20your%20own%20kids.%20%3Ci%3E(We%20also%20discovered%20that%20MY%20subscription%20to%20Thriving%20Family%20actually%20contains%20the%20fold-out%20map%20...%20which%20I'd%20probably%20have%20noticed%20had%20I%20been%20up-to-date%20on%20my%20own%20reading.)%3C/i%3E%3C/div%3E%0A%3Cdiv%3E%0A%3Ca%20href%3D%22https://blogger.googleusercontent.com/img/b/R29vZ2xl/AVvXsEjuVujKf9n-lh5ytuQQ6Y9VxGP7syCBHYOAo3uRswET8qk8D89lZslLS9I_5FtBT2snm7-fHpcARlA3U1acXzW8yGN6K3KPEZxYyLYFcGwzQTEeY_r8Db9jIzGx7NLckvfd4SiB3HwQObo/s540/family-time-missions.jpg%22%20imageanchor%3D%221%22%3E%3Cimg%20border%3D%220%22%20height%3D%22240%22%20src%3D%22https://blogger.googleusercontent.com/img/b/R29vZ2xl/AVvXsEjuVujKf9n-lh5ytuQQ6Y9VxGP7syCBHYOAo3uRswET8qk8D89lZslLS9I_5FtBT2snm7-fHpcARlA3U1acXzW8yGN6K3KPEZxYyLYFcGwzQTEeY_r8Db9jIzGx7NLckvfd4SiB3HwQObo/s320/family-time-missions.jpg%22%20width%3D%22320%22%20/%3E%3C/a%3E%3C/div%3E%0A%3Cdiv%3E%0AAnyhoo,%20the%20idea%20is%20you%20read%20about%20different%20countries%20all%20around%20the%20world,%20a%20biblical%20application,%20activity%20idea%20and%20prayer%20for%20the%20people%20of%20that%20region.%20Then%20the%20kids%20can%20put%20the%20applicable%20stamp%20in%20their%20passport%20book.%26nbsp;We%20printed%20out%20the%20travel%20guide%20and%20made%20each%20child%20their%20own%20passport.%20I%20printed%20the%20custom%20stamps%20on%20label%20paper,%20so%20they%20can%20really%20stick%20them%20in%20their%20booklet.%26nbsp;%3C/div%3E%0A%3Cdiv%3E%0A%3Ca%20href%3D%22https://blogger.googleusercontent.com/img/b/R29vZ2xl/AVvXsEj0aYegQ4x_3TAumVu2Sw9TKvddu7h2oXz-7kedH10o4zkN9RwvpWxYIyPm49FhCrc5PP5LpaA2kIIFVPGjrCcjvYJDnBNUzRWaQwERTCxQ0LdyXaDXnDQvH_baDkyoH9B4Uu8V205kYHs/s540/family-time-aroundtheworld.jpg%22%20imageanchor%3D%221%22%3E%3Cimg%20border%3D%220%22%20height%3D%22248%22%20src%3D%22https://blogger.googleusercontent.com/img/b/R29vZ2xl/AVvXsEj0aYegQ4x_3TAumVu2Sw9TKvddu7h2oXz-7kedH10o4zkN9RwvpWxYIyPm49FhCrc5PP5LpaA2kIIFVPGjrCcjvYJDnBNUzRWaQwERTCxQ0LdyXaDXnDQvH_baDkyoH9B4Uu8V205kYHs/s320/family-time-aroundtheworld.jpg%22%20width%3D%22320%22%20/%3E%3C/a%3E%3C/div%3E%0AThe%20kids%20first%20find%20the%20country%20and%20put%20their%20%22plane%22%20on%20it,%20then%20we%20read%20the%20very%20short%20%22guide.%22%20Look%20up%20the%20Bible%20verse%20and%20do%20an%20activity.%20Then%20we%20find%20an%20actual%20travel%20video%20on%20YouTube%20so%20they%20can%20get%20a%20great%20idea%20of%20what%20the%20country%20is%20really%20like.%20Then%20we%20say%20a%20little%20prayer%20for%20the%20people%20in%20that%20country.%20%3Ci%3E(Also,%20since%20we%20started%20late,%20we're%20doing%20one%20country%20a%20day,%20instead%20of%20how%20they%20have%20it%20spread%20over%20two.)%20%3C/i%3EVisit%20the%20%3Ca%20href%3D%22http://www.thrivingfamily.com/Features/Magazine/2013/around-the-world-in-60-days.aspx%22%3EThriving%20Family%20website%3C/a%3E%20to%20check%20it%20out%20and%20take%20your%20kids%20on%20a%20worldwide%20mission%20trip!)
Fashion Barbie Aqua Zebra Stripe 8 Year Old Girl Birthday Party! (part 2) 14 May 2013 6:00 AM (11 years ago)


