Photo credit: his majesty Bill Robertson. A great old friend and now photographer.
Hello out there.
Adepticon has passed and I have recovered somewhat. It certainly does deserve a recap. Let's just get into it! Get comfy and pull up your favorite throne.
Everyone wanted to buy the three foot Titan picture especially. Sorry, that has a spot on the wall.
Will quickly admit, and I wonder if more than anyone else, I was pretty nervous about the new venue. Had been going since 2008 and am too sentimental for my own good. Figured I'd miss the old place and feel out of water. Plus, it has been, sad to say, too many years since I have been. 2019 was my last trip, then covid and that October the house fire and all the work that came of it. Adepticon is so deeply a part of me it feels strange to even think about the gap in time. It will never go away, and is a part of my existence, even if other things in life separate us for what is comparatively to the importance of the thing, a very short time.
Not all hero's feet reach the floor.
The venue is great. It is better than the previous in just about every way possible. It is bigger, with room to grow. Talking to everyone as they came by the booth, the consensus was it took a day to get the feel for it, but after that everyone settled in quite quickly. We will all miss the lobby of the Schaumberg, and it forcing everyone to mingle and pass, but it is really a more than forgettable price to pay for all the plusses of the new. It is very similar to Gencon at this venue, but with all the close knit feeling and focused niches that I prefer, of the same old Adepticon.
Mom made a ridiculous amount of cookies. None survived.
The booth was thankfully a big hit, and everyone loved the light up backdrop. Was a bit worried it wouldn't work, and I had a ton of issues on the back end getting it. Spent so much time working on it, it became to me like a word you say over and over and it no longer has meaning. Could no longer tell if it was fun, or felt flat. It was great that so many people came up just to figure out if the pictures were real. Made me smile. It was worth it as well just for the pop the light added. Always felt really alive, even if yours truly was still nursing the morning coffee.
I don't know, I just like this picture.
Had a good few people come up and ask "So, what is going on? Do you photograph people's armies? Or sell prints?" I explained it was just my silly way of a doing a portfolio and it was fun to see them light up with the realization they were all models I have painted over the years. Just my style, and I do what is fun to me. Those conversations made me smile. No matter the varied reactions to the booth I felt good, and as usual it is thanks to just sticking to being myself. That never steers me wrong.
There were battles, victory, and the sour taste of defeat.
It was really beyond words to hang out and see the old crews again. Old fantasy crews, good buddies, 40k people, con friends. Too long and my face hurts from smiling. Really worth all of it just to go and talk some sass and reminisce. But as much there were tons of new faces. Part of that is likely time, but curious asking, it was often venue as well. Met some really great people for the first time both because I have been away, and because Milwaukee made it their first time, that I hope become those usual con faces.
SOIG - Stuff Only I Get
The wall now has some proper stories to tell. Still a work in progress, especially the half left of this phtoto, which I of course leave out. Good to have the Lejeune back up.
I had the great pleasure of meeting Jim Owczarksi. I never post about it but as a side gaming obsession I play (maybe better to say, plan) 10mm Napoleonics past few years. Have always been interested in the period, and now with a game space it seemed correct. It is mostly about being able to go wild on research, as if regular painting work and planning isn't enough. I realized over time I was actually treating Fantasy and Horus Heresy like historicals, and figured would make it proper on something that in model terms no one ever sees and is pure game. It is extreme depth of material, low stakes, so it works very well as a here and there side thing. But over the past couple years I have watched everything relevant Jim has played, often a couple times over, as I work. As explained to him, personally there really isn't anyone living today I would call myself a traditional "fanboy" of, but I certainly was a little when we met. Managed to get him to sign a picture from the wall. Still unclear if he understood why I was so excited. Which is understandable.

I got to see Jim's cantankerous thinking face. It's what I imagined.
Mistakes were made. Then luck.
After that he was kind enough to invite me to a game held by David Ensteness, owner of the Wargaming Company and writer of Et Sans Resultat. I bought that second edition from him in person in 2019 which started this side storm in a teacup. That copy died in the fire, but I had flipped through it plenty and knew it was a song that sung to me, so I bought another and the third edition release. Also brought along something for him to sign - a proper Wagram Napoleon, as I knew he'd also have a booth. He seemed a little more used to the request. Had a great time playing with both of them and the rest of the TTS crew (Achilles and Rob) It was one of those moments in life you flip in and out of lucidity of, where you are and the meaning of it. Was a real honor and a very special moment for me.
New place, new badge spot. I think this might get quite crowded.
A big thank you to those that run the thing. Adepticon may be bigger than I thought it would ever get after all these years, but the people behind the scenes who have been doing it all still do just because they like it and it's fun. It is really all of us that force decisions like a venue change. Which they take and make good decisions with for all of us. Great people and once a year is never enough.
The caption of this photo is simply "Family."
No rest for the wicked, and back to work! I know Adepticon always gives me the extra juice, but after this time I forgot just how much. See you next post, the ones after that, and next March.
Also photo and edit credit to his greatness, Mr. Robertson.


New, from Blammo - it's Crane Game!
Now your favorite Chapters can vertically advance themselves toward bloodsport and fabulous prizes. Voted the best new way to be entertained while slowly conveying by Grotular Mechanics. It's like Running Man, but standing!

Hello out there!
The urban camo Tau commission is all finished. This project came to me as a general idea of very light and dark greys, and "camo" on the larger pieces. Early on I did a panel of swatches and some camo samples, and ended up going with the digital over a larger chunky style. The light grey was a really fun smooth color to paint. Not quite white but a soft off grey. The shading and making it feel alive even though on paper it is a monotone "black and white" army made it very enjoyable to paint and very rewarding to step back and see the final result.
The bases are a combination of Elrik's Hobbies for some bases and flight stands, the rest I did up in putty, plus some oddball 3d printed items for fun. The Elrik's Hobbies City flight stand is a really great base sculpt. The drones are solid in 32mm and brass rod. Think they look a little better, and less fiddly that way. Something really pleasing about a gun drone skimming the ground, and the large drones look a bit silly sitting on top of a regular sized GW flight stand.
One thing that is always fun about Tau is working out the oddball Kroot running parallel. Those were done towards the end to sit on the main Tau scheme and let it percolate. We ended up going with, out of several thoughts, the lens color very dark for the Krootox, and light camo green for the Kroot skin. Always enjoy the little side puzzle of Kroot.
It isn't obvious from these photos but just about everything in this army is magnetized, with every codex option. Every suit has a full array, and each Fish has three of each weapon. Fun stuff, and I enjoy sending out a project that should be good for a couple codexes.
Outside of those notes, will let the photos tell the rest, and hope you enjoy them. Quite a few at that. This was a very photogenic and cooperative army, from posing to taking shots. Ended up with way too many and this is the result of hours of culling at that. Projects always behave differently when it comes to the camera. Some are fussy, some smile real big and say cheese and don't want to leave. But I enjoy that it is a thing.
Up next - Night Lords. That new backdrop at some point. Prep for Adepticon and then Adepticon itself. Not playing anything this year, but will have a big, fun booth! See you next time.

Hello out there!
A new side project underway. Some of you might recognize the bones of it. While I lost all of my backdrops in the fire, one thing learned the past few years is everything has a silver lining. If you are willing to look. Was quite full up in my little sentimental space. At the time I had not needed a new one for a while, and have since been working on new and better. There was one though that was extra special, and want to redo it. At least in basic form and spirit. Hopefully better. The Mars display I did not use often but it was always the one that never got "put up." I worked on designing it with a friend, and spent one very special, flurried week painting it.
Alex at Ironheart Artisans redid the skeleton, with a few little tweaks, and I have it here ready for paint. A few things different. For one, painting it in parts this time, not solid. What you see is all loose, and eventually as the walls and floor get painted more terrain will be added and lock it all in.
The paint scheme will be much different as well. The only thing really the same are the basics. I think for the better, and a little extra special to not just have it back, but one-up it.
Updates and the usual paint posts will come. This won't be used for the current Tau project, but it will be coming along to Adepticon. That's right, I need as much as I can to fill the big booth I have this year so need to get to work!
See you soon for more.

Hello out there! Something old, something new is the story of this post. Back into 40k with a new Tau army, prepped and ready for paint, on top of some hand made slate bases for the most part. A few Elrik's Hobbies in there, with more on the way for the fliers.
Another fun reason to do a pre-paint post is to show off the new workbench. It isn't my grandpa's 1950's time capsule as some of you may remember for these posts, but it is still my style. The wood is all salvaged studs and joists from tearing down the old house that I kept for this.
A swatch card for the project shows primary up top, to the basing thoughts in the bottom rectangle. Some camo samples in various degrees of finish for sake of example surround.
Will be a fun project, and while the end of the Civil War project is bittersweet for it being so large and such a big part of my life, it does feel good to get back to my roots of 40k. Looking forward to a pretty 40k post at the end of this, and on a new backdrop as well. Posts on that will come soon, too.
By the way, can you find the new Waldo? This is his first home-base debut as well. I kept it a little easy this time. Won't always be in the future.
Thanks for reading, see you next time.

Hello out there!
The huge ACW commission is finished! Clocking in at a whopping 1500 figures, it is the biggest project I have ever done, and that is certainly saying something. But for lack of words to get going, let's talk some more wherever the dopamine and thrill of the finale takes me.

I have done a lot of big projects in my 20 or so years of almost purely commission painting. Painting armies (or "large batch" for some projects that don't really fit that word) because it is what I enjoy. A single figure to me is a pleasure to paint well and fun. Many, many of them is something else multiplicative and much more. It is really hard to describe, but for some people wired like myself, the thrill of a truly grand effort, and the final conclusion of it, is always so much more than the sum of it's parts. This is not just 1500 individual models painted with individual care, it is also and more a single great effort of concentrated will and pleasure of craft that I am grateful to have the opportunity to be what I do. And I would say not just do, but is "me."

That is already enough sap to turn Canadian, but I have to add one very important additional point before we get to the details - this project is very important to me because it bookends the time of the house fire. This client's Samurai project was what I was working on when it happened. That was an ordeal I went through and here we are at the end. Our new house came during the first half of this project and now have even better.
Was in love with my old place. Didn't live there for any reason at all but it was sentimental. It is strange to say out loud but on bad days, I'd comfort myself by thinking well at least I will always be here. Making do with space simply because I wanted to and could. Everything I had ever painted and all my displays for photos fit by Millennium Falcon magic into a tiny bedroom and garage. If you have been around and you've seen my work, you would have been a bit surprised. Now have more square footage in my purely "studio" space than my entire old house. One thing taken away is every event in life no matter how dark, will always have some silver linings. They might just take a minute.
Have moved on for a while, but this post I suppose is true and final closure. And what a project to end it on.
This project is a combination of Perry Miniatures and Sash and Saber figures. Almost everything is metal, with a few exceptions. To start broadly, the two ranges work very well together. With some good paint over top, what subtle differences there are disappear. Which makes for a good end result, because I am always a fan of variety in sculpt in posing, just not style.
The one plastic entry is some of the artillery parts. 28 cannons and 18 limbers - 12 of the cannons were plastic. Both metal and plastic is Perry, but slight difference in size of the carriage between the two. My solution was to do a couple extra 12pdr Napoleons and put them on the plastics, and the ordinance and parrots on the metals. Just being too obsessive, but I sleep good. The limber teams are metal Perry, the boxes plastic. Really liked the plastic limber boxes.
As with any other project, what you see in the photos is me playing with and posing what the client needs for game. It is always an interesting aspect to these. This is for Regimental Fire & Fury rules, so he needed some disorder markers (casualties), brave colonels (individual leader figs) and such. I always appreciate these little things for what they add to the final photos, even though they are actually purely utilitarian.
The flags are for the most part GMB Designs printout, historically accurate flags I have taken and through a varnish process, essentially turned them into a workable plastic. Then work it and clip, cut, bend it, and use that as a base for what is otherwise all paint in what you see in the end. Really love all the flags, and the client chose a great command stand composition with the two banners, musician, and leader each.
One thing I really enjoyed about this project is the contrasting challenges of color between the Confederates and Union. For the Union, I worked very hard to mix the perfect blue that "feels" accurate but also looks very appealing. Spend a while on historical uniforms and reality, field wear, old far from color fast dyes, and variety of them ends up dead on the table, in the weeds to what looks good and looks Union, and is exciting to look at. Everything about the Union comes from this line of thinking and was a very special and hard fought mix.
The Confederates on the other hand, are an interesting challenge of mixture of color and process, rather than any one color. Every single line figure was jumbled and mixed in a process of color application to give just the right feel, and never ever cutting corners in color placement.
Analogous to that, the same was done for mounting. You will never find two of the same sculpt on one 2x2 40mm base. In the end, you can pick up any base and find a small scene of four unique figure sculpts. Beyond that, you can pick up any Confederate base and also see four totally unique figures, to the base and in the entirety of the Confederates in color application. It is one of those things that is a big effort, a small thing, and a big impact to the overall.
The basing is inspired by sample images sent by the client. Broadly, green natural and realistic with flowers. The base blend of flock is unique. Made one giant tub that is probably 20 different flocks - leaf, short and long various static flocks, tiny clump foliage and very fine foam flocks. Every base was give this application, and while still wet given flowers, sticks, brush. I have at this point various flocks enough to kill a cow, very possibly literally.
Some of the bases are larger scenic additions, made from various things. Perry camp kits, leftover models from here and there, Renedra tents, and various resin bits and bobs. I really like these, and just a few adds so much character overall.
Well folks, that is a project wrapped. Thank you very much for viewing. I hope you enjoyed the images and the project, and maybe my writing. See you very soon for more exciting stuff. Tau, Night Lords, new terrain backdrops, Gencon! Exciting rest of 24. See you soon, thank you.
"Fun" bonus story. The very last day of final true paint work before basing, wrapping etc, on this project I had worked so long and so hard on, we had a nasty storm that took out trees and power across the whole county. After all this time and effort, in the final moments, I am left without power and hanging for what ended up being around five days. It was torture. I mounted some figures by daylight and played some games by oil lamp at night. In some ways truly awful. In others, managed an okay camping in. Sometimes you just can't make life up.

Hello out there!
What a fitting post for what is Memorial Day over here in the states - the 28 artillery pieces and 18 limbers for the ACW project.
A mix of a couple different kits, the main bulk is metal Perry, with some additions of some artillery being plastic. All of the limber pieces themselves are the plastic kit as well. My biggest hurdle with this one was my particulars of gun tube and chassis. On each side, as per the client's official notes, each side had 8 metal gun carriages and 4 plastic. Side by side the two mix just fine, but I did not really want to mix and match per tube, so I put the 4 each iron tubes on the slightly smaller metal carriages, and did an extra two plastic on me to hold the 6, 12 pdr Napoleons on each side. Everything nice and clean that way.
ACW artillery is generally the same color on each side, an olive with brown undertones. In reality a matter of mixing yellow and lampblack to seal up the wood of the pieces. Lucky me, a color I have painted many time before for 40k, and enjoyed myself a lot between it, the metals and natural woods of the limber seats/lids.
I also did some extra models for the "at ease" or crew #5 and 6 going back to the limber. Most of the metal Perry limbers are at a galloping pose, but some are "at ease" and I used these extras to make those three each side, little dioramas. The little extra things that make something feel alive are always the last but most important little 10% of a project to go from toy soldiers to alive.
You might also notice some bits of artillery here and there. Like the round based dead figures, these are functional in the game, but I really enjoy them for spicing up the photos.
This is the last blog post of the project. It is quite fitting being such a big fun aspect of the project. I had to watch myself not spending too much time putting the rest of the models back on the table for a big shot. That is for next time. In fact this is the first time I had to break out a couple of card tables just to pull things off and repose. The final shots will be quite an adventure of posing the whole project and expect it to take at least a day if not two. Looking forward to it.
See you next time for the big finale. Some Zouaves, and then the 18 generals!

Union forces assault Lee's headquarters. Alabama, Louisiana, Missouri, and Florida defend, taking heavy casualties. Cavalry screen as the rest of the army deploys.
Hello out there!
Another update to the huge ACW project. This time the bulk of Confederate infantry, plus some extra goodies. Photography is getting a real treat as both sides start to come together.
A lot of fun sculpts. Mostly Sash and Saber, with some Perry mixed in. A lot of character, and fun to paint. Quite a different process than the Union. Instead of mounting like sculpts together, the figures were mounted for paint in 8-10 man strips, and each one jumbled through the process of color. Each model is unique, but overall that distinct Confederate look in mass.
Let's get on with some photos. Up next, two dozen artillery and limbers!
Bitter close fighting as Louisiana and Alabama defend Lee's headquarters from the Iron Brigade and 5th Union.
David Lang coolly commands the 8th Florida under heavy fire.
"There was a firefight!"...Reaching, but there's probably some Irishmen in there somewhere.
South Carolina is the first to deploy in support of Florida. Mounting casualties are swiftly moved to the field hospital.
Perry ambulance wagon. Two ambulances and several casualty sets jumbled to create many casualty markers, and unique wagons for each side plus a field hospital.
Stewart camp.
The hospital is made up of many different figures from sets and terrain elements.

Hello out there!
The Union infantry are finished, and quite a wide eyeful of models they are. For the blue side of the project, still a few small things to do, but can call this the triumphal gist of it with this last big batch of the regular infantry. Around 350 models just on the 40s, not to count the cavalry, mounted and dismounted, and other things shown so far on the Union side.
The infantry are a combination of Sash and Saber and Perry miniatures figures, which combine very well especially with paint. A really great variety too. One of the best feelings was not just putting the final touch on an entire table of stick mounted models, but turning right into popping them off for basing and putting each base together. They all work together very well and with so many figure poses the client chose, every base was a fun time of mini diorama.
There is something around 50 flags on the table now. For the infantry these command stands are a four figure base - Colonel, musician, and a state and national flag, for regiments that existed in the Civil War. The flags are actual historically accurate designs for regiments that the client wanted to represent. They are purchased printed designs I then roughed up with tools and soaked in varnish to create an almost plastic feel, and then used as a base to paint. Very few of these have any printer ink still showing. One of those things in a project that is a lot of work but even still worth more than the some of it's parts.
These bases are all interchangeable with command stands, so a 6-8 stand regiment of 14th Michigan can be made with that command stand, and then march figures or firing figures to fill out as the situation sees fit. So forth with every other command stand.
There are two separate and unique 6 stand groups with command of 54th Massachusetts. That might not ring a bell right away, but if you have seen the movie Glory you know of the African American regiment. A twofold special treat in the mass of models - both to paint dark skin which I have not in a while, and watch the movie while I paint the same regiment.
That is all for now! Up next is the Confederate side of this. An even bigger chunk of models and a fun contrast of variety versus the uniform of the Union blues. See you next time!

Hello out there!
Last time I posted the painting. Now the table is done, and ready for the Civil War project to sit on top. Let's just get into the how! There is a lot going on, and a lot of it doesn't make great play by play. So if you have any questions just drop me a line.
First thing, a lot of flock! It is important for realism to have a large pool to draw from, for variation. I won't use even most of the container of many of these, but it is important to have a lot of different types for variety, just like in nature. I personally prefer realism over the "gaming tabletop" style of look, although the latter is totally valid. Just not my style. If that is what you are after, stick to just a few very solid 4mm or so flocks in good colors.

It's really hard to show the process for this, because the two biggest tricks are one, knowing that the glue has to dry and whatever you do will not look the same the next day, after the white of the glue has dried. Two, that you are painting with material essentially, except instead of direct application the glue is your medium and the flock the pigment. I really don't like hard edges on flock, so I put down glue past where I want the edge and then apply it fading out. It takes practice and you might warm up on a painted and textured 1x1 or something before doing a whole table.

If you kneel down and look close at real grass and hay, it has many layers. It has a lot of dead almost woven dry stuff, with the live taller grass coming up. Real fields have this layer, and it is to me what separates that "gaming grass" look and something more realistic. So to start is a base, 2-4mm many different dry colors. Side note, a guy could go from here and keep the top layers dead as well for what from here would end up more an arid look. This only looks potentially finished because it is zoomed out, it needs more either way.
Starting to come up with a little green, and defining edges. It is a many stage process. Can't get too obsessed with the end, but where you are.
Spray bottle, shop vac and a little beater static grass applicator, flock stands in and on flock and grows up. The variation and realism got me excited so I tried to take a picture of the cross view. Make sure you have a shop vac with no bag and sweep every time you take a swing at it. Not just to reuse the new mixture you get for variety, but keeping it clean for applying glue.
Getting there on the grass and low layers! Again, nothing really to it than just being loose about how you put it on, and focus on variety. I keep plastic trays nearby and mix small quantities on the fly and on a whim. Nothing the same.
With that, it's time to make some trees! I want a lot, so I got these Supertrees from Scenic Express. I have seen these often but not yet had a reason to use them, so I was excted to give them a try. It is a process, and I tweaked the instructions a bit to what seemed good for me.
I still haven't bothered to look it up, but this is some sort of plant, like a weed. This is the backside of the clump when you open a box. But whatever it is, it sure looks like trees when you break them apart.
All of the broken off trees hanging. You use a matte medium to soak the plant and make it solid. In my head it makes sense, and I have done similar things with PVA and epoxy with fibrous materials like paper and books. It is the same idea as fiberglass - you take a fibrous material and soak it in an adhesive, and it becomes really strong. Keeps the new trees from drying out, and makes them flexible.
In the instructions, you do all of this in one step. Soak the tree for a bit, and then flock it. I did the soak as one step, seen here, and then apply flock later. It would probably work, but I would rather keep flock off the "trunk." If that makes sense.
To hang them I used clips on hemp cord between two chairs in our enclosed porch. Nothing about this smells, but it makes a mess and the air was warm and dry. I bought two giant bags of closepins, to hang them and some I added one to the end to help straighten. Another benefit to doing this in two steps. Doing that with flock on would mess it up. I don't mind a few bendy trees, will come in handy and look realistic in some places.
Time to flock them! I used a lot of different kinds, and trays to catch the loose and make new mixes from the scrap. I also had a few cans of spray, to vary up the trunk color a little. Not really necessary in the end, but worthwhile if it's sitting around.
Dip, flock and hang! Trying to really vary up the color from light to dark, and some dying. It was pretty fun, and I would say worth it if you need a lot of trees. It isn't really a cost saver unless you're making a huge board, and being able to control the variety is a bonus versus say, buying 200 of a few identical varieties. Fun experiment, which worked out and was fun. Never needed eight feet of treeline, but I hope I do again.
Two boxes makes a LOT of trees, but I will need them!
That is a big box.
Now that the trees are done, back to the table. To apply them, I just punch a hole with a nail, and dip the trunk in glue. Another benefit to making the huge batch is duds and ones I don't really like can be torn up to make a lot of variety of hedges, brambles etc. I not only made a ton of trees, but tons of variety of undergrowth. Compared to just buying trees at least.
Making a big mess. Shop vac earning it's keep. For bushes I take a big random handful of whatever, and with scissors cut off a flat bottom. For me, the most realistic look doesn't come from planning, but just making a shrub or something from random one at a time, getting it ready, and then seeing where it belongs. Same for trees. Everything ends up with a perfect place and ends up made for a reason, and more fun that way too.
The water is wet. There are a lot of ways to do water. You do not have to use two part epoxy unless you are doing deep water effects. Here, I went the patient and easy route since this will be thin. I used plain old gloss varnish in half a dozen layers. Use enough thin layers and anything will have depth, just don't use too much at once. I want a "it just rained somewhere north," frothy Appalachian stream look, so I painted on a lot of it over a couple weeks and then did the final top layers of churn with gel water effects, some white paint in there to taste.
A good sweep and putting away all that stuff, and all done! Ready for the huge project to sit on top. Speaking of which, the Union infantry are almost done, and just in time. I am hitting blocks that will need this bigger table just to photograph in whole! Only gets better from here, and see you next time. Enjoy the photos and drop me a line if you have any questions on the table.

Hello out there!
The building is done and everything is dry, time to get to painting. The paint for this one is backseat to what will be the real heavyweight of the final look - the flocking, so this is mostly setup for the finished effect. Let's just get to it though.
First thing to do is a varied but opaque and thick undercoat. The biggest mistake most people make is starting at a dark or medium tone, and trying to simply drybrush up. Many steps of a watercolor technique layering over each other, and varying color like in nature, makes anything look more like nature.
Step two on the left, three on the right top corner. Taking things darker, and keeping it varied.
Little darker tones and working more specifically. Will pick out a rock or foot square area and work in various colors. At this point it is better to work in chunks than the entire table at once.
A little bit of two stage drybrushing about now to pick up lost small rocks, vary the riverbed etc.
Getting to the final steps, I will do the same thing but in one step. A very light high final drybrush in varying straight grey to ochre tint to the white, and then a last shade color from black to browns and ochres.
And all done! A good setup for what will be a ton of flock work, but that will be the nest post. See you then for grass, fields, bushes, and trees!

Hello out there!
With my new work space finally done and moved in, and having lost all my old photo backdrops in the fire, I figured what better way to get in than to make the biggest backdrop I have ever made! The photos are a bit deceptive since the standard size table is usually 4 feet deep, but this one is about 5.5. Plus there is the simple fact this Civil War commission will need it. Not only has the project outgrown the smaller table I used to get by over at Mom's, the actual chunks of the project I am working on now simply don't fit on it themselves! So let's get to it.


First thing I did to make the table, was to make a table. I wanted to make a setup that was covered on the sides, on wheels, and on the first layer was a "flock sandbox" with modular terrain for smaller scales, and then pop in "toppers" that are sculpted and not modular for 28 and GW model photography. This is the twofold reason for the walls around this portion. Both to hold other tops, and also to use flock, sand, whatever I like, to meld modular terrain into what appears to be a solid table. What you see here is simply flock on a flat plain, but any of it can simply be "deleted" by loose flock or covered in terrain and the edges of those pieces blended in with loose flock.
Another big motivation was, since I am starting over why not be more efficient. I made all sorts of oddball backdrops over the years that took up tons of space and really had no plan one to the other, and would just prop them up on boxes or whatever to get them the right height. Same idea, more refined. I do still intend to make more cabinet style backdrops especially for 40k, but it isn't always necessary now.
First thing for the insert was to make a frame. Don't want this very thick or heavy, so some furring strips and one 1x10 in the middle will hold the foam and just fine. Normally in this situation, would just use 2" foam as a sturdy base screwed in from the sides, but this is bigger than a standard sheet, which means gluing.
The walls look a little ridiculous but will make more sense later.
The big sheet glued in, and then the gap filled with portions of another sheet, making sure the small splice covers the 1x10.
Starting to lay in the rough forms. At this point there is a broad view idea of the look on some scratch pieces of paper which I translate into the size of the table.
Starting to carve, making a big mess. I have a 50 gallon trash bag with pink scraps as I type this.
Continuing to carve, while also adding. I will focus a portion and start cutting into it and seeing what comes out, and then adding more where it might look good. Each one of these needs to dry for a long time, so I go around the table then step away. I use standard adhesive in a caulking tube, whatever brand. This dries extremely slow because of the moisture resistant qualities of the foam, but over the years I have found it to be the best option. The screws are just there to secure them in the meantime so I don't nudge something.
But on the bright side, the pause between steps gives some time to let the whole thing form. No good idea comes at once, but letting it stew.


Skipped a few steps, but once I felt pretty much there with the foam, cut away the frame. A little heat gun and a little palm sander took the hills down and took the perfectly flat out of the base sheet. Lots of filling gaps, blending in hill edges, adding forms, and blending in the frame to the foam using trim caulk. Normally I would use a putty, and this takes forever to cure, but since this will be moved around a lot and pretty thin with some flex, that will hold up compared to not over time.
Adding texture in patches, and some smaller detail. For the latter I use Smooth-On putty. Expensive by volume but worth it. Dries hard but takes detail as well as Milluput, and sticks like two part epoxy. It is extremely adhesive. Smaller rocks, logs, whatever you like can be stuck on with a glob and then textured in around the edges to look like dirt.
The Simple Green bottle is actually a thin glue and water mixture to spray on both before and after.
Skipped a few steps again, but finished with sand and ready for paint! Next post will be that process. See you then!

Hello out there!
It is time for another update on the Fire and Fury ACW project. This time, the entirety of the Union cavalry!
This section of the project technically has six elements:
- 3rd New Jersey Butterflies mounted
- Regular Union cavalry mounted
- Wilder's Lightning Brigade 17th Indiana mounted
- Regular and Wilder's dismounted
- Union cavalry horse holders
The 3rd NJ Butterflies were a very unique cavalry regiment. One of two regiments designated as Hussars in the American Civil War. This blend of new American and European romance for war from earlier periods created both in uniform and spirit a one of a kind regiment.
The Butterflies were mustered late in the war, at Camp Bayard in Trenton, New Jersey. They were the only one of the two regiments to serve in the Army of the Potomc.
During the Civil War, cavalry served a mixed role. In the previous 200 years, cavalry were often dedicated to a specific task. From the thick and rested for battle Curassier, to the sinewy and scouting Chassuer a Cheval. During the ACW, the single regiment would be used in a range of horseback assault, to reconnaissance, to dismounted infantry action.
Representing that, in Fire and Fury regular cavalry have the option to dismount. The horse holders staying back, figures can move and assault on foot.
Finally, we have Wilder's Lightning Brigade, or Hatchet Brigade, 17th Indiana. The Lightning Brigade was special in leaning much more towards mounted, mobile infantry. Hard fought men with a special task for the time - to be quick and agile, ready to get in the fight at a moment's notice.
The Lightning Brigade formed earlier in the war, and out of necessity. Starting with mule trains, wagons and actual steam trains, Wilder and crew ran hard fought raids and counter raids, until the natural conclusion came to be to simply mount regular infantry for such a task. Ignoring the earlier Dragoons, which we will for several reasons, the Lightning Brigade was really the first true mobile infantry brigade.
That is all for now! Up next, the Union infantry, and the new photo table. As you can see just this batch is really stretching the old table I made for the Samurai, so a new and much bigger one is in the works for this project. See you next time!

"Put the boys in!" The Battle of New Market - Don Troiani
Hello out there! Time for update number three on this big ACW project. This time a little more South than North for the first time. As usual more cavalry, and some foot regiments. The first true blue Union regiment as well, though, if you can believe it. I am a little bit spoiled for choice so blame it on that. Let's just get on with it!
Cherokee Braves hit first supported by rebel cavalry, on some Union Zouaves and Iron Brigade.
The din of powder smoke is thick but the Braves carry on with their charge under the three stripes and stars of their regimental banner.
Why the Cherokee nation would take a banner under the Confederacy is a long and complicated story, well beyond the scope of this little painting post. To summarize though, it has to do more than a little bit with anger at the Federal government and Andrew Jackson over the Trail of Tears. At least, as my research shows me. It is of course more complicated than that once sentence, and I would urge anyone interested to read up on it themselves. As someone who is part Blackfoot I broadly admire this unit complications aside, and enjoyed painting it on a certain personal level, even if on another the real history is a different issue. As with all periods in history, I try and think of the individual men, as I paint individual miniatures.
7th Wisconsin Iron Brigade holds the line against rebel cavalry.
After the defeat of the Federal Army at Bull Run in 1861, several volunteer units including the 7th Wisconsin were mustered under the name of Iron Brigade. Also known as the Black Hats, the Iron Brigade were as infamous and feared in the South as the Berdan. They comprised some of the hardest and stubborn men, in my personal opinion possibly since Napoleon's Guard. Holding the line when other men would not, or simply died trying while the Iron Brigade refused.
Pictured in all grey, VMI Cadets. These deserve an introduction.
The Virginia Military Institute was the second military college in the United States only to West Point, and founded in 1839. VMI is still around and responsible for more Army generals than any program in the US to this day. It's Cadets are famous for the Battle of New Market, where Major General John Breckenridge called them to action from VMI, a desperate punctuation on the state the Confederacy at the start of 1864. They put the boys in, and they prevailed.
“I'm a success today because I had a friend who believed in me and I didn't have the heart to let him down.”
―
Abraham Lincoln
See you next time.

Hello out there! Welcome to the first real installment of this blog series. Two Union regiments down, plus a Confederate cavalry unit and it's foot compliment. Let's get into that as we go though.
11th New York Fire Zouaves ambush a passing Confederate Georgia state cavalry unit as it marches by, led by Elmer E Ellsworth himself. More on all three in a moment, but can't help but feel the utility of the light infantry volunteer unit against such a valuable enemy element taken by surprise.
These newfangled stars and stripes, and the regimental banner, led by Ellsworth.

“It was not possible for Ellsworth to be neutral in anything, or idle
while others were working,” -John Hay.
The Zouaves were a French unit who saw action in North Africa, Algeria, and often seen fighting the Ottoman Empire from the early 19th century well up to the 1950s.
Elmer Ellsworth modelled the 11th New York Fire Zouaves after these units. Volunteers, light infantry, unique uniforms, unique men of comraderie. These men were New York Firefighter volunteer units, who did so for their country two fold. These are rarely known, but a very special group of men who came together under two banners and in a way unlike any other unit gave their lives twice for their country. They are my favorite unit personally and why I started with them.
The 11th New York charges uphilll at dismounted Georgia cavalry as fresh mounted presses their right. It seems insurmountable, but with assistance from the 1st sharpshooters...
11th focuses, ignoring the threat and pressing forward. The Georgian unit seems massive, but the sure rifles of Berdan's balance the scales.
Cavalry in the Civil War are often misunderstood. They were used as a harassment, and the horses were also more of a quick means of deploying an infantry unit, than what many of us think of as mounted cavalry. In the middle you can see the horse holders, the one in many held back from the lines to mind the horses until a new deployment was needed.
Georgia state cavalry in full charge.
An interesting point about the Civil War in general but especially the south - horses were a very valuable asset. A vast majority of horses across the war died. For the north, horses had a regimental standard at least until the attrition set in. For the south, horses were often commissioned or reimbursed to their owners for bringing them to battle. This led to a large mix of breeds especially for the south.
Cavalry were more often used as a mobile infantry unit. Sometimes a mounted harassment, but for the general equipped unit, it was more a method of quickly deploying a mass of infantry.
1st US Sharpshooters "Berdan's" repel Georgia cavalry harassment. What looks like insurmountable odds, is just a moment before camouflaged sights find their targets.
Berdan's Sharps were a special unit of US infantry that were truly the beginning of the US Marine sniper units. Moving in alternating fire and move, much more similar to later WW2 unit movement than anything seen in the Civil War, and unlike anything seen at the time, the Berdan green was often picked as a target by Confederates out of fear and legend.
Berdan's fought one time in true rank and file, and because of this Confederate fear, in that battle the 2nd US suffered heavy losses, almost half. They never again were used to fight in rank and file, instead their true trained purpose.
The Berdan green uniform is a sort of pine green. At least, when created from scratch. Often, with supply issues deeply affecting both sides, the green dye would be applied to an existing blue Union jacket, created an off green uniform. This was called "overdyed," and acceptable but clearly stood out in the ranks of the 1st and 2nd Sharps.
Thanks for reading. Catch you in the next one. Hope you enjoy both the photos and history.

 Fury at the Wall - Dan Nance
Hello out there! Something quite different on many levels for you today. The next commission is a massive American Civil War project. By massive I mean, even for myself, this is large and believe the largest project I have ever taken on, and in the many, many hundreds of miniatures. Possibly over a thousand, but gentlemen don't count until it's over.
On another level, it is a new opportunity even for myself having been painting armies for folks for almost two decades. Have never done an ACW project. Would not call myself an expert of course, but it is certainly something I have been interested in for my whole life. Seen all the movies, read (or listened to, to be fair) my small share of books from biography to battle dissection. So it is very interesting to me, and this army has a great deal of individual units which are themselves research dives I am enjoying.
If you have been around since the ancient times, you might remember I have done a couple of Empire Fantasy armies in similar fashion. There has always been something about historicals that tickles something in my brain. Back then being primarily a Fantasy player, I got my fix through Empire, making armies unit by unit, researching official lore and referencing colors and iconography. It was fun. Now though, I get to do it for real, and it is hard to convey how excited I am for this project. So, it feels right to blog this out as I did those old Empire armies, and maybe some of you will enjoy it.
Each baggie is a sorted unit. Each one ranges from 36 for special specific units, to the hundreds. Also, I am going to need a bigger display...
First, I will warm up with some smaller specialty units. Zouaves, Berdan 1st sharpshooters, and something or two for the Confederates, have not decided. Feels right to get going on something smaller, before I dive into the pool of hundreds of rank and file of each side. Plenty to look forward to though.
One last reason for this on a sentimental note - the Samurai I did a while back are the army I was on when the house burned. This army, which I hope to be photographing in the new place as both are finished, will see me out. I enjoy that, and while the Samurai were very special to me for being my first historicals project and a treat to work on and research, this will only top all that excitement with added celebration. Seems fitting and one might say fate.
But let's stop yapping and get to work. See you next time with some finished units and a little history.

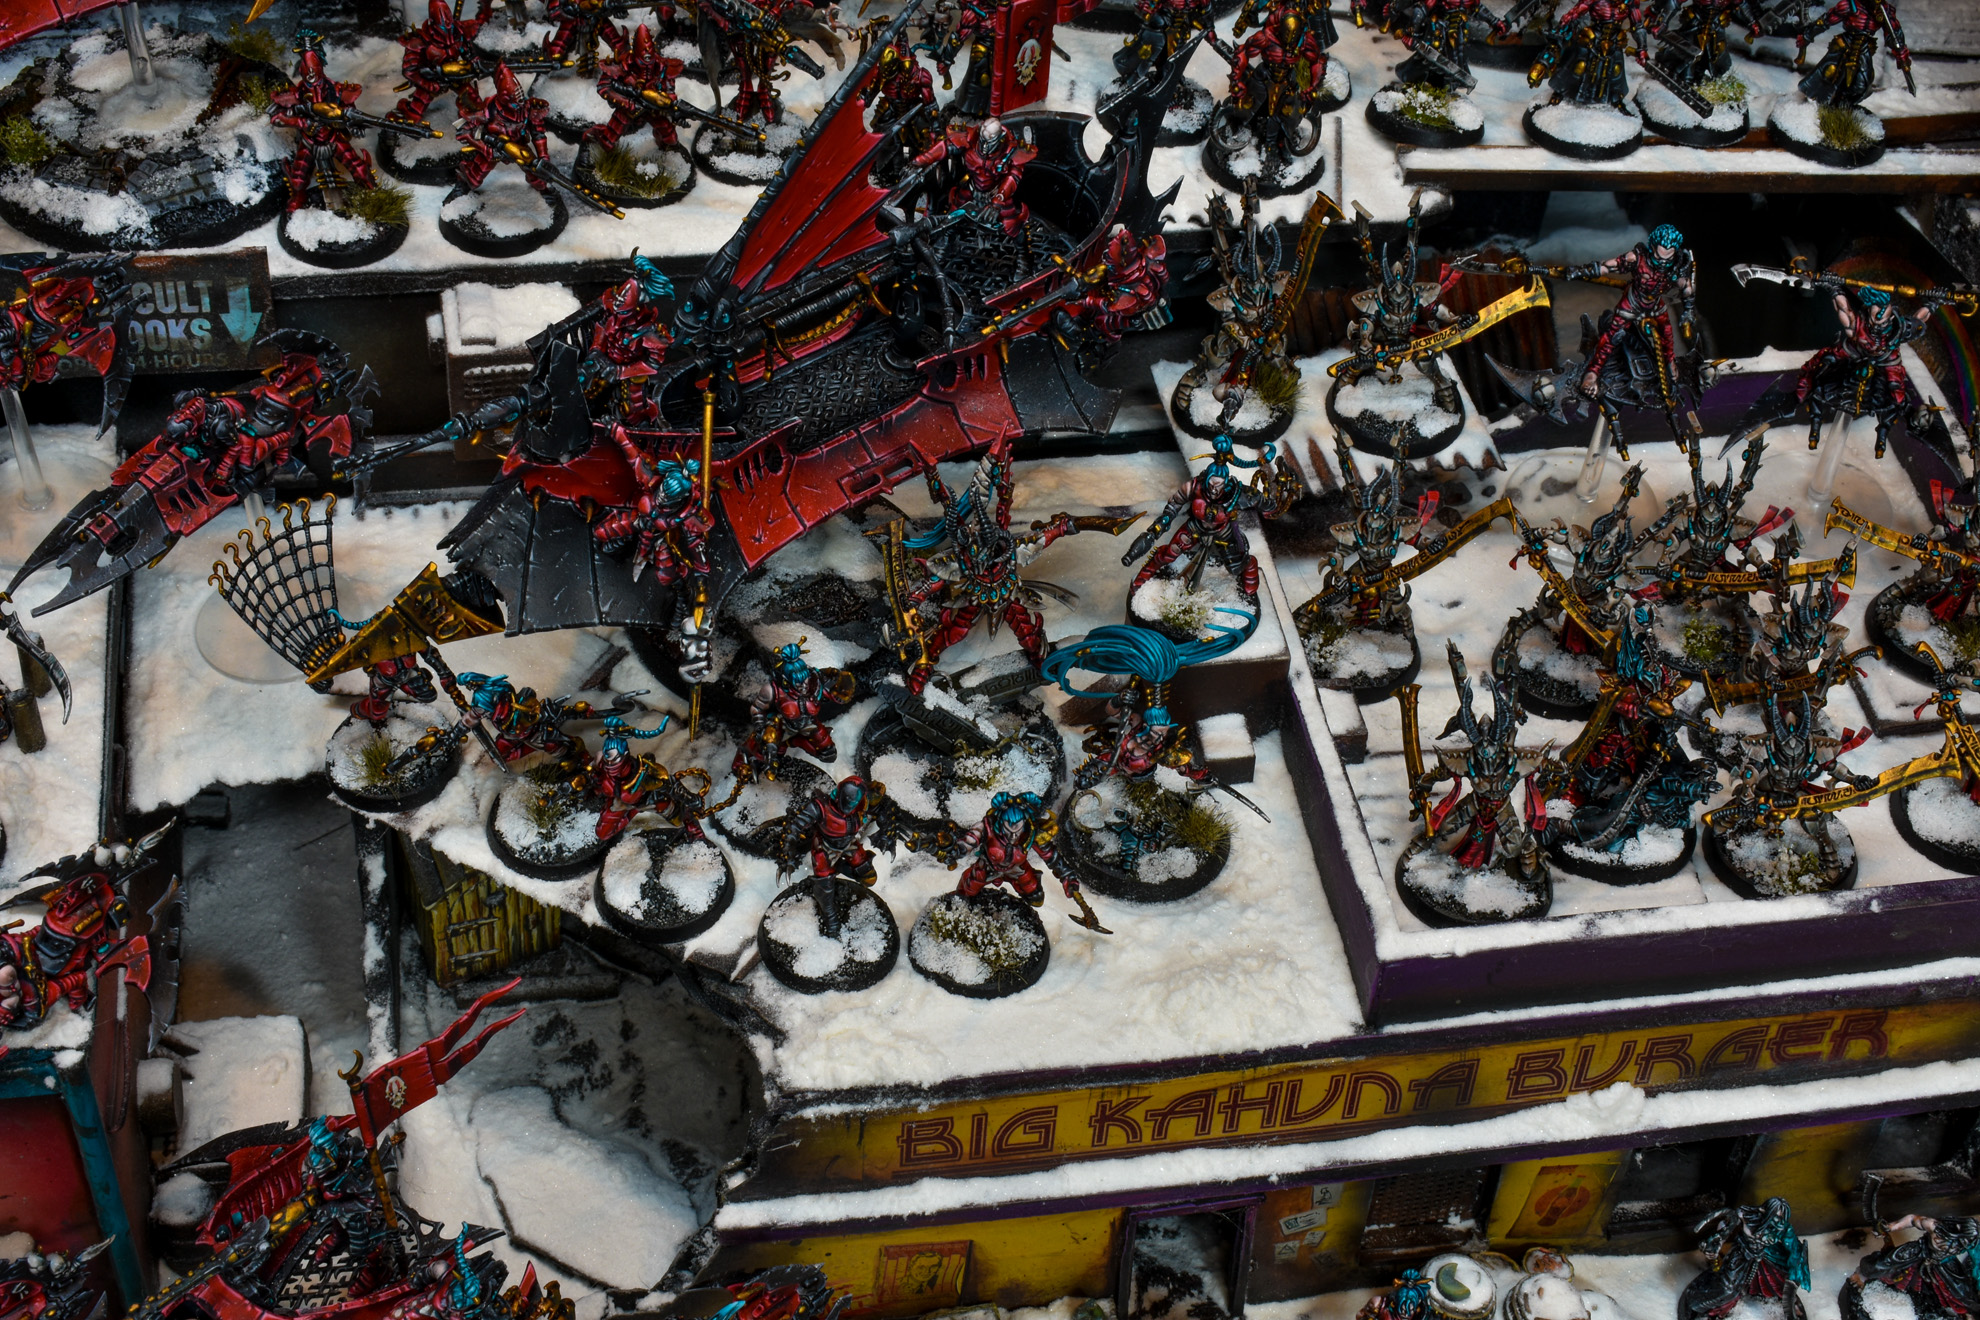
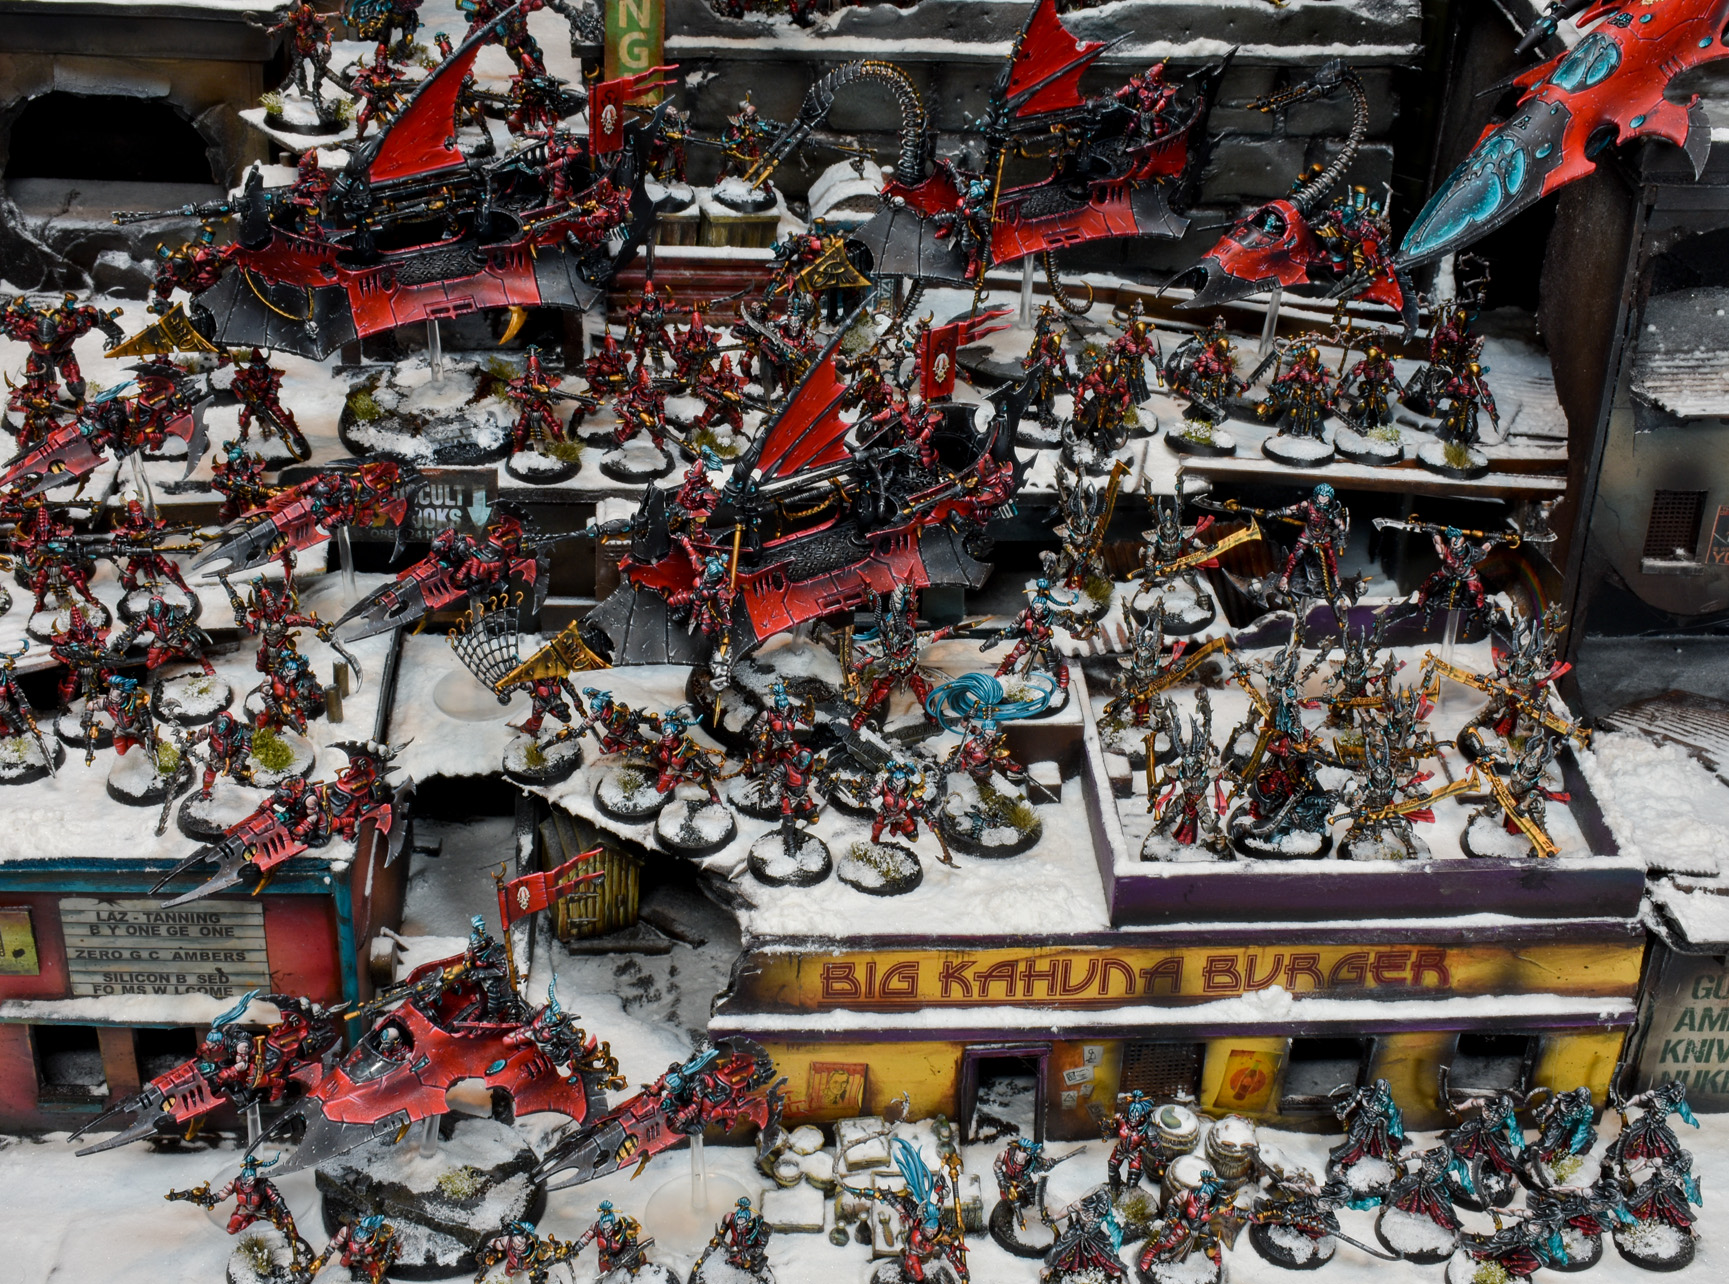
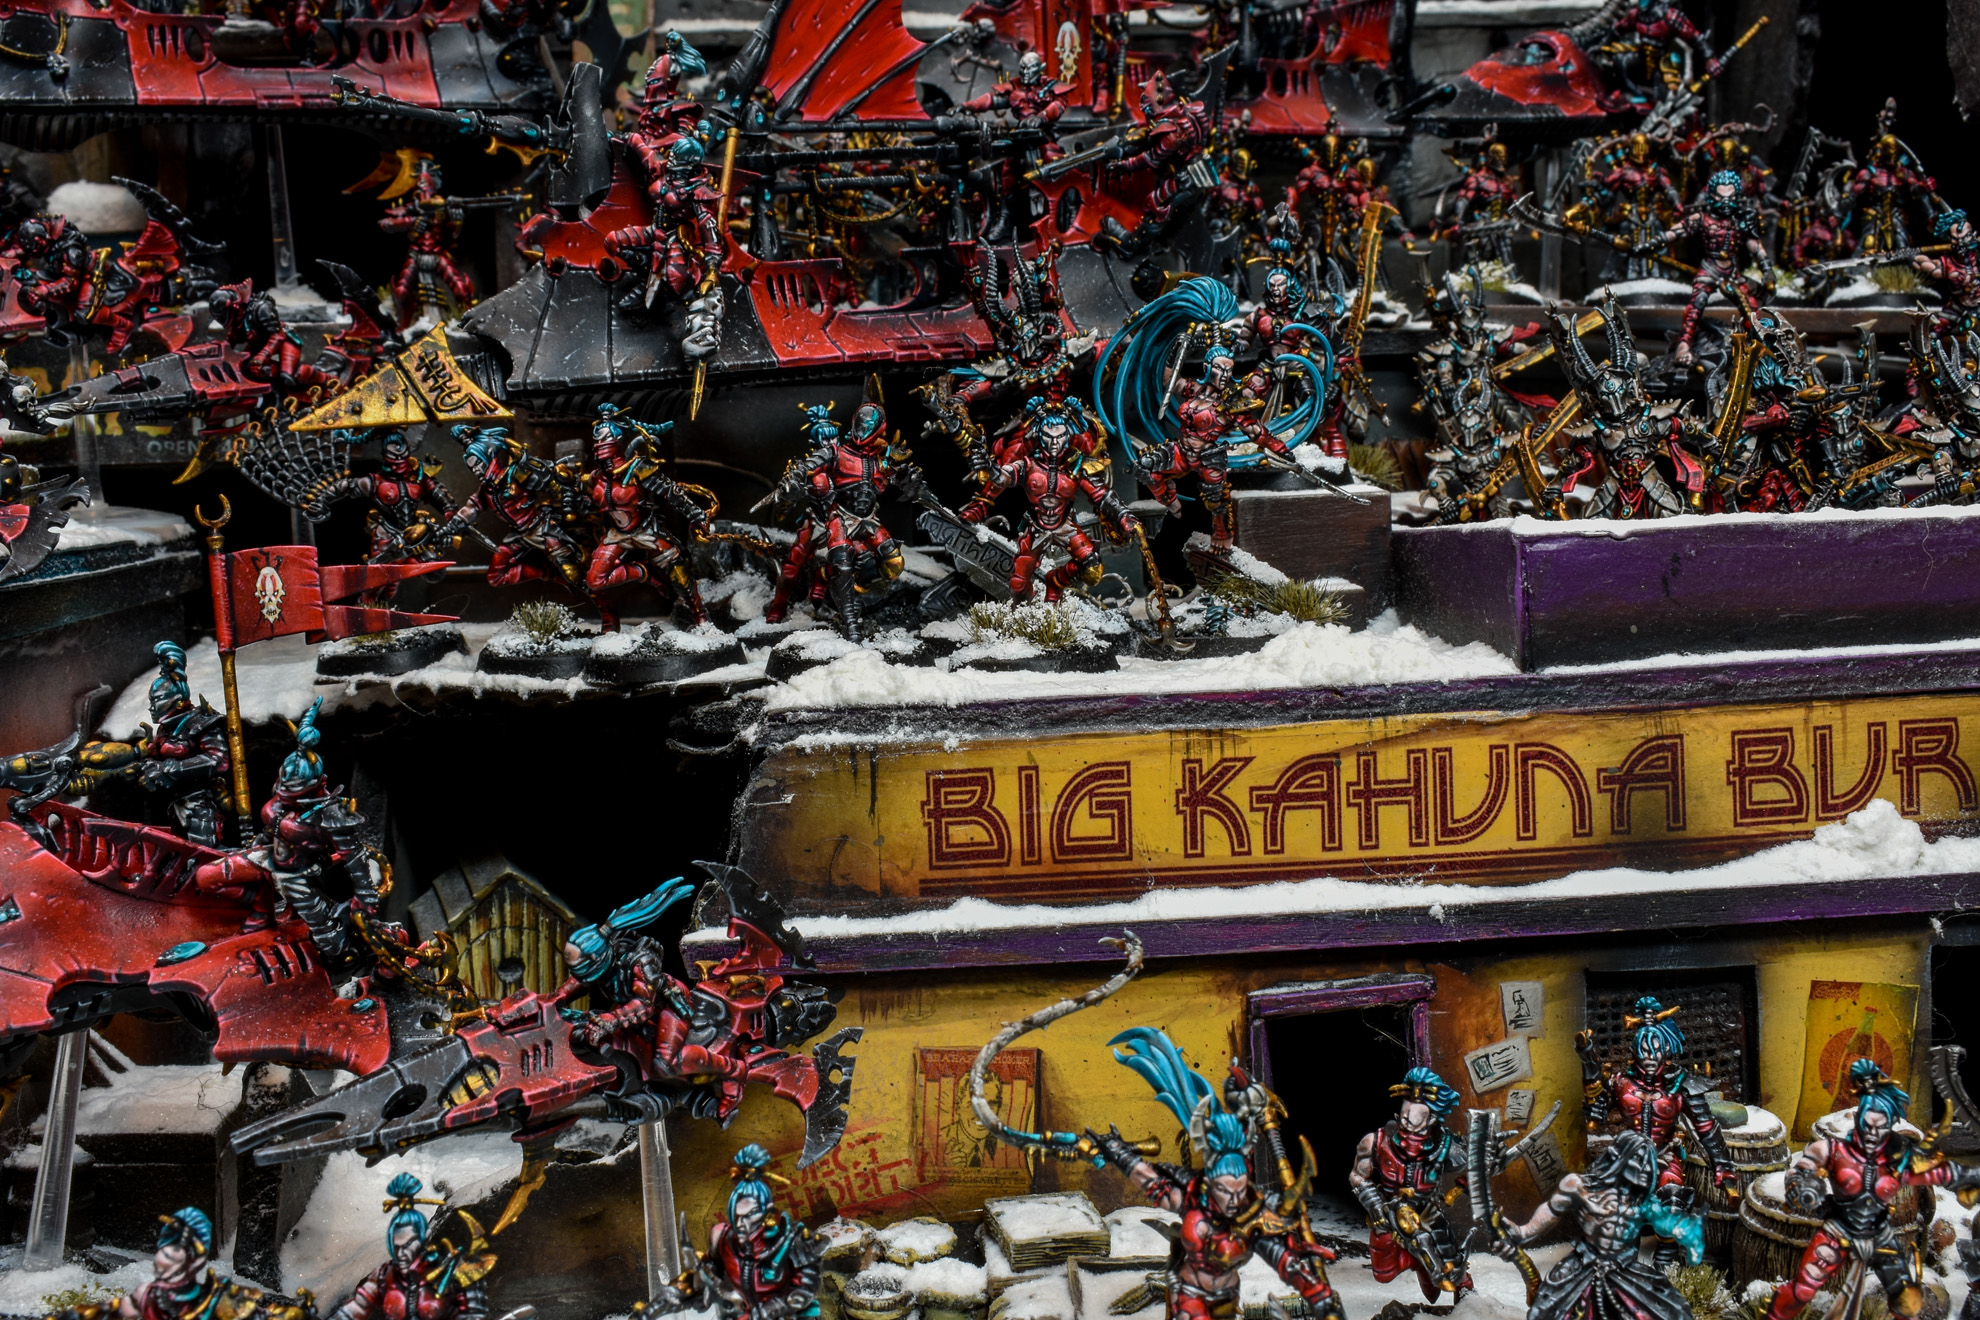
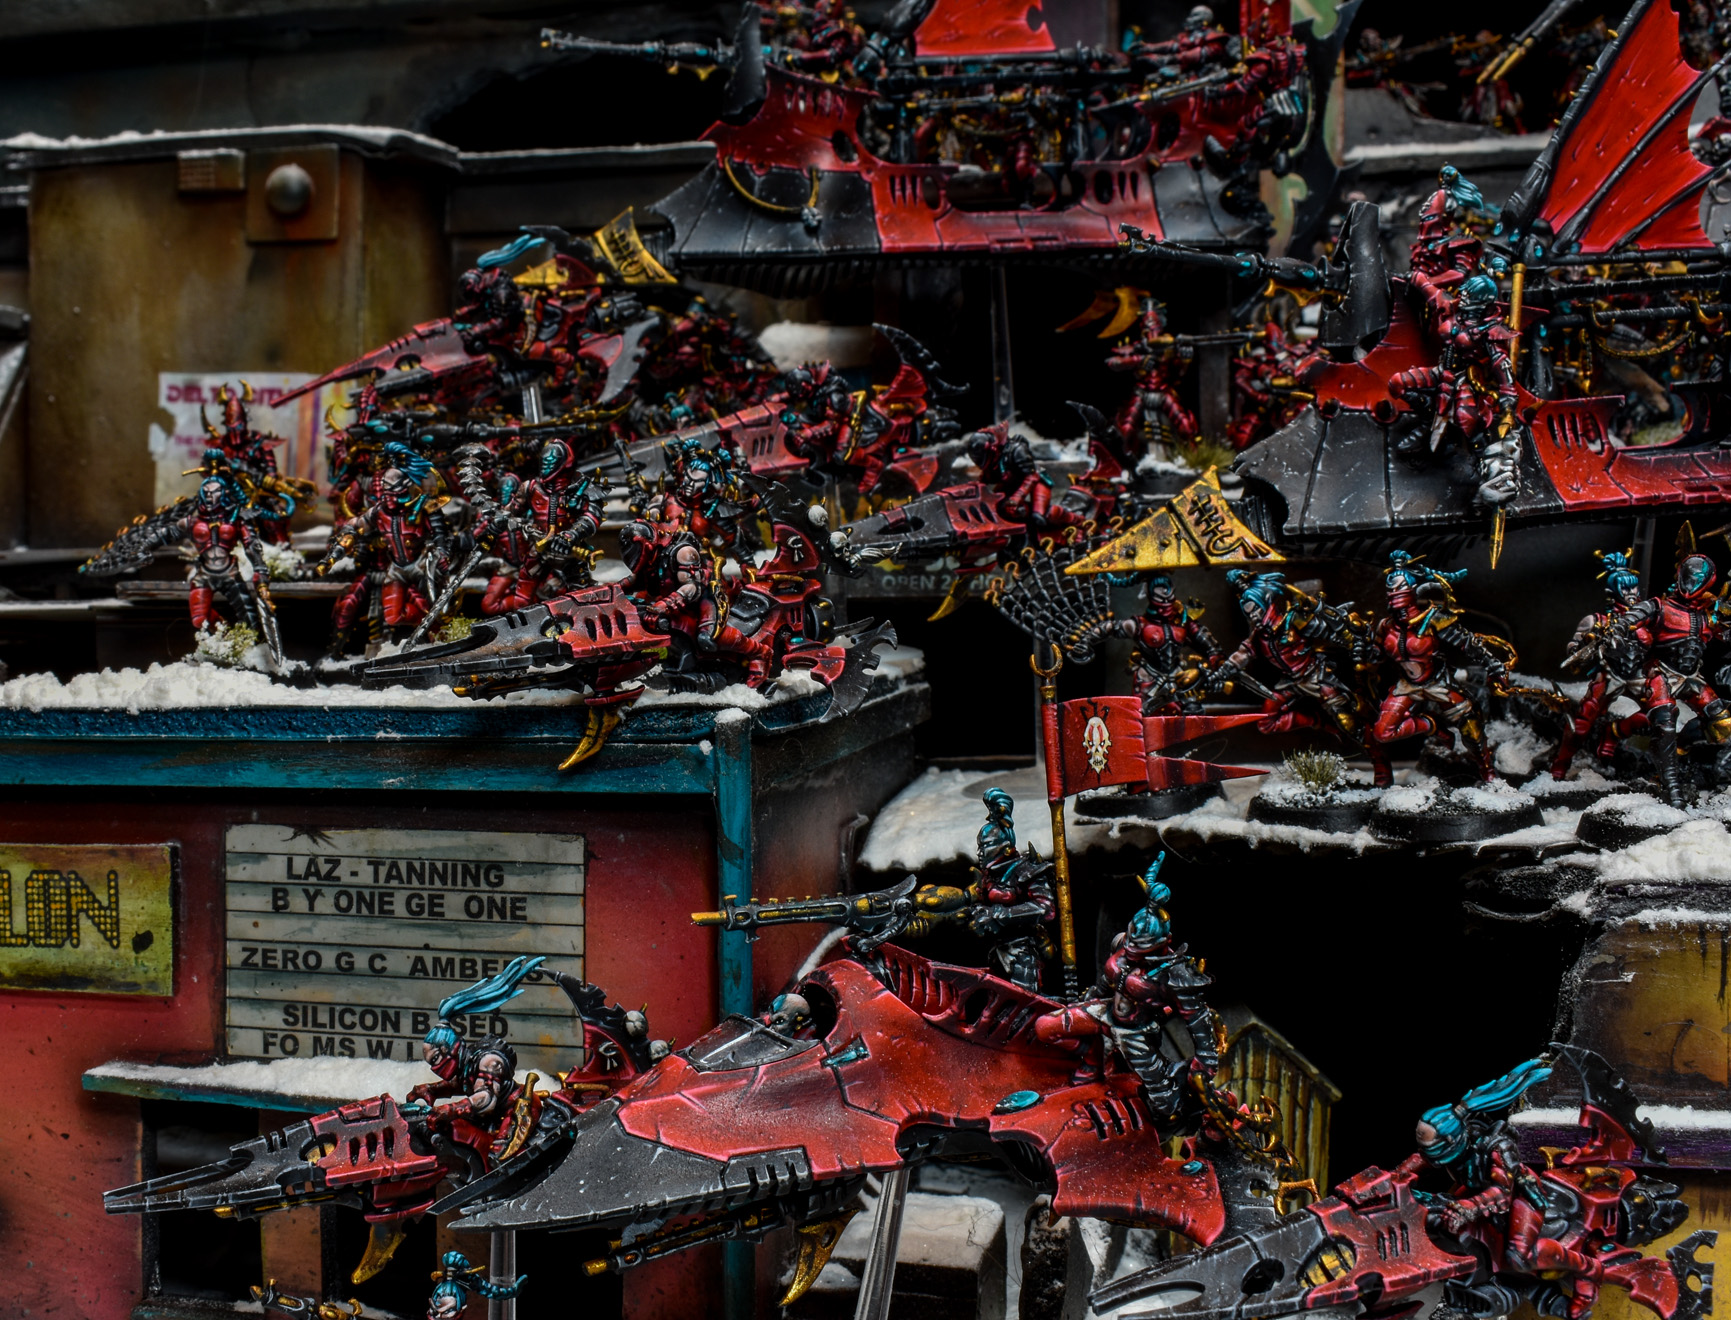
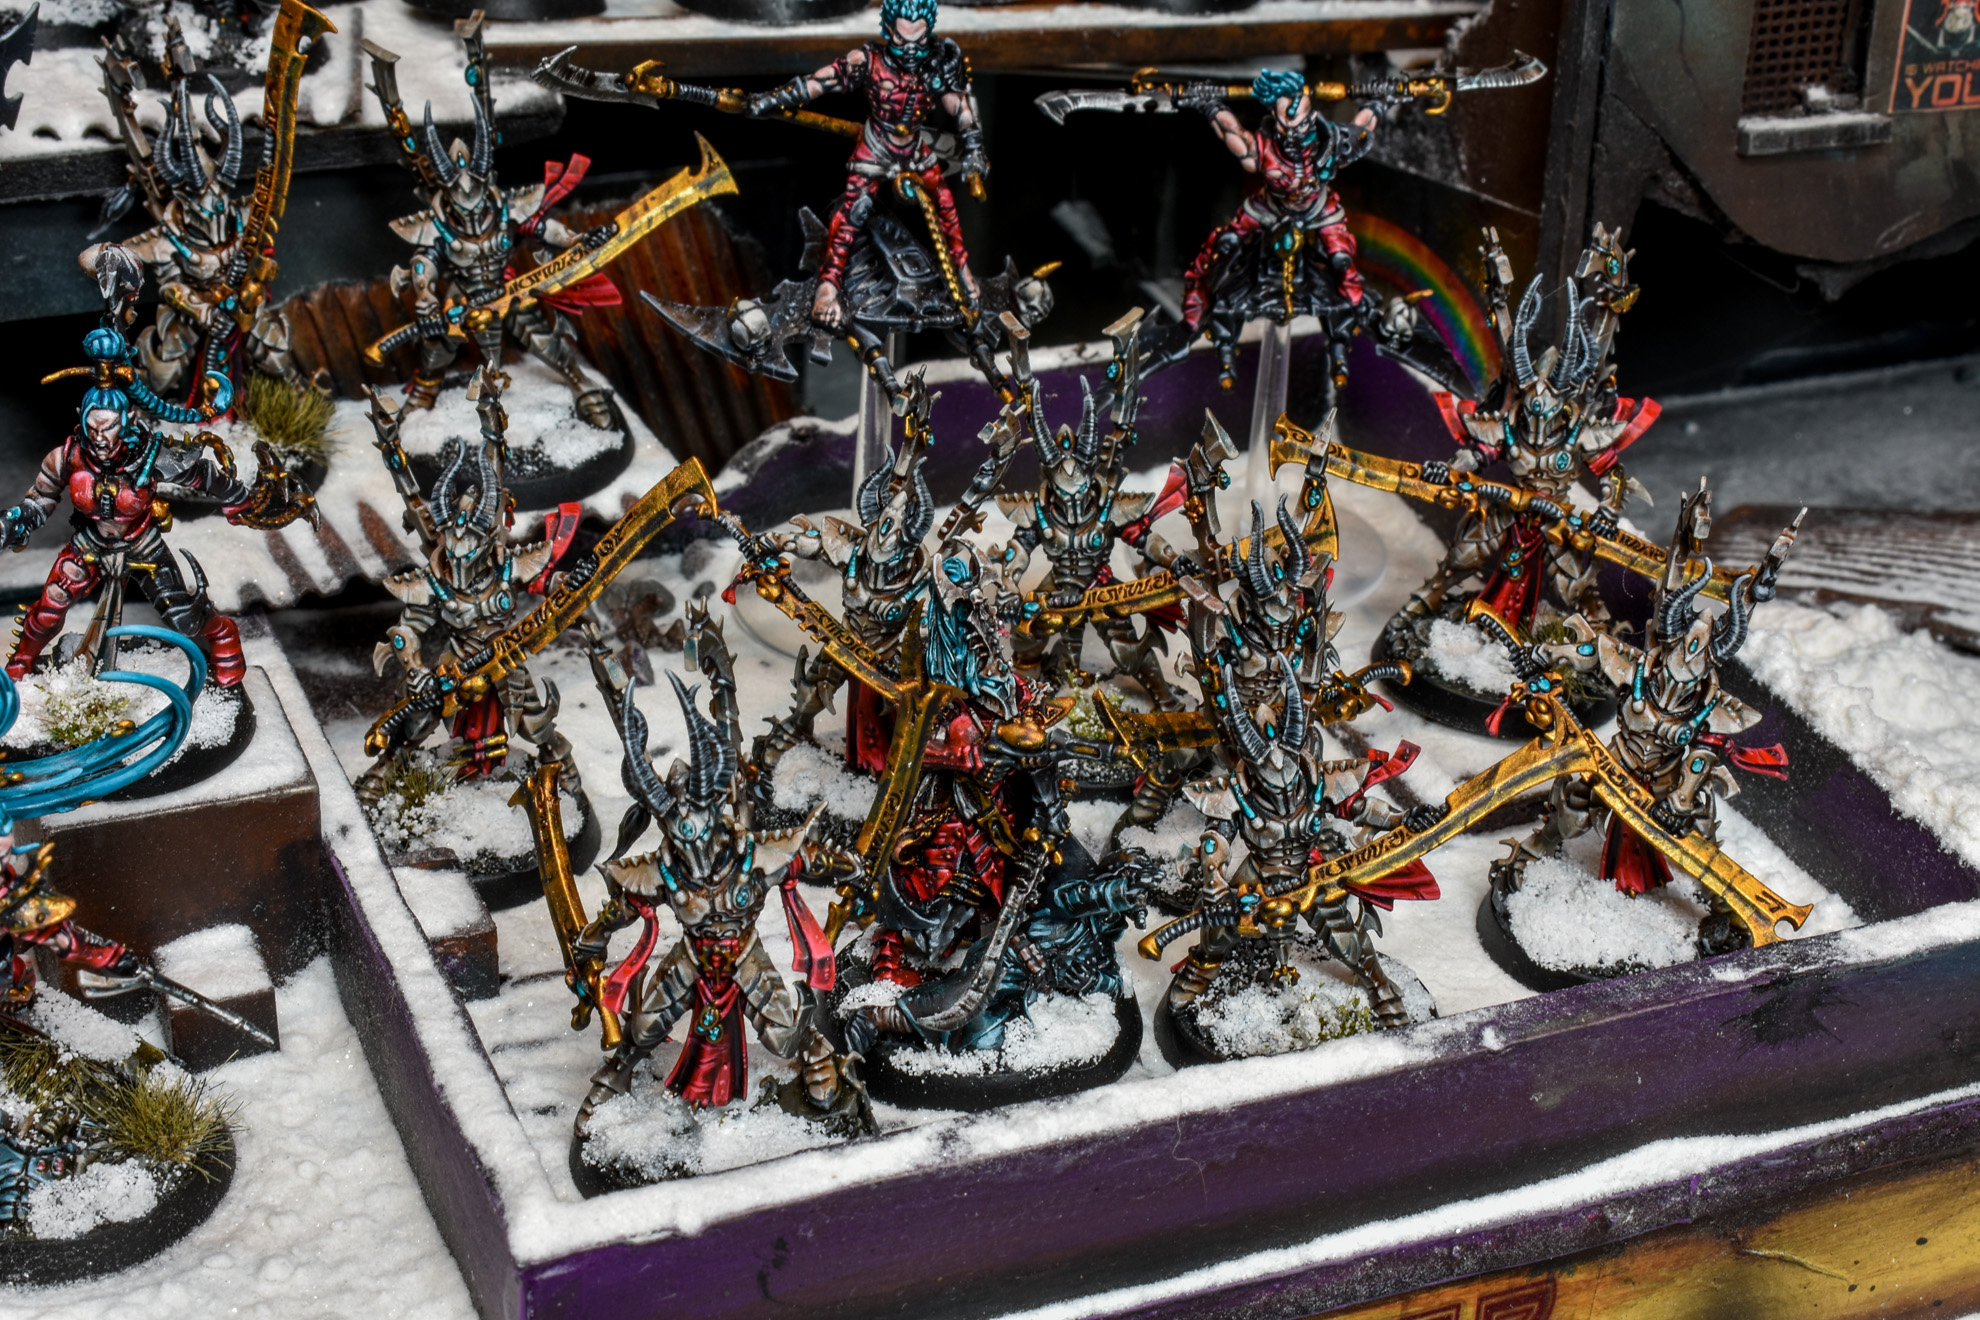
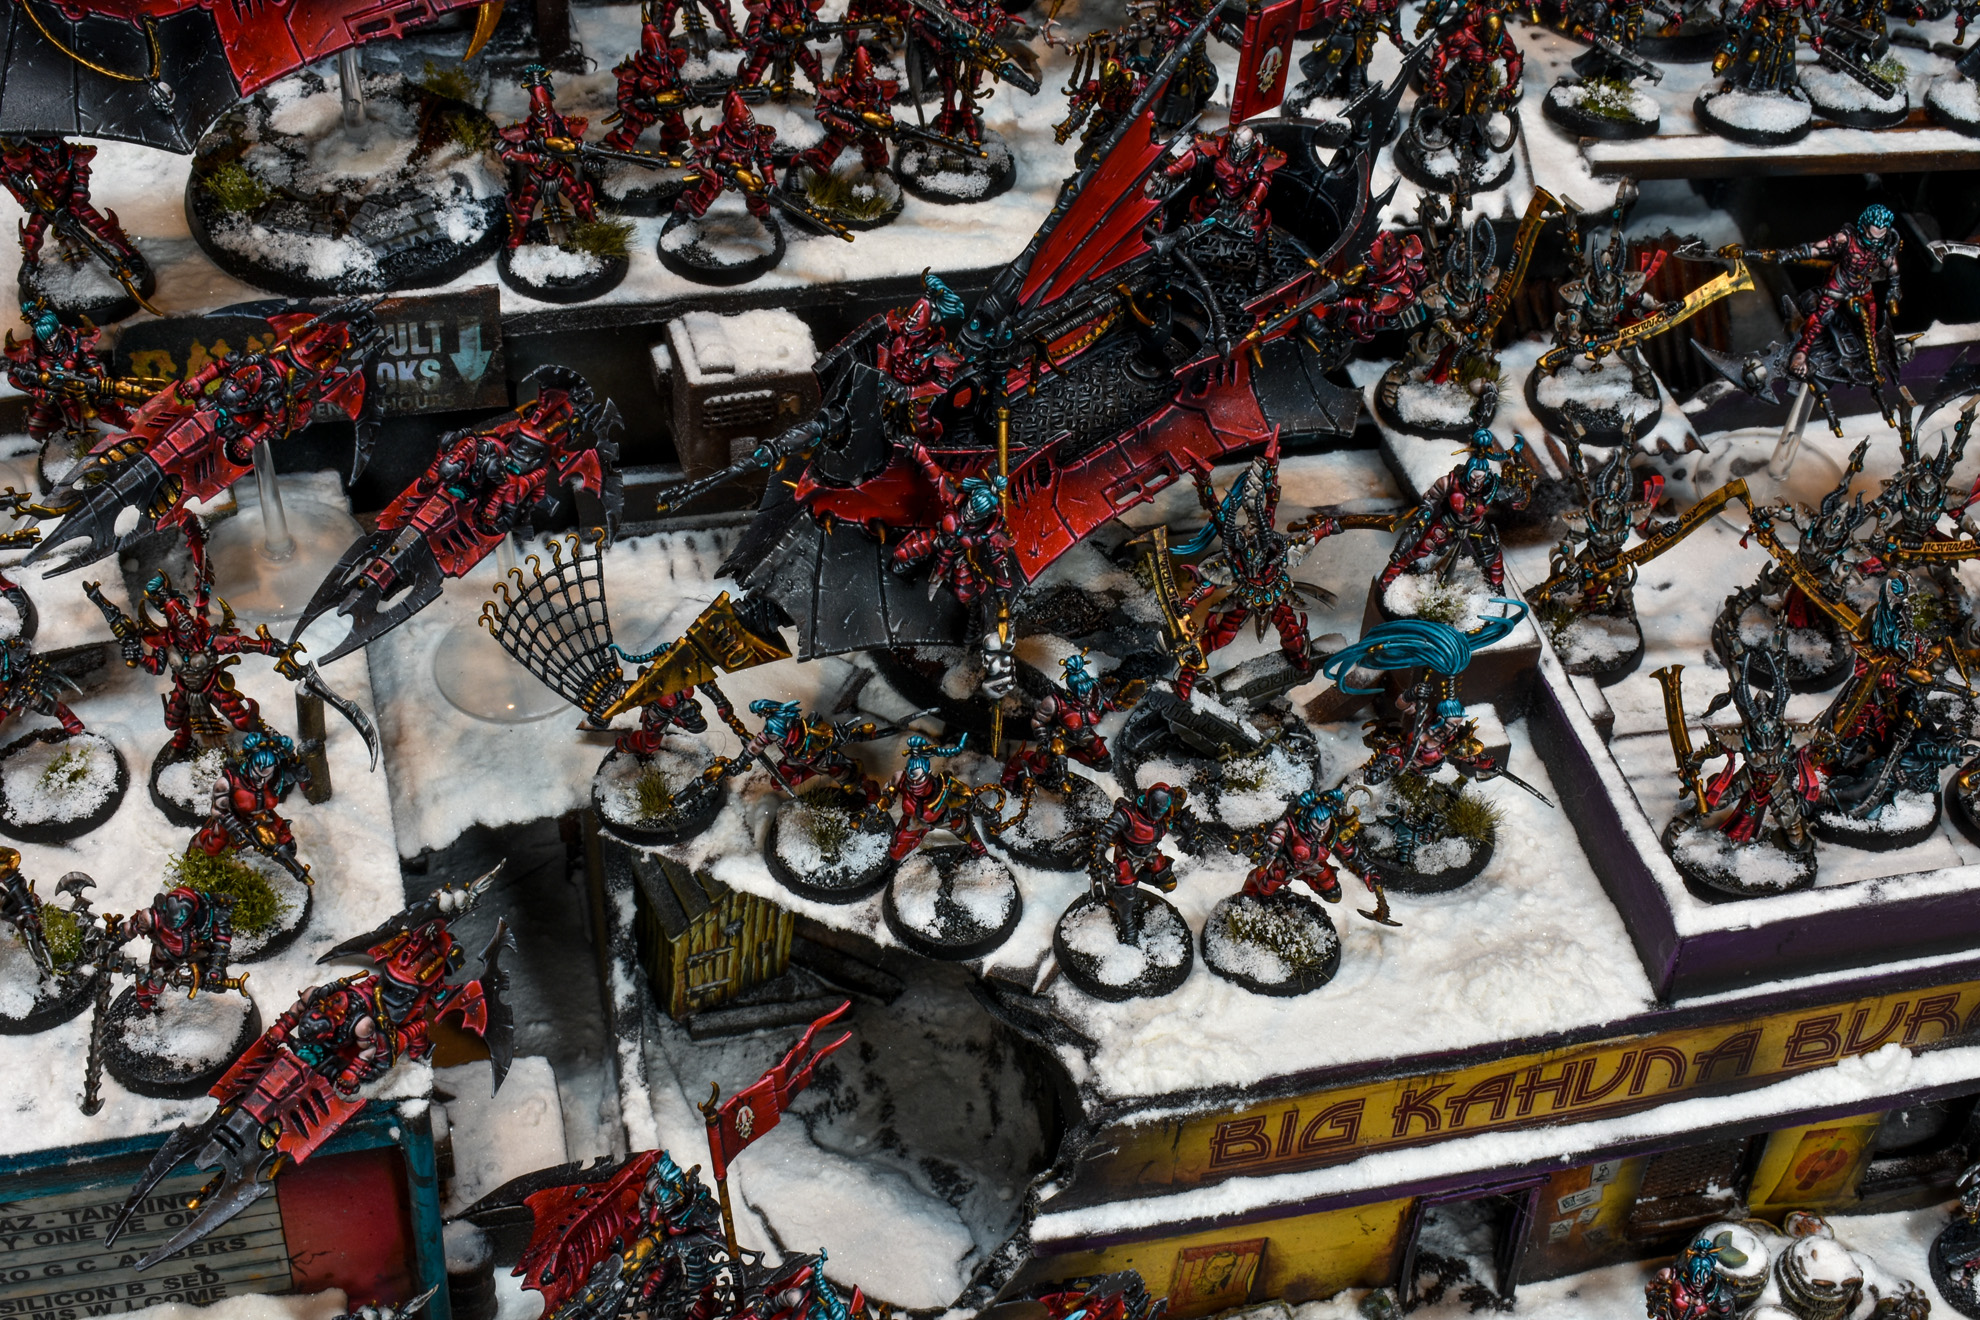
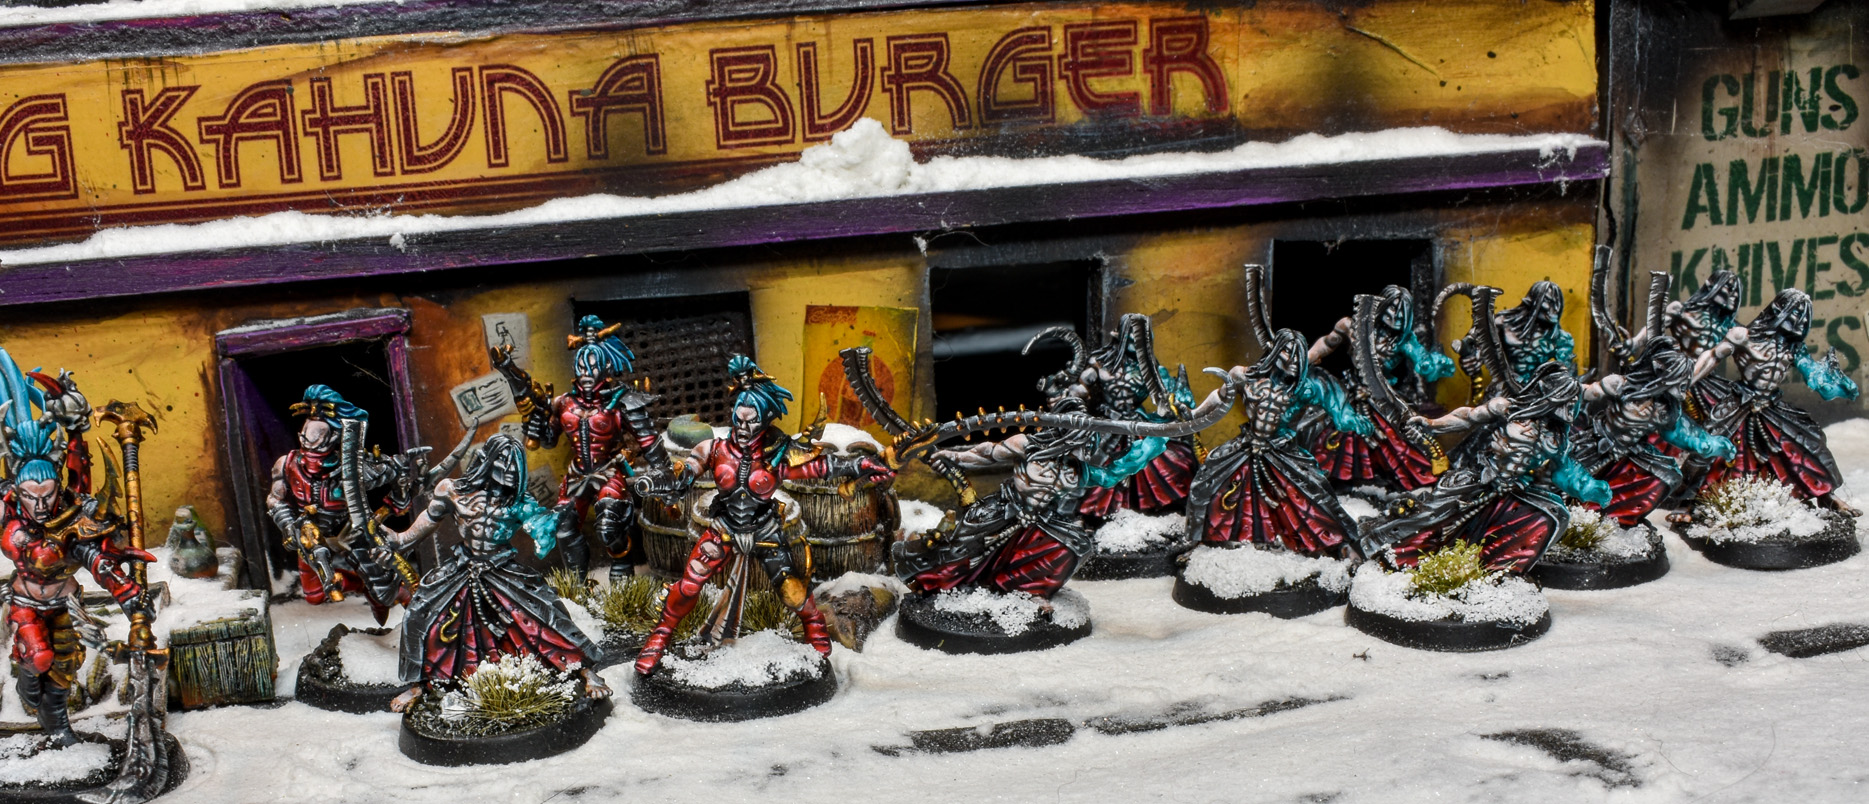
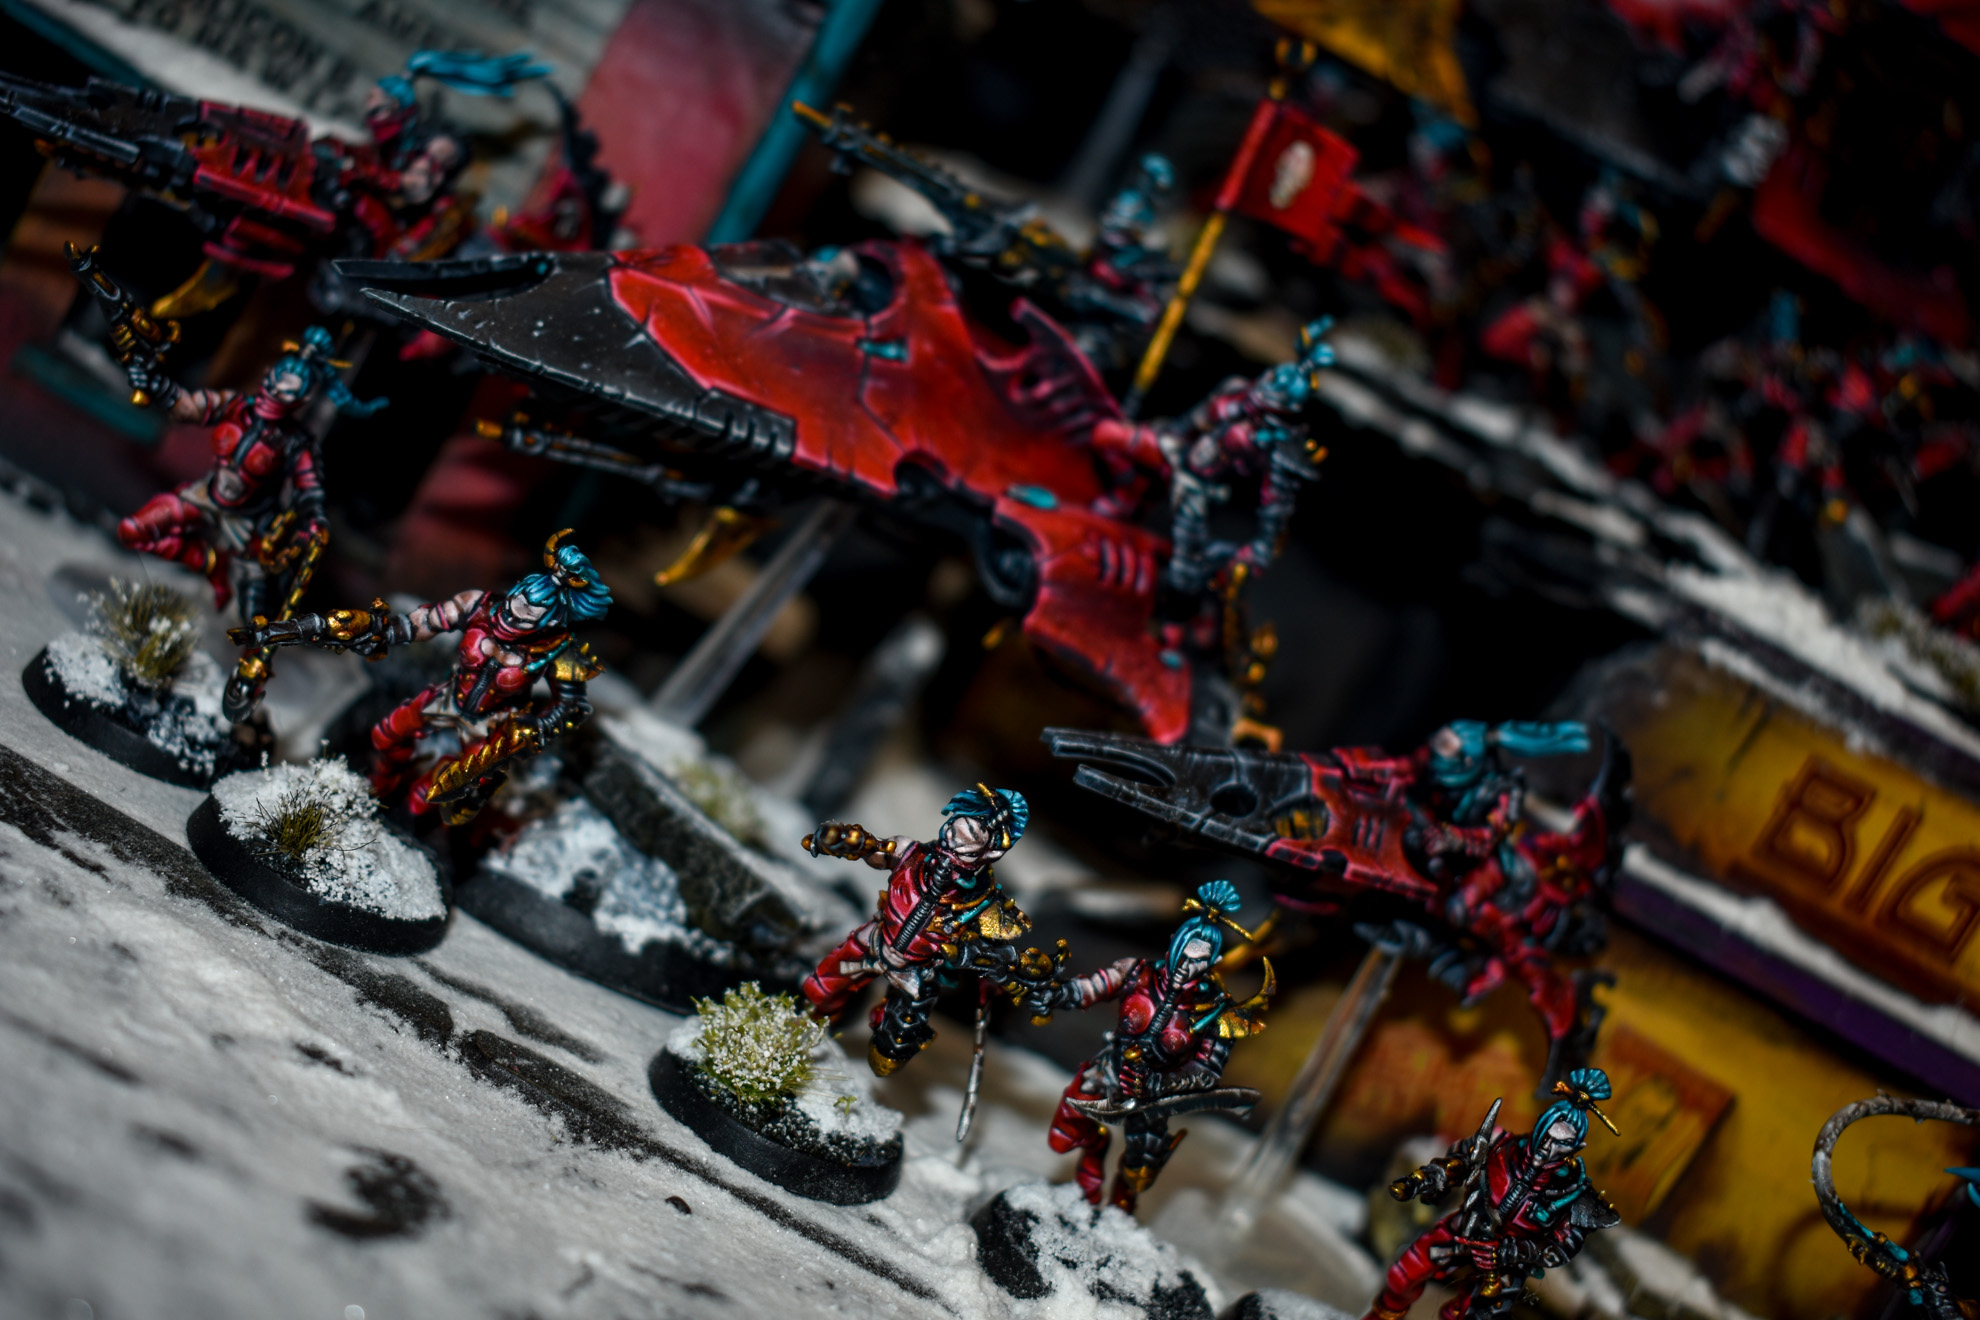
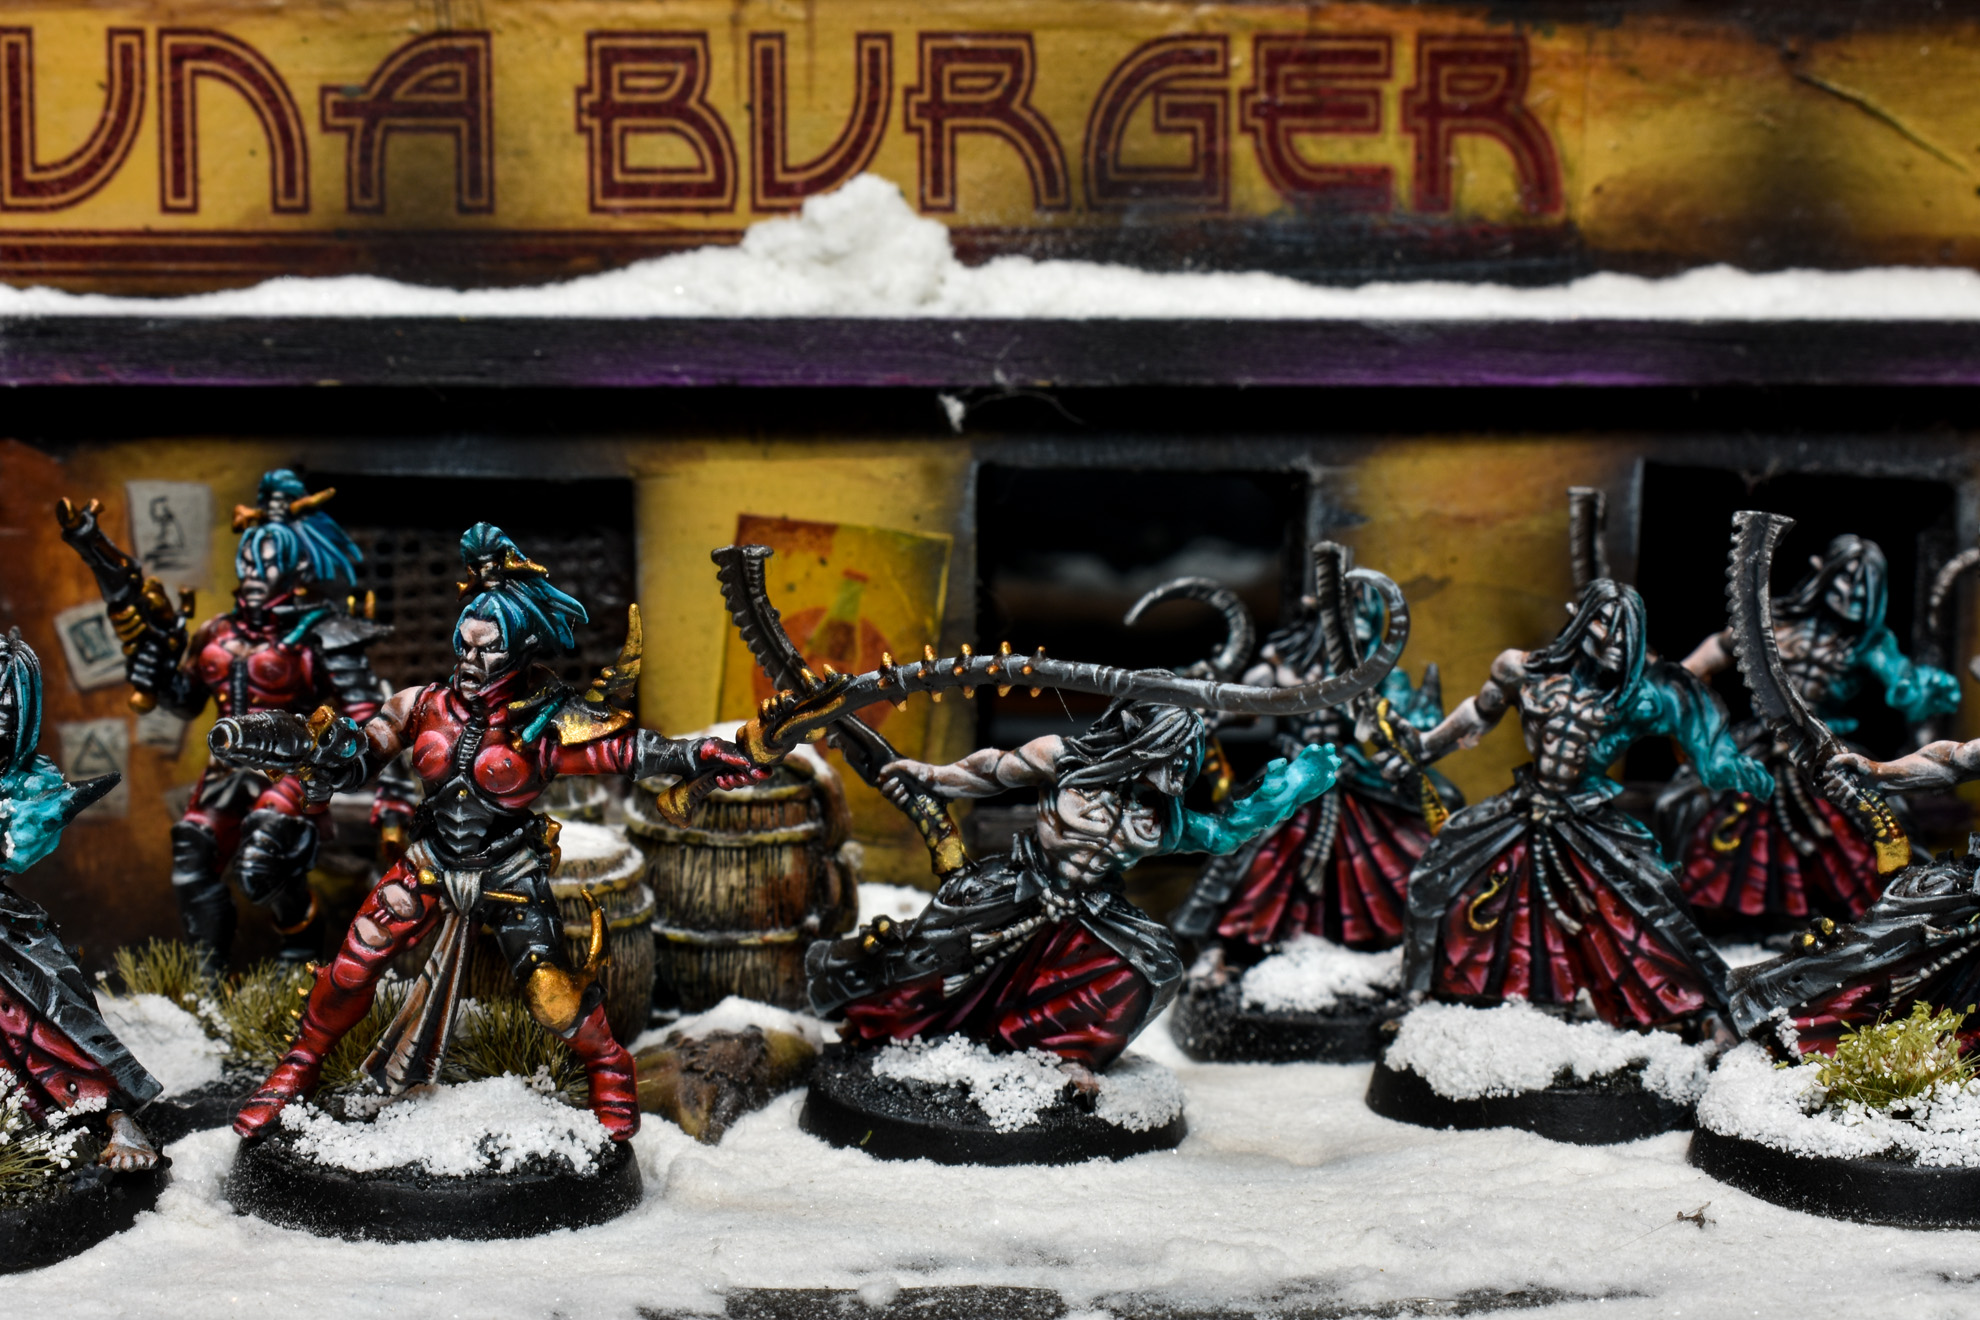
Hello out there! It has been a bit. Have for you this time a Drukhari army in the Flayed Skulls. A Dark Eldar army scheme with analogous application to traditional Fantasy vampire schemes and a lot of overlap there. At least that is how I see it, and really love that similar application of color and visual schemes, even if it is just me.
Okay, okay. Flayed Skull is truly it's own thing and been around since Dark Eldar heads were bigger than their entire torso (bless). But I do really enjoy any time I can paint this sort of deep and gemlike blood red. Coupled with the fact it is an old GW Kabal . I enjoy actual schemes equally to homebrew, they just hit in equal but different ways. And one like this that both has lore and history, and some really strong color theory going on with it, plus the ability to do something traditional in my own style and a modern application over some cool terrain....hard to beat. Real treat of an army and glad it came my way.
The snow is really to match the client's existing armies and terrain. You might remember the Glooming Lords from a few years ago. But, I think it works quite well and would have done the same even as a one off. I always enjoy throwing snow down on backdrops. Don't know why but the temporary of it and being able to put it down and play around in it to make it realistic feels very old movie magic and tickles me.
The new place is going great and finally about done. Looking forward to what will be more space dedicated purely to displays and work sprawl than what was the entire square footage of my old house. It was sentimental but the optimism and excitement for what is in the cards for the future and my work has helped with that pain quite a bit.
That is all for now. Next up is a huge "Perry Etc" Civil War project. Like the Samurai from not long ago, exciting for being such a new sort of project, especially for someone like me who has been doing this for going on a couple decades and always been a longing fan of historical from afar. Thanks for looking, see you again soon.

Hello out there!
Back and at it with another 40k army. Been a minute since I did one of those hasn't it. Feels good, and never gets old. Let's just talk about it then.
This is part two of Hexfleet Virules. It is an army I did the first batch for a few years ago, and the owner has a very active hobby/tournament blog under the same name on Facebook. The last batch was mostly Death Guard and the core of the army. You might remember a broadly similar black and white with the neon green Death Guard army.
This time it was mostly a mixed batch of models of Slaanesh and CSM with a bit of the old Death Guard scheme to add to the original force for play. The main trick when we started out was finding a way to balance these news gods against the existing army. The old batch was black and white with neon green accent. Which worked extremely well with those sculpts, but gives a little struggle in thinking of making cohesive but different other Chaos god forces. He had suggested he really liked purple, so I worked that purple in a way that could be flipped but visually balanced with the green of the rest of the army. Instead of fungus and pipes and eyes, stick the tertiary on cloaks and cloth, and make the visual power of that purple pretty similar. Add some fleshy accent but not too much. Keep the green of the bases to tie it all in, and it worked out great.
One testament to that which was really enjoyable - at the end of the project was able to totally jumble them all up in the final pictures and it still works so well, if I may say so. When I work on these I generally do them in subgroups and like types, which the clients see but neither of us in whole until the end and that is part of the fun. When I put an army on a display for photography, it is even my own first time seeing it as a whole outside of my head. It is a huge treat and because of these months of working out color and balance, that moment was even more special. A project is sneak peeks, I see that final culmination myself, and then send that final gift off of gallery photos in whole. It is just fun and very rewarding.
Another big deal about this army and the display, this is the first 40k army display since the fire as I posted before. My first one back, and it feels good. I was so full up before it did feel a bit stagnant. There are silver linings in even the worst things.
There are things I have learned over each display over the years. As I told the owner of the army, one thing I do love about this one and it feels good to be a first coming back, is it feels like it does it's job best. It is arguably less interesting than the display I made for his last batch, and you'd have to go back and look, but this one was made to hold it. When I was talking to him about it the analogy of a woman's hand to model a ring came to mind. In marketing there are specific hand models (or at least, that is what Seinfeld taught me), but you should not notice the hand, it should really only accentuate the ring being displayed. That is something I have been working on a lot in my head lately. I love making awesome displays but the display is not the point. In the past I have had issues with that, and while the earlier display was very much more interesting, it was much less functional, and that is what is most important. This one was designed to hold the army, and then the fun added around that. Just things you learn along the way.
Anyway. Let's call it a day on this one and end it with photos. Thanks for reading, and see you next time.

Hello out there!
Well, it has been a while. About time I posted something, huh? Have been working on a big 40k army, a second half of the Hexfleet Virules army I did a few years ago. Will save thoughts on that for later as much as I may be compelled to write already. Thought it time to get to a new backdrop a little before the army is finished.
Since I lost all of my backdrops in the fire, naturally I needed to pop out some new ones. Many years of work and collecting gone in front of me on one hand. On the other an opportunity and fresh start, a chance to start at new from a later point of experience and desire. Forest fires bring out the greenest of new growth. It is really however you want to look at it, and I genuinely prefer the positive. Not just as a means of coping. There are many poetic shifts to the situation, and silver linings. Someday I will have to come back to the subject. Necessity is the mother of invention. I did, truly, miss necessity. I missed that place. It feels amazing and it is where I belong. Need and hunger always beget more creativity than luxury. It is why sequels suck, barring a very psychologically unique creator. I digress.
But enough of that. Let's build some stuff!
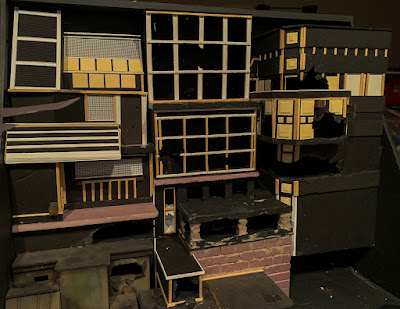
First thing's first, a cabinet. I did not always build the cabinet frame, but it felt fitting. Let's go clean for the first round back. Roughly 4 feet each dimension. As time went on I learned that vertical was best for photography. Instead of the models being on a large flat plane, a stair step allowed much better pictures of the same amount of figures. So we go what may be the most vertical that I have done yet. Will figure out the guts and an actual plan later.

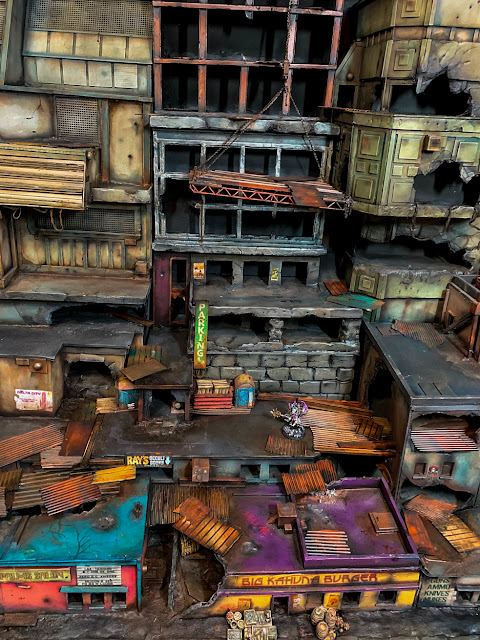
If you have been around a while, you might remember many years ago instead of the huge solid backdrops I used loose buildings and made new scenes out of them each time. I moved on from that a long time ago and built dedicated backdrops, but never got rid of the buildings. They were in a closet in the house and survived the fire, so it seemed a little fitting to use them in a new base display. A display that was big and general purpose urban is always something I really wanted to do as well, but never got around to it. Generic in the sense of multiple settings, from near future urban to 40k, but still interesting to look at itself. Seems like perfect timing for that.

Getting a little ahead of myself, but as I stewed on the building placement I went ahead and cut the sidewalk. 2mm plasticard, nice and thick. Scored edges and then to be roughed up more later. With a bit of putty work the thickness will shine. A street and sidewalk will give room for any later armies with vehicles, and anchor the scene and give it a little motion. A fly by of one side of a city block.
The usual look when I am busy, asking for attention without being direct. Because it works.
Something coming together. Was admittedly a little bit rusty. Had to just start making things to knock it off in the beginning and get something going, and did a few boxes and things I liked in a bubble, but not necessarily direct intent or planned. The top right control tower sort of thing was one, and never made it for good reason but thought it good to show the process. Good creativity is throwing 1000 things at a a broad idea and seeing how they feel, searching for the one that sticks, even if you know some of the other 999 are awful. There is value in seeing through even the bad ideas.
The overall process starts to click, and the fog begins to clear. Things start falling into place as I go. A parking garage would be good front, low and center, in theory going off into the distance.
Now, let's connect that to the building in front and add an elevator. Liking this so far. One payoff of sitting and staring at it for a while is things fall in and feel natural. Moving the medium building in the front to the left offsets it from Big Kahuna and is a little more interesting. Can fill the gap with platform since this is a dystopian sort of setting anyway.
As usual for these things I get a little excited and forget to take pictures. But a day or two later the rough feel for it falls into place and I am happy. Details will come after, but this works as a baseline structure. Building it in layers and chunks works well to make it a little more alive.
One thing that was important for this one was working in parts I am getting too old and crotchety to paint these things solid, and this one was a little more complicated than usual. So the back is three separate vertical structures that lock into each other, and later will be glued into the back.
One benefit as well of doing this in three chunks is avoiding making things overly complicated and interlocked. I do have a strange habit, as seen in past displays, of making everything a wall of Tetris, for lack of a better way of putting it. Working in three vertical structures forced me away from that, and gave me an opportunity to make each unique, when my creative autopilot would have leaned toward a wall of solid semi Escher painting. This also feels more realistic and fun than what would have surely come about if I just went at it solid. The bonus reward is added realism and life.

Adding details. These things usually have three stages. First, the overall structure which is the most important, and most mentally taxing and a bit stressful. Most time sitting and staring and thinking. Second, detail, which is usually fast and on the fly and fun. I always think about old movie props and sets and consider the fun they had. The Death Star trench was probably a chore to build as a structure and then the detail a lot of fun. At least if I were there. Third, what I call the after details, but that will come later. Tertiary character.
Starting a little bit of putty work. Even in the upper areas, putty is important. It helps blend the obvious structure of foamboard into a realistic setting. A little bit goes a long way. A touch of grainy putty turns a joint of obvious material into a realistic structure.
These are still loose, but testing them each time, seeing how they interact. Stuff is cattywampus since it is just free sitting, but the final glue will take care of any bit off level.
Little bit of primer on the back buildings before I get much further. Can clearly see the three different structures. Definitely want to paint these before sticking them in, and primer is a good setup color wise. It doesn't need it for the protection, these are always treated with care and not much harm comes to them in setting up scenes, it is more to set a very very early baseline for color I apply after. Pure black isn't often something I do for miniatures, but for terrain a level playing field is good. That is an entirely different tangent though.
One final look, half test half celebratory, before I get to paint.
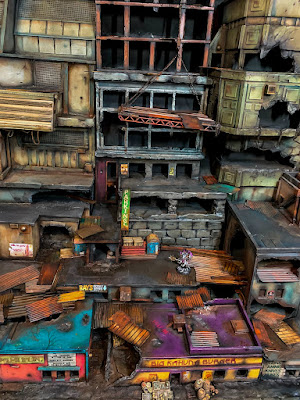
Worked right to left on paint. Likely part that since they were built the same direction, had proportional time to stew on how I wanted them to look in the end. I want each to be clearly different, but work with each other as well. I like the somewhat between military green and stone grey of used future buildings. I also like the same sort of palette tweaked blue and tan as a balance. So knew I wanted each on left and right, and then get literal in the center with balanced metals and whiteish stone.
As before, got a little excited and did not take enough photos. But there is the rough of getting the buildings in. Very happy with the separation and on multiple levels glad I went that way. Little loose test of all the front buildings and time to move on to the sidewalk now that I know for sure where those land.
The back buildings are adhered first with a little hot glue to level them out, and then the back wall of thinner (only half inch) extruded pink foam plays it's part - drilling tiny holes and spraying in expanding sealer foam. Gap filler foam obviously fills gaps, but that isn't why I use it here. It is a wonderful spray and pray method of adhesion. It grips like superglue and catches where you put it. Instead of trying to play hot glue's short cool time over such a large area, or liquid nails' slow cure on the back end, just spray some gap filler in the back pockets and wait overnight. There is something in the expanding nature that someone more physics oriented could figure out, but I go by feel, of weighing down the buildings with boards having more weight than the expanding pressure of the foam so they do not push out. That is all one has to worry about, but minimal, and in the end the bond is secure. I could throw the whole thing down a hill and not move. Hooray.

How to texture plasticard sidewalk the right way in one easy step.
Hot glued. I prefer hot glue here because very thick it adds variance, which will be covered and filled later with putty. Just adds character. Hot glue is a perfectly fine bond as long as you are dealing with either smaller parts or multiple or large points of contact. It is also quick and I am impatient with these things out of excitement. I use hot glue for almost everything, especially if it will get a putty or some other secondary bond later.
All stuck in.
First layer of putty. I use Smooth On Free Form for most terrain. It takes everything from glass smooth to grainy concrete well, and multiple layers blend well. Which is important so stuff gets locked in. The trick to stone grain is a wet rag.
After the sidewalk layer cured, started sticking in buildings. Another benefit of the Smooth On is it is also an incredible adhesive. After laying down the layer of putty I just stick the buildings in and touch up texture around with a rag or worn brush. I could pick the whole thing up by that building and it is the only adhesive.
Rest of them, overlapping layers as I go. Easy and fun.
Now ready for the next painting step of blending all that putty in and weathering the buildings. Looks like once again I got too into it and did not take pictures. So we move on.
Now for that tertiary step I talked about. Cutting up random metals and I beams and painting them with variance. This step doesnt have to be slow if you vary and stagger the steps of painting. Do not paint them in batches. A dozen different blends of color going darker at each step, and never giving any one part more than 6-8 means you paint all the stuff at the same time but still different. A dehumidifier also goes a long way in steps like these.
Added details go a long way beyond the basic structure and paint. Some of this stuff is old items I had as well. Just a little personal nostalgia and they still hold up great.
I love this crane. This was designed by Alex at Ironheart Artisans, a buddy of mine. Thought it would be a nice touch and add vertical space which is always gold in a backdrop. We also made the old big red Admech, martian display together and it was a nice little touch of throwback. That is the one backdrop I will certainly remake. Someday.
That is it. See you next time with an army on it.
"The trick, William Potter, is not minding that it hurts." - Lawrence

Hello out there.
It is time. I am done, and I am back.
There are a lot of thoughts and emotions behind this project that are hard to put into words. No idea where to start, or how to do them justice in specifics and in full. I will try and fail, and this time that is okay.
First want to thank the special someone behind it all. I am sorry the fire happened under your project, but certainly would not have it any other way. No one could have asked for a better person to go into this with. Thank you for your patience, understanding, and sticking with me. Every project for me is more than the sum of it's parts, and I feel a special bond with everyone that comes through here,. But as you may possibly imagine this is something that truly escapes words. The foxhole he jumped into with me so enthusiastically and without hesitation is a place I wish I could stay forever. Thank you Mike, for making a horrible situation something so truly great that I didn't want it to end. I will absolutely miss everything about this time in my life thanks to you. You turned what would otherwise be torture and trauma into an adventure. Thank you.

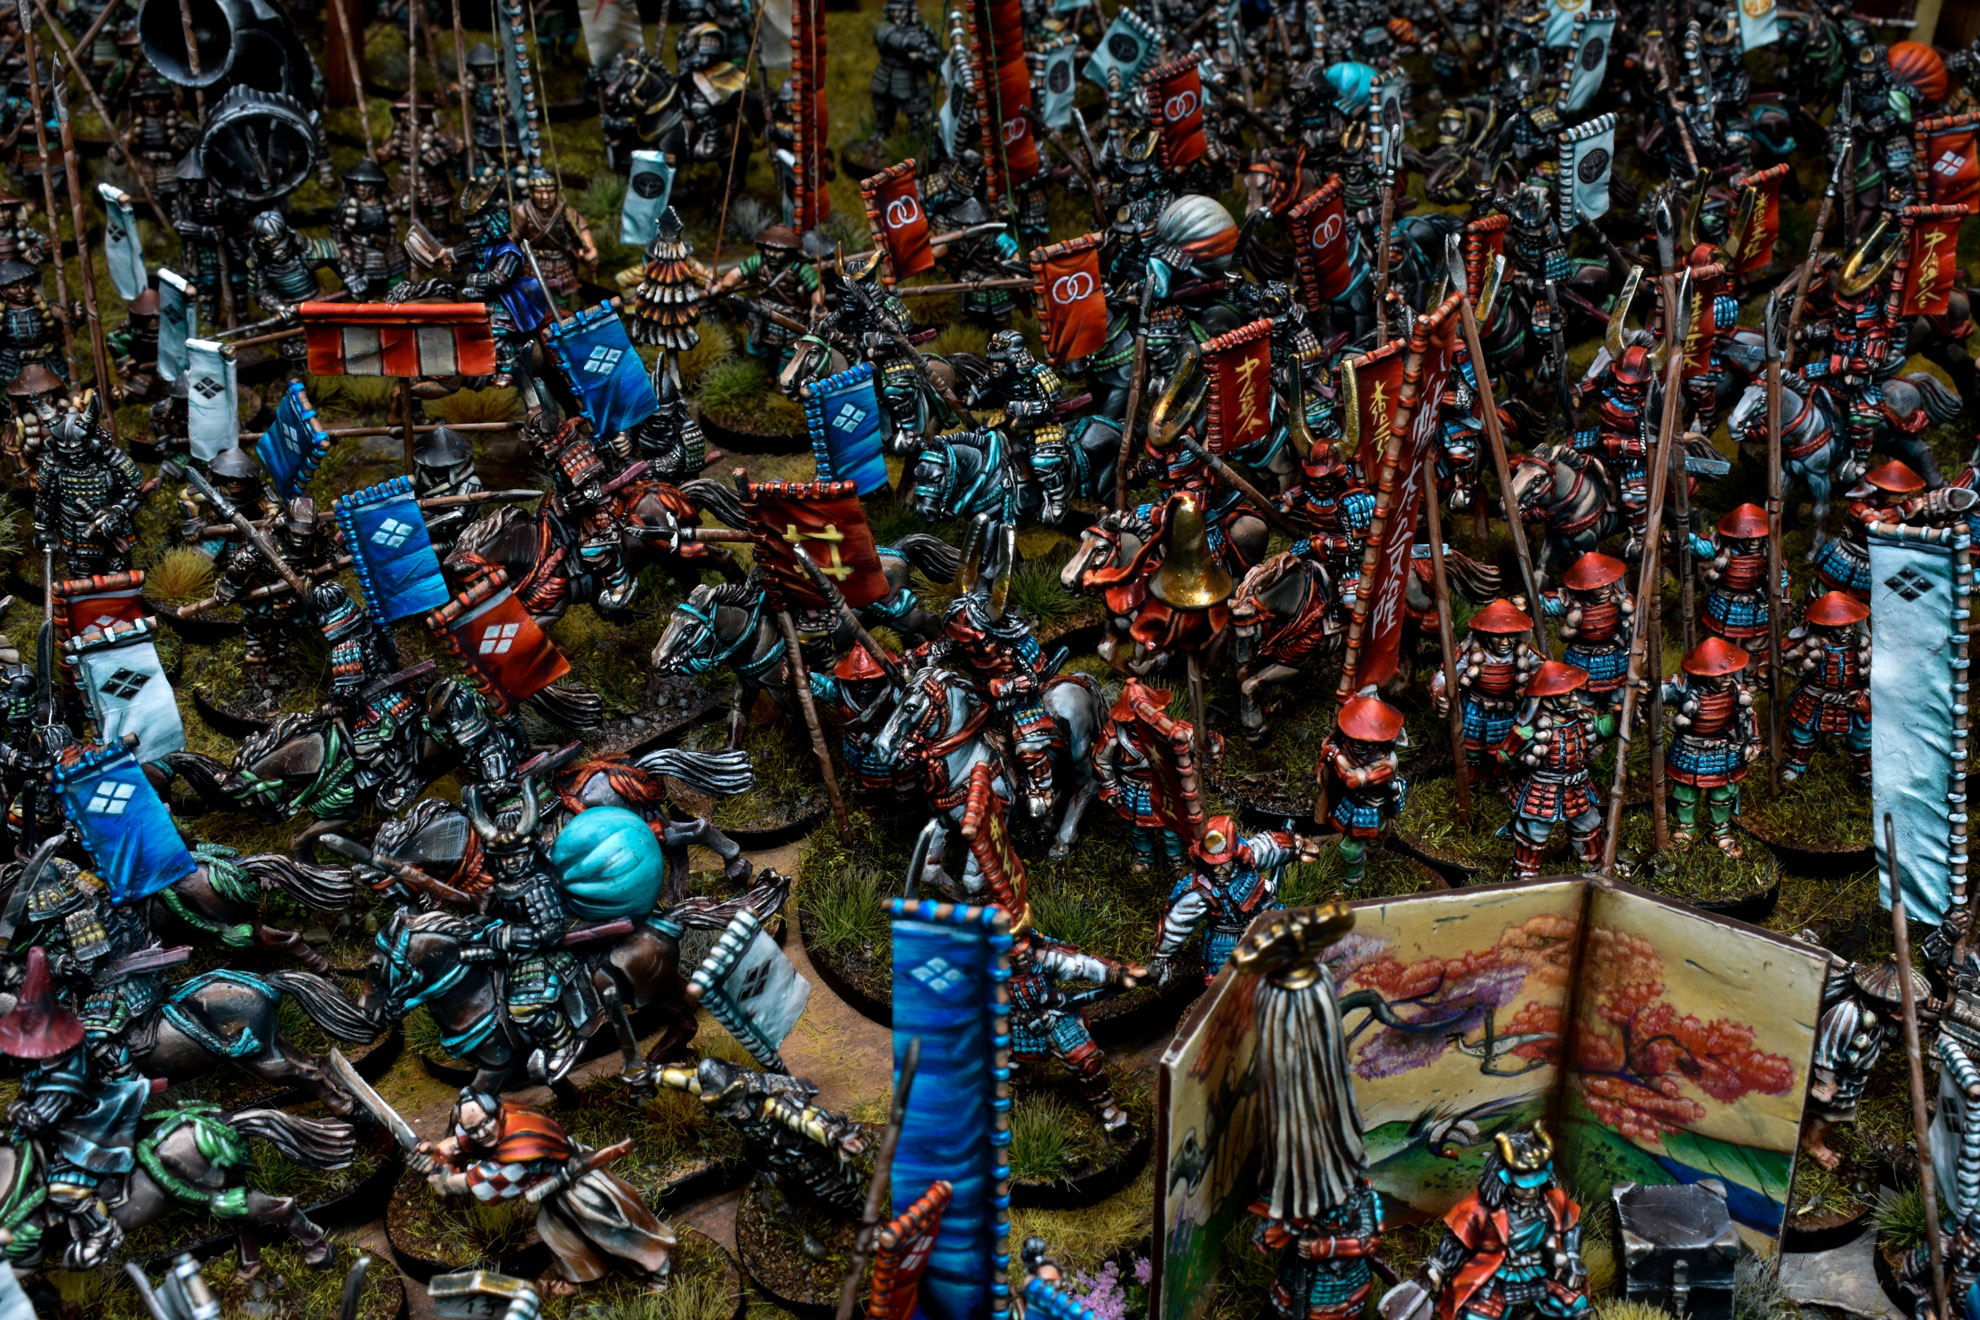
This army was already very special to me. Somehow in all my years I have never done a historical wargame project. Just never came by. Historicals have always been something I passively loved, and from my early teens on played Empire for a pseudo-historical fix. There has always been something to it I have admired from afar. The gentlemanly come as you are, lack of points. The broader brush strokes in the flow of gameplay. The historical accuracy, which was challenging but so different and so much fun. There is a moxie and character to it that I have and always will appreciate and admire, different from Warhammer in it's own way that will never fade. Even before all of this I was very excited and this army meant a lot to me. I would have never forgotten it before, and now especially so.

The project is based around three battles in 1500s Japan and the clans that participated, plus some bonus scenario or fun-of models like the Ikko-Ikki and townsfolk. Everything was particular in color scheme for historical accuracy with some artistic license in placement. The Samurai are based around one color scheme as a whole, but the colors outside of the armor randomized on each individual as it would have been in the period. In process this meant taking the whole batch and placing each color in a different place each model, starting with the blue and green since they really anchor the rest of the colors. Every time I touched a model i would make an effort to put it somewhere else than before, and then as the colors filled up, getting into the tans and pale yellows I would balance the new around what I had already done individually. This was a really different and new way of painting for me that was a lot of fun. It is a process that doesn't work anywhere else, but here does wonderfully.

As promised, I am at a loss for words and fail to give this what it deserves in full, both for the experience, his research, and the story behind it. There is a certain underlying poetry to everything about this project and it's time in my life that is so perfect I can't attempt to convey it to you. Only two people will know what the true depth of the journey behind it. I will flout usual convention in a way that may best drive the point home - in the recent past I have in the back of my mind toyed with the idea of finishing out my schedule and retiring from painting on some high note. If I were to leave, that is certainly the way I would want to go. Sometimes bad things happen for a reason, in the most timely fashion, and make a person appreciate what they have, and what they are meant to do. In so many ways too extensive and complicated to write here, in everything within this project and surrounding it I am reminded that I was born to paint, and will until I can no longer hold a brush. For this above all other many reasons I love this army, and will always remember it.
I am back, and the best is yet to come. There is still a lot to do, and a lot to get through outside of painting, but I know on the other end there is only pure destiny. I look forward to it in a brand new way. Warhammer, even more historicals, brand new backdrops. I am really spoiled and blessed to have the future I do in front of me.
As sure as the sun rises in the east, see you next time.

Hello out there!
I am officially back. In case you missed the last post, I recently had a house fire. Unfortunately, I lost all of the backdrops I've made for photography all these years. Which is too bad, mostly for sentimentality. There was an original inspiring army behind each one, and a reason for each within my collection. That meant more to me than the time put in, in all honesty. There is a silver lining to everything though, and before I was very full up on displays. All were at least big enough to play a game on, to give perspective, and 2-3 dozen. So like in nature, sometimes a fire while destructive is also rejuvenating, and what grows out of it is greener than before. I am looking forward to the next few years and the new backdrops I will want and need to make.
Right before it happened, I had started a Perry miniatures Samurai army, and a big one at that with over 500 models. I was already thinking of doing something new for it to celebrate my first historical army. Which is very exciting for me, as somehow in 15 or however many years I've been doing this I've never had one come my way. Have always been a big fan of historicals, and when I'm honest with myself a lot of my early Empire and Bretonnian armies were a way to get a pseudo-historical fix within a game I could actually have opponents to play, and treated the background of the armies with the same treatment a historical player would.
So my original ideas for this backdrop were to go back to roots a little bit, and the fire just made that notion a little more poetic. Emphasis on flocking, more of a traditional gaming table, a little on the model railroad side, and where we all started if we've been around long enough.
I also have always had a hangup for nothing showing behind the backdrop. I tended to make them very vertical to be a complete scene in the frame and give immersion. Which was valid and for good reason, and I will likely return to that. However for this one, the subject matter, the situation, staying at Mom's until we rebuild a new home, I thought let's throw away the formalities and show it all, and go back to a gaming table style.
Anyway. Let's get into it photo by photo.
First, the table itself. I was originally going to make this from scratch. I've been going to a local antique store, although it is much more than that, since I have been painting. This local shop is where I have bought most of the base pieces for my Adepticon displays such as the skeleton and throne, and most of my house decoration and furniture. Even with all this I try and stop by often, and he had this table for sale. It is 19th century French, not Japanese, but something about the front drawer seems passable for this project and also reusable for future historical projects. Beside just looking awesome in general. So I picked it up and off I went.

First, a good sanding and a layer of light primer. Looking back, the sanding was likely adequate, but an etching primer on top can't hurt. Any sort of tooth for the putty to stick to is better than nothing over gloss wood varnish. There is something enjoyable about doing this to real antiques. On one hand it hurts to wreck this great carving on top. On the other, it feels quite nice to make something original out of something special. That has always been one of the many appeals of the Adepticon displays as well.
Next is a secondary step to the back for a little bit of verticality and visual interest but nothing too crazy. My usual instincts to go tall are kicking in here but I remind myself the goal and meaning behind this project.
The first step of filling in the carving with putty. It is very deep, and will take a few layers. The goal is a sharp, flat plane that meets up flush with the outer frame.
This is a few steps ahead. First I decided I really hated the complete separation of the top and bottom, and added a long sloping ramp to the right side coming left. There are also around 70 cavalry in this army which will make great visual use of it.
Second I added a rocky ramp to the left side. There are some 60mm character scenes that have a more prominent right facing, and thought this would be a good way to show them off with an upward facing into the camera.
Third I worked in the large trees I had ordered. Have to be careful as even as big as this table is, space is at a premium with the giant army that will go on it. Balancing looks and purpose.
Within this I have also been getting more and more into the notion of a gaming table, and the purpose behind each part, working it into the elements both for front facing photography and playing on it. Making it balanced and also natural. There is a lot of this here in the choices and placement.
One last coat of putty. All carvings finally filled and flush. Dirt texture added in this step with a rag and brush as well.
Wanted to add a little more interest and vertical steps, so some rocks were added in the form of good old fashioned driveway gravel and some slate style slabs to stack models on. Nothing too crazy, as if you add too much you end up spacing models out.
The first coat of paint, using thinner paint in a more watercolor style for some of the yellow to show through since it works, and painting in the path.
Finer work. Getting the rocks painted, some shading, and variance in the dirt. Same watercolor style painting to fully finish the path. I don't have my old dehumidifier and shop setup, but a nice hot sunny day does the same job drying it out fast enough to keep up with me.
More shading and pushing the light and dark. Fully finished and ready for flock. This will be more an exercise in flock than painting, so trying to overcome the urge to spend days here hand painting the whole thing with a #2. Most won't be seen and will simply act as a base, so this is more than plenty and I step away.
Time to flock! I had a huge collection of flock and rarely had to buy any. It was fun to go on a bit of a shopping spree, and an opportunity to try some new materials. I found some really great new modelling plants I otherwise would've not run into. I was so excited I don't think the dirt varnish is dry in this picture.
I was also so excited I didn't take many pictures. It has been years since I have done something in this more model railroad style, and it is a lot of fun. Took a lot of inspiration from morning runs on a trail nearby with lots of farmland and wooded areas around. Which means I would get excited and not go very far. Good problems to have.
A little more progress. Again, a little too excited to take photos each step, or be bothered to clean the thing off it seems. To describe, it is many layers of thinned glue and careful application of each flock. The trick is many layers, and to pick your edges not by the application of glue but the flock. Unless you want hard edges for some appropriate reason, the goal is to cover a larger area with glue each application of flock and apply it well within that boundary.
And finished. I am very happy with this one being a new first backdrop and for all the meaning wrapped up within it. This is something I have always wanted to make, and the way everything fell together makes it all the better.
Put in place, and ready for an army. It isn't my Grandpa's garage, but it is equally sentimental being the same basement I started in way back in the day. In that regard, I am grateful. Feels good to have a new one under my belt. Definitely looking forward to more new backdrops, but we will cross that bridge when we get there. For now, just a matter of time for the army and photos. See you then!

Hello out there.
Well, it's time I finally posted the news. I recently had a house fire.
Let's start with the good news. We are alive. I now literally owe my life to painting. Poetic how life can be sometimes. I am normally a night owl, but that night I was feeling good and decided to push a little more, and was up and closing down around 4 am when I heard what thought was an animal getting in the garage. Was raising new chicks at the time. I let the dog out, grabbed the gun, looked out back at it, and saw that glow out the back window and knew exactly what it was.
By the time Fire Department arrived, the fire had spread to the roof. By nature of how smoke works, and the ceiling structure, the smoke alarms didnt even go off until it was falling in and busted the ceiling drywall out. If I had gone to bed, we would probably be dead.
Ive been putting off writing about it so far because this part is really hard. The house was nice, but it wasnt special to anyone else. It was my Grandpas house and his garage. My mom and my aunt who was all my artistic inspiration were raised there. He was a carpenter, and that garage was as much him as the flesh and blood that passed two years ago. It was small, but being in it was like being wrapped up in his presence. The tools, old bench I had taken photos of pre paint on, were all older than me, some things older than mom.
As I stood across the street and those two front corners of the garage fell in with a clack, and it was all gone, it was a slap across my soul. It was where I did my photography, and every display I have ever made was in there, and it didnt even cross my mind to give some idea.
There are times in life where things are so random and unexpected, they go full circle into feelings of poetic fate. Call it God, fate, karma, whatever you like. The more time goes on, I realize more and more silver linings, and purpose to it. With time I feel less feelings of "why" and more "this is why."
The families on this road have all been here 80+ years. When my Grandpa moved in back in the 50s, he made a close friend with the couple across the street. That family is now three generations, and still lives in the three plots over there. The day after it burned (well, for me it was all one 72 hour day) his son came over. He offered to general the whole thing, and off we went tearing it down.
I learned a lot. I saw a lot. It was almost two months of taking that thing apart with just us two, a tractor, and a constantly rotating 40 yard dumpster. I wanted to live in that house forever, but as I took it apart, I realized in hindsight that may not have happened. It was built over top of a very old structure, and added to many times over the years. The walls and floors were layers thick. The core of the right side of the house was all native lumber. It felt more like stone than wood, and had all the saw marks from a steam mill. I found hand cut limestone flower beds underground. The original spot where the front door was. It was like stepping back in time and seeing what was once a little gem of a house on the corner of a 40 acre orchard I had heard so many stories about.
I've never in my life met another man like John Paul. I only learn the reality of his generosity piece by piece and day by day as we go. It reminds me why I live out here, and why I always will. I sit here trying to write it out and explain it, to explain the experience of that two months or so, and I just can't. A genius of a guy wrapped up in the facade of a country bunpkin to many. Talk your ear off, but never say the same thing twice. Generosity just because you're a neighbor.
Attached are a couple photos. One of the front, showing the old front door and native lumber. The other is of the little back bedroom with wood paneling. This was my grandpas old hangout room when he lived here, and as long as Ive been alive. It was then where I painted every single army Ive done for the past ten years or so. A desk, a couch and a coffee table where moved models step by step. Add some Christmas lights and you have the perfect comfy spot. I loved it to death. It was my lair, my decompression chamber, and my instanced little separate world. I am lost without it.
There are other points of good news. The inside of the house wasnt too bad. Anything inside that would survive nasty black water is fine. My Adepticon displays were in the dining room, and they are too much of me to burn anyway. They're a little beat and in storage, but okay.
I'll also be able to build a new house. Planning and having that drawn up has been fun. I was adamant at first to rebuild it exact, but with time the more I think if it's gone, it is best to start over. Ill move it back a little. Have a bigger garage. Ill give it a basement with a little bedroom and replicate that wood paneled room.
Currently I am staying at mom's. She has a finished basement. Ironically this is the same basement I started painting in 15 or so years ago with nothing but some Apple Barrel and a dream. It's nostalgic and I am back to work, despite being distracted by all this. I've made a new little hidey hole I can paint away the hours and be alright. It's good for mom as well to be able to dote on the dog and cook for somebody.
As time goes on, the more I realize the silver linings, and while I would prefer to just go back, the more I realize there is a poetic reasoning behind every little thing about this, and I will be okay.
To be clear I am not posting this for sympathy, although I know you all are great and I will probably get aplenty, and I appreciate it.. Just letting you know why I am quiet and may be a bit yet.
Rest assured I will be back. With a fire of revenge to put to shame the one that took all this from me.

Hello out there!
I am back again from deep beneath the earth, bringing back some colorful balls of tainted stubbornness. This time it is Age of Sigmar Dwarves with a Tzeentch flavor. This army has some very personal and unique backstory the client has been working on for years, so let's kick it off with a small summary of that:
"The Kromidrakk Lodge dwells beneath the “Glass Sea” in the city of Fanokbulla on Chamon, the Realm of Metal. This lodge went to the Realm of Metal in search of ur-gold under the deep depths of the Glass Sea under false pretense. They have been hired by an agent of Tzeentch for thousands of years, The Changeling.
It is with Tzeentch's blessings that the Kromidrakk Lodge has been slightly mutated to have gills by the Changer of Ways. The Kromidrakk Lodge has no knowledge of the true identity of The Changeling. Crestis'Chk, the Lord of Change, personally oversees this endeavor. It is he who mutates the magmadroths into Vortex Beasts. It is he who further mutates the Lodge from within. They continue to serve Tzeentch unknowingly, all the while, believing in their cause."
Tzeentch tainted Dwarves. A very unique army that is also very colorful. This was right up my alley and a lot of fun to work on. Quite a lot to dig into and flex the color theory and composition muscles, going from a broad idea for an army with very fleshed out backstory, to an overall whole bringing the two together and making something that works both as a visual whole and with the story the client had created..
For a great project with a lot of feeling behind it, well written, fleshed out and personal backstory is half of the battle. The other is the paint that tells the story visually. Combine the two and you get a very sentimental and special thing that you can point out across the table and know what went into it. I put a lot of work into my projects and what most people see at first glance is that effort, but cannot give enough credit to the clients that have worked on and thought about their personal army for years, and allow me that foundation to work on top of. Thank you very much to a certain special someone for this one! Was all my pleasure.
Next up - Perry Samurai! Somehow in all these years of painting I have never done historicals or Perry. Very much looking forward to digging in. See you then!

Hello out there! Another army finished and ready to roll out.
This army is a Sylvaneth Age of Sigmar batch themed around the end of Autumn and the fade into winter time. This project began as a simple but specific premise and idea of the client. I work with all ranges of no idea what someone wants to very specific and fleshed out army ideas, and there is a lot of fun in the range in between too. For this army the client's base ideas were a simple range of colors they would love to see - icy look and icy blue accents, darker old wood, lighter new wood, and some red color thrown in for accent as well.
Sometimes within that range of structure in a client's vision, there is an army that is simply colors they love but maybe no specific theme. That is fine, and I actually enjoy those for the challenge of finding something that wraps around what they want but adds even more that they weren't expecting or knew was hiding within that. So thinking within that set of colors, what came to me was a bunch of Sylvaneth that are transitioning from fall to winter. This sets off a play on both the red and the icy blue, which otherwise might not work so well, or seem two colors simply applied to a tree model, which I am sure if you think of armies painted just with "I like these colors" but nothing beyond that looks like.
There were also some other pleasant surprises that just by nature of working on them came to me or appeared. They have a bit of an overcast feeling in the tone which I really love. Treefolk walking through the woods, leaves still hanging on, but the cold of winter and that first heavy snow wet with still slightly warm weather. The new season powering them from within.
In the end a straightforward but fun exercise and an example of why I really enjoy any range of ideas a client might come to me with, and lucky to be able to have that switch up from project to project.
That is all for this time. Next up is some Tzeentch themed Dwarves for AoS, which will be an awesome example of the far end of the spectrum - an army with a fully fleshed out idea from the go that just needs nothing from me but to do it. Unique and colorful, which is right up my alley. See you then!


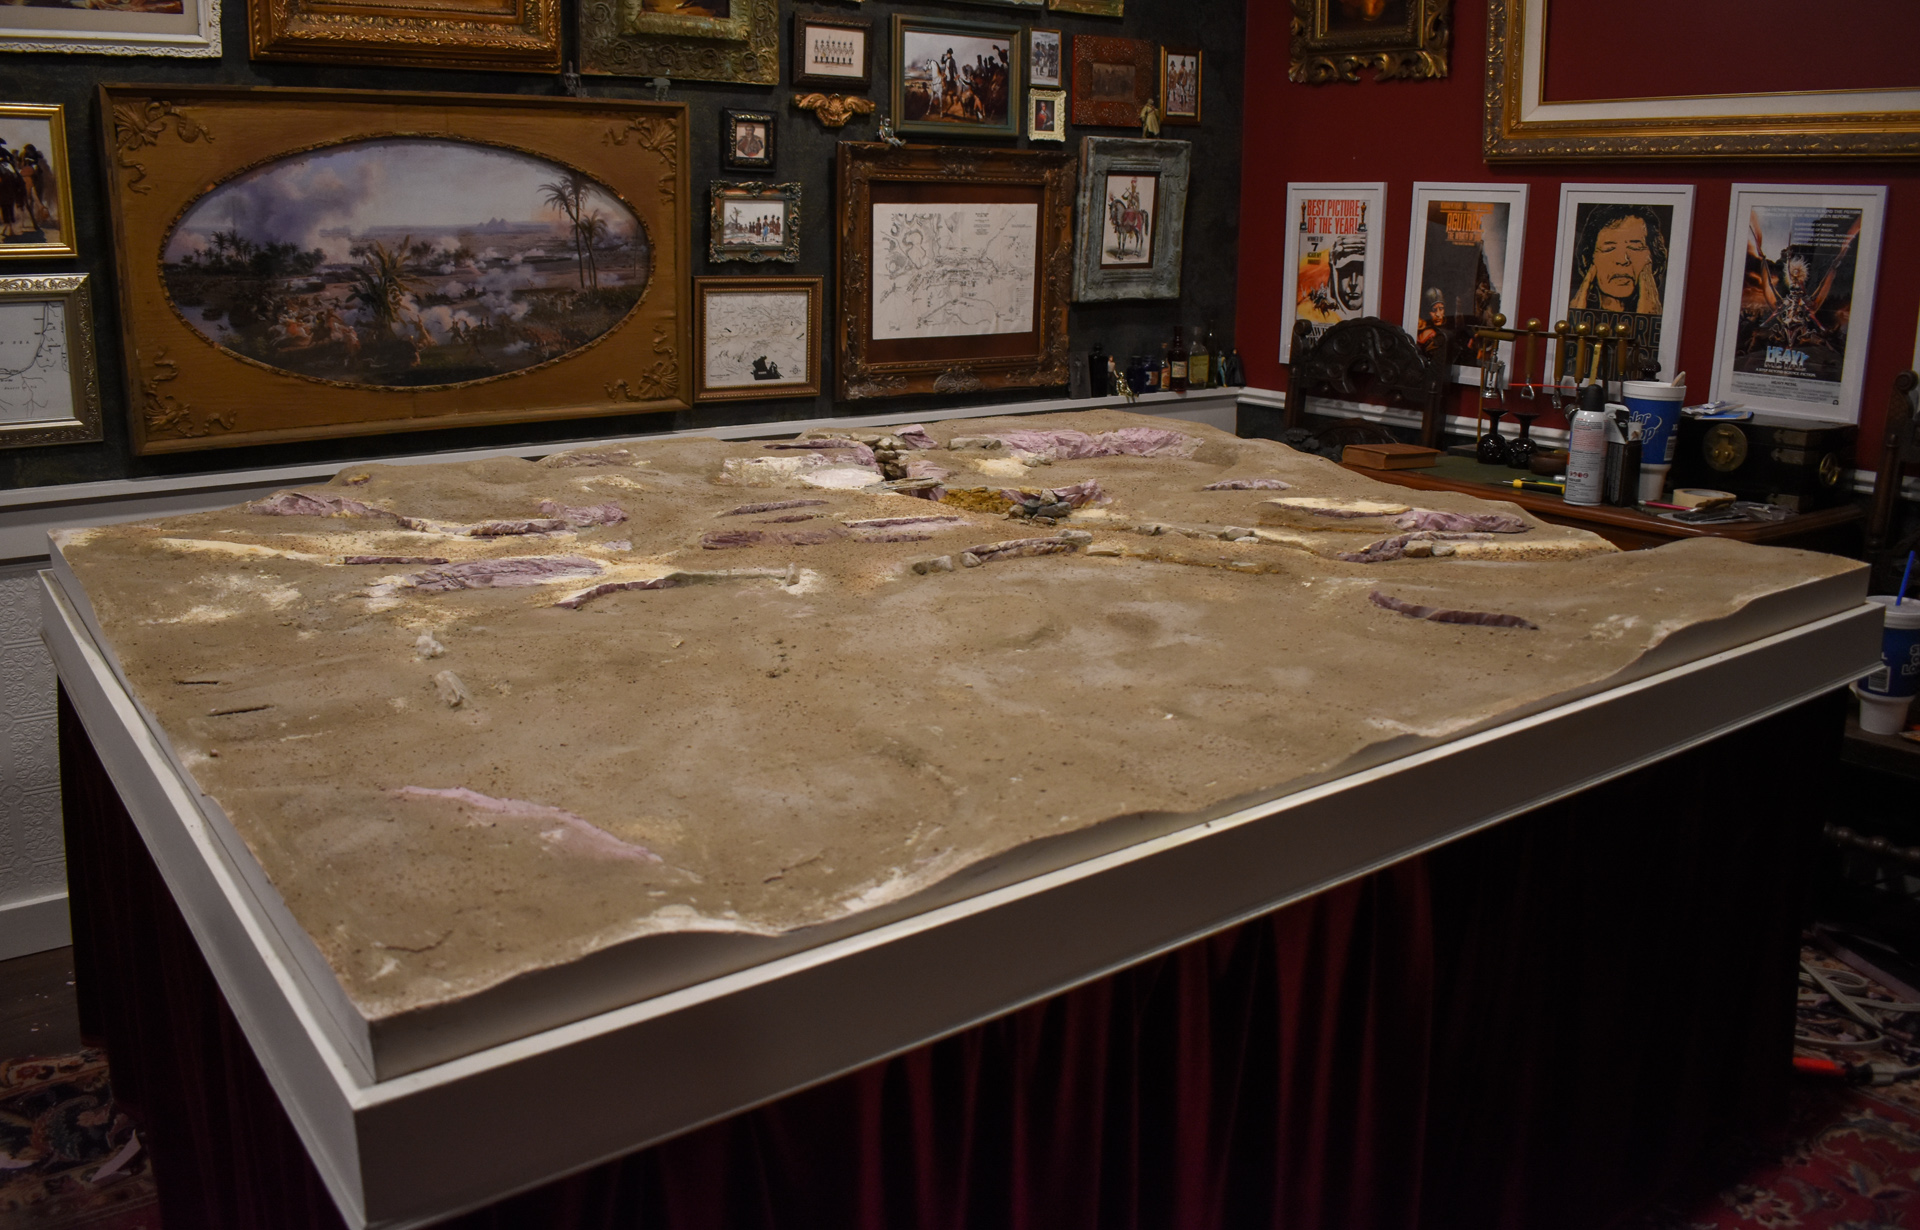


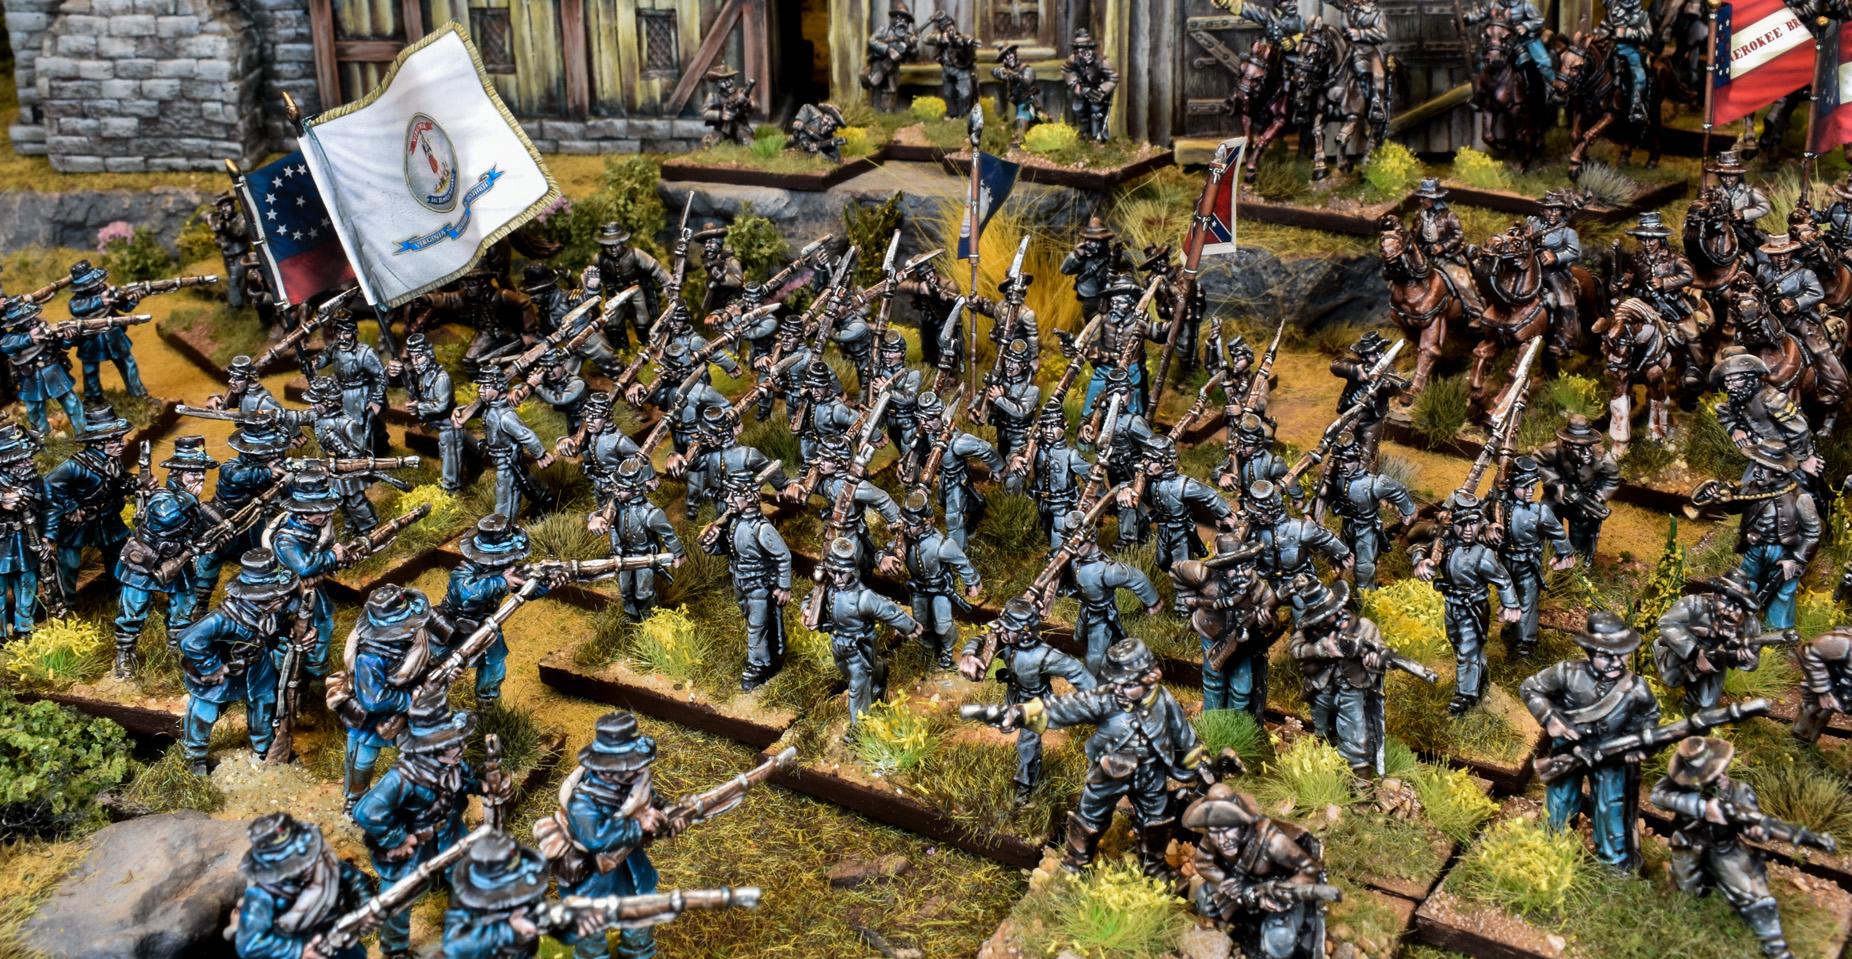


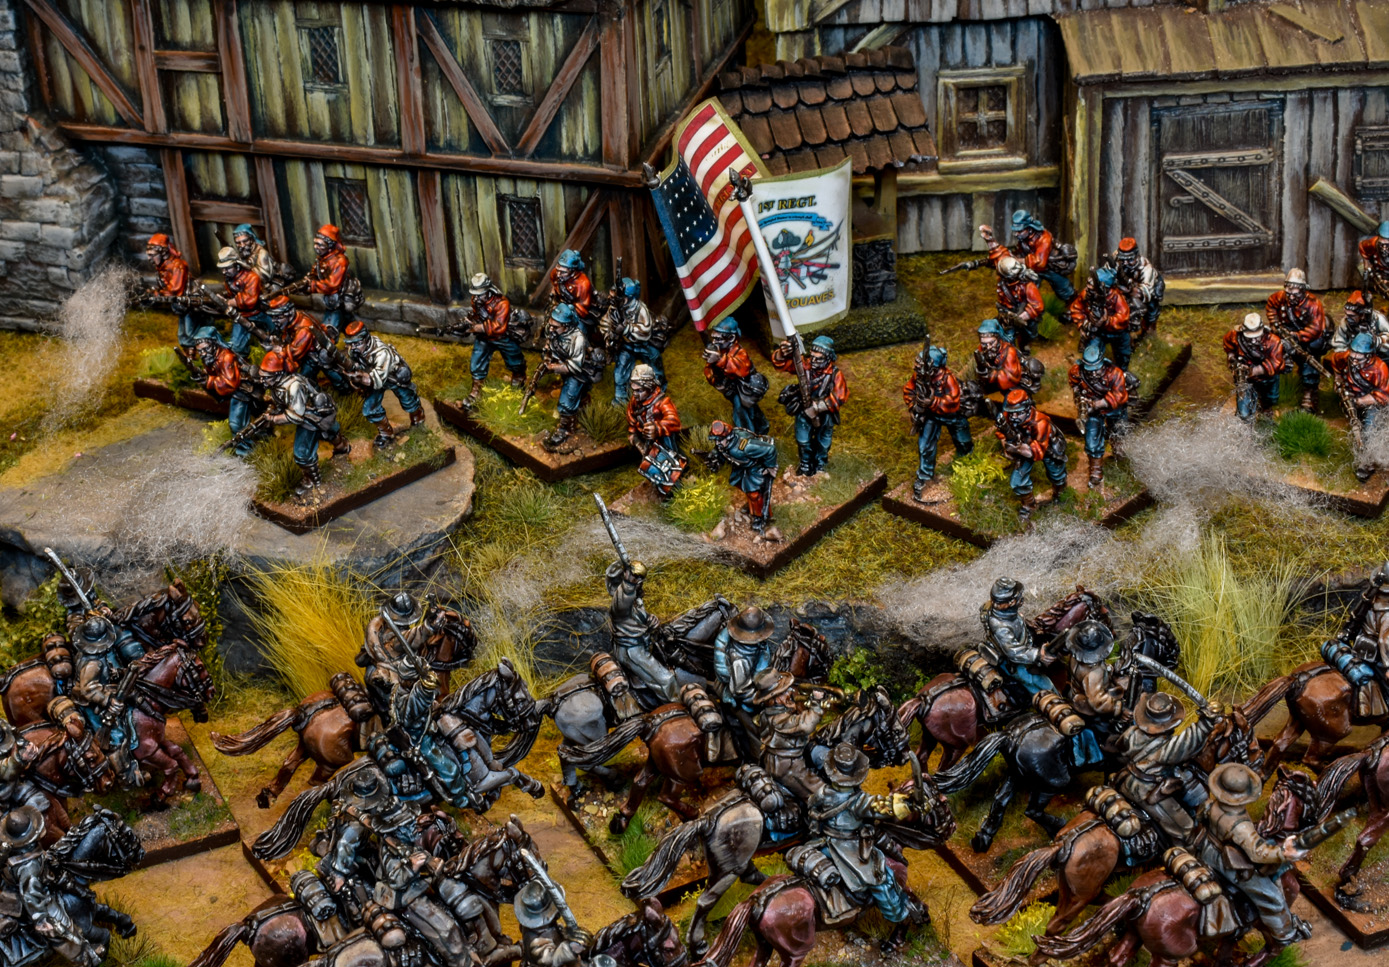
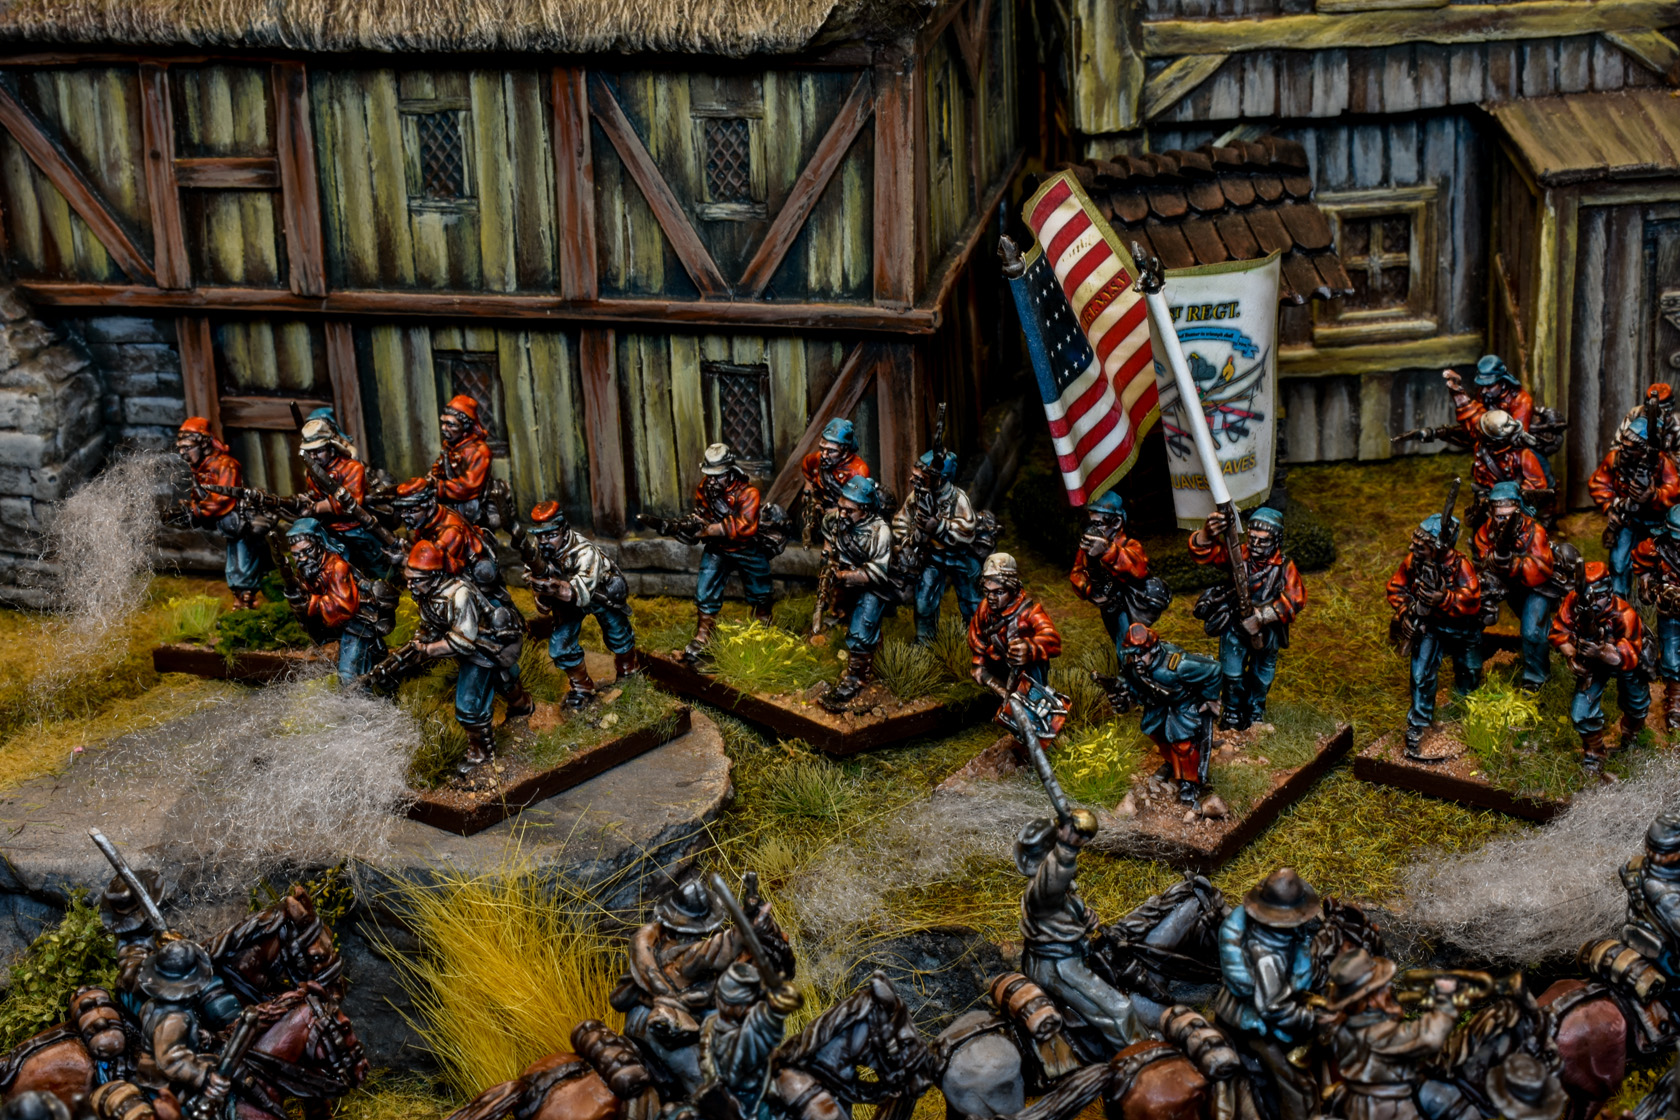

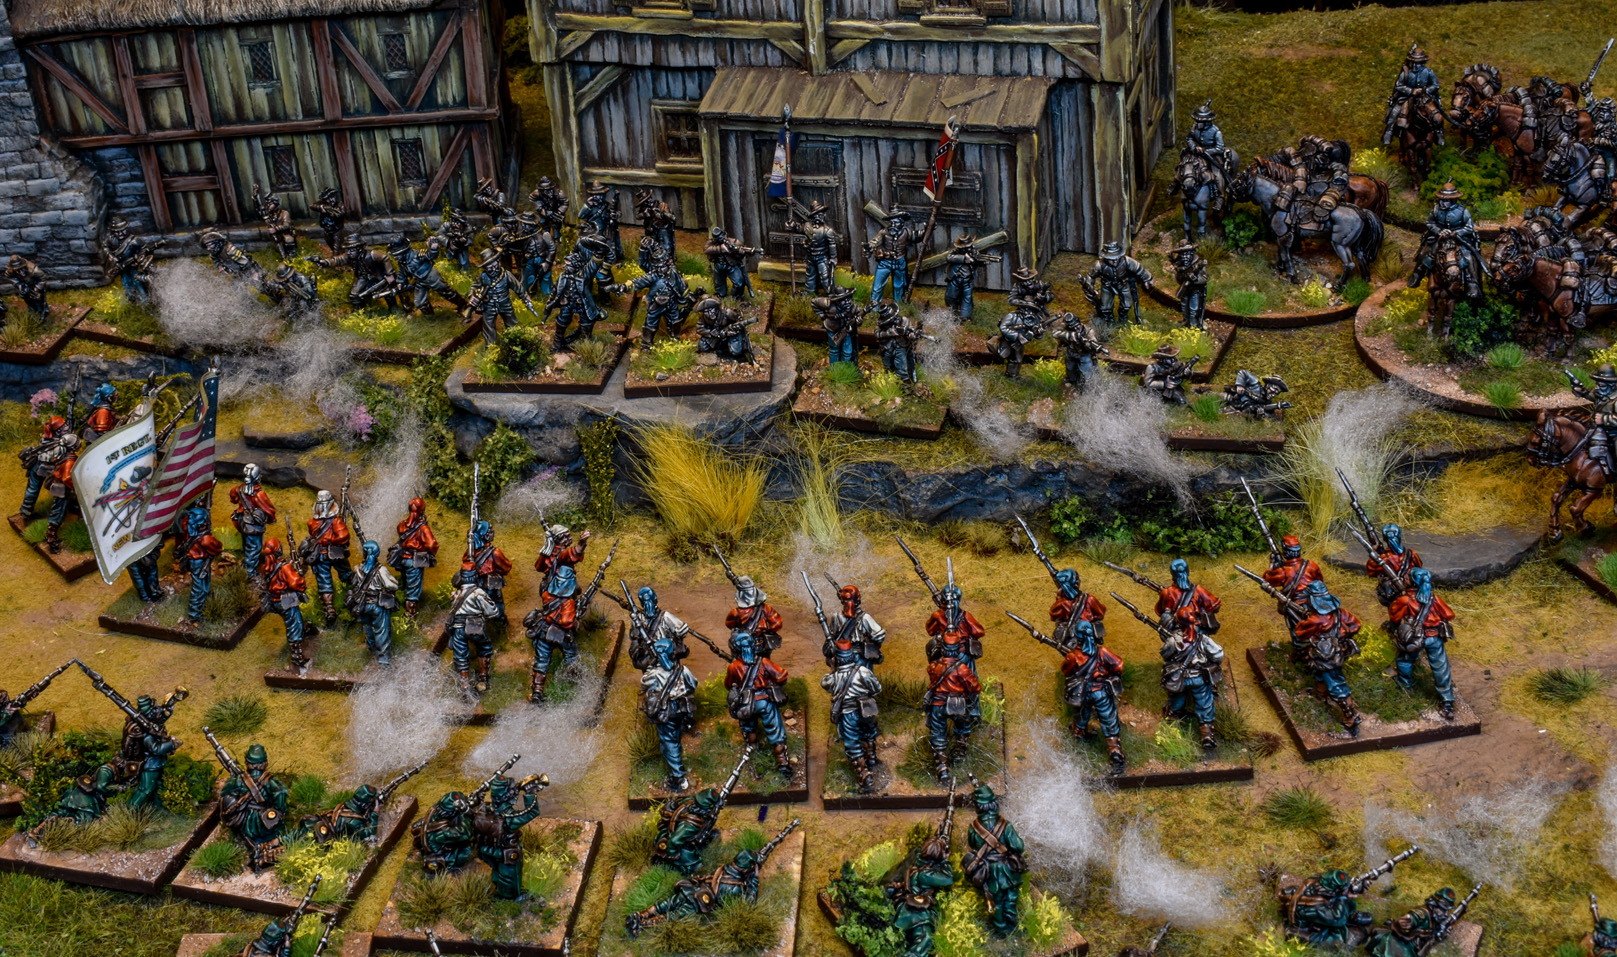


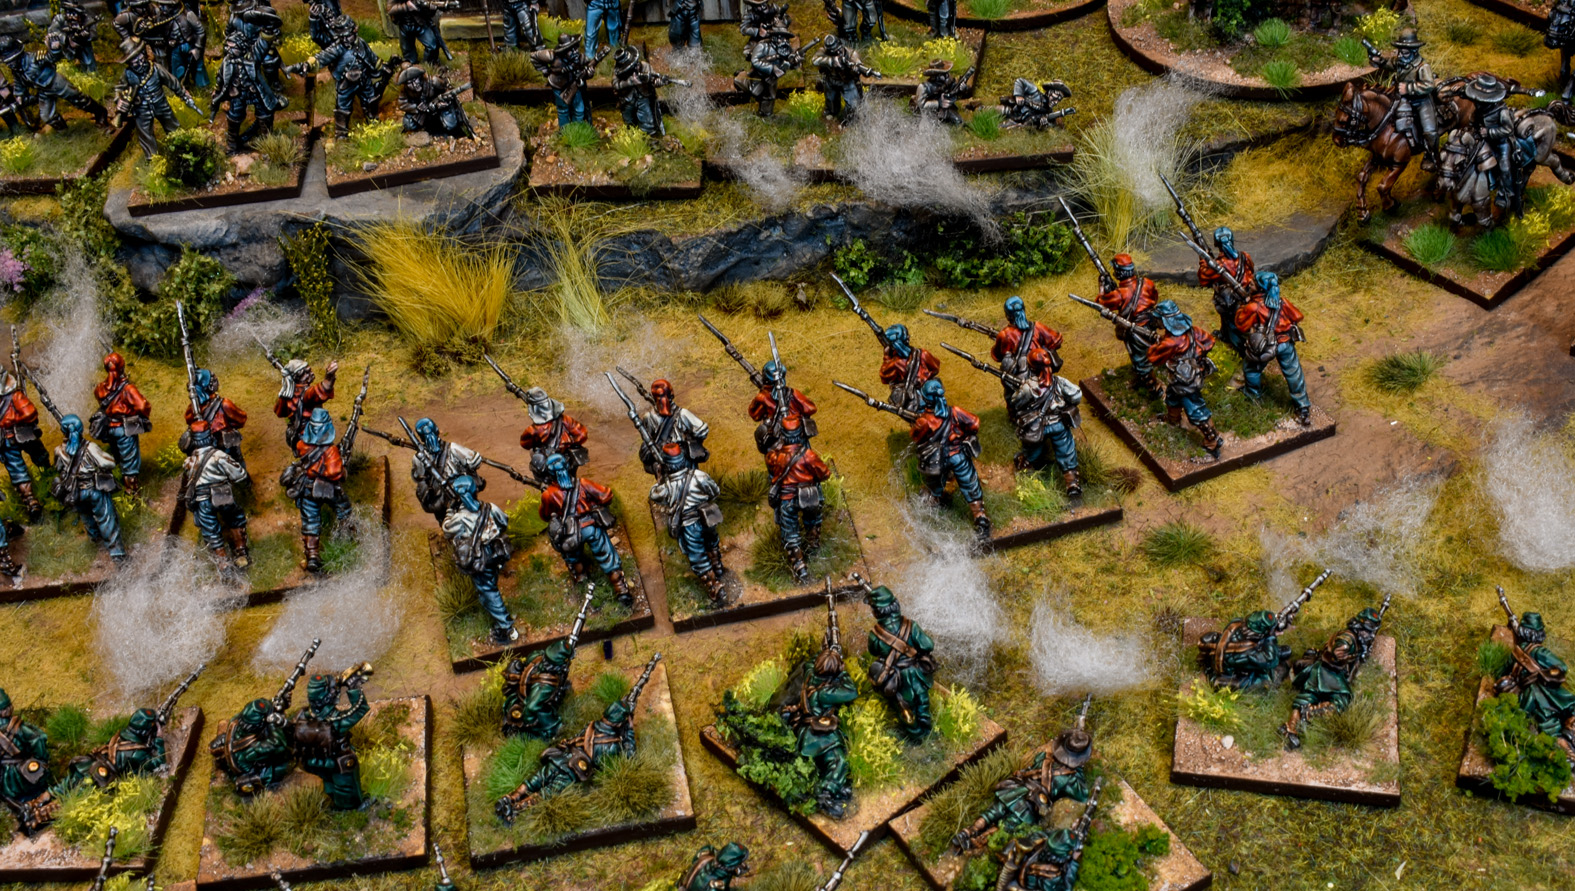


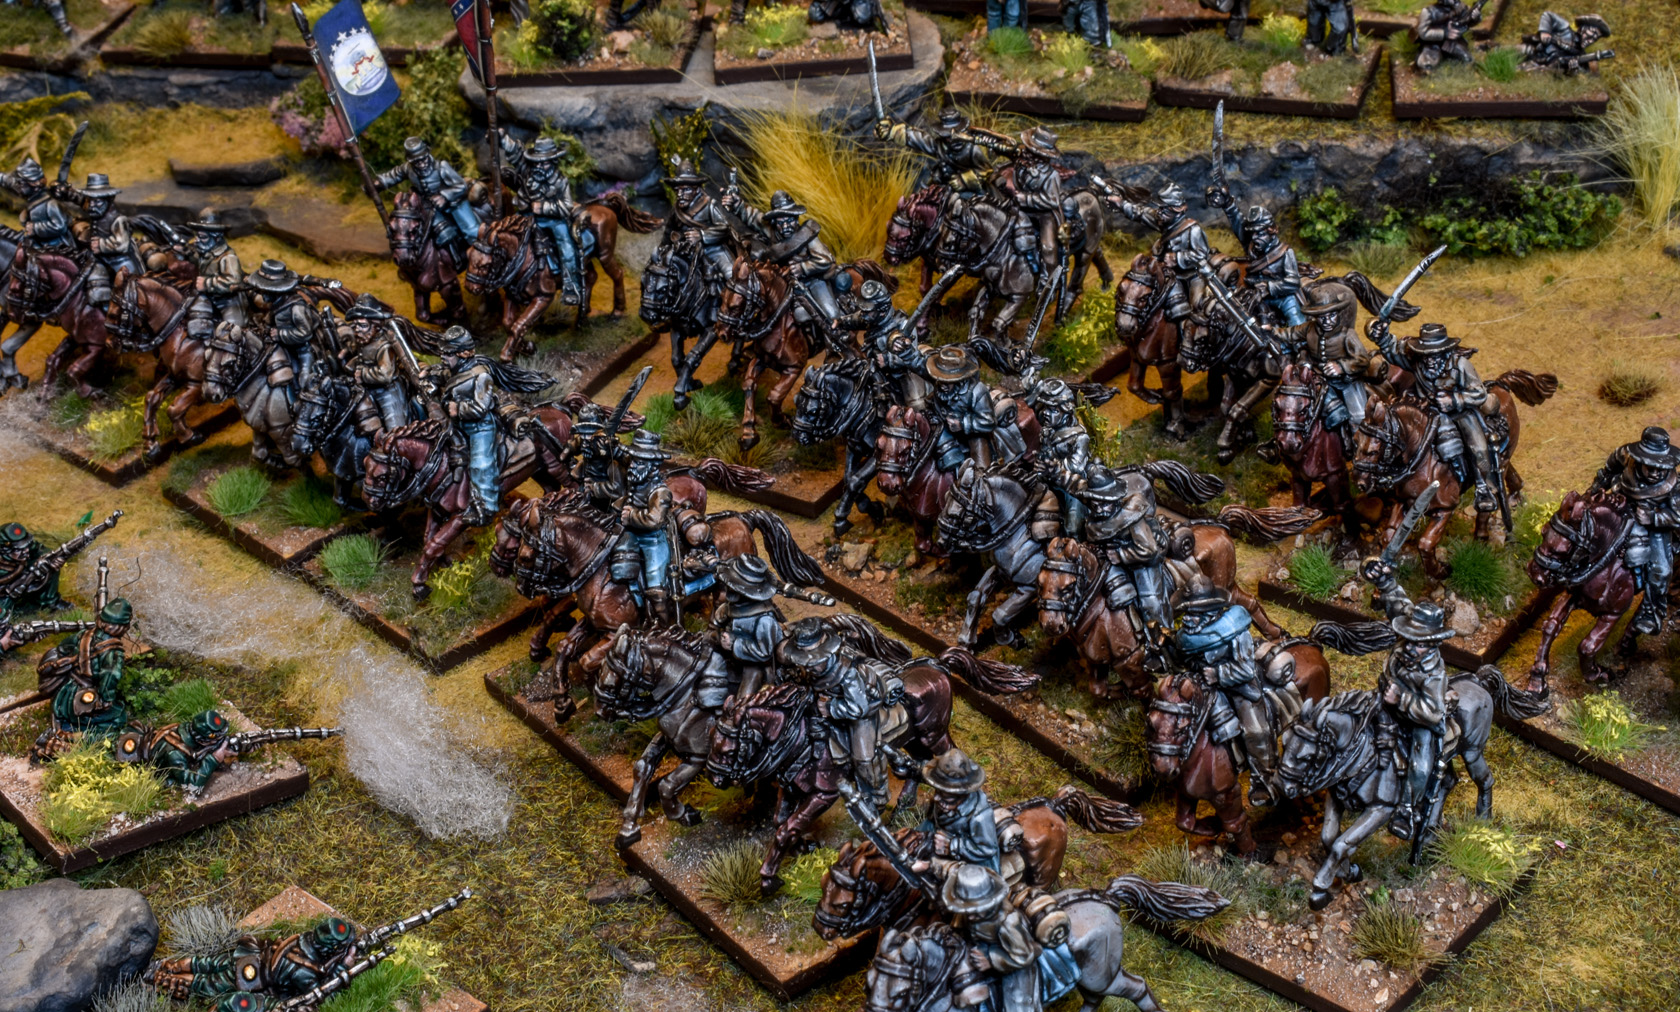


%20my%20small%20share%20of%20books%20from%20biography%20to%20battle%20dissection.%20So%20it%20is%20very%20interesting%20to%20me,%20and%20this%20army%20has%20a%20great%20deal%20of%20individual%20units%20which%20are%20themselves%20research%20dives%20I%20am%20enjoying.%3C/div%3E%3Cdiv%3E%3Cbr%20/%3E%3C/div%3E%3Cdiv%3EIf%20you%20have%20been%20around%20since%20the%20ancient%20times,%20you%20might%20remember%20I%20have%20done%20a%20couple%20of%20Empire%20Fantasy%20armies%20in%20similar%20fashion.%26nbsp;%20There%20has%20always%20been%20something%20about%20historicals%20that%20tickles%20something%20in%20my%20brain.%26nbsp;%20Back%20then%20being%20primarily%20a%20Fantasy%20player,%20I%20got%20my%20fix%20through%20Empire,%20making%20armies%20unit%20by%20unit,%20researching%20official%20lore%20and%20referencing%20colors%20and%20iconography.%26nbsp;%20It%20was%20fun.%26nbsp;%20Now%20though,%20I%20get%20to%20do%20it%20for%20real,%20and%20it%20is%20hard%20to%20convey%20how%20excited%20I%20am%20for%20this%20project.%20So,%20it%20feels%20right%20to%20blog%20this%20out%20as%20I%20did%20those%20old%20Empire%20armies,%20and%20maybe%20some%20of%20you%20will%20enjoy%20it.%26nbsp;%26nbsp;%3C/div%3E%3Cdiv%3E%3Cbr%20/%3E%3C/div%3E%3Cdiv%3E%3Ca%20href%3D%22https://blogger.googleusercontent.com/img/b/R29vZ2xl/AVvXsEiLiPJOL-ga9QuC2jS0VdEGW0GADv6imUw2U5nwRW22tBF8fJMrAGcjdHEUwb3Xv9kZ--XNWo3U63ebyrJve2mr2vYCrgafeL3qtEOsV6ywLMK_lo5Km9sjGWfqJA5GpNHmaCKYssoYoUla-WNX80DB2KAiu7m-xnwoQPfdCHQO_CqZVCC1-16Amv7_/s1390/start.jpg%22%3E%3Cimg%20border%3D%220%22%20data-original-height%3D%22986%22%20data-original-width%3D%221390%22%20height%3D%22284%22%20src%3D%22https://blogger.googleusercontent.com/img/b/R29vZ2xl/AVvXsEiLiPJOL-ga9QuC2jS0VdEGW0GADv6imUw2U5nwRW22tBF8fJMrAGcjdHEUwb3Xv9kZ--XNWo3U63ebyrJve2mr2vYCrgafeL3qtEOsV6ywLMK_lo5Km9sjGWfqJA5GpNHmaCKYssoYoUla-WNX80DB2KAiu7m-xnwoQPfdCHQO_CqZVCC1-16Amv7_/w400-h284/start.jpg%22%20width%3D%22400%22%20/%3E%3C/a%3E%3C/div%3E%3Ci%3E%3Cdiv%3E%3Ci%3EEach%20baggie%20is%20a%20sorted%20unit.%26nbsp;%20Each%20one%20ranges%20from%2036%20for%20special%20specific%20units,%20to%20the%20hundreds.%26nbsp;%20Also,%20I%20am%20going%20to%20need%20a%20bigger%20display...%3C/i%3E%3C/div%3E%3Cdiv%3E%3Ci%3E%3Cbr%20/%3E%3C/i%3E%3C/div%3E%3C/i%3E%3Cp%3EFirst,%20I%20will%20warm%20up%20with%20some%20smaller%20specialty%20units.%26nbsp;%20Zouaves,%20Berdan%201st%20sharpshooters,%20and%20something%20or%20two%20for%20the%20Confederates,%20have%20not%20decided.%26nbsp;%20Feels%20right%20to%20get%20going%20on%20something%20smaller,%20before%20I%20dive%20into%20the%20pool%20of%20hundreds%20of%20rank%20and%20file%20of%20each%20side.%26nbsp;%20Plenty%20to%20look%20forward%20to%20though.%3C/p%3E%3Cp%3EOne%20last%20reason%20for%20this%20on%20a%20sentimental%20note%20-%20the%20Samurai%20I%20did%20a%20while%20back%20are%20the%20army%20I%20was%20on%20when%20the%20house%20burned.%26nbsp;%20This%20army,%20which%20I%20hope%20to%20be%20photographing%20in%20the%20new%20place%20as%20both%20are%20finished,%20will%20see%20me%20out.%26nbsp;%20I%20enjoy%20that,%20and%20while%20the%20Samurai%20were%20very%20special%20to%20me%20for%20being%20my%20first%20historicals%20project%20and%20a%20treat%20to%20work%20on%20and%20research,%20this%20will%20only%20top%20all%20that%20excitement%20with%20added%20celebration.%26nbsp;%20Seems%20fitting%20and%20one%20might%20say%20fate.%26nbsp;%26nbsp;%3C/p%3E%3Cp%3EBut%20let's%20stop%20yapping%20and%20get%20to%20work.%26nbsp;%20See%20you%20next%20time%20with%20some%20finished%20units%20and%20a%20little%20history.%26nbsp;%3C/p%3E%3Cp%3E%3C/p%3E)