Games Day 2010 Pics 22 Aug 2010 7:00 AM (14 years ago)
![]() Well, I hadn't planned to go to Games Day 2010, but I happened to win a ticket. Many thanks to Shelexie over at Wanna B Painter. At first I was going to give it to my son go so he could go with his friends, but I decided to go along. It was my first Games Day, and I'm glad I went along. It was a great experience. Next year's Games Day is in Chicago. I imagine that Games Day 2012 will be in Los Angeles. So it will be a while before I get another chance.
Well, I hadn't planned to go to Games Day 2010, but I happened to win a ticket. Many thanks to Shelexie over at Wanna B Painter. At first I was going to give it to my son go so he could go with his friends, but I decided to go along. It was my first Games Day, and I'm glad I went along. It was a great experience. Next year's Games Day is in Chicago. I imagine that Games Day 2012 will be in Los Angeles. So it will be a while before I get another chance.
Below are some pictures I took. First some generic photos.
Waiting for the doors to open:![]()
A very large Space Marine:![]()
A Witch Hunter:
A Space Marine, the winner of the costume contest:
A Space Ork, not sure if this was an official costume or not: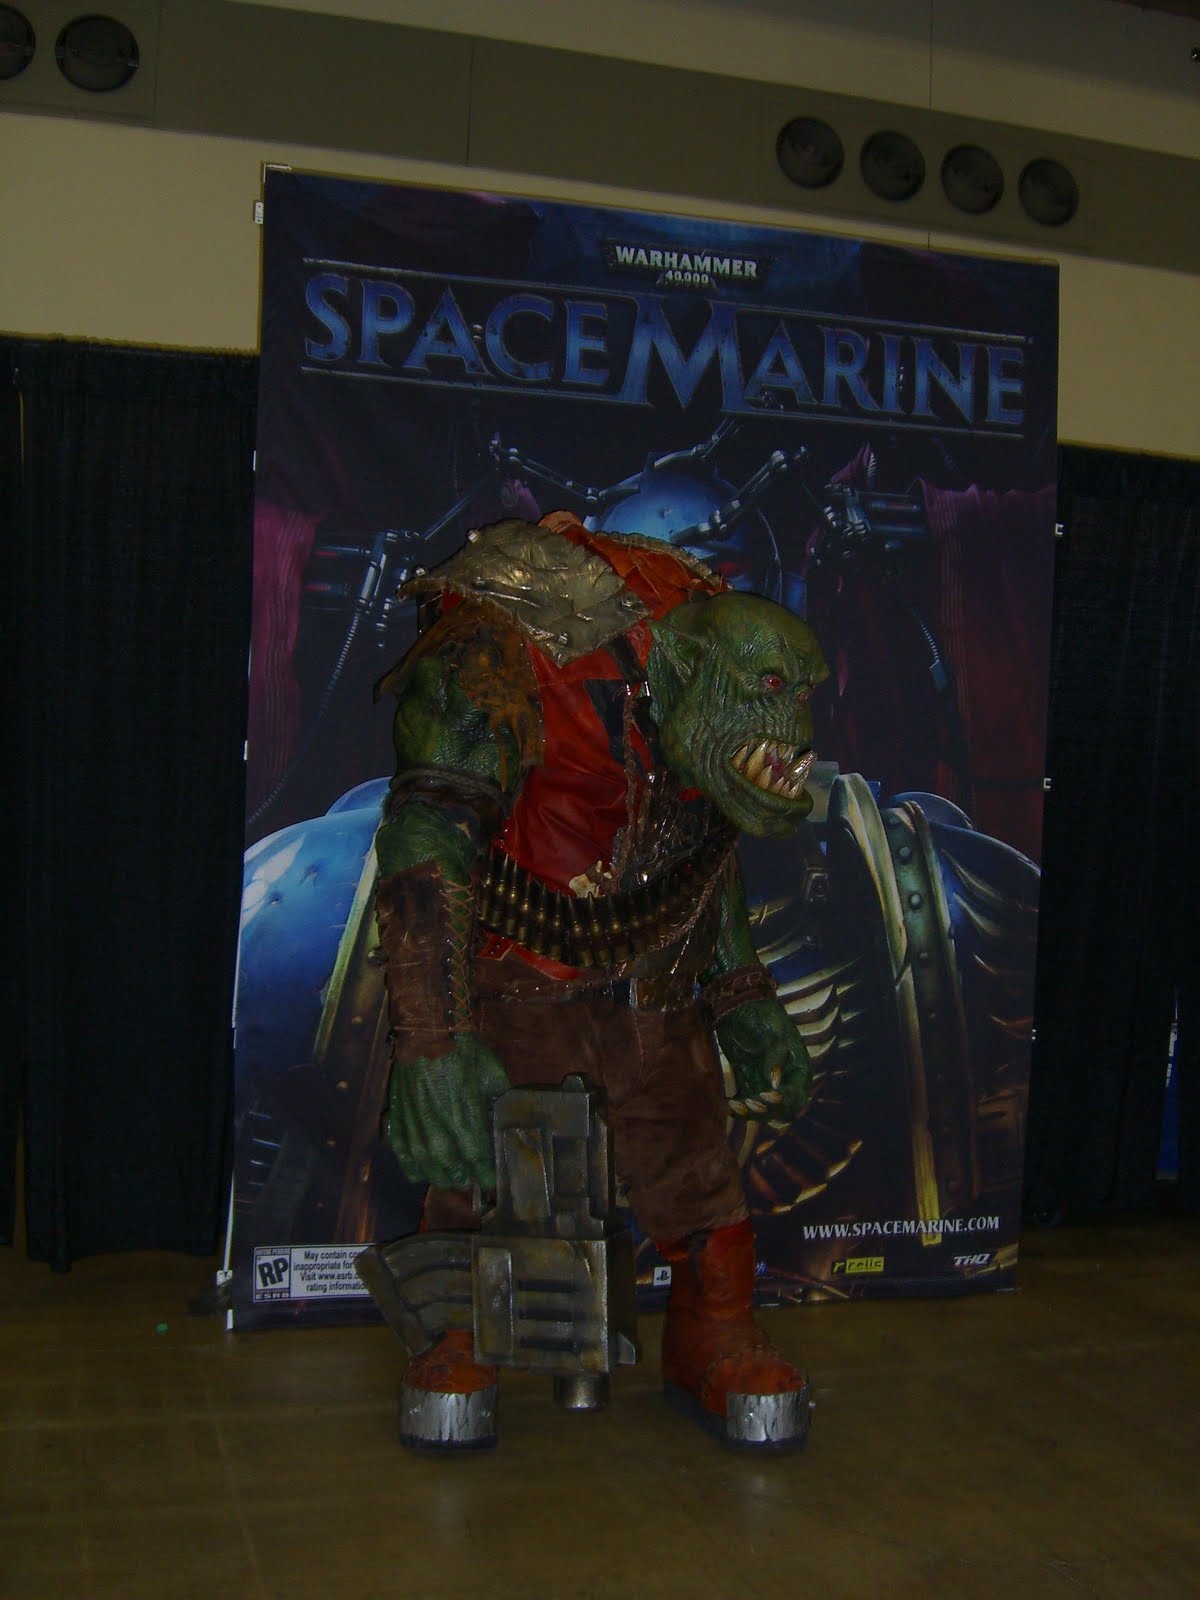 Regrettably, my camera was not doing too well in the hall, so many of the pictures I took didn't turn out very well. This was especially true at the Forge World display. I did however have decent luck at the Golden Daemons display. I couldn't get them all, as the glass cases were unkind to my flash. I'm pretty sure I have these right
First up is the LotR Golden Daemon:
This the the Young Blood winner:
40k 1st place vehicle:
40k second place vehicle:
40k third place vehicle: 
40k first place squad:
40k second place squad:
40k third place squad:
40k Large Monster and Slayer Sword winning entry:

Land Raider WIP 8 Aug 2010 7:00 AM (14 years ago)
![]()
 The next item on my Grey Knights list is a Land Raider. Frankly, I've wanted to build one of these for a while, and could hardly wait to get started. Painting the Dreadnought had to wait!
There's quite a few folks out there who, despite the fact the inside a vehicle/aircraft will seldom be seen, feel the need to paint it. This despite my paint pot procrastinating tendancies. Probably for the same reason the folks at GW put some time into detailing the inside. The Land Raider kit has nice detail, and I looked at it as a chance to play around with ideas. The top picture is the engine compartment and a control panel. My favorite part is the brass fittings, which are done using a Tin Bitz base over light grey primer, overcoated with Burnished Gold and a Badab Black wash. The skull and gear icon was my first attempt at mirroring colors. I like the way it looks, and was looking for an excuse to try it.
Next is a picture of the sides. Here was an experiment in yellow using VMC Light Yellow and Gryphonne Sepia wash. I'm wondering if I got a bad batch of Gryphonne Sepia, as it comes out of the pot looking orangish. I imagined it as something much more yellow. Also here is a failed experiment with highlighting the edges, probably not going to use that much again. I do have some Forgeword Grey Knight doors for this. I got the Land Raider, including the doors, in a good deal on Ebay, still much cheaper than what a Land Raider would cost in a store. Timing is everything. Here is the inside of the front, top hatch. Very happy with the colors, and am actually looking forward to having some red on the outside as well. After looking at this picture, I touch up some spots I had missed. May have to take pictures of everything from now on...
 An odd part about the side doors is that they were too small. I'm not sure if that is the case with all FW Land Raider doors. If I had bought these direct from FW, I would have called about the problem. One bad thing about buying second hand, you can't take advantage of FW customer service. It's a relatively easy fix. I glued thin strips of plasticard around the outside, filed away any overlap, so it should be unnoticable after a good priming. Fix is on the left here, next to the other door still needing to be done.

Poseable Action Dreadnought 5 Aug 2010 7:00 AM (14 years ago)
![]()
 I found another fun thing to do with magnets. I honestly don't know what inspired me for this particular magnet idea. Perhaps I was just looking for a way to paint pot procrastinate. Perhaps I just had magnets on my mind. Regardless, I thought I'd share the fun.
I started putting together a Dreadnought for my growing Grey Knight army.  I got a great deal on an unfinished standard Dread and some extra arms (see my last two posts about arms). As I was putting it together, I noticed there was enough gap in the waste to place a magnet or two. Since the magnets would have to reach through two thick plastic sections, I wasn't sure how many I'd need. So, I just put one of every size round one I had.
 In order to make this work, I figured the other magnet needed to be loose inside the sarcophagus. The only issue I had was trying to use small magnets. There are two metal pins in my dread. One holding on the head, and one the smoke launchers. Every small magnet I used would stick to one of these pins. It would stick so well I'd have to shake it loose every time, which I didn't want to do. So, I tossed in a big square magnet leftover from a batch bought for some long forgotten project. While it still sticks to the pins when the dread top is not touching the bottom, the pull between to two magnets is strong enough to pull them together when they're close enough.
The actual design does limit its "poseability," but it was still a fun experiment with magnets. Another advantage, given all the nooks and crannies of the legs, is that it will be easier to paint in two sections.  This is why the leg armor isn't attached yet. Well, I actually had them on and realized I wouldn't be able to paint behind them very well. They'll be added later. The armor is from the Dark Angels sprue, with a poor attempt at a GS book.
The front of the sarcophagus actually keeps it from spinning all the way around. With the magnets though, it can easily be made to look backward, should something attack from behind. Here's some views of the "poseable" range.
Right:
Left:
Up:
Down:
Another Dreadnought Arm Conversion 4 Aug 2010 10:00 AM (14 years ago)
![]()
 So, of all the extra Dreadnought arms I had, one of my favorite weapons was missing; the plasma cannon. I had a SM Devastator plasma cannon left from a previous bitz buy. I've had success converting one to use on a Sentinel, so it made perfect sense to use it here. This is the finished product.
 I started with an extra Assault on Black Reach Multi-Melta arm like this one. First thing to do is cut off the front weapon parts and the cables underneath. I also decided to remove the fuel canister tips from the back end.
 I had to add a bit of plastic to the bottom cutout, as I hadn't accounted for the part where the wires enter the backpack. I cut the backpack part to fit in the bottom cutout, figured out how to make the original large cable fit the gap, and used a piece of electrical wire to replace the original smaller cable. I also added a few bits to break up the flatness of the back.

Dreadnought Arm Modification 27 Jul 2010 7:00 AM (14 years ago)
![]()
 I had picked up a standard Dreadnought and a set of extra arms, which included several from the Assault on Black Reach set. My plan is to have several arm options. Breaking from my magnet preference, I decided friction was enough to hold the arms in place during games. Like many Dreadnought makers before me, I also found the AoBR arm holes were smaller than the standard Dreadnought kit. Some converting is required to make them work.
A quick look through my tool box found that a 3/16" drill bit was the proper size for the standard Dreadnought. I didn't feel the plastic around the current AoBR hole would stand the strain of drilling, let alone attaching and reattaching for game play and storage. However, with a bit of reinforcement, it should work out alright. I used sprue bits, cut to size and glued in place, as shown in the first picture. I used more than enough glue, to help fill in the gaps between sprue and the existing attachment hole. Once the glue dried, I took the 3/16" inch drill and bored the bigger hole. I was concerned with using a power drill on this work, so actually used the drill bit like you would a Hobby Drill. In other words, I simply held it in place with my hand, and spun it with my fingers to drill the hole larger. It took a bit of wrangling that way, but I was happy with the results.
 I took a cue from John over at Santa Cruz Warhammer and decided to 'plate off" the inside of the arm so you can't see the sprue bits. It gives a cleaner look, and is similar to the way the standard Dreadnought arms come on their sprue. Using a pencil, I traced the outline on a piece of thin plasticard, cut it with a knife, and dry-fitted it in place. Before I glued the plasticard on, I used a standard hole punch to make the hole in the plasticard, roughly estimating the location. Once glued in place, I then cut and filed the excess and beveled the edge.

My First Forgeworld Order 10 Jul 2010 7:00 AM (14 years ago)
![]() So, I won a gift card at work last month, and decided to indulge in a bit of Forgeworld goodness. I had a lot of stuff in my wish list, and it was tough narrowing it down to my limit. Given I've started putting together a small force of Grey Knights, I decided to focus on that for my first purchase. I want to say it was a good first experience, as they had it shipped the day after I ordered it, and it was to my house in Virginia, USA 10 days later. All except one were perfect casts, and that one had only minor warping. I've read many complaints about poor casts and long delays with Forgeworld orders. I've no complaints here, except for discovering someone on the Internet is wrong!
So, I won a gift card at work last month, and decided to indulge in a bit of Forgeworld goodness. I had a lot of stuff in my wish list, and it was tough narrowing it down to my limit. Given I've started putting together a small force of Grey Knights, I decided to focus on that for my first purchase. I want to say it was a good first experience, as they had it shipped the day after I ordered it, and it was to my house in Virginia, USA 10 days later. All except one were perfect casts, and that one had only minor warping. I've read many complaints about poor casts and long delays with Forgeworld orders. I've no complaints here, except for discovering someone on the Internet is wrong! First on my list was a set of etched brass Inquisition/Grey Knight emblems. I blame Karitas for making me want these, as I saw him use them on his AoBR to GK Terminator conversion post. Before that, I had thought them a luxury, but now consider this a must have for Grey Knight conversions. While I could create some of these with GS, the detail on this small piece of brass is great and will definitely save me some time. For information, I'm planning on a GK Dreadnought, a Land Raider, and converting some plastic Terminators. This will come in very handy!
 Though I like the look of the Forgeworld Dreadnought arms, I wanted to try converting some instead (in other words, I already have some extra arms). So, I moved on to stuff I'd need for the Land Raider. I really liked the look of the tank commander, so I picked up one of those. It comes in five main pieces, the body, the arms, right and left shoulder armor pads, and a head. They also throw in two purity seals. As usual with Forgeworld bits, they have great detail and I'm looking forward to putting them together. Price-wise, it's not much different than you'd pay for a similar specialized GW mini, so I consider it a decent purchase.
 Next up is the Psycannon upgrade for the Land Raider. I didn't think this was something I wanted to convert, so I decided to buy it. I do plan to try a psycannon dreadnought arm conversion, so this will be used to scale that as well. As you can see, there are three unique pieces: right and left psycannons, and a targeter. Frankly, I expected it to come with the mounting bits, and was disappointed when I found it did not. One more thing to add to my magnetizing "to-do" list.
 Last up is a set of Aircraft Punisher Cannons. Now I know these aren't Grey Knight related, but I have a conversion in mind for this and did an impulse buy. Here was the lone bad spot in the order, as one of the barrels is slightly warped. Even though I have no experience with fixing resin pieces, this should be a simple fix. This set contains a lot of repeat pieces. The two cannons are identical, the two magazines are identical, of course the wing mounts are identical, and the two ammo belts were cast as one piece but are the same.
My plan is to make a turret, mount the cannons and magazines over-under, and have it count as a Hydra. I blame credit Admiral Drax for this conversion idea, as he suggested something similar on Col. Corbane's post about Kitbashing a Hydra. The only trouble so far is, all the turret ideas I had are too small to accommodate a cannon and magazine set up. Actually, I was concerned with this before I ordered it. It will be a couple months before I get to it, so have plenty of time to figure out how to make it happen. Other options I'm considering are Admiral Drax's Hydra turret, or buying a Forgeword Manticore Conversion kit and magnetizing it for both versions. Suggestions are welcome.
More Grey Knights 9 Jul 2010 7:00 AM (14 years ago)
![]()
 Since I posted about a Nemesis Force Weapon Scratch Build, I've seen some posts about converting AoBR Termies into Grey Knight Termies. Now I'm not ready for that conversion yet, but I did have a regular Grey Knight in power armor that needed a NFW. In my earlier scratch build post, I started with a force halberd pole and handguard, and only needed the blade. With this figure, I was missing the whole arm. I figured if you can convert a CC arm from a regular Terminator to a GK Terminator, I should be able to do it for a regular Grey Knight. I just followed other examples of this type of conversion, like USABOB's over on Astronomicon. Here is my finished result.
Simple assembly, using the following parts:
Metal Grey Knight body on 25mm base;
One Space Wolf Hammer (regular, not Terminator);
Straight pin (you can see the pin head at the halberd base);
Space Marine shoulder pad;
Plastic tube;
Space Wolf Terminator Sword (I would have used a SM Scout combat knife, if I'd had one). Speaking of Grey Knight Terminators, here's a WIP of a squad I'm currently working on. I usually primer my figures in white or light grey, but these came to me primered black. Rather than strip 'em, I decided to try the ol' Citadel how-to painting technique. These will be painted in the standard Grey Knight scheme found in the Daemon Hunters Codex. So far, I've got the Boltgun Metal layer on all, and one has a layer of CeramCoat Metalic Silver (from Michaels, a local craft store). After I took the picture, I coated the other four figs with the CeramCoat Silver.
;%3Cbr%20/%3EStraight%20pin%20(you%20can%20see%20the%20pin%20head%20at%20the%20halberd%20base);%3Cbr%20/%3ESpace%20Marine%20shoulder%20pad;%3Cbr%20/%3EPlastic%20tube;%3Cbr%20/%3ESpace%20Wolf%20Terminator%20Sword%20(I%20would%20have%20used%20a%20SM%20Scout%20combat%20knife,%20if%20I'd%20had%20one).%3Cbr%20/%3E%3Cbr%20/%3E%3Ca%20href%3D%22https://blogger.googleusercontent.com/img/b/R29vZ2xl/AVvXsEiQFfUzSsWAdCRZwTvBaHsCWM0bPHsTKbZVD3o3l3mqvO7mKeB-PYqrDn6IDvnyGQbjFozs6usEA85fPzkHkDIExSGvKNHrgamzo_X-iLZjTOEc-GlbweuyizPHx6pmPKSVcDDWUARbWeTN/s1600/IMG_2066.JPG%22%3E%3Cimg%20style%3D%22MARGIN:%200px%200px%2010px%2010px;%20WIDTH:%20200px;%20FLOAT:%20right;%20HEIGHT:%20110px;%20CURSOR:%20hand%22%20id%3D%22BLOGGER_PHOTO_ID_5491222851960555058%22%20border%3D%220%22%20alt%3D%22%22%20src%3D%22https://blogger.googleusercontent.com/img/b/R29vZ2xl/AVvXsEiQFfUzSsWAdCRZwTvBaHsCWM0bPHsTKbZVD3o3l3mqvO7mKeB-PYqrDn6IDvnyGQbjFozs6usEA85fPzkHkDIExSGvKNHrgamzo_X-iLZjTOEc-GlbweuyizPHx6pmPKSVcDDWUARbWeTN/s200/IMG_2066.JPG%22%20/%3E%3C/a%3ESpeaking%20of%20Grey%20Knight%20Terminators,%20here's%20a%20WIP%20of%20a%20squad%20I'm%20currently%20working%20on.%20I%20usually%20primer%20my%20figures%20in%20white%20or%20light%20grey,%20but%20these%20came%20to%20me%20primered%20black.%20Rather%20than%20strip%20'em,%20I%20decided%20to%20try%20the%20ol'%20Citadel%20how-to%20painting%20technique.%20These%20will%20be%20painted%20in%20the%20standard%20Grey%20Knight%20scheme%20found%20in%20the%20Daemon%20Hunters%20Codex.%20So%20far,%20I've%20got%20the%20Boltgun%20Metal%20layer%20on%20all,%20and%20one%20has%20a%20layer%20of%20CeramCoat%20Metalic%20Silver%20(from%20Michaels,%20a%20local%20craft%20store).%20After%20I%20took%20the%20picture,%20I%20coated%20the%20other%20four%20figs%20with%20the%20CeramCoat%20Silver.)
Finished Veterans 8 Jul 2010 7:00 AM (14 years ago)
![]()
 Here is the group shot of my latest squad of veterans. There’s an extra three here in case I want to try some different weapons options. It’s been a few months since I posted the WIP for these vets. Actually, they’re made up of a few WIP posts. For the bases, I used the cobble stone pattern from my Holiday Basing Ideas post. When painting the bases, I used Ron, From the Warp, Saikowski’s Bloodthirster basing technique which I also used for my Skulltaker. The heads are from my review of the GW Heads Sprue. The plasma guns are my standard conversion. Finally, all the WIPs and techniques have come together and they’re ready for the table.
I'm not sure I'm happy with how the cobblestones worked out. The technique is really designed to simulate marble floors, but I thought it might work here. I'll have to search for methods for painting cobblestones, or come up with another way to do them. I don't plan to rebase these, but will likely try something else next batch.
The colorful backdrop is the tiles I use for painting. They're in need of a clean up, which is as simple as scraping the old paint off using a hard plastic scraper. I know I should use a wet palette, but when I tried a homemade version, I wasn't impressed. When I get to the point I'm using up too much paint, I'll change the name of my blog and try again.
Cheers!

This week's challenge 2 Jun 2010 7:00 AM (15 years ago)
![]()
 Only a couple figures to show this week. Up top is a priest with an eviscerator. Got this one in an ebay auction with a bunch of other bits. My son took him to battle last Saturday, within the first few days we had him, and he personally took out a Land Raider in four turns, don't ask me how. I do know he had a squad of IG there to absorb damage. My son came home and said he deserved to be painted right away, so he went to the top of the list. He had been primed rather badly, and in black which I'm not used to painting over. But, I scraped away the thicker stuff and painted him up. I'm right happy with the monk's robe look. I'll call my experiment in brown a success for now. I could never get the skin painted up right and it looks rather ghoulish now. This will cause me to rethink painting another bald guy for quite some time. It also taught me to always strip a primed second hand mini, as some detail is lost and there's some nasty cracks in some places.
 The second piece was actually finished up right before the eviscerator priest. It is a conversion from and I-Kore Militia Leader, meant to be a Callidus Assassin. She's about 1/6th GW, as her right arm is actually an Eldar Pilot's arm, with a guardsman pistol hand. The Neural Shredder is a complete conversion, made from a jewel type bead, a bit of sprue, a Tau Firewarrior foot, and some GS to tie them all together. I wasn't sure about it before it was painted up, but I like the finished look. The pads on her upper sleeves are green stuff, meant to match her existing knee pads. I figured she looked roughly American Indian , so tried for that skin tone. Again, not too happy with the face, but the right hand gives me hope that some day I shall be able to do skin well. Now, if only I can remember how I did that...
Now it's back to painting the headless veterans waiting in the wings.

Magnetizing a Rhino / Predator 25 May 2010 7:00 AM (15 years ago)
![]()


Friend of my son needed help magnetizing a Predator. I've never built a Predator, may never have done one on my own, so this gave me a chance to give it a try. Not to mention, it was a great excuse to procrastinate instead of hitting the paint pots. Though much of what I did has been seen before, I thought I'd show how I did it. I already had magnets, mainly in sizes 1/16" x 1/16" and 1/8" x 1/8" cylinders, so I concentrated on using these. I actually came about having the 1/16" cylinder magnets by mistake, and often wondered what I was going to do with 500 of them. They've actually been quite useful.
 I started with the side sponsons, as I figured most of the work would be involved there. First I drilled out the normal attachment holes on both sides with a 1/8" bit, and glued in the magnets here. I used the 1/16" magnets on the sponson arm, as the arm's width wasn't wide enough for a 1/8" magnet. To ensure a good hold, I doubled up the 1/16" magnets on the arm, both side by side and lengthwise to fit in the arm. You can see the before and after pictures above.
 To the right is my method of attaching magnets. Once I glue the sponson arm magnet in place, I put a piece of wax paper over the magnet and let the weapon side magnet attach on, holding the wax paper in place. This way I can glue the next magnet and know it will line up perfectly. For gluing magnets, I often use a metal epoxy called JB Weld.
  It's magnetic so will surround the magnet as it cures giving a good hold. Wax paper is essential though, as you don't want it surrounding the magnet and bulking up any surfaces you want to keep flat.
Below are the finished pieces. Next up is the turret set up. This is very straight forward, as the pins on the weapon barrels are exactly 1/8", so no drilling on the turret is required. You do want to add some green stuff or glue sprue pieces inside the turret to keep the magnets from being pushed too far in when you glue them in place. For the weapon barrels, simply remove the pins and drill 1/8" holes. Important here to line up the magnets in the proper direction. I actually did not use the wax paper trick on this one and regretted it. I had not inserted the magnet far enough into the turret hole and had to pry it out because there wasn't enough room for the barrel piece to fit in.
 For the back of the turret, I used one magnet here. I've seen a lot of folks use two, and that's fine, but as long as you don't use too much paint between turret and box/power pack, one should to be strong enough. My magnets are N50s, which are almost the strongest magnets you can buy, so two may be better if weaker magnets are used.
 You can see here and above how I've added magnets to hold the hatches in. Another fairly straightforward magnet application. On the closed hatch and in the turret hole, a piece or two of sprue is required to build it up so the magnets meet at the right spot. I used the SM gunner as the basis for placing the magnet. I wasn't quite happy with the location, as it wasn't quite center. They still rotate, but I made the mistake of using the SM gunner when I lined up the magnets in the hull hatches, so the other fill-in bits don't marry up quite right. You can see what I mean in the Predator top shot, I hope. The right hull hatch hole is centered, so fits everything well. The left hull hatch hole is set back a bit. While the hatches work fine, the other fill in circular bits sit funny, as their magnet is centered. Minor annoyance. The bottom of the turret is what you see here. Filling the hole here is a piece of sprue with a magnet it in. It attaches to either of the two magnets seen on the sprue bits crossing the main hatch. While the hatches themselves have magnets on them to hold them in place, the turret top bit does not. The strength of the turret magnet holds the two sided top bit in place so you can use it either way. If I had the bits to make a Razorback turret, either of the three vehicles could be made from this set up.
 The side door and sponson parts are also magnetized. I couldn't figure out a standard way for a single set of magnets to hold both the door and the sponson, so I used different magnets for each. The sponson uses 1/8" magnets in a single location, while the doors use 1/16" in three places two at the top and one at the bottom (bottom not shown). I actually placed the bottom magnet after taking all these pictures because, as you can see in the rhino picture at the top of the page, the bottom of the door hung out. Once painted, the magnets will hardly be noticable.
 The back hatch uses 1/16" magnets at the upper corner of the door. The 1/16" magnets are perfect for these doors. They are small enough to fit in the narrow plastic part, and strong enough to hold the lightweight doors in place, but not so strong that you have to struggle to open them. The only bad part is there is little room for error; you need to be careful where you drill.
Nemesis Force Blade Scratch Build 3 May 2010 9:05 AM (15 years ago)
![]()
 So as I mentioned in my last post, I've been working on some Deamonhunter allies for my son's Imperial Guard force. I just heard a rumor that the "allies" part of Deamonhunters may disappear with the new codex. I'm hoping that's not the case, as I like the excuse to paint some of these figures up. They give me a good excuse to break from painting up Imperial Guard. What you see in the first picture is the latest addition to the group, namely a standard Grey Knight with Nemesis Halberd. The difference here is that the figure was received second hand and lacked the fighting end of the halberd, so I had to recreate it.
I regret that sometimes, like this time, I get wrapped up in the conversion and I don't think of taking WIP shots until it's too late. I hope with this one though, a picture and explanation may be enough. So in the close-up picture above I've broken down the parts.
I started with the blade, which is simply two pieces of plasticard glued together. You could use a thick piece of plasticard, but I didn't have that. The important thing here is that it has to be thick enough for drilling pinning holes. You need pinning holes for the spikey bit on top, and for attaching to the halberd pole. I used a stock Halberd for sizing up the blade.
Once the blade is finished, shape the edge and build up the pieces at the base of the blade. The spikey bit on top is made from a piece of sprue filed down and pinned with a nail brad. A nail brad is stronger than a paper clip, and strength is needed here. It is also thicker, so some caution is needed so you don't split out the side while you are drilling. The spikey part on the bottom is not a separate piece, but file down after building up with very thin pieces of plasticard on the halberd base. Another piece of sprue is used to make the transition from blade to hand guard. The handguard is simple a thick piece of plasticard. Not seen in the picture, underneath where the purity seal goes (purity seal fell off for the pic), is a round transition piece. In my case, I used a piece of copper wire wrapped around the pin, but a hollow rod could just as easily work. Copper wire from old phone cord is used for the power line. Here is a side by side comparison picture. This is not the blade I used for sizing up my scratch built blade. The figure was chosen for its more similar pose. There are four different halberds, and I evidently chose the largest size when I sized mine.
,%20is%20a%20round%20transition%20piece.%20In%20my%20case,%20I%20used%20a%20piece%20of%20copper%20wire%20wrapped%20around%20the%20pin,%20but%20a%20hollow%20rod%20could%20just%20as%20easily%20work.%20Copper%20wire%20from%20old%20phone%20cord%20is%20used%20for%20the%20power%20line.%3Cbr%20/%3E%3Cbr%20/%3E%3Ca%20href%3D%22https://blogger.googleusercontent.com/img/b/R29vZ2xl/AVvXsEhyGw1Pl9lq6AzuWMyQBmOEYnXZ9Gb8NDOrJw6QdBa5pMvyUY5mwjlxlzQibTMSk9E8-ASY45me4-JRs5mg5VfdtoUnyGhHLQevC10uAol823X4ayMNc9Y5Hdt9LRMgLcpX499hFEBGXyWA/s1600/GKL.jpg%22%3E%3C/a%3E%3Ca%20href%3D%22https://blogger.googleusercontent.com/img/b/R29vZ2xl/AVvXsEh-Wm2h13rGto9H8rAm7vQbD197ddBtE90A-X2FmGxpSA6D4LNQzE2opxN8zzZKgoS51ZuRj-4PeP1to9fVwFXOuvk9Hy8FdZ4PqvRM1bc5n5cE2raP6_JOqNFVqPpol61d8AEIMtG7Zecc/s1600/IMG_1670.JPG%22%3E%3Cimg%20style%3D%22MARGIN:%200px%200px%2010px%2010px;%20WIDTH:%20200px;%20FLOAT:%20right;%20HEIGHT:%20150px;%20CURSOR:%20hand%22%20id%3D%22BLOGGER_PHOTO_ID_5465762560439295298%22%20border%3D%220%22%20alt%3D%22%22%20src%3D%22https://blogger.googleusercontent.com/img/b/R29vZ2xl/AVvXsEh-Wm2h13rGto9H8rAm7vQbD197ddBtE90A-X2FmGxpSA6D4LNQzE2opxN8zzZKgoS51ZuRj-4PeP1to9fVwFXOuvk9Hy8FdZ4PqvRM1bc5n5cE2raP6_JOqNFVqPpol61d8AEIMtG7Zecc/s200/IMG_1670.JPG%22%20/%3E%3C/a%3EHere%20is%20a%20side%20by%20side%20comparison%20picture.%20This%20is%20not%20the%20blade%20I%20used%20for%20sizing%20up%20my%20scratch%20built%20blade.%20The%20figure%20was%20chosen%20for%20its%20more%20similar%20pose.%20There%20are%20four%20different%20halberds,%20and%20I%20evidently%20chose%20the%20largest%20size%20when%20I%20sized%20mine.%3Cstrong%3E%3C/strong%3E)
Inquisitor Lord Solar Macharius 27 Apr 2010 9:00 AM (15 years ago)
![]()
 I've had a Solar Macharius mini sitting around in my box for some time. Recently, my son decided he needed Inquisitorial allies to add a little punch to his IG force. I found some Grey Knights which are coming along nicely but still currently Painting in Progress (PIP). He also wanted to have an Assassin, and I happened to have a figure that made a good Callidus stand-in. Trouble with adding assassins is, you need to have an Inquisitor Lord in order to field them. Out of the box came Solar Macharius.
Lord Macharius, a great looking mini, came to us as part of an E-Bay purchase made a while back.  He was poorly painted and became a victim in my how to strip minis experiments long ago. On that matter, I use Simple Green to start, for the really tough metal minis I use undiluted citrus cleaner. The citrus cleaner proved to soften plastics, and I never got around to trying it diluted. Regardless, Solar was put back together (minus the cape) and took on his new Inquisitor Lord responsibilities with gusto. A couple weeks ago, before I started Skulltaker, I decided he was ready for a fresh coat of paint. So the the workbench he went. The cape was painted separate from the mini, and glued on when all was finished.
 This is my most significant use of red, white, and gold on a mini so far. Not a bad experience, and I am actually more happy with the whites. I started with a light grey primer and the white turned out very easy. One thinned coat of white followed by a light grey wash in the crevices, then a heavy white dry brush. Gold is Shining Gold with a Gryphonne Sepia wash and a Burnished Gold dry brush. The red is Red Gore with a Baal Red wash. Not much to drybrush on the red, as there aren't significant red edges thanks to the gold trim. He's not been clear coated yet either, but that will definitely happen before the next game. The right toe sticks out from the base enough to be a problem with the paint rubbing off.
 I am impressed with the level of detail on many of GW's old metal minis, and this is no exception. My only issue with the mini is the huge hands. Also, either the face lacks detail, or I was just unable to pull it out with my painting technique. I know I applied more paint than I would have liked trying to make it look good, and admit I need more practice there. I was talking to a guy at my FLGS who had invested quite a bit in Forgeworld DKOK. A comment he made that stuck with me was that he enjoyed painting them because their faces were mostly covered up and he hated painting faces. I'm not there yet, and still think practice will bring me around at some point.
 I think he makes a great Inquisitor Lord, so he'll be filling that role for quite some time. He has quite the impressive record on the table already, so far victorious over the forces of Chaos he's faced upon the field of battle.
.%20He%20also%20wanted%20to%20have%20an%20Assassin,%20and%20I%20happened%20to%20have%20a%20figure%20that%20made%20a%20good%20Callidus%20stand-in.%20Trouble%20with%20adding%20assassins%20is,%20you%20need%20to%20have%20an%20Inquisitor%20Lord%20in%20order%20to%20field%20them.%20Out%20of%20the%20box%20came%20Solar%20Macharius.%3Cbr%20/%3E%3Cbr%20/%3ELord%20Macharius,%20a%20great%20looking%20mini,%20came%20to%20us%20as%20part%20of%20an%20E-Bay%20purchase%20made%20a%20while%20back.%20%3Ca%20href%3D%22https://blogger.googleusercontent.com/img/b/R29vZ2xl/AVvXsEhRGFe6HIMTOLTAzuxlvC267cpABmRFZXvvVDM8Oid8Jv_2wWbgKNj1hHQLX2ENR7MC5qDKd6D3eweW93P1ojldRoEL-Fmk3TFl0fTlE90YoblMSZe850WD0KLhS-KMUEVBYHiUU8GM3Z1I/s1600/SM_BackQtr.jpg%22%3E%3Cimg%20style%3D%22MARGIN:%200px%200px%2010px%2010px;%20WIDTH:%20132px;%20FLOAT:%20right;%20HEIGHT:%20200px;%20CURSOR:%20hand%22%20id%3D%22BLOGGER_PHOTO_ID_5464785636913838850%22%20border%3D%220%22%20alt%3D%22%22%20src%3D%22https://blogger.googleusercontent.com/img/b/R29vZ2xl/AVvXsEhRGFe6HIMTOLTAzuxlvC267cpABmRFZXvvVDM8Oid8Jv_2wWbgKNj1hHQLX2ENR7MC5qDKd6D3eweW93P1ojldRoEL-Fmk3TFl0fTlE90YoblMSZe850WD0KLhS-KMUEVBYHiUU8GM3Z1I/s200/SM_BackQtr.jpg%22%20/%3E%3C/a%3EHe%20was%20poorly%20painted%20and%20became%20a%20victim%20in%20my%20how%20to%20strip%20minis%20experiments%20long%20ago.%20On%20that%20matter,%20I%20use%20Simple%20Green%20to%20start,%20for%20the%20really%20tough%20%3Cstrong%3Emetal%3C/strong%3E%20minis%20I%20use%20undiluted%20citrus%20cleaner.%20The%20citrus%20cleaner%20proved%20to%20soften%20plastics,%20and%20I%20never%20got%20around%20to%20trying%20it%20diluted.%20Regardless,%20Solar%20was%20put%20back%20together%20(minus%20the%20cape)%20and%20took%20on%20his%20new%20Inquisitor%20Lord%20responsibilities%20with%20gusto.%20A%20couple%20weeks%20ago,%20before%20I%20started%20Skulltaker,%20I%20decided%20he%20was%20ready%20for%20a%20fresh%20coat%20of%20paint.%20So%20the%20the%20workbench%20he%20went.%20The%20cape%20was%20painted%20separate%20from%20the%20mini,%20and%20glued%20on%20when%20all%20was%20finished.%3Cbr%20/%3E%3Cbr%20/%3E%3Ca%20href%3D%22https://blogger.googleusercontent.com/img/b/R29vZ2xl/AVvXsEjULeCB4mDGnoIGEkj6-bFy0yyWJAGVmqZkRxjdN8c9b9hdDt76vNBAzsiTIgjK7z8TtVERf49PyKaTeTX3cPHoyQATfQZCTpyuwo2fEzFExwV9OQsc5ZoGamGtfdycmhF8PxP2TrR4ZNmn/s1600/SM_Side.jpg%22%3E%3Cimg%20style%3D%22MARGIN:%200px%200px%2010px%2010px;%20WIDTH:%20172px;%20FLOAT:%20right;%20HEIGHT:%20200px;%20CURSOR:%20hand%22%20id%3D%22BLOGGER_PHOTO_ID_5464785657121119858%22%20border%3D%220%22%20alt%3D%22%22%20src%3D%22https://blogger.googleusercontent.com/img/b/R29vZ2xl/AVvXsEjULeCB4mDGnoIGEkj6-bFy0yyWJAGVmqZkRxjdN8c9b9hdDt76vNBAzsiTIgjK7z8TtVERf49PyKaTeTX3cPHoyQATfQZCTpyuwo2fEzFExwV9OQsc5ZoGamGtfdycmhF8PxP2TrR4ZNmn/s200/SM_Side.jpg%22%20/%3E%3C/a%3EThis%20is%20my%20most%20significant%20use%20of%20red,%20white,%20and%20gold%20on%20a%20mini%20so%20far.%20Not%20a%20bad%20experience,%20and%20I%20am%20actually%20more%20happy%20with%20the%20whites.%20I%20started%20with%20a%20light%20grey%20primer%20and%20the%20white%20turned%20out%20very%20easy.%20One%20thinned%20coat%20of%20white%20followed%20by%20a%20light%20grey%20wash%20in%20the%20crevices,%20then%20a%20heavy%20white%20dry%20brush.%20Gold%20is%20Shining%20Gold%20with%20a%20Gryphonne%20Sepia%20wash%20and%20a%20Burnished%20Gold%20dry%20brush.%20The%20red%20is%20Red%20Gore%20with%20a%20Baal%20Red%20wash.%20Not%20much%20to%20drybrush%20on%20the%20red,%20as%20there%20aren't%20significant%20red%20edges%20thanks%20to%20the%20gold%20trim.%20He's%20not%20been%20clear%20coated%20yet%20either,%20but%20that%20will%20definitely%20happen%20before%20the%20next%20game.%20The%20right%20toe%20sticks%20out%20from%20the%20base%20enough%20to%20be%20a%20problem%20with%20the%20paint%20rubbing%20off.%3Cbr%20/%3E%3Cbr%20/%3E%3Ca%20href%3D%22https://blogger.googleusercontent.com/img/b/R29vZ2xl/AVvXsEgrY-DsYhJhhaYH4t1KmbnYA8vY8ssoLfcFAo2MyD3RFWrakDeTjorcY0NqFySndiA993GE8NFm_G2ecs_9WXCDKINHXPlgDnhpqWAgKLiaEapN0fRnxzzwqF6gH1BL7kcXkQRq62oy9p1T/s1600/SM_FrontQtr.jpg%22%3E%3Cimg%20style%3D%22MARGIN:%200px%200px%2010px%2010px;%20WIDTH:%20148px;%20FLOAT:%20right;%20HEIGHT:%20200px;%20CURSOR:%20hand%22%20id%3D%22BLOGGER_PHOTO_ID_5464785652800866738%22%20border%3D%220%22%20alt%3D%22%22%20src%3D%22https://blogger.googleusercontent.com/img/b/R29vZ2xl/AVvXsEgrY-DsYhJhhaYH4t1KmbnYA8vY8ssoLfcFAo2MyD3RFWrakDeTjorcY0NqFySndiA993GE8NFm_G2ecs_9WXCDKINHXPlgDnhpqWAgKLiaEapN0fRnxzzwqF6gH1BL7kcXkQRq62oy9p1T/s200/SM_FrontQtr.jpg%22%20/%3E%3C/a%3EI%20am%20impressed%20with%20the%20level%20of%20detail%20on%20many%20of%20GW's%20old%20metal%20minis,%20and%20this%20is%20no%20exception.%20My%20only%20issue%20with%20the%20mini%20is%20the%20huge%20hands.%20Also,%20either%20the%20face%20lacks%20detail,%20or%20I%20was%20just%20unable%20to%20pull%20it%20out%20with%20my%20painting%20technique.%20I%20know%20I%20applied%20more%20paint%20than%20I%20would%20have%20liked%20trying%20to%20make%20it%20look%20good,%20and%20admit%20I%20need%20more%20practice%20there.%20I%20was%20talking%20to%20a%20guy%20at%20my%20FLGS%20who%20had%20invested%20quite%20a%20bit%20in%20Forgeworld%20DKOK.%20A%20comment%20he%20made%20that%20stuck%20with%20me%20was%20that%20he%20enjoyed%20painting%20them%20because%20their%20faces%20were%20mostly%20covered%20up%20and%20he%20hated%20painting%20faces.%20I'm%20not%20there%20yet,%20and%20still%20think%20practice%20will%20bring%20me%20around%20at%20some%20point.%3Cbr%20/%3E%3Cbr%20/%3E%3Ca%20href%3D%22https://blogger.googleusercontent.com/img/b/R29vZ2xl/AVvXsEiqGChrrxMY5bnFHzSE5zREwWT890SVCUelJ94tIsY4a-hs430G74YPLYGb1bWW1LFExKy8jmnJ-w74J1Y9FdZAB-5fIu5vkLMHlrNW0pwOz3WtybhCKU-BZNHF4-3jN-PZd9NzGvMOwNJJ/s1600/SM_Back.jpg%22%3E%3Cimg%20style%3D%22MARGIN:%200px%200px%2010px%2010px;%20WIDTH:%20147px;%20FLOAT:%20right;%20HEIGHT:%20200px;%20CURSOR:%20hand%22%20id%3D%22BLOGGER_PHOTO_ID_5464785629431243458%22%20border%3D%220%22%20alt%3D%22%22%20src%3D%22https://blogger.googleusercontent.com/img/b/R29vZ2xl/AVvXsEiqGChrrxMY5bnFHzSE5zREwWT890SVCUelJ94tIsY4a-hs430G74YPLYGb1bWW1LFExKy8jmnJ-w74J1Y9FdZAB-5fIu5vkLMHlrNW0pwOz3WtybhCKU-BZNHF4-3jN-PZd9NzGvMOwNJJ/s200/SM_Back.jpg%22%20/%3E%3C/a%3EI%20think%20he%20makes%20a%20great%20Inquisitor%20Lord,%20so%20he'll%20be%20filling%20that%20role%20for%20quite%20some%20time.%20He%20has%20quite%20the%20impressive%20record%20on%20the%20table%20already,%20so%20far%20victorious%20over%20the%20forces%20of%20Chaos%20he's%20faced%20upon%20the%20field%20of%20battle.)
Skulltaker 19 Apr 2010 8:01 AM (15 years ago)
![]()
 So, as some of you know, I enjoy building more than painting, and actually don't play though I do enjoy watching a game now and again. Getting a solid block of time where I could play would be a challenge. I build and paint an hour or two at a time, mainly in the evenings and never without interruption. My oldest son does like to play though, so most of my work does get time on the table. His birthday was a couple weeks ago, and there was food and fun for all.
 He and three of his friends were joined by my youngest and one of his friends for a 2v2v2 game. I don't think they finished the game, but the party was a success.
So now there are at least three birthday parties following his, one of which was yesterday, and all of them have or will involve playing Warhammer 40K. My son wanted to give one of his friends a painted figure, and asked me if I would paint one up. I said I would, providing I got to pick the figure. He agreed, and I chose Skulltaker. For the base, I borrowed the idea given by Ron over at ++ From the Warp ++. In his post on Bloodthirster base painting, step by step, he showed how he makes bases so they look like they have marble tile. I liked this, and decided to try it out for myself. About the only thing different I did was to not thin the washes as much as he recommended, and I followed up with a thin wash of Gryphonne Sepia toward the end of the painting to tie it all together. Also, painting Skulltaker was not completely done when I attached him to the base. I needed him attached to the base because I used the base to hold the model while I finished painting. You can see in this picture the rubbed-off primer on the sword, which is what I had been holding on to most to this point.
 Not having a lot of time to get it painted before the party, and not having much experience with painting red, I also decided to borrow the ideas of another blogger. In this case, I followed pretty closely the Painted Skulltaker tutorial posted by Master Darksol. I like the way he lays out his tutorials, which include a picture a most every step, including the paint used.
 The main difference in my effort was that I used light grey primer instead of black. Can't really tell in the finished product. Some other differences are from not having the recommended colors, so I substituted. I also combined a couple of the Heavy Devlan Mud wash steps. There was a point where my way of painting would have painted over a wash, then reapplied the same color wash, so I combined the two wash steps after painting the two areas. When I took these pictures, I noticed I had not done the eyes or teeth yet, and I forgot to take a picture of the finished piece.
Two great tutorials helped a lot here, with a resulting success. He received it yesterday, and was very happy with it.

Regimental Advisers 11 Mar 2010 7:00 AM (15 years ago)
![]()
 One of the few recent pieces I actually consider finished are these Regimental Advisers. My son wanted to try them out in a game, so we got a set and I painted them up. I liked the looks of the Master of Ordnance and Officer of the Fleet, but I wasn't sure about the Astropath. In the end, that was simple and the one I enjoyed painting the most. After applying white primer, I washed the outside of the cloak a couple times with GW Asurmen Blue, and highlighted with a Vallejo sky blue. The inside of the hood and the sleave cuffs are Bleached Bone with a wash of Gryphonne Sepia. The Astropath has had a sealer applied; I'll seal the other two this weekend.
Painting the medals and outer accouterments on the two officers was an interesting challenge, especially the white gloves. Between those and the uniform, I don't think I've painted that much white on a single mini before. To make things easier, I painted Master of Ordnance's backpack separately, gluing it on right before taking these pictures.

Vets WIP 10 Mar 2010 7:02 AM (15 years ago)
![]()
 Over the last couple months, I've kind of haphazardly been putting things together. One thing I did was to take the "roads" I showed in my Holiday Basing Ideas Post and use them with another vet squad I'm putting together. You can see the WIP here. One odd thing about using these Christmas Village roads is they are very pliable, not rigid like plasticard. While I could cut them with scissors, filing them smooth with the base edge wasn't as easy as I expected.
The squad was put together using SM scout legs, cadian torsos, and a mix of scout, cadian and catachan arms. The flamer is intended to be a heavy flamer version, and connected the new flamer with the back back using red wire from what's inside interior telephone wire. You may also notice there are 10 heads missing here. Once these are painted up, I'll be using the heads I showed in my review of the Games Workshop Head Sprue.

Vendetta Conversion 9 Mar 2010 9:00 AM (15 years ago)
![]()
 Here's a WIP of my version of a popular conversion, a Vendetta. For the wing-mounted twin-linked lascannons I've strayed from what I see is the norm by using a razorback turret lascannon. This is an extremely easy conversion as, other than the cable, there is no significant cutting or trimming required. There's already a left and right side lascannon, they're made to fit together side-by-side, and both sides are flat and almost the perfect size for adding a lascannon power supply. Except for the magnet (and nail, explained later), all parts are shown here in the right picture. The finished lascannon in the upper left is how it looks with all parts in place.
 For some reason, I was trying to reduce my magnet consumption when I came up with this conversion, so my attachment method may seem odd. However, it does show another way to get it done and, if done correctly, it's quite sturdy. I drilled magnet holes in the wing pylon coming in from the front and back. You can see here they are flat sides to the front and back. Once I glued the magnets in I drilled two other holes straight in and deep. The difference in my method is that I glued a nail in the lascannons, missiles and missile pods, and that guides it and helps hold it in place. You can see the finished result in the picture to the right. The nail pieces fit into the holes and are held in place mostly by magnetism, but also by friction. This not only keeps them in place, but also makes sure they are hanging straight.
 I've done it with the other weapons as well, so they can be swapped out at will. There's more involved with this method, but it's a good solid hold and I'm more comfortable with the fit. I made two mistakes while figuring this method out that I would change for the next time. I should have gone with a longer nail, as that would have made for a more solid fit. And, I didn't measure the width between the two holes on each pylon. This leaves me with two sides that are not interchangeable; the left side only works on the left side, and the right only on the right.
 The hull weapon conversion is pretty straight forward, using a magnet on a piece of plasticard in the hull nacel. I went ahead and purchased extra hull weapon bits, added to the order during another bitz buy. Minimal work this way, and I still can have a single lascannnon mount, as well as a twin link version. WIP effort pictured here as well. I have some thoughts for the other bits that came with the lascannon bit, but am not sure when I'll be getting around to working that idea. Hopefully that won't linger long.
I need to finish off the crew, and work out some bugs with the way my heavy bolters connect, then the Valkyrie will be ready for final painting. More to come on this, hopefully soon.
,%20all%20parts%20are%20shown%20here%20in%20the%20right%20picture.%20The%20finished%20lascannon%20in%20the%20upper%20left%20is%20how%20it%20looks%20with%20all%20parts%20in%20place.%3Cbr%20/%3E%3Cbr%20/%3E%3Ca%20href%3D%22https://blogger.googleusercontent.com/img/b/R29vZ2xl/AVvXsEicqDdh_zkvP6M9BPqkpkX0UDBdieZ1-G6-kZO4Ax2JKJw9TF9LgHAJsaw9FG9Pb_cPAhXp9OIvruFzvaaw_EO2vXkpohAoMTVf33g67GpWKXJVoGYXugnFALKWOM1U5IqAsBz_dt4_b9zh/s1600-h/IMG_1377.JPG%22%3E%3Cimg%20style%3D%22MARGIN:%200px%200px%2010px%2010px;%20WIDTH:%20200px;%20FLOAT:%20right;%20HEIGHT:%20150px;%20CURSOR:%20hand%22%20id%3D%22BLOGGER_PHOTO_ID_5446463923320015266%22%20border%3D%220%22%20alt%3D%22%22%20src%3D%22https://blogger.googleusercontent.com/img/b/R29vZ2xl/AVvXsEicqDdh_zkvP6M9BPqkpkX0UDBdieZ1-G6-kZO4Ax2JKJw9TF9LgHAJsaw9FG9Pb_cPAhXp9OIvruFzvaaw_EO2vXkpohAoMTVf33g67GpWKXJVoGYXugnFALKWOM1U5IqAsBz_dt4_b9zh/s200/IMG_1377.JPG%22%20/%3E%3C/a%3EFor%20some%20reason,%20I%20was%20trying%20to%20reduce%20my%20magnet%20consumption%20when%20I%20came%20up%20with%20this%20conversion,%20so%20my%20attachment%20method%20may%20seem%20odd.%20However,%20it%20does%20show%20another%20way%20to%20get%20it%20done%20and,%20if%20done%20correctly,%20it's%20quite%20sturdy.%20I%20drilled%20magnet%20holes%20in%20the%20wing%20pylon%20coming%20in%20from%20the%20front%20and%20back.%20You%20can%20see%20here%20they%20are%20flat%20sides%20to%20the%20front%20and%20back.%20Once%20I%20glued%20the%20magnets%20in%20I%20drilled%20two%20other%20holes%20straight%20in%20and%20deep.%20The%20difference%20in%20my%20method%20is%20that%20I%20glued%20a%20nail%20in%20the%20lascannons,%20missiles%20and%20missile%20pods,%20and%20that%20guides%20it%20and%20helps%20hold%20it%20in%20place.%20You%20can%20see%20the%20finished%20result%20in%20the%20picture%20to%20the%20right.%20The%20nail%20pieces%20fit%20into%20the%20holes%20and%20are%20held%20in%20place%20mostly%20by%20magnetism,%20but%20also%20by%20friction.%20This%20not%20only%20keeps%20them%20in%20place,%20but%20also%20makes%20sure%20they%20are%20hanging%20straight.%3Cbr%20/%3E%3Cbr%20/%3E%3Ca%20href%3D%22https://blogger.googleusercontent.com/img/b/R29vZ2xl/AVvXsEgD8nVu1fVEBGQh73uri2ssHN6xx2QPOd-I4etZRDixbI6g8s2yjGi-vBcTi_m0uVXITS1Uz00AN50A0cKYUyHE5RWe_urrlLzQ5m9SREJgPQT2xGfvRxycdboi8OmoJPJPqzYrOnKmsRAz/s1600-h/IMG_1381a.jpg%22%3E%3Cimg%20style%3D%22MARGIN:%200px%200px%2010px%2010px;%20WIDTH:%20140px;%20FLOAT:%20right;%20HEIGHT:%20200px;%20CURSOR:%20hand%22%20id%3D%22BLOGGER_PHOTO_ID_5446463924729353922%22%20border%3D%220%22%20alt%3D%22%22%20src%3D%22https://blogger.googleusercontent.com/img/b/R29vZ2xl/AVvXsEgD8nVu1fVEBGQh73uri2ssHN6xx2QPOd-I4etZRDixbI6g8s2yjGi-vBcTi_m0uVXITS1Uz00AN50A0cKYUyHE5RWe_urrlLzQ5m9SREJgPQT2xGfvRxycdboi8OmoJPJPqzYrOnKmsRAz/s200/IMG_1381a.jpg%22%20/%3E%3C/a%3EI've%20done%20it%20with%20the%20other%20weapons%20as%20well,%20so%20they%20can%20be%20swapped%20out%20at%20will.%20There's%20more%20involved%20with%20this%20method,%20but%20it's%20a%20good%20solid%20hold%20and%20I'm%20more%20comfortable%20with%20the%20fit.%20I%20made%20two%20mistakes%20while%20figuring%20this%20method%20out%20that%20I%20would%20change%20for%20the%20next%20time.%20I%20should%20have%20gone%20with%20a%20longer%20nail,%20as%20that%20would%20have%20made%20for%20a%20more%20solid%20fit.%20And,%20I%20didn't%20measure%20the%20width%20between%20the%20two%20holes%20on%20each%20pylon.%20This%20leaves%20me%20with%20two%20sides%20that%20are%20not%20interchangeable;%20the%20left%20side%20only%20works%20on%20the%20left%20side,%20and%20the%20right%20only%20on%20the%20right.%3Cbr%20/%3E%3Cbr%20/%3E%3Ca%20href%3D%22https://blogger.googleusercontent.com/img/b/R29vZ2xl/AVvXsEgsrKPZ2l9OHR8b4c09tpG-NnXF_6Y_2ghshiYmHenh-u9V9AJe4UrFq1CTihFb5Swu9P03urFGRSQTy5ph0vBQZZPTaFAwS4O0q7lQGT4bIkIuhJbjJCjVGAZuyfjEQDPnFAx1G0whLmKh/s1600-h/IMG_1389a.jpg%22%3E%3Cimg%20style%3D%22MARGIN:%200px%200px%2010px%2010px;%20WIDTH:%20136px;%20FLOAT:%20right;%20HEIGHT:%20200px;%20CURSOR:%20hand%22%20id%3D%22BLOGGER_PHOTO_ID_5446463928595081298%22%20border%3D%220%22%20alt%3D%22%22%20src%3D%22https://blogger.googleusercontent.com/img/b/R29vZ2xl/AVvXsEgsrKPZ2l9OHR8b4c09tpG-NnXF_6Y_2ghshiYmHenh-u9V9AJe4UrFq1CTihFb5Swu9P03urFGRSQTy5ph0vBQZZPTaFAwS4O0q7lQGT4bIkIuhJbjJCjVGAZuyfjEQDPnFAx1G0whLmKh/s200/IMG_1389a.jpg%22%20/%3E%3C/a%3EThe%20hull%20weapon%20conversion%20is%20pretty%20straight%20forward,%20using%20a%20magnet%20on%20a%20piece%20of%20plasticard%20in%20the%20hull%20nacel.%20I%20went%20ahead%20and%20purchased%20extra%20hull%20weapon%20bits,%20added%20to%20the%20order%20during%20another%20bitz%20buy.%20Minimal%20work%20this%20way,%20and%20I%20still%20can%20have%20a%20single%20lascannnon%20mount,%20as%20well%20as%20a%20twin%20link%20version.%20WIP%20effort%20pictured%20here%20as%20well.%20I%20have%20some%20thoughts%20for%20the%20other%20bits%20that%20came%20with%20the%20lascannon%20bit,%20but%20am%20not%20sure%20when%20I'll%20be%20getting%20around%20to%20working%20that%20idea.%20Hopefully%20that%20won't%20linger%20long.%3Cbr%20/%3E%3Cbr%20/%3EI%20need%20to%20finish%20off%20the%20crew,%20and%20work%20out%20some%20bugs%20with%20the%20way%20my%20heavy%20bolters%20connect,%20then%20the%20Valkyrie%20will%20be%20ready%20for%20final%20painting.%20More%20to%20come%20on%20this,%20hopefully%20soon.)
Armored Basilisk Conversion 23 Feb 2010 12:01 PM (15 years ago)
![]()
 My apologies for not posting in a while. After getting caught up from the holidays, I found I was getting frustrated with my paint pot procrastinating. As busy as I stay with building and converting, and even getting a start to the painting, I still run into a painters block and can't seem to get things finished. Rather than post unfinished stuff, I held off in hopes I'd finish and be able to post a complete project. So far, no good. I've decided to post my WIP here, in hope that you all will forgive my painters block for a while.
 First up is my Armored Basilisk Conversion. You might remember my post a while back about double tracking the new Hellhound hull. I had noted I was working on something I'd show later. This is the something. In the top picture you can see I used a Shadowsword turret assembly as the basis for an armored Basilisk. The turret is too wide to fit the standard Chimera hull, so some modification was needed to make it work. The picture to the right is the WIP for the double tracking of the hull I discussed in a previous post. The old Chimera sides made it too wide, so I used the new Chimera sides. It actually works quite well.
 The next challenge was to make the barrel assembly. I didn't want to just plop a Shadowsword top on a widened Chimera hull. Plus I was getting the big parts from bitz buys and wanted to limit my purchases. So I scratch-built the barrel using a writing pen tube, an Xacto blade protector, and barrel bits from an old style Demolisher. I found a large plastic bushing to transition from barrel to turret. A nail holds it in place, allowing the barrel to elevate. The turret doesn't rotate, which begs the question, “Is it still a turret?” My original barrel-to-hull transition was cumbersome, and would have complicated making the turret rotate, so I decided not to try. I wished I’d rethought when I change to the bushing, because I think making it rotatable, like modern self propelled artillery, wouldn’t have been that much more effort. If I can get the bitz cheap, I may try it.
 As you can see, there's a fair amount of card stock involved. I've had plain plastic stock saved up for a while, but I didn't hesitate to use other stock of opportunity. In this picture, you can see a used gift card. The blue pieces are punch-outs from an electrical circuit box and are supposed to be vents. The clear pieces were once a twist off top to a drink bottle, and will be tail/backup lights and perhaps a place to add some markings. I broke one of the antennas off before I was even done with it, and both are now magnetized.

Two more pictures to show the front and other side. While the intent was to magnetized the hull weapon, instead of adding a magnet I glued a piece of metal under the hole. I figured the magnet would be strong enough, but now I miss the holding power of using two. For instance, I’m not sure where the HB I magnetized, missing in these latest pics, has gone. Yep, magnet on both sides from now on…
Holiday Basing Deals 11 Dec 2009 8:01 AM (15 years ago)
![]()
 Way back in May, Col. Corbane over at Corbania Prime gave great tutorial about Plasticard bases. I've yet to try the technique yet, but I do remember trying to find a ready source of stone patterned plasticard. I couldn't find it in my local stores, and never got around to searching out online sources. I was looking through the local arts and crafts store the other day and found a great deal where I wasn't looking. Sometimes I get lucky. What I found was roads you can buy for the little Christmas villages. Normally selling for four dollars (US), they were on clearance for half off. So, I bought the last set. They also had snow, but I don't have plans to use snow on my bases (yet).
 You get two in a pack. For some reason, this company packaged two different roads together. Seems to me, even in a Christmas village, you'd want your roads to be the same, but that wasn't an option. I plan to base at least my vet squads on the cobble stone pattern. And will probably use the brick version for heavy weapon squads or other mini using 60 mm bases. The pattern is a bit wider than I would like to have, but with a little extra debris rolled in, it should look just fine. I rolled these out and put a ruler on them so you can see the size. They are each 18 inches long by 2.5 inches wide. That's a lot of plastic base material for two dollars. I placed some bases down to get an idea as to coverage. They are wide enough for 60 mm bases. With good planning, they can pump out quite a few 25 mm bases as well.
 My next vet squad is waiting for me to finish vehicles I'm currently working on. It's busy this time of year, so it will probably be after the holidays before I can actually try these out. Just wanted to get the word out about keeping your eyes open for good basing holiday deals.
Again, a how to on basing with these can be found at Corbania Prime: Tutorial : Plasticard bases.
,%20they%20were%20on%20clearance%20for%20half%20off.%20So,%20I%20bought%20the%20last%20set.%20They%20also%20had%20snow,%20but%20I%20don't%20have%20plans%20to%20use%20snow%20on%20my%20bases%20(yet).%3Cbr%20/%3E%3Cbr%20/%3E%3Ca%20href%3D%22https://blogger.googleusercontent.com/img/b/R29vZ2xl/AVvXsEjCH6XNmjk38zgL92beIhHhdHVu0Mkb42ZSujbjBfCMfmAvLtzihuSQiSqVvdMSy4RO8wo3liS9t5GvRSOIHM0XNYdEtDiLM0uSiMiJcwDsmD0lDJkOOQAj2Swauy7vR1Fcf-BQ5aPslsOU/s1600-h/Roads.jpg%22%3E%3Cimg%20style%3D%22TEXT-ALIGN:%20center;%20MARGIN:%200px%20auto%2010px;%20WIDTH:%20320px;%20DISPLAY:%20block;%20HEIGHT:%20166px;%20CURSOR:%20hand%22%20id%3D%22BLOGGER_PHOTO_ID_5413799139071544562%22%20border%3D%220%22%20alt%3D%22%22src%3D%22https://blogger.googleusercontent.com/img/b/R29vZ2xl/AVvXsEjCH6XNmjk38zgL92beIhHhdHVu0Mkb42ZSujbjBfCMfmAvLtzihuSQiSqVvdMSy4RO8wo3liS9t5GvRSOIHM0XNYdEtDiLM0uSiMiJcwDsmD0lDJkOOQAj2Swauy7vR1Fcf-BQ5aPslsOU/s320/Roads.jpg%22%20/%3E%3C/a%3EYou%20get%20two%20in%20a%20pack.%20For%20some%20reason,%20this%20company%20packaged%20two%20different%20roads%20together.%20Seems%20to%20me,%20even%20in%20a%20Christmas%20village,%20you'd%20want%20your%20roads%20to%20be%20the%20same,%20but%20that%20wasn't%20an%20option.%20I%20plan%20to%20base%20at%20least%20my%20vet%20squads%20on%20the%20cobble%20stone%20pattern.%20And%20will%20probably%20use%20the%20brick%20version%20for%20heavy%20weapon%20squads%20or%20other%20mini%20using%2060%20mm%20bases.%20The%20pattern%20is%20a%20bit%20wider%20than%20I%20would%20like%20to%20have,%20but%20with%20a%20little%20extra%20debris%20rolled%20in,%20it%20should%20look%20just%20fine.%20I%20rolled%20these%20out%20and%20put%20a%20ruler%20on%20them%20so%20you%20can%20see%20the%20size.%20They%20are%20each%2018%20inches%20long%20by%202.5%20inches%20wide.%20That's%20a%20lot%20of%20plastic%20base%20material%20for%20two%20dollars.%20I%20placed%20some%20bases%20down%20to%20get%20an%20idea%20as%20to%20coverage.%20They%20are%20wide%20enough%20for%2060%20mm%20bases.%20With%20good%20planning,%20they%20can%20pump%20out%20quite%20a%20few%2025%20mm%20bases%20as%20well.%3Cbr%20/%3E%3Cbr%20/%3E%3Ca%20href%3D%22https://blogger.googleusercontent.com/img/b/R29vZ2xl/AVvXsEimfDLWcLr3ZJ7mZq1YU-FP3lqOIhjofvf7W1ajOU8fQRv1DljWYn-lF2NA0T4axvsv6r4rY1ENiY8aatwzmIhs-JlqYdZ5VFhbNGqu3zMgGT1duXVJPXICJueFZ8YQ6gP5UecKgdTWpk7M/s1600-h/IMG_1118.JPG%22%3E%3Cimg%20style%3D%22MARGIN:%200px%200px%2010px%2010px;%20WIDTH:%20150px;%20FLOAT:%20right;%20HEIGHT:%20200px;%20CURSOR:%20hand%22%20id%3D%22BLOGGER_PHOTO_ID_5413798828807228258%22%20border%3D%220%22%20alt%3D%22%22%20src%3D%22https://blogger.googleusercontent.com/img/b/R29vZ2xl/AVvXsEimfDLWcLr3ZJ7mZq1YU-FP3lqOIhjofvf7W1ajOU8fQRv1DljWYn-lF2NA0T4axvsv6r4rY1ENiY8aatwzmIhs-JlqYdZ5VFhbNGqu3zMgGT1duXVJPXICJueFZ8YQ6gP5UecKgdTWpk7M/s200/IMG_1118.JPG%22%20/%3E%3C/a%3EMy%20next%20vet%20squad%20is%20waiting%20for%20me%20to%20finish%20vehicles%20I'm%20currently%20working%20on.%20It's%20busy%20this%20time%20of%20year,%20so%20it%20will%20probably%20be%20after%20the%20holidays%20before%20I%20can%20actually%20try%20these%20out.%20Just%20wanted%20to%20get%20the%20word%20out%20about%20keeping%20your%20eyes%20open%20for%20good%20basing%20holiday%20deals.%3Cbr%20/%3E%3Cbr%20/%3EAgain,%20a%20how%20to%20on%20basing%20with%20these%20can%20be%20found%20at%20%3Ca%20href%3D%22http://corbaniaprime.blogspot.com/2009/05/tutorial-plasticard-bases.html%22%3ECorbania%20Prime:%20Tutorial%20:%20Plasticard%20bases%3C/a%3E.%3C/p%3E)
Basilisk: More WIP 2 Dec 2009 9:01 AM (15 years ago)
![]()
 Amongst the four models on my work bench now (not counting various infantry in the paint pot queue), is this standard Basilisk. I posted a WIP a few weeks ago. After two tone painting a few Leman Russ tanks, I've decided my standard paint scheme needed a small bit of light grey. The main two colors on my vehicles are a gray spray primer and a camo tan Krylon paint for plastics. Since this Basilisk was the first planned from the outset as three colors, I decided to start with a light grey base coat. I then taped the areas needing to remain light grey, and followed with a coat of dark grey. Another taping (over the original), and follow up with the final coat of camo tan.
 While I like how it turned out, I found I tend toward applying heavy coats of spray. I guess I wanted to be sure I got a solid, even coat all around, but this can lead to some thick areas where the third coat is applied. Some of the tape lines needed smoothing as well. Frankly it probably isn't much different than I'd have achieved brushing it on, so I'm not concerned about this particular piece. I will however take a lighter touch on the next try.
 I am also considering applying the light grey last. The light grey overlaps the other two colors, so that would require removing the previous tape and reapplying for the final coat. Something I had hoped to avoid by spraying light grey first, but I think applying it last would thin the paint over most of the model.
As you can tell from my earlier post about it, t his Basilisk is the victim of my Paint Pot Procrastination because of another distraction on the workbench, a Valkyrie. I couldn't resist detailing the inside, and have probably put more time into it than I will the outside. A shame considering the outside will be seen much more than the inside, but I really enjoy the detail GW put into it and wanted to do it up nice. One thing I relearned here is the sticking power of primer over straight paint. To be sure of a strong bond where the hull pieces will attache, I removed the grey primer along the edges. It took a bit of scraping to get it all. Scraping regular paint from plastic means big chunks at a time. Paint over primer is much more stubborn. Really hit home the need to prime first.
,%20is%20this%20standard%20Basilisk.%20I%20posted%20%3Ca%20href%3D%22http://paintpotprocrastinator.blogspot.com/2009/11/basilisk-wip_12.html%22%3Ea%20WIP%20a%20few%20weeks%20ago%3C/a%3E.%20After%20two%20tone%20painting%20a%20few%20Leman%20Russ%20tanks,%20I've%20decided%20my%20standard%20paint%20scheme%20needed%20a%20small%20bit%20of%20light%20grey.%20The%20main%20two%20colors%20on%20my%20vehicles%20are%20a%20gray%20spray%20primer%20and%20a%20camo%20tan%20Krylon%20paint%20for%20plastics.%20Since%20this%20Basilisk%20was%20the%20first%20planned%20from%20the%20outset%20as%20three%20colors,%20I%20decided%20to%20start%20with%20a%20light%20grey%20base%20coat.%20I%20then%20taped%20the%20areas%20needing%20to%20remain%20light%20grey,%20and%20followed%20with%20a%20coat%20of%20dark%20grey.%20Another%20taping%20(over%20the%20original),%20and%20follow%20up%20with%20the%20final%20coat%20of%20camo%20tan.%3Cbr%20/%3E%3Cbr%20/%3E%3Ca%20href%3D%22https://blogger.googleusercontent.com/img/b/R29vZ2xl/AVvXsEjRigbtHQWM1SacT-_5K_PDdwznq-OqtwQF4KR2E6AdnmtuCEhwRMUCzsz15QiOD6h4AfCYJKfWhKhHjGsH3L02cLekLQ_EOsxpiCyTZZ3o2uWFUEMSXOOem-16ru2E8gqcFq0iFchihFbl/s1600/Bas1Top.jpg%22%3E%3Cimg%20style%3D%22MARGIN:%200px%2010px%2010px%200px;%20WIDTH:%20200px;%20FLOAT:%20left;%20HEIGHT:%20126px;%20CURSOR:%20hand%22%20id%3D%22BLOGGER_PHOTO_ID_5410242440459126930%22%20border%3D%220%22%20alt%3D%22%22%20src%3D%22https://blogger.googleusercontent.com/img/b/R29vZ2xl/AVvXsEjRigbtHQWM1SacT-_5K_PDdwznq-OqtwQF4KR2E6AdnmtuCEhwRMUCzsz15QiOD6h4AfCYJKfWhKhHjGsH3L02cLekLQ_EOsxpiCyTZZ3o2uWFUEMSXOOem-16ru2E8gqcFq0iFchihFbl/s200/Bas1Top.jpg%22%20/%3E%3C/a%3EWhile%20I%20like%20how%20it%20turned%20out,%20I%20found%20I%20tend%20toward%20applying%20heavy%20coats%20of%20spray.%20I%20guess%20I%20wanted%20to%20be%20sure%20I%20got%20a%20solid,%20even%20coat%20all%20around,%20but%20this%20can%20lead%20to%20some%20thick%20areas%20where%20the%20third%20coat%20is%20applied.%20Some%20of%20the%20tape%20lines%20needed%20smoothing%20as%20well.%20Frankly%20it%20probably%20isn't%20much%20different%20than%20I'd%20have%20achieved%20brushing%20it%20on,%20so%20I'm%20not%20concerned%20about%20this%20particular%20piece.%20I%20will%20however%20take%20a%20lighter%20touch%20on%20the%20next%20try.%3Cbr%20/%3E%3Cbr%20/%3E%3Ca%20href%3D%22https://blogger.googleusercontent.com/img/b/R29vZ2xl/AVvXsEhrU1AQILj0nEhsCUipA9nNKxQ9PiaYOkH_gvJm1djjJ-Ru1aXfCDE47G4HVJxPl03nSnwrhM9rX4yyqBOHLMQz-pCD3tqYBk5qdaVhR7l-OJ0cLTTtKJamOEnUqO1NisN2HyoRB3xQ_IgE/s1600/Bas1Side.jpg%22%3E%3Cimg%20style%3D%22MARGIN:%200px%2010px%2010px%200px;%20WIDTH:%20200px;%20FLOAT:%20right;%20HEIGHT:%20144px;%20CURSOR:%20hand%22%20id%3D%22BLOGGER_PHOTO_ID_5410242435984502434%22%20border%3D%220%22%20alt%3D%22%22%20src%3D%22https://blogger.googleusercontent.com/img/b/R29vZ2xl/AVvXsEhrU1AQILj0nEhsCUipA9nNKxQ9PiaYOkH_gvJm1djjJ-Ru1aXfCDE47G4HVJxPl03nSnwrhM9rX4yyqBOHLMQz-pCD3tqYBk5qdaVhR7l-OJ0cLTTtKJamOEnUqO1NisN2HyoRB3xQ_IgE/s200/Bas1Side.jpg%22%20/%3E%3C/a%3EI%20am%20also%20considering%20applying%20the%20light%20grey%20last.%20The%20light%20grey%20overlaps%20the%20other%20two%20colors,%20so%20that%20would%20require%20removing%20the%20previous%20tape%20and%20reapplying%20for%20the%20final%20coat.%20Something%20I%20had%20hoped%20to%20avoid%20by%20spraying%20light%20grey%20first,%20but%20I%20think%20applying%20it%20last%20would%20thin%20the%20paint%20over%20most%20of%20the%20model.%3Cbr%20/%3E%3Cbr%20/%3EAs%20you%20can%20tell%20from%20my%20earlier%20post%20about%20it,%20t%3Ca%20href%3D%22https://blogger.googleusercontent.com/img/b/R29vZ2xl/AVvXsEgW85hKhuSjWP0Q2pKP0-gyPSDKcb0hwRhyphenhyphen99MczxVZ1AbEaTQZaZ6MsRhZDlIw5_yFpL0HfIm60eOPJTp6kMPft_XrgO3BLd0rloyWTtlubzK2HHEFXN2Qlhog2fUDE3yKw7gOKugZxEAu/s1600/IMG_1095.JPG%22%3E%3Cimg%20style%3D%22MARGIN:%200px%200px%2010px%2010px;%20WIDTH:%20200px;%20FLOAT:%20right;%20HEIGHT:%20150px;%20CURSOR:%20hand%22%20id%3D%22BLOGGER_PHOTO_ID_5410242776702518034%22%20border%3D%220%22%20alt%3D%22%22%20src%3D%22https://blogger.googleusercontent.com/img/b/R29vZ2xl/AVvXsEgW85hKhuSjWP0Q2pKP0-gyPSDKcb0hwRhyphenhyphen99MczxVZ1AbEaTQZaZ6MsRhZDlIw5_yFpL0HfIm60eOPJTp6kMPft_XrgO3BLd0rloyWTtlubzK2HHEFXN2Qlhog2fUDE3yKw7gOKugZxEAu/s200/IMG_1095.JPG%22%20/%3E%3C/a%3Ehis%20Basilisk%20is%20the%20victim%20of%20my%20Paint%20Pot%20Procrastination%20because%20of%20another%20distraction%20on%20the%20workbench,%20a%20Valkyrie.%20I%20couldn't%20resist%20detailing%20the%20inside,%20and%20have%20probably%20put%20more%20time%20into%20it%20than%20I%20will%20the%20outside.%20A%20shame%20considering%20the%20outside%20will%20be%20seen%20much%20more%20than%20the%20inside,%20but%20I%20really%20enjoy%20the%20detail%20GW%20put%20into%20it%20and%20wanted%20to%20do%20it%20up%20nice.%20One%20thing%20I%20relearned%20here%20is%20the%20sticking%20power%20of%20primer%20over%20straight%20paint.%20To%20be%20sure%20of%20a%20strong%20bond%20where%20the%20hull%20pieces%20will%20attache,%20I%20removed%20the%20grey%20primer%20along%20the%20edges.%20It%20took%20a%20bit%20of%20scraping%20to%20get%20it%20all.%20Scraping%20regular%20paint%20from%20plastic%20means%20big%20chunks%20at%20a%20time.%20Paint%20over%20primer%20is%20much%20more%20stubborn.%20Really%20hit%20home%20the%20need%20to%20prime%20first.)
Terrain: Dragons Teeth Tank Traps 25 Nov 2009 9:01 AM (15 years ago)
![]()

Back in June, FoxPhoenix provided a great tutorial about making Tank Traps using an ice tray. Now, I'd heard of the idea before, but could never find a good sized tray to use. Before I had a chance to go find one one, one found me. I had bought a mini fridge for the basement and a mini ice tray came with it.
Being the cheap bugger that I am, I searched my home improvement leftovers cabinets for a good plaster alternative. I found I had some a bit of concrete patch mix and tried that. It was a bit brittle, and I didn't want to chance that with something that was going to get tossed around a bit. So, instead of using water to mix it, I used leftover white latex paint. Worked like a charm. They're actually very sturdy to blunt force, but they can easily be holed with a sharp point and 'fractured' out from that.
I still had a bit of backer board from an old kitchen cabinet, so I cut a odd piece and glued some of my new Dragons Teeth down and added debris in the form of sprue pieces, bitz, and some pieces from the GW Basing Kit. Quick paint work in my standard basing style and it's done!

Imperial Guard Heavy Bolter 16 Nov 2009 9:01 AM (15 years ago)
![]()
 Here's another Imperial Guard Heavy Weapon Team that's been waiting out my Paint Pot Procrastinating. An experiment in miniature diorama making that's been done for quite some time. One advantage to basing like this is the built in protection it provides. It's going to take a bit of effort to break the pieces off the base. It could become a problem though if I'm trying to put the piece inside a building or other tight spot. Hasn't been an issue yet.
 Unfortunately, there is another form of "protection" that could raise concern on the playing field. I had built it for a fun look. It had slipped my mind when I started it that an opponent could protest about my piece having its own built in cover. This is something Dverning recently, and conveniently, brought up in his blog about Playing Fair with Conversions. Luckily, over half of the base is open on one side. If there is any concern, we can expose the side without cover toward the opposing force.

Double Tracking the new Hellhound Hull 13 Nov 2009 9:01 AM (15 years ago)
![]() So, I've decided to build an armored basilisk. In my typical eureka fashion, I thought up something I haven't seen done, and am somehow finding a way to make it work. I'll cover the basic idea in another post, once I get a bit farther along. I don't want to give it all up right away. Though I hadn't originally planned to widen the tracks, the bits I decided to use for the armored part require it. After a couple experiments, this is what I came up with.
So, I've decided to build an armored basilisk. In my typical eureka fashion, I thought up something I haven't seen done, and am somehow finding a way to make it work. I'll cover the basic idea in another post, once I get a bit farther along. I don't want to give it all up right away. Though I hadn't originally planned to widen the tracks, the bits I decided to use for the armored part require it. After a couple experiments, this is what I came up with. To widen the tracks of the old Chimera/Hellhound kit, you simply glued road wheels side by side and glued the track to that. While that probably could still work, you'd have to find a new source of road wheels, as the new kit doesn't use them. The new Hellhound sides come with spacers that fit together, one side is a "male," the other is a "female." So, first off, you need to make them both "female" as shown in the top photo. You need to make the new holes the same size as the old ones, so keep that in mind.
 Next, find eight nails with the same diameter, and cut them the length of two pieces of tank tread side by side. If you can't find a nail the right diameter, like me, you'll need to get one a little larger and file it down a bit. It needs to be a snug fit.
The  third picture shows the width of the standard Hellhound side piece. The next picture is of the widened side piece, having the nails as spacers. The nails, tightly fitted in the spacer holes, give you the rigidity you need to remove any play in the finished side piece.
  If they end up moving around too much, you're going to start loosing tread pieces. We don't want that.
Next up is the treads themselves. It's not good enough to simply glue two pieces of tread together.  One strong push on the joint and you'll break the glue join. Also, the edges of the tread has natural gaps, which would allow you to "see-through" them once finished. While there may be other ways to do this, I chose to use some old two-part epoxy I had laying around and connect them together as shown in the fifth picture.
 The sixth picture shows a partially finished wide track side. If you look close, you can see the epoxy poking up through the tread. Please ignore the plasticard attachment, for now. You'll see what that's for in a later post.
One shame to note. There is absolutely no difference in the new tracks than the old. They are exactly the same, down to every hinge and tread pad. What you see here are actually old treads I had lying around. And, although they look a bit different, the sides have the same overall dimensions. The fact that the tread lines up perfectly once assembled shames me, as I could never get them to do that with the old road wheel system. Kudos to GW for improving this part of the kit.
Basilisk WIP 12 Nov 2009 9:01 AM (15 years ago)
![]()
 So, I purchased a Basilisk on eBay a while back. I had always had good luck with my eBay purchases. That was not the case here. It was pretty bad off. Most of the back end and some gun carriage parts were broken or missing, and there was glue in too many places. I now buy only un, or partly, finished stuff. The sides were still salvageable, as was the gun itself. Shortly after this purchase, I was lucky to get a couple more Basilisks still on the sprue for a steal. Unfortunately, they mostly sat waiting for their time to be built. I was inspired recently to build an armored Basilisk; now still very much WIP, to be covered soon. Many of the parts I won't be needing on the armored variant are exactly what I needed to flip the ruined piece. Here is the WIP.
 This is pretty much the standard Basilisk. I don't like the tall shield, so cut that down a bit. It's got some old pewter pieces thrown in, and I've still got some little adjusting to do, but it's pretty much done. I did try a little something different with the back. I added some window screen to fill in the gap between floor and hand rail. Last thing the crew wants is a wayward round rolling off the back. Plus, it's a great place to hang their packs and other assorted gear. Note the backpack in the lower left will be hanging off one of the side hand rails after it's all painted.
 One thing I've been concerned with for my own Basilisks was the ladder on the back end. It's a very breakable piece, just hanging out the back by two fragile pieces of plastic. Even a Forge World example shows this break point (see bottom picture here). So, I gave it a bit of thought and came up with an idea for a "hinge." I drilled a hole through one of the round bits you find on the back of every sprue, sliced pieces of the round, trimmed a flat end and glued it to where the ladder usually connects, where the rivets are. I trimmed, rounded and holed each top of the ladder, and connected it all together with the head of a pin. Now I can flip it over to a somewhat safer area for transit. I had hoped it would lay over flat, but I didn't get it trimmed right. I didn't want to adjust this one anymore, as that would just weaken the remaining plastic. I still think it's possible to get it to lay flat, and will give it another go when I finally get around to building my other standard Basilisk.
.%20So,%20I%20gave%20it%20a%20bit%20of%20thought%20and%20came%20up%20with%20an%20idea%20for%20a%20%22hinge.%22%20I%20drilled%20a%20hole%20through%20one%20of%20the%20round%20bits%20you%20find%20on%20the%20back%20of%20every%20sprue,%20sliced%20pieces%20of%20the%20round,%20trimmed%20a%20flat%20end%20and%20glued%20it%20to%20where%20the%20ladder%20usually%20connects,%20where%20the%20rivets%20are.%20I%20trimmed,%20rounded%20and%20holed%20each%20top%20of%20the%20ladder,%20and%20connected%20it%20all%20together%20with%20the%20head%20of%20a%20pin.%20Now%20I%20can%20flip%20it%20over%20to%20a%20somewhat%20safer%20area%20for%20transit.%20I%20had%20hoped%20it%20would%20lay%20over%20flat,%20but%20I%20didn't%20get%20it%20trimmed%20right.%20I%20didn't%20want%20to%20adjust%20this%20one%20anymore,%20as%20that%20would%20just%20weaken%20the%20remaining%20plastic.%20I%20still%20think%20it's%20possible%20to%20get%20it%20to%20lay%20flat,%20and%20will%20give%20it%20another%20go%20when%20I%20finally%20get%20around%20to%20building%20my%20other%20standard%20Basilisk.)
Terrain - Power Plant or Shield Generator 11 Nov 2009 9:01 AM (15 years ago)
![]()
 It's been a while since I last posted. Between work and other hobbies, blogging took a back seat. My regrets for that. For a while, I felt I hadn't really been up to much. Then I got the camera out and realized I had done quite a bit. It seems there's still a lot waiting out my Paint Pot Procrastinating, so I hope to make it up to you with a flurry of posting. This is the first of four unrelated posts in four days. Enjoy!
 First up is a bit of terrain, shown above. The second picture here shows the basic material; a piece of masonite (from the back of an old cabinet) and the plastic from a box of cookies. I'm always about flexibility, so chose to make three pieces instead of one. This lets us adjust the terrain for small or large games.
 After cutting the individual parts into three equal parts, add a bit of basing material, prime paint and voila, three pieces of terrain that fit together to make one if needed. Given a wider choice of material, I would have preferred a taller piece. So, now I'm on the lookout for a box of really big cookies!
%20and%20the%20plastic%20from%20a%20box%20of%20cookies.%20I'm%20always%20about%20flexibility,%20so%20chose%20to%20make%20three%20pieces%20instead%20of%20one.%20This%20lets%20us%20adjust%20the%20terrain%20for%20small%20or%20large%20games.%3Cbr%20/%3E%3Cbr%20/%3E%3Ca%20href%3D%22https://blogger.googleusercontent.com/img/b/R29vZ2xl/AVvXsEhzb6eV0fy3RbB9TC5x3EdDFDIHUam7jCK-wQSr_fd1K54wpeSd8OhdM0QweBFoWI372vAcgN3V9BkbqgqMYA07PsZaEhwM7qnQD2qPu6j7M0T3oY1ug36T6KrwgNg1bPo3lOVD_Sou6tf3/s1600-h/IMG_0789.JPG%22%3E%3Cimg%20id%3D%22BLOGGER_PHOTO_ID_5402686954905524626%22%20style%3D%22FLOAT:%20right;%20MARGIN:%200px%200px%2010px%2010px;%20WIDTH:%20200px;%20CURSOR:%20hand;%20HEIGHT:%20150px%22%20alt%3D%22%22%20src%3D%22https://blogger.googleusercontent.com/img/b/R29vZ2xl/AVvXsEhzb6eV0fy3RbB9TC5x3EdDFDIHUam7jCK-wQSr_fd1K54wpeSd8OhdM0QweBFoWI372vAcgN3V9BkbqgqMYA07PsZaEhwM7qnQD2qPu6j7M0T3oY1ug36T6KrwgNg1bPo3lOVD_Sou6tf3/s200/IMG_0789.JPG%22%20border%3D%220%22%20/%3E%3C/a%3EAfter%20cutting%20the%20individual%20parts%20into%20three%20equal%20parts,%20add%20a%20bit%20of%20basing%20material,%20prime%20paint%20and%20voila,%20three%20pieces%20of%20terrain%20that%20fit%20together%20to%20make%20one%20if%20needed.%20Given%20a%20wider%20choice%20of%20material,%20I%20would%20have%20preferred%20a%20taller%20piece.%20So,%20now%20I'm%20on%20the%20lookout%20for%20a%20box%20of%20really%20big%20cookies!)
Mortar Squad 12 Oct 2009 2:05 PM (15 years ago)
![]()
 So, after sitting in various stages of completion, I finally cracked down and finished this mortar squad. One of my biggest distractions with 60mm bases is the urge to make a complex little scene out of them. I hope to grow out of this urge before too long. It takes far to long to get them on the table this way. I can remember commenting when reading Hal'jin's series, I Hate Right Hands, that the mortar holding right hand was another alternative. Out of this whole squad, the guy holding binos is the only one that does not use the mortar holding right hand from the heavy weapons sprue. While I didn't start these to show how this right hand could be used in other ways, here's some examples.
 In the picture above, the one on the left has been just shy of being done for over a year. The problem with paint pot procrastinating on this team was a change in my army colors. Originally painted in standard Cadian 8th colors, I later decided I preferred grey armor over green, so I repainted the crew. The basing also didn't match my newer style, so I gave it a wash and a new drybrush, but is still a ways off. The brick wall is made from spackle (the all purpose basing material) with a bit of other basing experiments mixed in. The crew has some mods, the most notable being hand swaps for both, and a new leg job on the guy holding the binos. The left leg is from a kneeling figure, and is now propped up on the wall. One thing I don't like about the mortar holding hand is that it is designed for a kneeling figure, and doesn't allow for a two handed hold on the round. A quick hand swap here fixes that issue.
 The next featured team is on the base I showed in my earlier article about using latex paint chips as basing material. It's since had a wash made from GW terracotta, and the figures added of course. This one is intended to show one of the crew re-aiming the mortar, and the other impatiently waiting to load the next round. The aiming mortarman's hand is the standard mortar holding hand, with the mortar drilled out. I did play with the idea of simply removing the adjusting wheel on the mortar itself and having the remaining mortar body serve as proxy. Either way works, though the proxy would have been easier. The right mortarman still holds the mortar, but with the hand swapped to a different arm. He, like the last crew, likes to keep two hands on the round.
 This little mini-diorama has one mortarman continuing to annoy the enemy while the other prepares new rounds for the next volley. This crew took a little more effort in the form of scratch building the boxes. Heavy weapons sprues come with a spare mortar round, and I wanted to do something with the few I've collected. I'm not comfortable leaving mortar rounds lying about on the ground, so I built boxes to hold them. Actually, I cheated a bit; the bottom box is empty. I got lazy and used the standard mortar holding right arm on the standing guardsman.
  The kneeling one's right hand has the mortar drilled out, which makes an excellent lid holding hand. I hadn't really noticed before, but their left hands are the same also. I had built a little crow bar for the crew to use opening the boxes, but I seem to have misplaced it. Hoping I can find that before it's time to vacuum under my chair.
Playing with my camera for these shots, I discovered it has a "vivid" setting (right next to Sepia) in its "My Colors" menu. Although it tends to point out my painting faults, I'll continue to make use of that in the future.