Stacked Floral Candleholder 14 Apr 8:12 AM (2 days ago)
Perfect beginner project repurposes leftover wood
By Michael E. Riffel
Remember using a compass to draw a circle? Did you ever draw six overlapping arcs along the circle’s perimeter to create a flower with six identical petals? That design inspired this tea light candleholder.
As well as being a perfect project for the beginning scroller, this floral votive holder provides a way to repurpose scraps of 1/4″ (6mm)-thick lumber. My candleholder uses varieties of wood including walnut, pine, cedar, poplar, and redwood. For a different look, choose a light-colored wood you can paint or stain. For future stacked projects, consider making this clamping station project to hold all your pieces together during assembly.
Making the Candleholder
Attach the pattern to the base and drill a 1/8″ (3mm)-deep hole with a 2″ (51mm)-diameter Forstner bit. This creates a solid footing for the glass tea light/votive candleholder. Cut the rest of the base with a scroll saw. Attach the patterns to the other ring blanks. Cut the center holes with a scroll saw or drill them with the 2″ (51mm)-dia. Forstner bit. Then, cut the perimeters. Sand, finish, and simply stack the rings to assemble the candleholder.
|
Materials • Wood, 1/4″ (6mm) thick: assorted hardwood scraps • Sandpaper • Finish: gloss enamel or urethane spray • Glass tea light/votive candleholder: |
Tools: • Scroll saw blades: #2/0 reverse-tooth • Drill press with bit: assorted small, 2″ (51mm)-dia. Forstner |
| About the Author |
|
Ever since taking woodshop in high school, Michael Riffel has enjoyed creating small things from scrap pieces of wood. After retiring from the defense industry in 2007, Michael created a shop in his garage in Norco, Calif., and returned to woodworking. More of his work can be found on his website, riffsart.com, or on Pinterest at www.pinterest.com/theriff48/.
|
 |
Purchase our latest issue! Click for Spring IssueFor more articles like these, subscribe to Scroll Saw Woodworking & Crafts magazine. SubscribePlus! Get mini magazines in your e-mail between printed issues with Short Cuts, our e-mail newsletter. Subscribe to Short Cuts |
The post Stacked Floral Candleholder appeared first on Scroll Saw Woodworking & Crafts.


Making Your Own Clamping Station 14 Apr 8:11 AM (2 days ago)
By Rolf Beuttenmuller
|
I assemble many things that require a flat surface, such as clocks, intarsia, or jointed items. For me, a quick-and-dirty solution was to repurpose an old bathroom cabinet. I put wheels on it and added some drawers. For the top, I used a piece of quality 3/4″ (1.9cm) plywood, which was big enough to provide me some overhang for clamping. I then came across a piece of polished granite countertop at a thrift shop. It provides a hard, flat surface, and any glue that gets on it is easily scraped off with a razor blade. For clamping at a perfect 90° angle, I use square blocks and pieces of metal, but you can buy clamping squares from many sources online. In addition to adding this clamping station to your list of spring projects, craft a stacked floral candleholder to add to your outdoor decor. |
A granite countertop and metal blocks make a great assembly station. |

|
Purchase our latest issue! Click for Spring IssueFor more articles like these, subscribe to Scroll Saw Woodworking & Crafts magazine. SubscribePlus! Get mini magazines in your e-mail between printed issues with Short Cuts, our e-mail newsletter. Subscribe to Short Cuts |
The post Making Your Own Clamping Station appeared first on Scroll Saw Woodworking & Crafts.
Scroll Saw Woodworking & Crafts Summer 2025 (Issue #99) 7 Apr 5:26 AM (9 days ago)
The Summer 2025 issue of Scroll Saw Woodworking & Crafts includes a variety of fascinating features and techniques, as well as nature-themed projects and patterns.
This issue is a part of the regular magazine subscription. It is also available from your favorite retailer or from Fox Chapel Publishing, foxchapelpublishing.com, 1-800-457-9112.
Click Here for Our Latest IssueFeature
 |
Into the Woods Alex Jepson shares nature’s wonder through art that’s inspired by the Canadian wilds By Dorissa Bolinski |
Projects
 |
Tooth Box Sink your teeth into an easy project that will charm both kids and adults By Rita Cels |
 |
Star Bowl Create an easy celestial vessel to hold your keepsakes By Dave Van Ess |
 |
Under the Sea Patience and careful organization pay off in this advanced seahorse intarsia project By Janette Square |
 |
Easy Paper Stand Keep paper clutter at bay while pursuing hobbies or doing office work By Al Baggetta |
 |
Stylish Pendants Transform scrap wood into an earthy statement necklace By Roshaan Ganief |
Patterns
 |
Butterfly Trivet Take flight with ornate fretwork that evokes a breezy summer day By Sue Mey |
 |
Catbird Seat These cool kitties are taking it all in on a sunny day By Frederick P. Arndt |
 |
Koala Bear Magnets Practice cutting small segments with a charming little character and his friend By Brad Eklund and Hazel Trinidad |
 |
Fresh Catch Reel in a stylish ode to a favorite pastime By Judy Gale Roberts |
 |
Giraffe Pencil Holder Scroll a whimsical desk accessory that will make homework a little more fun By Al Baggetta |
 |
Baseball Ornaments Hit a home run with some sports-themed decorations By Sue Mey |
 |
The Hive Get busy with a dramatic ode to the hardworking honeybee By Charles Hand |
 |
Strawberry Alphicons Sink your teeth into a juicy project for the summertime By Dave Van Ess |
 |
African Elephant Take a safari adventure with this charming pachyderm portrait By Wayne and Jacob Fowler |
 |
Taking Flight Soar straight to the scroll saw to create this lively wildlife portrait By Charles Dearing |
 |
Sweet Treats Kerf details add interest to a craveworthy puzzle By Jaeheon Yun |
 |
Tissue Box Bedeck a utilitarian item with a fresh botanical design By Sure Mey |
Techniques
 |
Swan Family Practice compound-cutting progressively smaller objects to see how low you can go By Diana Thompson |
 |
Decorative Bowties Custom inlays add a fun look to projects or mask flaws By George Vondriska |
Web Extras
Extra Pattern – Scroll an attractive frame for Judy Gale Roberts’ fishing portrait.
Free Patterns – Find more summertime projects in the How-To section of our website.
Click Here for How-To sectionE-News – Get extra tips and techniques at scrollsawer.com/enews.
|
Purchase our latest issue! Click for Spring IssueFor more articles like these, subscribe to Scroll Saw Woodworking & Crafts magazine. SubscribePlus! Get mini magazines in your e-mail between printed issues with Short Cuts, our e-mail newsletter. Subscribe to Short Cuts |
The post Scroll Saw Woodworking & Crafts Summer 2025 (Issue #99) appeared first on Scroll Saw Woodworking & Crafts.
Making a Floral Trivet 13 Jan 7:10 AM (3 months ago)
Simple design is easy to cut and has many uses
By Brian Dahlen
Cut by Dale Helgerson
|
Designing is an obsession for me. As a kid I sat on the beach in Wisconsin and sketched to the sound of the waves. Now, years later, my options have increased thanks to computers so I’m into doodling, cartooning, animating, and creating 3-D models, but I’m still listening to the waves pound at the beach—this time on Maui. Something about being near the water inspires me. My designs have their roots in the old engravers, like Albrecht Dürer, Gustave Doré, and William Blake, as well as Art Nouveau and Baroque art. I enjoy the smell and feel of the wood and often imagine I can still feel life within it. Creating something out of wood for utility or beauty brings me a sense of satisfaction that feeds my spirit. The large open frets make this pattern ideal for beginners. You can use the stylized tulip design in a number of ways. Cut a single pattern to use as a trivet. Stack-cut and group two or more images to make an interesting wall display. Cut four patterns, connect them in a rectangle, and add a bottom to form a luminary. The pattern resizes well, and the simple design is easy to stack-cut from paper to make cards or tags. Before scrolling this floral trivet, create a magnetic blade holder out of scrap wood to keep your blades organized while your scroll. |
Materials• Cherry, 1/2″ to 3/4″ (1.3cm to 1.9cm)-thick: 5-1/8″ x 8″ (13cm x 20.3cm) • Sandpaper • Finish of choice |
Tools• Scroll saw with blades: #5 reverse-tooth |
| About the Author |
|
An artist since his childhood, Brian Dahlen co-wrote three books of scroll saw patterns with Patrick Spielman. In addition to woodworking, Brian enjoys cartooning and animation. |
|
Purchase our latest issue! Click for Spring IssueFor more articles like these, subscribe to Scroll Saw Woodworking & Crafts magazine. SubscribePlus! Get mini magazines in your e-mail between printed issues with Short Cuts, our e-mail newsletter. Subscribe to Short Cuts |
The post Making a Floral Trivet appeared first on Scroll Saw Woodworking & Crafts.
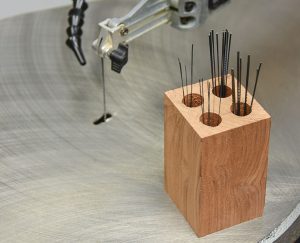
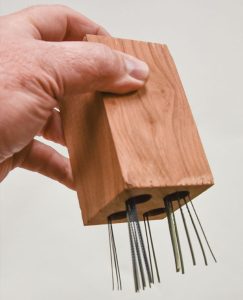
Stay-Put Blade Holder 13 Jan 7:09 AM (3 months ago)
By Dave Van Ess
|
Transform a chunk of scrap wood into a custom blade holder. Measure in 1/2″ (1.3cm) from the edge on all four sides. Buy inexpensive rare earth magnets around 1/2″ (1.3cm) in diameter (the size doesn’t really matter). Choose a Forstner bit slightly larger than the rare earth magnets. Center the bit where the lines intersect and drill down to within 1/4″ (6mm) of the bottom. Apply a little glue to the bottom of each magnet and insert them into the holes. The magnets hold scroll saw blades securely enough to keep them from flying everywhere if you knock the holder over. They are usually strong enough to secure the holder to a metal surface; I put my holder sideways on a metal filing cabinet near my saw. After making your blade holder, start scrolling your next project with this spring-inspired floral trivet. |
The magnetized base holds fast to any metal surface, even the saw itself.
This simple blade holder is virtually spill-proof and lets you sort blades by size or type. |
| About the Author |
|
Dave Van Ess is a retired engineer living in Chandler, Ariz. He has been woodworking for 45 years and scrolling for 35 years. He is the past president of Arizona Woodworkers in the greater Phoenix area and volunteers his time and resources to providing wood projects for kids. Email him at davevaness21@gmail.com. |
|
Purchase our latest issue! Click for Spring IssueFor more articles like these, subscribe to Scroll Saw Woodworking & Crafts magazine. SubscribePlus! Get mini magazines in your e-mail between printed issues with Short Cuts, our e-mail newsletter. Subscribe to Short Cuts |
The post Stay-Put Blade Holder appeared first on Scroll Saw Woodworking & Crafts.
Scroll Saw Woodworking & Crafts Spring 2025 (Issue #98) 8 Jan 5:09 AM (3 months ago)
The Spring 2025 issue of Scroll Saw Woodworking & Crafts includes a variety of fascinating features and techniques, as well as nature-themed projects and patterns.
This issue is a part of the regular magazine subscription. It is also available from your favorite retailer or from Fox Chapel Publishing, foxchapelpublishing.com, 1-800-457-9112. Click Here for Our Latest Issue
|
Feature
 |
Breaking Away Artist Meleah Gabhart had to leave it all to find herself By Dorissa Bolinski |
Projects
 |
Bobcat Intarsia Richly figured wood adds a fur-like appearance to this striking portrait By Janette Square |
 |
Ladybug Counting Blocks This fun toy is a puzzle and learning tool in one By Sheila Bergner-Landry |
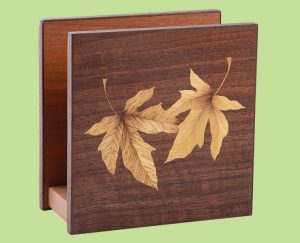 |
Marquetry Napkin Holder Add a touch of elegance to an everyday item with a leaf design By Matthew Werner |
 |
Butterfly Wall Hanging A subtle shimmer adds extra interest to this streamlined segmentation By Marc Anderson |
 |
Tulip Bouquet Segmentation Shape and paint some cheery flowers that don’t need water By Danielle Wendell |
 |
Modern Bud Vase Welcome spring with a minimalist design to showcase the beauty of nature By Thomas Haapapuro |
Patterns
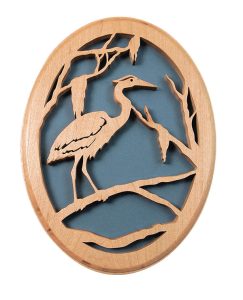 |
Blue Bayou Heron Customize this wall hanging with various wood and backing colors By Judy Gale Roberts |
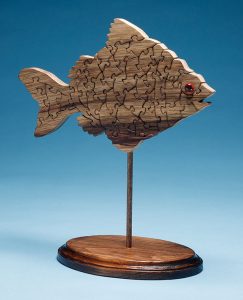 |
Fish on a Stick Explore the depths of the ocean with this freestanding puzzle By Brian Beals |
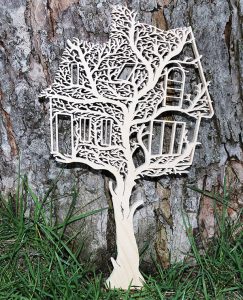 |
Tree House Relive childhood memories with this cozy clubhouse still life By Charles Hand |
 |
Rabbit Fretwork Get hopping and scroll this charming portrait By Charles Dearing |
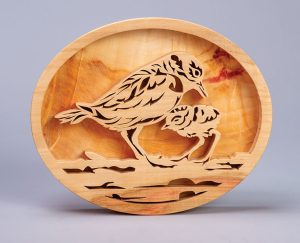 |
Snowy Plovers Take a trip to the beach with this sweet pair of shorebirds By Wayne and Jacob Fowler |
 |
Celebrate Jump for joy with these easy desk sitters By Jean-Bernard Germe |
 |
Axolotl Puzzle Scroll a charming fellow to put a smile on your face By Tim Gilman |
 |
Baby Animal Puzzles Scroll a sweet menagerie of little farm friends By Judy and Dave Peterson |
Techniques
 |
Dizzy Bowl Scroll a lively statement piece that will make heads spin By Carole Rothman |
 |
Compound Cut Egg Create a Fabergé-style decoration for the Easter season By Sue Mey |
Web Extras
More Patterns – Check out some great projects in the How-To section.
Click Here for How-To sectionE-Newsletter – Get extra tips and techniques at scrollsawer.com/enews.
|
Purchase our latest issue! Click for Spring IssueFor more articles like these, subscribe to Scroll Saw Woodworking & Crafts magazine. SubscribePlus! Get mini magazines in your e-mail between printed issues with Short Cuts, our e-mail newsletter. Subscribe to Short Cuts |
The post Scroll Saw Woodworking & Crafts Spring 2025 (Issue #98) appeared first on Scroll Saw Woodworking & Crafts.
Gingerbread Man Puzzle 23 Dec 2024 6:59 AM (3 months ago)
This sweet design is a treat to cut and assemble
By Sarah Lyn Chamberlain
This time of year, there’s nothing better than a fresh batch of cookies baking in the oven. My family and I would always bake together, and gingerbread cookies were my favorite. This puzzle is an ode to the season and a delicious treat of my childhood.
Getting StartedChoose a light wood; I prefer 3/4″ (1.9cm)-thick pine. Prepare the blank by sanding progressively through the grits to 220. Cover the surface with blue painter’s tape. For maximum stability, I recommend orienting the patterns with the grain running horizontally across the body. Photocopy the pattern, and then use spray adhesive to secure it to the surface of the tape. Use a small bit to drill blade-entry holes for the eyes and mouth. |
Cutting and FinishingCut the project on a scroll saw, starting with the facial details. Go slowly and let the blade do the work. Once you’ve made all the cuts, remove the patterns. Then reassemble the puzzle. Smooth the front and back with an orbital sander, and then sand the edges by hand. Stain as desired; I used several shades of Minwax®. Once dry, apply several light coats of a clear gloss finish, sanding lightly between coats. |
Materials• Wood, such as pine, 3/4″ (1.9cm) thick: approx. 6 1/2″ x 8 1/2″ (16.5cm x 21.6cm) • Spray adhesive • Tape: blue painter’s • Sandpaper: assorted grits to 220 • Assorted water-based stains, such as Minwax®: dark walnut, gunstock, red oak • Finish: clear spray, such as Rust-Oleum® 2X Gloss |
Tools• Scroll saw with blades: #5 or #7 reverse-tooth • Drill with bit: small • Sander: orbital • Paintbrush |
| About the Author |
|
Sarah Lyn Chamberlain has loved woodworking since age five but did not start scrolling until she purchased her first scroll saw as an adult. She taught herself how to use it and hasn’t stopped since. Sarah enjoys intricate projects, but her favorite thing to create is playful puzzle designs. For more of Sarah’s work, visit her website at creativestuff.ca. |
 |
Purchase our winter issue!. Purchase Our Winter Issue Here!For more articles like these, subscribe to Scroll Saw Woodworking & Crafts magazine.Subscribe
Plus! Get mini magazines in your e-mail between printed issues with Short Cuts, our e-mail newsletter. |
The post Gingerbread Man Puzzle appeared first on Scroll Saw Woodworking & Crafts.
Scroller's Aid 20 Dec 2024 2:32 PM (3 months ago)
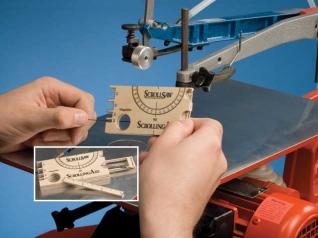 This clever, pocket-sized device combines six scrolling tools in one.
There are some tools a scroller uses every day. In an organized shop, they are always within easy reach. Unfortunately, my shop is not that organized. I designed this project to combine several of the most useful tools into a pocket-sized Scroller’s Aid.
This device is the size of a business card. The magnifier is great for checking the direction of teeth on tiny scroll saw blades. The small ruler doubles as a depth gauge. There is a series of thickness gauges for standard dimensions and a protractor to ensure your saw table is at the correct angle in relation to the blade.
On the back of the aid is a chart showing what size blade to use, based on the wood thickness, and what size drill is required to drill blade-entry holes for the different blades. This gadget also includes a handy drawer to store tiny numbered drill bits that seem to disappear so often.
The key to the accuracy of this aid is in the transfer of the pattern and the cutting of the project. Start by sanding the plywood with 220- grit sandpaper.
Heat transfer patterns
There are a couple of ways to transfer patterns to wood with heat.
The first is to transfer the toner from a photocopy or a laser printer to wood by using a clothes iron. Toner is fused at a temperature around 400º, but some copiers and printers use a fusing oil, which will impede this process.
The second is T-shirt transfers. In my opinion, this method is better, because it gives the finished project a protective finish. T-shirt transfer paper is designed for inkjet printers. The image is printed in reverse. A reverse image pattern is available for download as article attachment. Place the transfer image-side-down onto the wood. Apply even pressure, and heatit with a clothes iron for 45-60 seconds to release the transfer from the backing paper. I found a medium setting on my iron worked best. Do not remove the backing paper until the transfer has completely cooled. Slip a sharp craft knife under one edge of the paper, and peel it back.
Once you remove the backing sheet, you may find some spotswhere the transfer did not bond well. There will be shiny blotches on the image. Take a piece of grease-proof parchment paper, and place it on the transfer. Reapply heat with the iron. The grease-proof paper will not stick to the image, allowing you to seal the transfer properly.
Materials
- 1⁄8″ x 4″ x 8&frac; ” Baltic birch plywood
- Dollar store telescope lens
- T-shirt heat transfer paper
- Grease-proof parchment paper
- Wood glue
- Sandpaper, assorted grits up to 220 grit
Tools
- #3 reverse-tooth blades or blades of choice
- Inkjet printer
- Clothes iron
- Drill with assorted small drill bits
- Clamps of choice
Attachments
Scroller’s Aid Transfer Download
The post Scroller's Aid appeared first on Scroll Saw Woodworking & Crafts.
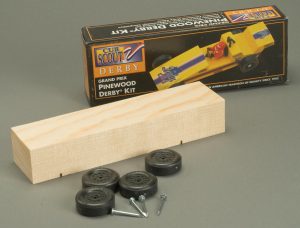
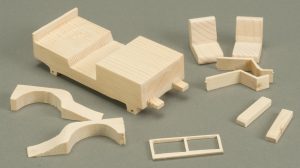
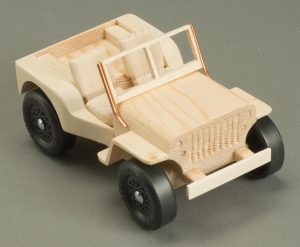
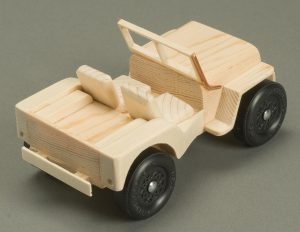
Off-road Racing Jeep 15 Dec 2024 7:15 AM (4 months ago)
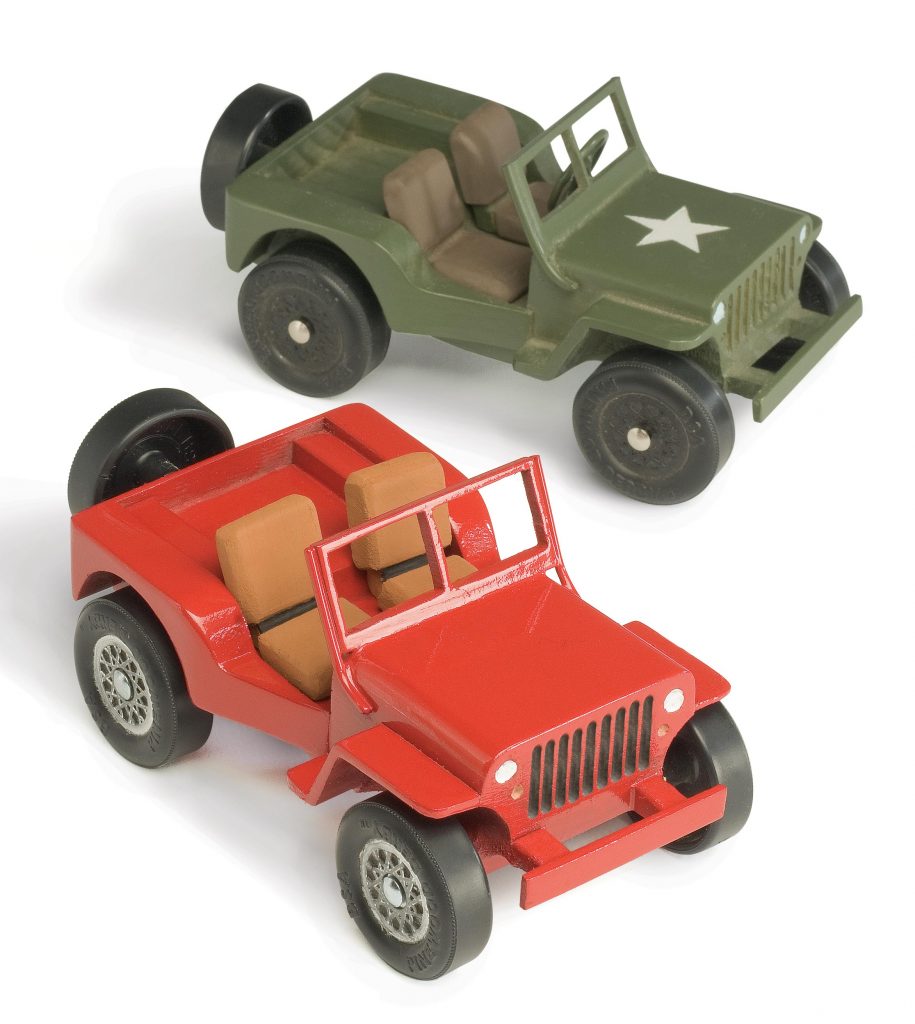 Use this clever design in a scout’s Pinewood Derby® or as a working wooden car
By Troy Thorne
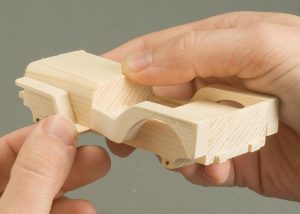
While designing diff erent cars for my son’s Pinewood Derby scouting event, I came up with the idea of a Jeep that meets the offi cial rules for the derby. If you don’t have a derby participant in your family, the bright colors and working design still make it a great toy for any age.
Despite its short wheelbase, this off – road Jeep meets the requirements of the Pinewood Derby. In Canada, the derby is called the Kub Kar®. No matter where you live, you should check with your local pack to ensure you are adhering to all the rules of the derby. To make the Jeep, you will need an extra wheel for the spare tire, and a bit of wire for the windshield. By adding the proper weights behind the seats, your Jeep can be a derby winner!
 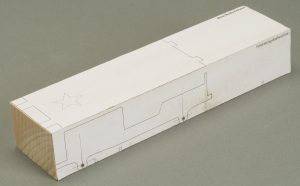 |
Set up the blank. Fold the pattern along the dotted line and attach the pattern to the blank with spray adhesive. Drill new axle holes where indicated on the pattern. Use a #44 drill bit. Set the wheels and axles aside for now. |
 |
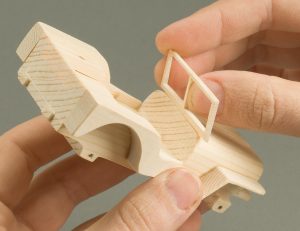
Cut the pieces. Be careful when cutting the thick wood of the Jeep body. Use a large scroll saw blade and do not force the wood into the blade. Round the edges of the hood and bevel the bottom edge of the windshield with sandpaper. |
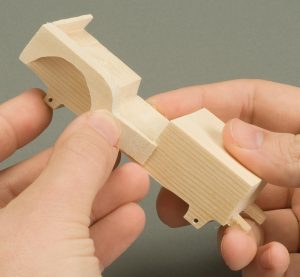  |
Attach the back fenders. Round the back corners and the wheel wells with sandpaper. Use the photo as a guide to properly align the rear fenders. Attach the fenders to the blank with cyanoacrylate (CA) glue. |
  |
Attach the front fenders and inner wheel wells. Use CA glue to attach the front fenders. Then attach the wheel wells behind the seat area with CA glue. The wheel wells will hide the slight gap between the rear fenders and the body of the Jeep. |
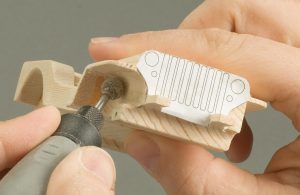 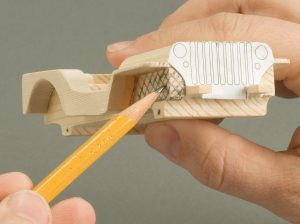 |
Shape the front. Attach the front-end pattern to the blank with spray adhesive. Remove the wood around the front axles (the shaded area) with a Dremel flexible shaft tool and a ball-shaped carbide rotary carving bit. |
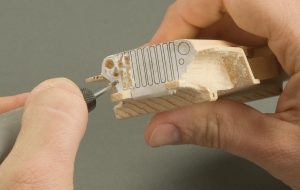 |
Shape the grill and headlights. Use a small, cylinder-shaped, high-speed cutter to carve the grill and headlights. The flexible shaft of the Dremel lets you hold and use the tool like a pencil, making it easy to carve the details. |
 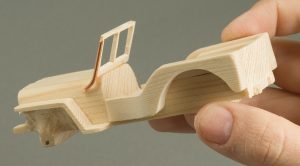 |
Attach the windshield. Apply CA glue to the bevel on the bottom of the windshield and position it on the hood. Cut two short lengths of copper wire, bend them to shape, and glue them to the sides of the windshield and hood for added support. |
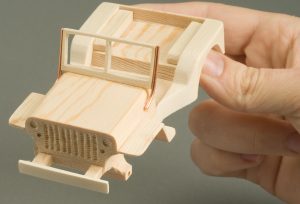 |
Attach the front bumper. Center the bumper and glue it in place with CA glue. Then add a bit more CA glue to the windshield-wire joint. The CA glue helps to build up the area between the wire and windshield to smooth the transition. |
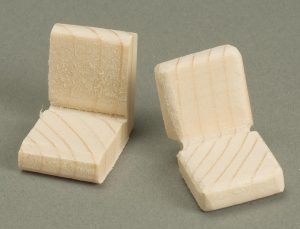 |
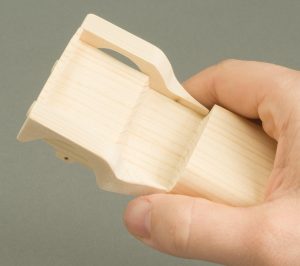
Shape the seats. Round the corners, and relieve away some of the wood at the bend to shape the seat cushions. Use a small, cylinder-shaped, high-speed cutter. Use CA glue to attach the seats and the rear bumper to the Jeep body. |
  |
Dry assemble the wheels. Slide the axles through the wheels and carefully push them into the axle holes. Friction should hold the axles in place. Rotate the wheels to make sure they spin freely. Sand wood away from any areas where the wheels bind. |
Finishing
I prefer to paint the seats and Jeep separately before gluing the seats in place. I use matte brown paint for the seats to resemble leather, and a glossy red for the Jeep body. You can choose any color scheme you want. Cut a notch in the spare tire to accommodate the bumper and glue it in place with CA glue.
Tip: Sanding Sticks
Use spray adhesive to attach assorted grits of sandpaper to tongue depressors. These sanding sticks last forever and are handy when sanding small parts like the back fender supports.Sanding Sticks Tip
Materials:
• Wood of choice: Pinewood Derby kit, or 11/4″ x 13/4″ x 7″ (body)
• Wheel: 5 each 11/4″-dia. (if not using the kit)
• Nails: 4 each 3/32″-dia. x 1″ (axles, if not using the kit)
• Ground wire, copper: 4″ 14-gauge (windshield support)
• Sandpaper: assorted grits
• Spray paint: red
• Cyanoacrylate (CA) glue
• Acrylic paints of choice for the details
Tools:
• #9 skip-tooth blades or blades of choice
• Rotary power carver
• Rotary carving bit, carbide ball: 1/4″-dia.
• Cutter, high speed, small: cylinder-shaped
• Assorted paintbrushes of choice
CLICK HERE to download the Off-Road Jeep Pattern.
The post Off-road Racing Jeep appeared first on Scroll Saw Woodworking & Crafts.
Scroll Saw Woodworking & Crafts Winter 2024 (Issue #97) 7 Oct 2024 5:17 AM (6 months ago)
The Winter 2024 issue of Scroll Saw Woodworking & Crafts includes a variety of fascinating features and techniques, as well as wintry-themed projects and patterns.
This issue is a part of the regular magazine subscription. It is also available from your favorite retailer or from Fox Chapel Publishing, foxchapelpublishing.com, 1-800-457-9112.
Click Here for Our Latest Issue
Features
 |
Treasure from Trash Landfill remnants are transformed in Ike Wynter’s uplifting statement pieces By Dorissa Bolinski |
 |
Wood Profile: Sycamore Interesting grain patterns abound in this easy-to-cut hardwood By Janette Square |
Projects
 |
Workshop Signs Lay claim to your space with a personalized plaque By Wayne and Jacob Fowler |
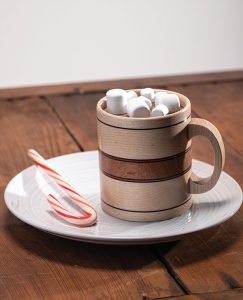 |
Cocoa Mug Box Cozy up to this mug of comfort that’s so real you can almost smell the chocolate By Carole Rothman |
 |
Nativity Segmentation Reclaimed wood lends a rustic elegance to this inspirational piece By Danielle Wendell |
 |
Christmas Truck Join Santa in bringing home the tree and hone your intarsia skills at the same time By Judy Gale Roberts |
Patterns
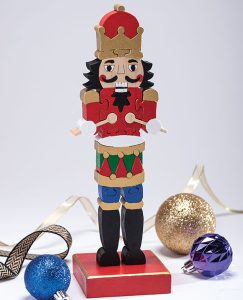 |
Nutcracker Puzzle This freestanding holiday favorite is full of vintage charm By Tim Gilman |
 |
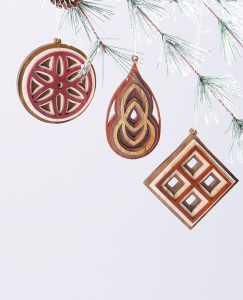
Holiday Bells Ring in the season with this cheerful intarsia ornament By Brad Eklund and Hazel Trinidad |
 |
Classic Fretwork Ornaments Stuff a stocking or adorn the tree with six nostalgic designs By Kathy Morawski |
 |
Best Mom Signs Delight a special person in your life with a nature-inspired tribute By Al Baggetta |
 |
Penguin Fretwork This exotic little bird makes a great shelf decoration for any nature lover By Wayne and Jacob Fowler |
 |
Trumpet Puzzle Get in the swing of things with this brass band favorite By Tim Gilman |
 |
Layered Ornaments Recycle contrasting scrap wood to create heirloom quality decorations By Dan Wilckens |
 |
Squiggly Christmas Trees Harvest a forest of lively decorations from the comfort of your workshop By Sue Mey |
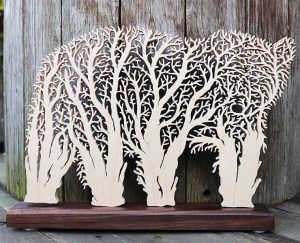 |
Stylized Bear A might grizzly commands the forest in this dramatic fretwork portrait By Charles Hand |
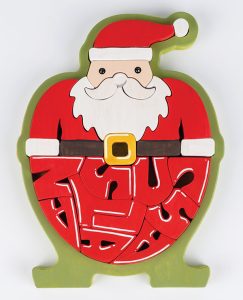 |
Holiday Puzzle Scroll a jolly Santa with a secret inside By Jaeheon Yun |
 |
Victorian Ornament Create some sparkle in an entryway with an elegant Star of Bethlehem By Staff of Scroll Saw Woodworking |
Techniques
 |
Compound-Cut Dreidel Celebrate the Festival of Lights with a homemade take on an age- By Al Baggetta |
 |
Wristwatch Clock Time is on your side with this quick but impressive conversation piece By Rita Cels |
Web Extra
Free Project – Want more ornaments? Get 26 patterns for a holiday-themed alphabet from Dave Van Ess!
Click Here for Holiday-Themed Alphabet Ornaments Project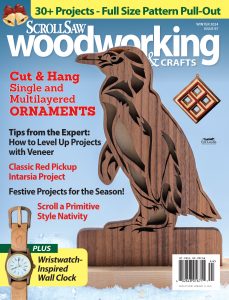 |
Purchase our latest issue! Click for Winter IssueFor more articles like these, subscribe to Scroll Saw Woodworking & Crafts magazine. SubscribePlus! Get mini magazines in your e-mail between printed issues with Short Cuts, our e-mail newsletter. Subscribe to Short Cuts |
The post Scroll Saw Woodworking & Crafts Winter 2024 (Issue #97) appeared first on Scroll Saw Woodworking & Crafts.