The End Times... 3 Jan 2018 8:30 AM (7 years ago)

It was the day after Christmas, and it was one of the most Games Workshoppy ones my lady and I'd had in a while. I’d already been hit with a financial crunch, but really... by seventh edition I’d lost most hope for the game. As I’ve mentioned before.

Eighth edition has really rekindled my love for 40K. And I’d already been having this ongoing fling with Age of Sigmar, so it was kinda the best of both worlds. And my girlfriend’s okay with it as long as she gets included sometimes (I'm a lucky guy).
So this Christmas was some Death Guard and a core of Stormcast Eternals for me, while she got the core of a shiny new Arkanaut/ Kharadron force (she’s had her eye on the steampunk dwarves and their airships since they first showed up).
There was much rejoicing.
But it got me thinking about building a lot of this stuff. And the tweaks I still need to make to my Death Guard so they’ll fit this brave new millennium we’ve entered into. Plus some Primaris I have left to build. Really, there’s a ton of additions for the Relictors that have kinda piled up. And the core of a Seraphon army that I’ve been collecting for ages...

That’s a lot of stuff to work on. And not a lot of time. Especially since I’m really pushing to get two new books done in 2018.
When you also consider that I barely managed to post twelve times last year...and only nine times the year before that. Trying to do any sort of noteworthy project, document it, and write up semi-useful directions takes up a fair amount of time. Plus, there hasn’t been any real response on anything in about two years, and even then it’s not like there were long lines of people waiting to share their thoughts.
So... I think I’ll be shuttering this blog. I won’t be so extreme as to delete it—there’s still plenty of advice here for conversions and Paperhammer models. Plus the models themselves in the STC files.
I may still post something now and then, too. I’ve got a scratch-built Ogre Tyrant that I put together for about six bucks. Some updates on my cheap Legion of the Damned. And I’ve been toying with building a cardstock version on Witchfate Tor. Maybe even get some of these Paperhammer projects finally done and painted...
I may put some new stuff over on my just-as-neglected Relictors blog. It’s a little less instruction, a little more of my musing about the game and the chapter and my take on them (and how my models fit into that take). And I'll continue to do stuff with the Atomic Warlords (for as long as they'll have me).
So, to the three of you who still check this page every other month or so... thanks. If you have any interest, I actually blab a lot about geeky stiff on Twitter and Instagram. Maybe I’ll see you there.
The Emperor Protects.


.%3Cbr%20/%3E%0A%3Cdiv%3E%0A%3Cbr%20/%3E%0ASo%20this%0AChristmas%20was%20some%20Death%20Guard%20and%20a%20core%20of%20Stormcast%20Eternals%20for%20me,%20while%0Ashe%20got%20the%20core%20of%20a%20shiny%20new%20Arkanaut/%20Kharadron%20force%20(she%E2%80%99s%20had%20her%20eye%20on%0Athe%20steampunk%20dwarves%20and%20their%20airships%20since%20they%20first%20showed%20up).%26nbsp;%20%3C/div%3E%0A%3Cdiv%3E%0A%3Cbr%20/%3E%0AThere%20was%0Amuch%20rejoicing.%3C/div%3E%0A%3Cdiv%3E%0A%3Cbr%20/%3E%0ABut%20it%20got%0Ame%20thinking%20about%20building%20a%20lot%20of%20this%20stuff.%26nbsp;%0AAnd%20the%20tweaks%20I%20still%20need%20to%20make%20to%20my%20Death%20Guard%20so%20they%E2%80%99ll%20fit%0Athis%20brave%20new%20millennium%20we%E2%80%99ve%20entered%20into.%26nbsp;%0APlus%20some%20Primaris%20I%20have%20left%20to%20build.%26nbsp;%0AReally,%20there%E2%80%99s%20a%20ton%20of%20additions%20for%20the%20Relictors%20that%20have%20kinda%0Apiled%20up.%26nbsp;%20And%20the%20core%20of%20a%20Seraphon%0Aarmy%20that%20I%E2%80%99ve%20been%20collecting%20for%20ages...%3C/div%3E%0A%3Cdiv%3E%0A%3Ca%20href%3D%22https://blogger.googleusercontent.com/img/b/R29vZ2xl/AVvXsEh8QcCABPiKGwIiz3CJOcLTQuU9OiSclPckmsO7fTqXW4AmOkKERFGsrx9b7bBCcuhDsTEyc_rG0_0gD2vVKuAunsimdztKb3FlhSgNFlJ3Pvj88YEqZd7tyGyc4y7s4BdgbcIvP7-PyPLy/s1600/Primaris.jpg%22%20imageanchor%3D%221%22%3E%3Cimg%20border%3D%220%22%20data-original-height%3D%221080%22%20data-original-width%3D%221080%22%20height%3D%22200%22%20src%3D%22https://blogger.googleusercontent.com/img/b/R29vZ2xl/AVvXsEh8QcCABPiKGwIiz3CJOcLTQuU9OiSclPckmsO7fTqXW4AmOkKERFGsrx9b7bBCcuhDsTEyc_rG0_0gD2vVKuAunsimdztKb3FlhSgNFlJ3Pvj88YEqZd7tyGyc4y7s4BdgbcIvP7-PyPLy/s200/Primaris.jpg%22%20width%3D%22200%22%20/%3E%3C/a%3E%3Cbr%20/%3E%0AThat%E2%80%99s%20a%0Alot%20of%20stuff%20to%20work%20on.%26nbsp;%20And%20not%20a%20lot%0Aof%20time.%26nbsp;%20Especially%20since%20I%E2%80%99m%20really%0Apushing%20to%20get%20two%20%3Ca%20href%3D%22http://amzn.to/2zI5e9E%22%3Enew%20books%3C/a%3E%20done%20in%202018.%3C/div%3E%0A%3Cdiv%3E%0A%3Cbr%20/%3E%0AWhen%20you%0Aalso%20consider%20that%20I%20barely%20managed%20to%20post%20twelve%20times%20last%20year...and%20only%0Anine%20times%20the%20year%20before%20that.%26nbsp;%20Trying%0Ato%20do%20any%20sort%20of%20noteworthy%20project,%20document%20it,%20%3Ci%3Eand%3C/i%3E%20write%20up%0Asemi-useful%20directions%20takes%20up%20a%20fair%20amount%20of%20time.%26nbsp;%20Plus,%20there%20hasn%E2%80%99t%20been%20any%20real%20response%20on%0Aanything%20in%20about%20two%20years,%20and%20even%20then%20it%E2%80%99s%20not%20like%20there%20were%20long%20lines%0Aof%20people%20waiting%20to%20share%20their%20thoughts.%3C/div%3E%0A%3Cdiv%3E%0A%3Cbr%20/%3E%0ASo...%20I%0Athink%20I%E2%80%99ll%20be%20shuttering%20this%20blog.%20I%20won%E2%80%99t%20be%20so%20extreme%20as%20to%20delete%0Ait%E2%80%94there%E2%80%99s%20still%20plenty%20of%20advice%20here%20for%20conversions%20and%20Paperhammer%20models.%26nbsp;%20Plus%20the%20models%20themselves%20in%20%3Ca%20href%3D%22http://thegrimcheapness.blogspot.com/2015/11/new-stc-data-discovered.html%22%3Ethe%20STC%20files%3C/a%3E.%3C/div%3E%0A%3Cdiv%3E%0A%3Cbr%20/%3E%0AI%20may%20still%0Apost%20something%20now%20and%20then,%20too.%26nbsp;%20I%E2%80%99ve%0Agot%20a%20scratch-built%20Ogre%20Tyrant%20that%20I%20put%20together%20for%20about%20six%20bucks.%26nbsp;%20Some%20updates%20on%20my%20cheap%20%3Ca%20href%3D%22http://thegrimcheapness.blogspot.com/2010/11/unyielding-spectres-follow-up.html%22%3ELegion%20of%20the%20Damned%3C/a%3E.%20%26nbsp;And%20I%E2%80%99ve%20been%20toying%20with%0Abuilding%20a%20cardstock%20version%20on%20Witchfate%20Tor.%26nbsp;%0AMaybe%20even%20get%20some%20of%20these%20Paperhammer%20projects%20finally%20done%20and%20painted...%3C/div%3E%0A%3Cdiv%3E%0A%3Cbr%20/%3E%0AI%20may%20put%20some%0Anew%20stuff%20over%20on%20my%20%3Ca%20href%3D%22http://relictorschapter.blogspot.com/%22%3Ejust-as-neglected%20Relictors%20blog%3C/a%3E.%20It%E2%80%99s%20a%20little%20less%0Ainstruction,%20a%20little%20more%20of%20my%20musing%20about%20the%20game%20and%20the%20chapter%20and%20my%0Atake%20on%20them%20(and%20how%20my%20models%20fit%20into%20that%20take).%26nbsp;%20And%20I'll%20continue%20to%20do%20stuff%20with%20%3Ca%20href%3D%22http://atomicwarlords.blogspot.com/%22%3Ethe%20Atomic%20Warlords%3C/a%3E%20(for%20as%20long%20as%20they'll%20have%20me).%3C/div%3E%0A%3Cdiv%3E%0A%3Cbr%20/%3E%0ASo,%20to%20the%0Athree%20of%20you%20who%20still%20check%20this%20page%20every%20other%20month%20or%20so...%26nbsp;%20thanks.%20If%20you%20have%20any%20interest,%20I%20actually%0Ablab%20a%20lot%20about%20geeky%20stiff%20on%20%3Ca%20href%3D%22https://twitter.com/PeterClines%22%3ETwitter%20%3C/a%3Eand%20%3Ca%20href%3D%22https://www.instagram.com/peterclines/%22%3EInstagram%3C/a%3E.%20Maybe%20I%E2%80%99ll%20see%20you%0Athere.%3C/div%3E%0A%3Cbr%20/%3E%0AThe%20Emperor%20Protects.%3Cbr%20/%3E%0A%3Cbr%20/%3E%0A%3Cdiv%3E%0A%3Ca%20href%3D%22https://blogger.googleusercontent.com/img/b/R29vZ2xl/AVvXsEjyn8PT-n-EmWWC_Tj2rJAGWU6h4tyJLjJDn4KnRcgo_4gG8DfpazkNMrH2-qLskHL6EQdvZ_XVSU4Kn5pBih4GNYBtg9o51BaGwYNxVYCrvSaAh03tpmFt6LyvCgPnCm27RJzzOjRLZ_Xn/s1600/IMG_4372.JPG%22%20imageanchor%3D%221%22%3E%3Cimg%20border%3D%220%22%20data-original-height%3D%22881%22%20data-original-width%3D%221171%22%20height%3D%22300%22%20src%3D%22https://blogger.googleusercontent.com/img/b/R29vZ2xl/AVvXsEjyn8PT-n-EmWWC_Tj2rJAGWU6h4tyJLjJDn4KnRcgo_4gG8DfpazkNMrH2-qLskHL6EQdvZ_XVSU4Kn5pBih4GNYBtg9o51BaGwYNxVYCrvSaAh03tpmFt6LyvCgPnCm27RJzzOjRLZ_Xn/s400/IMG_4372.JPG%22%20width%3D%22400%22%20/%3E%3C/a%3E%3C/div%3E%0A%3C/div%3E)


Based On... What? 18 Oct 2017 12:55 PM (7 years ago)

 Well, my first option came to me from WarGamma, a fun
after-market site I’ve bought stuff from before. He’s a sculptor who’s done some wonderful items
for “heroic scale” gaming, and he jumped on the rebasing issue less than a
month after the introduction of the 32mm base.
Check these out—base expanders.
Just drop your model in, add superglue, and done. They work out to .70 cents each.
Well, my first option came to me from WarGamma, a fun
after-market site I’ve bought stuff from before. He’s a sculptor who’s done some wonderful items
for “heroic scale” gaming, and he jumped on the rebasing issue less than a
month after the introduction of the 32mm base.
Check these out—base expanders.
Just drop your model in, add superglue, and done. They work out to .70 cents each. At first I’d planned to split them between my Relictors and my Alpha Legion, just dropping them on (or under) HQ units, squad leaders, and other key figures. Then I realized their best use was metal figs on slottabases. Which is only a few Relictors and Alpha Legion guys, but a lot of my Death Guard and Thousand Sons. And Necrons. So the priorities shifted a bit there.
 As an added bonus, these adaptors make a minifig about a milimeter or two
taller. On a regular base, I think it’d
be one even, but the raised area in the middle means slottabases sit a little
higher. In these days of size-creep... that’s not a bad thing.
As an added bonus, these adaptors make a minifig about a milimeter or two
taller. On a regular base, I think it’d
be one even, but the raised area in the middle means slottabases sit a little
higher. In these days of size-creep... that’s not a bad thing.The catch here is that it means wrecking any basing/scenery you might’ve previously added. Plus... well, I don’t know about you. but the knife’s slipped a few times for me or slid off path and suddenly a marine’s missing part of their heel or toes. It’s a minor thing, but it grates at me. I did maybe a dozen Relictors like this a few weeks back, carefully cutting off one foot at a time. Only one lost a bit of his heel.
 And this led me to option three.
 You can even do this with plastic slottabase figs. I picked out some of my Relictors with
missile launchers from the Battle for Macragge/ Black Reach sets. It takes a little more work to clip the
slottabase off, but it works exactly the same.
Clip, file, glue, done. Faster,
safer, a little taller.
You can even do this with plastic slottabase figs. I picked out some of my Relictors with
missile launchers from the Battle for Macragge/ Black Reach sets. It takes a little more work to clip the
slottabase off, but it works exactly the same.
Clip, file, glue, done. Faster,
safer, a little taller.And there you go. Three quick, easy, and relatively cheap way to make your old models new and even a little bigger.
Got to stand up to those Primaris somehow...


In Other News... 19 Sep 2017 5:00 PM (7 years ago)


Sorry... need to mention my other art projects for a minute.
And if I’m not going to be near you... well, most of these stores take orders and ship. Some of them even ship internationally! Give them a call, request something for enscribbling, and you can still have a personalized copy in your hands in just a few days.
(and there’s also a kick-ass audiobook narrated by Ray Porter, which means you can listen while building and painting... just saying)
Hope to see you there.
%3C/div%3E%0A%3Cbr%20/%3E%0AHope%20to%20see%20you%20there.%3C/div%3E)
Knight Missile Pod 12 Sep 2017 2:11 PM (7 years ago)

 That said, a while back you may remebember GW put out their Renegade
box set, with Imperial Knights vs Traitor Knights. Big shock—I loved the idea of Knights that
had fallen to Chaos. Plus, it meant I
could now do fantastic giant robot battles with Marcus.
One of the online bitz sellers I deal with frequently bought a bunch of Renegade
sets and put a lot of Knights up for sale at about half off. Just bare-bones
Knights—not the expansion/ Warden sprue—but still really cheap. Almost
half-off.
That said, a while back you may remebember GW put out their Renegade
box set, with Imperial Knights vs Traitor Knights. Big shock—I loved the idea of Knights that
had fallen to Chaos. Plus, it meant I
could now do fantastic giant robot battles with Marcus.
One of the online bitz sellers I deal with frequently bought a bunch of Renegade
sets and put a lot of Knights up for sale at about half off. Just bare-bones
Knights—not the expansion/ Warden sprue—but still really cheap. Almost
half-off. And here’s what I came up with.
 These two boxes will be the base of our rocket pod. They’re from the classic Rhino set (normally they’d go on the back slope of the treads). I glued the open faces together to give me a solid box. If you don’t have these exact pieces—no worries. There are enough random boxes and blocks kicking through the various lines that will work. You could even just scratch-build a box from scrap plastic.
Next, I very, very carefully found the center point on one of the narrow sides and drilled a hole there. My post is the bottom half of a Lizardma—sorry, Seraphon standard pole.
Helpful Hint—whenever I need to do a hole, I start small. I use a thinner drill bit than I need, because it’ll be easier to place the hole, or to clean it up if you’re a bit off. Then I can expand up to the larger size, using the initial hole as a guide.
 I checked that post from every angle. It’s very important
that it be as straight as possible—perpendicular to the surface of the
box. I checked it multiple times from
every angle.
I checked that post from every angle. It’s very important
that it be as straight as possible—perpendicular to the surface of the
box. I checked it multiple times from
every angle.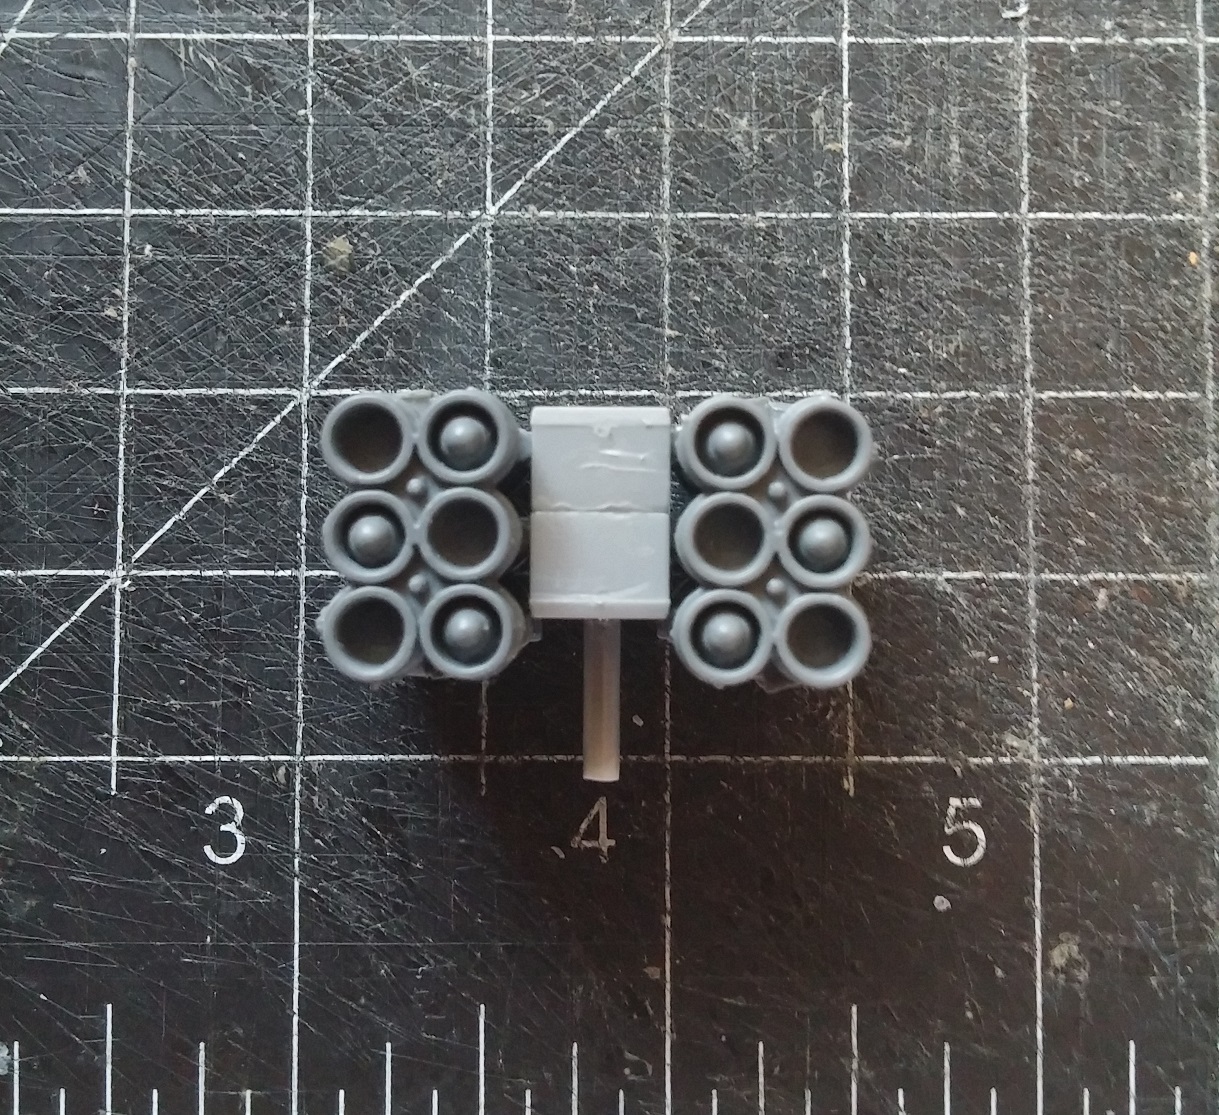 Once they were relatively dry, I glued them onto either side of the box. This took a little bit of work and
patience. I wanted them to be flat
across the top, but they also needed to have a lot of surface area touching the
boxes for the glue. It required some
wiggling.
Once they were relatively dry, I glued them onto either side of the box. This took a little bit of work and
patience. I wanted them to be flat
across the top, but they also needed to have a lot of surface area touching the
boxes for the glue. It required some
wiggling.Now, the next part was tricky. I had a post that fit in the top socket of the Knight, but I needed a bracket to hold the pod upright and stable. I dug through some random scraps and found some plastic tubing that was just about the right size to fit in the ring around the socket. A little work on the edges with a file and it fit perfectly! I could cut a short section and set it around the post, so the two elements would each lock into place.
 But... it needed to be perfectly centered. Even a little bit off and nothing would
fit. I’d have to cut it off and try
again. I mulled on this for a few minutes
and then realized the answer was right in front of me. The ring and socket on the knight were
already there. I just needed to fit the tube section and pod into place and
they’d center themselves. The only worry
was being cautious with the glue so I didn’t accidentally attach the whole
thing right now.
But... it needed to be perfectly centered. Even a little bit off and nothing would
fit. I’d have to cut it off and try
again. I mulled on this for a few minutes
and then realized the answer was right in front of me. The ring and socket on the knight were
already there. I just needed to fit the tube section and pod into place and
they’d center themselves. The only worry
was being cautious with the glue so I didn’t accidentally attach the whole
thing right now.
Anyway... at this point the missile pod was more or less done, but I wanted to add just a few details to make it look more solid, more like the original pod and even more Chaos-y. So I dug up another one of those vehicle sprues and clipped off a few more things...
 The big Horus eye plaque for the Land Raider fit almost
exactly across the top of the missile pod. That helped to tie it all together
so it looked a little less cobbled together. I also added in a strip of plastic
here to fill a small gap. Next, the
regular missile launcher has a sort of antenna/sensor array that wraps around
one side. I wanted to imply that, and
found out that one of the curved spiky bits (usually used to line hatches and
turrets) worked like a dream for this.
The big Horus eye plaque for the Land Raider fit almost
exactly across the top of the missile pod. That helped to tie it all together
so it looked a little less cobbled together. I also added in a strip of plastic
here to fill a small gap. Next, the
regular missile launcher has a sort of antenna/sensor array that wraps around
one side. I wanted to imply that, and
found out that one of the curved spiky bits (usually used to line hatches and
turrets) worked like a dream for this.And there you have it. A $30 missile pod for... well, one afternoon of rooting through my bits.

Primaris—an Introspective 15 Aug 2017 7:30 AM (7 years ago)

 So, a while back I came up with a rationalization for why Roboute
Guilliman would send a company’s worth of Primaris Marines to the
Relictors to help bolster their near-decimated chapter.
So, a while back I came up with a rationalization for why Roboute
Guilliman would send a company’s worth of Primaris Marines to the
Relictors to help bolster their near-decimated chapter. Between two and three, I’m pretty sure we’ll be seeing
Primaris versions of most of the major Space Marine characters over the next
year or three. Tigerius. Dante. Lysander.
Shrike. You could save time now and just convert an Aggressor into
Primaris Marneus Calgar.
Between two and three, I’m pretty sure we’ll be seeing
Primaris versions of most of the major Space Marine characters over the next
year or three. Tigerius. Dante. Lysander.
Shrike. You could save time now and just convert an Aggressor into
Primaris Marneus Calgar.How are any of the Primaris from that first group (point one) dealing with this?
 How are they really going to fit in? How are they going to
react to their super-secretive Dark Angels brethren or the savage, bestial
Space Wolves they’re now training with?
It’s easy enough to repaint your armor, but how do you go against the
twenty-forty-sixty years of training you’ve had to deal with these... these
other people and their way of doing things?
How are they really going to fit in? How are they going to
react to their super-secretive Dark Angels brethren or the savage, bestial
Space Wolves they’re now training with?
It’s easy enough to repaint your armor, but how do you go against the
twenty-forty-sixty years of training you’ve had to deal with these... these
other people and their way of doing things?
Quick Dark Imperium Conversions 4 Aug 2017 8:57 AM (7 years ago)

 So, I’ve mentioned before (in a few places) my plan to use the Primaris
Marines from the Dark Imperium set as my new Relictors second
company. Naturally, the Relictors
Conclave isn’t going to tell the new guys everything about how their
Chapter functions, but I still wanted to make a few small tweaks to some of the
higher-ups, something to show just a small hint of... well, you know.
So, I’ve mentioned before (in a few places) my plan to use the Primaris
Marines from the Dark Imperium set as my new Relictors second
company. Naturally, the Relictors
Conclave isn’t going to tell the new guys everything about how their
Chapter functions, but I still wanted to make a few small tweaks to some of the
higher-ups, something to show just a small hint of... well, you know. I added a few skulls to the base. It’s a habit I got into with Age of Sigmar models, because it’s an easy way to make characters stand out (and if
you’ve been playing this game for a while, odds are you’re not short on
skulls). It also helps fill some space, since Primaris are on 40mm bases.
I added a few skulls to the base. It’s a habit I got into with Age of Sigmar models, because it’s an easy way to make characters stand out (and if
you’ve been playing this game for a while, odds are you’re not short on
skulls). It also helps fill some space, since Primaris are on 40mm bases. Finally, the biggest tweak, but it’s still kinda
subtle. Using a very sharp knife, I
sliced the pommel off the Captain’s power sword and replaced it with a
skull. A deliberately large—perhaps even
life-sized—skull. He also got another
purity seal on the back of his hand, as close to the sword as possible. It doesn’t scream “Chaos weapon,” but it
maybe mumbles it under its breath. I may give the blade a red-orange paint job,
just to make it a bit more iffy.
Finally, the biggest tweak, but it’s still kinda
subtle. Using a very sharp knife, I
sliced the pommel off the Captain’s power sword and replaced it with a
skull. A deliberately large—perhaps even
life-sized—skull. He also got another
purity seal on the back of his hand, as close to the sword as possible. It doesn’t scream “Chaos weapon,” but it
maybe mumbles it under its breath. I may give the blade a red-orange paint job,
just to make it a bit more iffy.Not bad, I think.
%20my%20plan%20to%20use%20the%20Primaris%0AMarines%20from%20%3Ca%20href%3D%22http://thegrimcheapness.blogspot.com/2017/06/dark-imperium.html%22%3Ethe%20Dark%20Imperium%20set%3C/a%3E%20as%20my%20new%20Relictors%20second%0Acompany.%26nbsp;%20Naturally,%20the%20Relictors%0AConclave%20isn%E2%80%99t%20going%20to%20tell%20the%20new%20guys%20%3Ci%3Eeverything%3C/i%3E%20about%20how%20their%0AChapter%20functions,%20but%20I%20still%20wanted%20to%20make%20a%20few%20small%20tweaks%20to%20some%20of%20the%0Ahigher-ups,%20something%20to%20show%20just%20a%20small%20hint%20of...%20well,%20you%20know.%3C/div%3E%0A%3Cdiv%3E%0A%3Cbr%20/%3E%3C/div%3E%0A%3Cdiv%3E%0AHere%E2%80%99s%20the%20Primaris%20Captain.%26nbsp;%0AOne%20of%20the%20first%20thing%20that%20struck%20me%E2%80%94a%20running%20theme%20I%E2%80%99ve%20noticed%20with%0Athe%20Primaris%E2%80%94is%20that%20he%E2%80%99s%20actually%20designed%20with%20a%20reliquary%20(a%20philatory,%20if%20you%20want%20to%0Abe%20exact)%20hanging%20at%20his%20waist.%20%26nbsp;That%E2%80%99s%20a%0Agood%20start.%20%3C/div%3E%0A%3Cdiv%3E%0A%3Cbr%20/%3E%3C/div%3E%0A%3Cdiv%3E%0A%3Ca%20href%3D%22https://blogger.googleusercontent.com/img/b/R29vZ2xl/AVvXsEjsNFjljaZ2M2OkC_WY_HmtYe2maTjgz4xBDKRh_XweaLs11L6RBTNj9PB6e5nRG9P8XWRw4poGbmXNLeCWYqwJntbn6oceuJdp66Jk1HbBc4-0YZNyE87ZAL5SwEf_yZYDnMg09pg3RYqj/s1600/Purity+Seals.jpg%22%20imageanchor%3D%221%22%3E%3Cimg%20border%3D%220%22%20data-original-height%3D%22337%22%20data-original-width%3D%22432%22%20height%3D%22155%22%20src%3D%22https://blogger.googleusercontent.com/img/b/R29vZ2xl/AVvXsEjsNFjljaZ2M2OkC_WY_HmtYe2maTjgz4xBDKRh_XweaLs11L6RBTNj9PB6e5nRG9P8XWRw4poGbmXNLeCWYqwJntbn6oceuJdp66Jk1HbBc4-0YZNyE87ZAL5SwEf_yZYDnMg09pg3RYqj/s200/Purity+Seals.jpg%22%20width%3D%22200%22%20/%3E%3C/a%3EI%20added%20a%20few%20skulls%20to%20the%20base.%26nbsp;%20It%E2%80%99s%20a%20habit%20I%20got%20into%20with%20%3Ca%20href%3D%22http://thegrimcheapness.blogspot.com/2016/06/cultists-and-marauders.html%22%3EAge%20of%20Sigmar%20models%3C/a%3E,%20because%20it%E2%80%99s%20an%20easy%20way%20to%20make%20characters%20stand%20out%20(and%20if%0Ayou%E2%80%99ve%20been%20playing%20this%20game%20for%20a%20while,%20odds%20are%20you%E2%80%99re%20not%20short%20on%0Askulls).%20It%20also%20helps%20fill%20some%20space,%20since%20Primaris%20are%20on%2040mm%20bases.%3C/div%3E%0A%3Cdiv%3E%0A%3Cbr%20/%3E%3C/div%3E%0A%3Cdiv%3E%0AI%20added%20more%20purity%20seals,%20because%20the%26nbsp;%3Ca%20href%3D%22http://thegrimcheapness.blogspot.com/2013/10/space-marine-captain.html%22%3ERelictors%20love%20purity%20seals%3C/a%3E.%26nbsp;%20Some%20on%20the%0Ashoulder,%20a%20few%20on%20the%20cape.%20%26nbsp;I%20like%20them%20because%20the%20Chapter%20has%20such%20an%20overall%20simple%20color%20scheme%20that%20it%20isn%E2%80%99t%20always%20clear%20to%20some%0Afolks%20that%20they%E2%80%99re%20actually%20painted%20(I%20had%20once%20had%20a%20tournament%26nbsp;judge%20comment%20on%20my%20%E2%80%9Cprimer%20gray%E2%80%9D%20army).%20So%20purity%20seals%20also%20serve%20to%20add%20some%20color%0Aand%20contrast%20to%20each%20model.%3C/div%3E%0A%3Cdiv%3E%0A%3Cbr%20/%3E%3C/div%3E%0A%3Cdiv%3E%0A%3Ca%20href%3D%22https://blogger.googleusercontent.com/img/b/R29vZ2xl/AVvXsEhzrdm2M5BsvdWDblJkIZX2taOyYutUfOVJ6kdh8IoPWBsuNcU3-VQ3Kv3m7Uf0RUhQR7uD_crL5E8EQsWO6_58MPjsY4UVMk5Eq4intFEzLXYRjDz_PRzedwQpSjiuRKQRG0DfuhZau5mO/s1600/Sword+Detail.jpg%22%20imageanchor%3D%221%22%3E%3Cimg%20border%3D%220%22%20data-original-height%3D%22391%22%20data-original-width%3D%22560%22%20height%3D%22139%22%20src%3D%22https://blogger.googleusercontent.com/img/b/R29vZ2xl/AVvXsEhzrdm2M5BsvdWDblJkIZX2taOyYutUfOVJ6kdh8IoPWBsuNcU3-VQ3Kv3m7Uf0RUhQR7uD_crL5E8EQsWO6_58MPjsY4UVMk5Eq4intFEzLXYRjDz_PRzedwQpSjiuRKQRG0DfuhZau5mO/s200/Sword+Detail.jpg%22%20width%3D%22200%22%20/%3E%3C/a%3EFinally,%20the%20biggest%20tweak,%20but%20it%E2%80%99s%20still%20kinda%0Asubtle.%26nbsp;%20Using%20a%20very%20sharp%20knife,%20I%0Asliced%20the%20pommel%20off%20the%20Captain%E2%80%99s%20power%20sword%20and%20replaced%20it%20with%20a%0Askull.%26nbsp;%20A%20deliberately%20large%E2%80%94perhaps%20even%0Alife-sized%E2%80%94skull.%26nbsp;%20He%20also%20got%20another%0Apurity%20seal%20on%20the%20back%20of%20his%20hand,%20as%20close%20to%20the%20sword%20as%20possible.%26nbsp;%20It%20doesn%E2%80%99t%20scream%20%E2%80%9CChaos%20weapon,%E2%80%9D%20but%20it%0Amaybe%20mumbles%20it%20under%20its%20breath.%20I%20may%20give%20the%20blade%20a%20red-orange%20paint%20job,%0Ajust%20to%20make%20it%20a%20bit%20more%20iffy.%3Cbr%20/%3E%0A%3Cbr%20/%3E%0ANot%20bad,%20I%20think.%3C/div%3E%0A%3C/div%3E)
SDCC Schedule 17 Jul 2017 7:23 AM (7 years ago)

However...
 If you’re into that sort of thing, I thought I’d mention my San Diego
Comic Con schedule. This kinda snuck up
on me in a couple ways. I hadn’t planned
on going, and my big plans for the coming weekend involved putting together my
Lizardman/Seraphon army for Age of Sigmar.
If you’re into that sort of thing, I thought I’d mention my San Diego
Comic Con schedule. This kinda snuck up
on me in a couple ways. I hadn’t planned
on going, and my big plans for the coming weekend involved putting together my
Lizardman/Seraphon army for Age of Sigmar.
Anyway, turns out the folks at Random House had some clever ideas for early Paradox Bound stuff and they asked if I wanted to be part of them, sooooo... the Lizardmen will have to wait. So if you’re going to be at SDCC and wanted to tell me what a crappy painter/ gamer I am... well, here’s what I’ve got for you...
Friday 7/21, 3:00-4:00 – Some random giveaways at the Crown Booth (1515). Odds of being given something increase if you tell them "The road beckons." I’m not officially there, but I’ll probably be informally hanging out/lurking a bit if you had something you wanted me to scribble on. Or if the booth folks handed you something you wanted scribbled in.
Saturday 7/22, 2:15-3:15—All the folks from that panel are going to be under the sail for a signing. And Mysterious Galaxy will be there with piles of books from all of us, so it’s a great chance to get something scribbled in without having to lug it around for half the day (and to fill in those holes in your collection).
I don’t have anything official scheduled for Sunday, so—to be horribly honest—I’m not sure I’ll be there or not. I may try to sneak off with that life sized Spider-Man LEGO sculpture. We’ll see how that goes...
Hope to see some of you there.
%20the%20past%20three%20weeks%20have%20been%20kind%20of%20a%20blur.%26nbsp;%20I%20don%E2%80%99t%20have%20an%20actual%20post%20for%20you.%26nbsp;%20%3Cbr%20/%3E%0A%3Cbr%20/%3E%0AHowever...%3Cbr%20/%3E%0A%3C!--%5Bif%20!supportLineBreakNewLine%5D--%3E%3Cbr%20/%3E%0A%3C!--%5Bendif%5D--%3E%3C/div%3E%0A%3Ca%20href%3D%22https://blogger.googleusercontent.com/img/b/R29vZ2xl/AVvXsEjiN_bxPLyscgN72lP4uhAU6Wh24HZGapsItqgtyAw_-17vdLS-rahWoeluDZyaNa7te7VbXzNC6eSYeAWe4CVCQM_mpyePbJtX4pV6sIEVUF-ZNeXmMFBUKfIsAGNN2beLr98J3Ow6yrwM/s1600/11230930_10153460713908270_3887335619546930876_o.jpg%22%20imageanchor%3D%221%22%3E%3Cimg%20border%3D%220%22%20data-original-height%3D%22649%22%20data-original-width%3D%22526%22%20height%3D%22200%22%20src%3D%22https://blogger.googleusercontent.com/img/b/R29vZ2xl/AVvXsEjiN_bxPLyscgN72lP4uhAU6Wh24HZGapsItqgtyAw_-17vdLS-rahWoeluDZyaNa7te7VbXzNC6eSYeAWe4CVCQM_mpyePbJtX4pV6sIEVUF-ZNeXmMFBUKfIsAGNN2beLr98J3Ow6yrwM/s200/11230930_10153460713908270_3887335619546930876_o.jpg%22%20width%3D%22161%22%20/%3E%3C/a%3EIf%20you%E2%80%99re%20into%20that%20sort%20of%20thing,%20I%20thought%20I%E2%80%99d%20mention%20my%20San%20Diego%0AComic%20Con%20schedule.%26nbsp;%20This%20kinda%20snuck%20up%0Aon%20me%20in%20a%20couple%20ways.%26nbsp;%20I%20hadn%E2%80%99t%20planned%0Aon%20going,%20and%20my%20big%20plans%20for%20the%20coming%20weekend%20involved%20putting%20together%20my%0ALizardman/Seraphon%20army%20for%20Age%20of%20Sigmar.%26nbsp;%0A%3Cbr%20/%3E%0A%3Cbr%20/%3E%0AAnyway,%20turns%20out%20the%20folks%20at%20Random%20House%20had%20some%20clever%20ideas%20for%20early%20%3Ci%3E%3Cb%3E%3Ca%20href%3D%22http://amzn.to/2thUuAe%22%3EParadox%20Bound%3C/a%3E%3C/b%3E%3C/i%3E%20stuff%20and%20they%20asked%20if%20I%20wanted%20to%20be%20part%20of%20them,%20sooooo...%20the%0ALizardmen%20will%20have%20to%20wait.%26nbsp;%20So%20if%20you%E2%80%99re%0Agoing%20to%20be%20at%20SDCC%20and%20wanted%20to%20tell%20me%20what%20a%20crappy%20painter/%20gamer%20I%20am...%20well,%20here%E2%80%99s%0Awhat%20I%E2%80%99ve%20got%20for%20you...%3Cbr%20/%3E%0A%3Cbr%20/%3E%0A%3Cdiv%3E%0A%3Cb%3EThurs%207/20,%201:00-2:00%3C/b%3E%20%E2%80%93%20I%E2%80%99m%20doing%20a%20signing%20at%20the%0ACrown%20Booth%20(1515).%26nbsp;%20It%E2%80%99s%20going%20to%20be%0Acool.%20If%20you%20happen%20to%20be%20a%20fan%20of%20my%20writing,%20you%20%3Ci%3Ereally%3C/i%3E%20don%E2%80%99t%20want%20to%20miss%20this,%20okay?%26nbsp;%20Seriously.%26nbsp;%0APlease%20be%20there%20and%20hop%20in%20line.%26nbsp;%0AIt%E2%80%99ll%20be%20worth%20it,%20honest.%3Cbr%20/%3E%3Cbr%20/%3E%3C/div%3E%0A%3Cdiv%3E%0AAnd%20that%E2%80%99s%0Aall%20we%E2%80%99re%20saying%20about%20that...%3Cbr%20/%3E%0A%3Cbr%20/%3E%0A%3Cb%3EFriday%207/21,%203:00-4:00%3C/b%3E%20%E2%80%93%20Some%20random%20giveaways%20at%20the%20Crown%20Booth%0A(1515).%26nbsp;%20Odds%20of%20being%20given%20something%20increase%20if%20you%20tell%20them%20%22%3Cb%3EThe%20road%20beckons%3C/b%3E.%22%20%26nbsp;I%E2%80%99m%20not%20officially%20there,%20but%0AI%E2%80%99ll%20probably%20be%20informally%20hanging%20out/lurking%20a%20bit%20if%20you%20had%20something%20you%0Awanted%20me%20to%20scribble%20on.%20%26nbsp;Or%20if%20the%0Abooth%20folks%20handed%20you%20something%20you%20wanted%20scribbled%20in.%3C/div%3E%0A%3Cdiv%3E%0A%3Cbr%20/%3E%3C/div%3E%0A%3Cdiv%3E%0A%3Cb%3ESaturday%207/22,%26nbsp;%201:00-2:00%3C/b%3E%0A%E2%80%93%20There%E2%80%99s%20a%20big%20cross-genre%20panel%20in%20room%2028DE.%20I%E2%80%99m%20up%20there%20on%20stage,%20but%20so%20are%20a%0Alot%20of%20better,%20classier%20authors%20like%20Sarah%20Kuhn,%20Charlie%20Jane%20Anders,%20Vic%0AJames,%20Daryl%20Gregory,%20and%20Pierce%20Brown.%26nbsp;%0AIt%E2%80%99ll%20definitely%20be%20worth%20it%20to%20see%20all%20of%20them.%26nbsp;%20And%20one%20of%20us%20may%20something%20%3Ca%20href%3D%22http://thoth-amon.blogspot.com/%22%3Ewise%20and%20clever%20about%20writing%3C/a%3E.%26nbsp;%20Or%20at%20least%20funny.%3Cbr%20/%3E%0A%3Cbr%20/%3E%0A%3Cb%3ESaturday%207/22,%202:15-3:15%3C/b%3E%E2%80%94All%20the%20folks%20from%20that%20panel%20are%20going%20to%20be%0Aunder%20the%20sail%20for%20a%20signing.%26nbsp;%20And%0AMysterious%20Galaxy%20will%20be%20there%20with%20piles%20of%20books%20from%20all%20of%20us,%20so%20it%E2%80%99s%20a%0Agreat%20chance%20to%20get%20something%20scribbled%20in%20without%20having%20to%20lug%20it%20around%20for%0Ahalf%20the%20day%20(and%20to%20fill%20in%20those%20holes%20in%20your%20collection).%3Cbr%20/%3E%0A%3Cbr%20/%3E%0AI%20don%E2%80%99t%20have%20anything%20official%0Ascheduled%20for%20Sunday,%20so%E2%80%94to%20be%20horribly%20honest%E2%80%94I%E2%80%99m%20not%20sure%20I%E2%80%99ll%20be%20there%20or%0Anot.%26nbsp;%20I%20may%20try%20to%20sneak%20off%20with%20that%0Alife%20sized%20Spider-Man%20LEGO%20sculpture.%26nbsp;%0AWe%E2%80%99ll%20see%20how%20that%20goes...%3C/div%3E%0A%3Cdiv%3E%0A%3Cbr%20/%3E%0AHope%20to%20see%0Asome%20of%20you%20there.%3C/div%3E%0A%3C/div%3E)
Dark Imperium, Week Two 28 Jun 2017 12:53 PM (7 years ago)

 Past that...
 The simplest one is head swaps within the set.
Many of these models have separate heads, and they all use the standard
neck-ball that Space Marines of all types have used for the past... what,
almost twenty years? I swapped the heads
of these two Plague Marines and didn’t have to cut or trim a single thing.
The simplest one is head swaps within the set.
Many of these models have separate heads, and they all use the standard
neck-ball that Space Marines of all types have used for the past... what,
almost twenty years? I swapped the heads
of these two Plague Marines and didn’t have to cut or trim a single thing. Also, because of that standard socket, most older head would fit on these models, too (and without too much of a scale problem). Yeah, it wouldn’t make much sense for a Primaris to wear a Mk 7 helmet, but it’d be simple to work a lot more bare heads into the army to give them a less straight-out-of-the-box look. I bet some of the Space Wolves unhelmeted heads would look good, too. Or if the Plague Marines look a little too Nurgley for your particular army, it would be easy enough to swap in some regular Chaos Marine heads to bring them down a notch.
Helpful Hint—I’d perhaps avoid heads with bionic implants for Primaris soldiers. After all, they’ve been in so few battles at this point, how many of them would have lots of replacement parts...?
 The PoxWalkers worried me a little. There’s ten variants (two of each in the
set), and they all have pretty extreme horns. Silly as it may sound, they’re so
extreme that it actually makes them all very distinctive. It felt obvious they were repeating
poses/models within the squad (to me, anyway). So I shaved off a few of the
horns and spikes. It helped break them up a bit, and it also helped to inch the
whole squad a little closer to my existing plague zombies.
The PoxWalkers worried me a little. There’s ten variants (two of each in the
set), and they all have pretty extreme horns. Silly as it may sound, they’re so
extreme that it actually makes them all very distinctive. It felt obvious they were repeating
poses/models within the squad (to me, anyway). So I shaved off a few of the
horns and spikes. It helped break them up a bit, and it also helped to inch the
whole squad a little closer to my existing plague zombies.Next time, I may show off a few of them.
Dark Imperium 20 Jun 2017 9:30 AM (7 years ago)

 Marcus was going to talk about the revised game mechanics
over at Atomic Warlords. Very short version—they’ve moved 40K a lot toward Age
of Sigmar. Not all that way, but if
you’re somebody who really loathes those game mechanics, you’re not going to be happy with
the grim dark future...
Marcus was going to talk about the revised game mechanics
over at Atomic Warlords. Very short version—they’ve moved 40K a lot toward Age
of Sigmar. Not all that way, but if
you’re somebody who really loathes those game mechanics, you’re not going to be happy with
the grim dark future... There’s two more character figs for the Plague Marines, so
there’s another $50. There are
three more Primaris characters, too, but Marcus pointed out it wouldn’t be
surprising to see them as some kind of command squad. Let’s conservatively call them $40
altogether.
There’s two more character figs for the Plague Marines, so
there’s another $50. There are
three more Primaris characters, too, but Marcus pointed out it wouldn’t be
surprising to see them as some kind of command squad. Let’s conservatively call them $40
altogether.There’s also that Foetid Bloat-Drone. It’s dreadnaught sized, so I don’t have trouble believing it could be a $35 or $40 set once we get one with options. We’ll call it $35.

Also, something we realized late Sunday night. This is a very complete, balanced set. It’s two actual, viable armies that are pretty fairly matched, not a couple random things that look good individually but don’t really match up (y’know, like a bunch of cultists vs Dark Angels terminators...).
This set is a freakin’ amazing value, even using my very conservative prices. Half price on everything, if not more. Split the box with someone, Chaos and Primaris, and get an army for $80. Heck, let them keep the rulebook, haggle a bit, and get your half for $60 (heck, GW’s giving the basic rules away for free). That’s maybe a third what you’d pay for either set. Literally 66% off!
.%26nbsp;%20Going%20off%20the%20average%0Aclamshell%20prices%20for%20single%20figs,%20it%20wouldn%E2%80%99t%20be%20outrageous%20to%20say%20these%20would%0Abe%20$30%20to%20$35%20each.%26nbsp;%20GW%E2%80%99s%20been%20getting%0Aslightly%20better%20about%20pricing,%20though,%20and%20there%E2%80%99s%20some%20online%20retailers%20who%0Aoffer%20nice%20discounts,%20so%20let%E2%80%99s%20say%20they%E2%80%99re%20only%20going%20to%20cost%20$25%20each--%20%3Cb%3E$50%3C/b%3E%0Afor%20the%20two%20of%20them.%3C/div%3E%0A%3Cdiv%3E%0A%3Cbr%20/%3E%3C/div%3E%0A%3Cdiv%3E%0A%3Ca%20href%3D%22https://blogger.googleusercontent.com/img/b/R29vZ2xl/AVvXsEh1utpNYJFwdfu4rIGmJJjQy-dKXXUAiUCYz5gZ0CgVhXeZB3rc_lbEORYAcn0Fquxw7LNw-gunwTLMAYB9rWYTmcO1ZjHiiEPg-lciPNZEALp2aZD5noxiay4cPUWCcMA9iPRA4W72op7W/s1600/PrimarisLieutenant.jpg%22%20imageanchor%3D%221%22%3E%3Cimg%20border%3D%220%22%20data-original-height%3D%22845%22%20data-original-width%3D%22700%22%20height%3D%22200%22%20src%3D%22https://blogger.googleusercontent.com/img/b/R29vZ2xl/AVvXsEh1utpNYJFwdfu4rIGmJJjQy-dKXXUAiUCYz5gZ0CgVhXeZB3rc_lbEORYAcn0Fquxw7LNw-gunwTLMAYB9rWYTmcO1ZjHiiEPg-lciPNZEALp2aZD5noxiay4cPUWCcMA9iPRA4W72op7W/s200/PrimarisLieutenant.jpg%22%20width%3D%22165%22%20/%3E%3C/a%3EThere%E2%80%99s%20two%20more%20character%20figs%20for%20the%20Plague%20Marines,%20so%0Athere%E2%80%99s%20another%20%3Cb%3E$50%3C/b%3E.%26nbsp;%20There%20are%0Athree%20more%20Primaris%20characters,%20too,%20but%20Marcus%20pointed%20out%20it%20wouldn%E2%80%99t%20be%0Asurprising%20to%20see%20them%20as%20some%20kind%20of%20command%20squad.%26nbsp;%20Let%E2%80%99s%20conservatively%20call%20them%20%3Cb%3E$40%3C/b%3E%0Aaltogether.%3Cbr%20/%3E%0A%3Cbr%20/%3E%0AThere%E2%80%99s%20also%20that%20Foetid%20Bloat-Drone.%20It%E2%80%99s%20dreadnaught%20sized,%20so%20I%20don%E2%80%99t%20have%0Atrouble%20believing%20it%20could%20be%20a%20$35%20or%20$40%20set%20once%20we%20get%20one%20with%0Aoptions.%26nbsp;%20We%E2%80%99ll%20call%20it%20%3Cb%3E$35%3C/b%3E.%3C/div%3E%0A%3Cdiv%3E%0A%3Cbr%20/%3E%3C/div%3E%0A%3Cdiv%3E%0AAt%20this%20point,%20we%E2%80%99re%20already%20over%20%3Ca%20href%3D%22http://amzn.to/2tmrpjp%22%3Ethe%20box%20set%E2%80%99s%20price%20tag%20of%20$160%3C/a%3E.%26nbsp;%20We%20haven%E2%80%99t%20even%20added%20in%20the%20three%0Afive-man%20Primaris%20squads,%20or%20the%20jump%20troops,%20or%20the%20Plague%20Marine%20squad,%20or%0Athat%20twenty-man%20%3Ca%20href%3D%22http://thegrimcheapness.blogspot.com/2013/04/plague-zombies.html%22%3EPoxWalker%20squad%3C/a%3E%20(probably%20another%20%3Cb%3E$40%3C/b%3E,easy).%26nbsp;%20Heck%20there%E2%80%99s%20a%20full-sized,%20hardcover%20rulebook,%0Awhich%20sells%20for%20%3Cb%3E$60%3C/b%3E%20on%20its%20own.%3C/div%3E%0A%3Cdiv%3E%0A%3Ca%20href%3D%22https://blogger.googleusercontent.com/img/b/R29vZ2xl/AVvXsEhh2deo0SdjoQYd7T5BYWqowwAZ8zSH8U-o0KCnzfXwZijmEvIx1cD-q_8H4rmbweLWXOvJTLebqiymgCWPqr6ai6xjTQz26tbIOwJQ9KtjXIAn4HIdwseuLT7Iaz6oMJIL4CFb9XjuraRF/s1600/PlaugueGuard1.jpg%22%20imageanchor%3D%221%22%3E%3Cimg%20border%3D%220%22%20data-original-height%3D%221004%22%20data-original-width%3D%221000%22%20height%3D%22200%22%20src%3D%22https://blogger.googleusercontent.com/img/b/R29vZ2xl/AVvXsEhh2deo0SdjoQYd7T5BYWqowwAZ8zSH8U-o0KCnzfXwZijmEvIx1cD-q_8H4rmbweLWXOvJTLebqiymgCWPqr6ai6xjTQz26tbIOwJQ9KtjXIAn4HIdwseuLT7Iaz6oMJIL4CFb9XjuraRF/s200/PlaugueGuard1.jpg%22%20width%3D%22198%22%20/%3E%3C/a%3E%3Cbr%20/%3E%0AAlso,%20something%20we%20realized%20late%20Sunday%20night.%26nbsp;%0AThis%20is%20a%20very%20complete,%20balanced%20set.%26nbsp;%0AIt%E2%80%99s%20two%20actual,%20viable%20armies%20that%20are%20%3Ca%20href%3D%22http://atomicwarlords.blogspot.com/2017/06/8th-out-of-box.html%22%3Epretty%20fairly%20matched%3C/a%3E,%20not%20a%0Acouple%20random%20things%20that%20look%20good%20individually%20but%20don%E2%80%99t%20really%20match%20up%0A(y%E2%80%99know,%20like%20%3Ca%20href%3D%22http://thegrimcheapness.blogspot.com/2012/09/a-few-thoughts-on-dark-vengeance.html%22%3Ea%20bunch%20of%20cultists%20vs%20Dark%20Angels%20terminators%3C/a%3E...).%3Cbr%20/%3E%0A%3Cbr%20/%3E%0A%3Ca%20href%3D%22http://amzn.to/2tmrpjp%22%3EThis%20set%3C/a%3E%20is%20a%20freakin%E2%80%99%20%3Ci%3Eamazing%3C/i%3E%20value,%20even%20using%20my%20very%20conservative%0Aprices.%20%26nbsp;Half%20price%20on%20everything,%20if%20not%0Amore.%20%26nbsp;Split%20the%20box%20with%20someone,%20Chaos%0Aand%20Primaris,%20and%20get%20an%20army%20for%20$80.%26nbsp;%0AHeck,%20let%20them%20keep%20the%20rulebook,%20haggle%20a%20bit,%20and%20get%20your%20half%20for%0A$60%20(heck,%20GW%E2%80%99s%20%3Ca%20href%3D%22https://www.games-workshop.com/en-US/Battle-Primer-2017-ENG%22%3Egiving%20the%20basic%20rules%20away%20for%20free%3C/a%3E).%26nbsp;%20That%E2%80%99s%20maybe%20a%20third%20what%20you%E2%80%99d%20pay%20for%0Aeither%20set.%26nbsp;%20Literally%2066%25%20off!%3Cbr%20/%3E%0A%3Cbr%20/%3E%3C/div%3E%0AIf%20you%20don%E2%80%99t%20have%20a%20ton%20of%20money%20to%20spend%20(been%20there,%20believe%20me)%20but%20really%0Awant%20to%20get%20into%20the%20game...%20this%20might%20be%20worth%20saving%20up%20for.%3C/div%3E)
Counting the Hours... 15 Jun 2017 6:32 PM (7 years ago)

 I don’t
know about you, but the past few editions have been... well, a bit of a letdown
for me. Honestly, at times it felt like
someone at GW really had it out for me.
I don’t
know about you, but the past few editions have been... well, a bit of a letdown
for me. Honestly, at times it felt like
someone at GW really had it out for me.  And let’s not forget—the whole
reason I started this page was because GW effectively priced me out of the game. I needed to find newer,
cheaper ways to play that didn’t involve models which had practically doubled
in price. Paperhammer was, if I may be
so bold, Emperor-sent at a time when I didn’t have a lot of good things going
on in my life.
And let’s not forget—the whole
reason I started this page was because GW effectively priced me out of the game. I needed to find newer,
cheaper ways to play that didn’t involve models which had practically doubled
in price. Paperhammer was, if I may be
so bold, Emperor-sent at a time when I didn’t have a lot of good things going
on in my life.I have high hopes for this weekend. I really want this game to be fun again.
.%26nbsp;%20That%0Apretty%20much%20put%20the%20Alpha%20Legion,%20my%20largest%20army,%20out%20to%20pasture.%26nbsp;%20But%20at%20least%20I%20still%20had%20my%20beloved%0ARelictors!%3C/div%3E%0A%3Cdiv%3E%0A%26nbsp;%26nbsp;%26nbsp;%26nbsp;%26nbsp;%26nbsp;%26nbsp;%26nbsp;%26nbsp;%26nbsp;%26nbsp;%20Well,%20until%0Asomeone%20declared%20them%20%3Ci%3EExcommunicate%20Traitoris%3C/i%3E%20in%20the%20fluff.%26nbsp;%20Stupid%20Inquisition...%26nbsp;%20Yeah,%20that%20doesn%E2%80%99t%20affect%20day-to-day%20games,%0Abut%20it%20still%20just%20felt%20like%20getting%20kicked%20when%20you%20were%20already%20down.%26nbsp;%20Imagine%20if%20it%20had%20been%20the%20Space%20Wolves.%26nbsp;%20Or%20the%20Blood%20Angels.%3C/div%3E%0A%3Cdiv%3E%0A%26nbsp;%26nbsp;%26nbsp;%26nbsp;%26nbsp;%26nbsp;%26nbsp;%26nbsp;%26nbsp;%26nbsp;%26nbsp;%20Heck,%20I%0Anever%20even%20finished%20my%20Dark%20Eldar%20army.%26nbsp;%0AThey%20came%20out,%20sold%20a%20ton%20of%20models,%20and%20then%20the%20entire%20army%20took%20a%20hit%0Ato%20their%20saving%20throws%20with%20the%20new%20edition.%26nbsp;%20I%20already%20have%20an%0Aarmy%20that%20runs%20around%20with%20thin%20armor.%26nbsp;%0ABut%20at%20least%20%3Ca%20href%3D%22http://thegrimcheapness.blogspot.com/2013/01/the-bitz-bins.html%22%3Ethe%20Catachans%3C/a%3E%20get%20real%20tanks...%3C/div%3E%0A%3Cdiv%3E%0A%26nbsp;%26nbsp;%26nbsp;%26nbsp;%26nbsp;%26nbsp;%26nbsp;%26nbsp;%26nbsp;%26nbsp;%26nbsp;%20Plus,%20the%0Agame%20itself%20had%20become%20so%20bogged%20down.%26nbsp;%0APages%20and%20pages%20and%20pages%20of%20rules,%20rolling%20dice%20again%20and%20again%20and%0Aagain%20for%20what%20should%20be%20simple%20results,%20units%20that%20were%20so%20randomized%20they%20were%20effectively%20useless.%3C/div%3E%0A%3Cdiv%3E%0A%3Ca%20href%3D%22https://blogger.googleusercontent.com/img/b/R29vZ2xl/AVvXsEg9eK4F6g4b1ySBQJlPFKLzY9ff9UmtbNXBjphmWmAeY_HnIxxpqbnmTEEx4OvaimndCI1ki7oJNB80JsogQ6xby1tIBVrUWViI4Kbx5Pg1DqHuWRlbTnM4QEs-mkdlc7QUF2tu64-SjfCK/s1600/PrimarisAncient.jpg%22%20imageanchor%3D%221%22%3E%3Cimg%20border%3D%220%22%20data-original-height%3D%22797%22%20data-original-width%3D%22600%22%20height%3D%22200%22%20src%3D%22https://blogger.googleusercontent.com/img/b/R29vZ2xl/AVvXsEg9eK4F6g4b1ySBQJlPFKLzY9ff9UmtbNXBjphmWmAeY_HnIxxpqbnmTEEx4OvaimndCI1ki7oJNB80JsogQ6xby1tIBVrUWViI4Kbx5Pg1DqHuWRlbTnM4QEs-mkdlc7QUF2tu64-SjfCK/s200/PrimarisAncient.jpg%22%20width%3D%22150%22%20/%3E%3C/a%3E%26nbsp;%20%26nbsp;%20%26nbsp;%20%26nbsp;%20%26nbsp;%20%26nbsp;%20And%20let%E2%80%99s%20not%20forget%E2%80%94the%20whole%0A%3Ca%20href%3D%22http://thegrimcheapness.blogspot.com/2016/01/gaming-on-cheap.html%22%3Ereason%20I%20started%20this%20page%3C/a%3E%20was%20because%20GW%20effectively%20%3Ca%20href%3D%22http://thegrimcheapness.blogspot.com/2013/07/the-ferrari-mentality.html%22%3Epriced%20me%20out%20of%20the%20game%3C/a%3E.%26nbsp;%20I%20needed%20to%20find%20newer,%0Acheaper%20ways%20to%20play%20that%20didn%E2%80%99t%20involve%20models%20which%20had%20practically%20doubled%0Ain%20price.%26nbsp;%20Paperhammer%20was,%20if%20I%20may%20be%0Aso%20bold,%20Emperor-sent%20at%20a%20time%20when%20I%20didn%E2%80%99t%20have%20a%20lot%20of%20good%20things%20going%0Aon%20in%20my%20life.%3C/div%3E%0A%3Cdiv%3E%0A%26nbsp;%26nbsp;%26nbsp;%26nbsp;%26nbsp;%26nbsp;%26nbsp;%26nbsp;%26nbsp;%26nbsp;%26nbsp;%20If%20it%20weren%E2%80%99t%0Afor%20my%20friends%20at%20%3Ca%20href%3D%22http://atomicwarlords.blogspot.com/%22%3Ethe%20Atomic%20Warlords%3C/a%3E,%20I%E2%80%99ve%20got%20to%20be%20honest.%26nbsp;%20I%20probably%20would%E2%80%99ve%20dropped%20this%20game%20a%20year%0Aor%20five%20back.%3C/div%3E%0A%3Cdiv%3E%0A%26nbsp;%26nbsp;%26nbsp;%26nbsp;%26nbsp;%26nbsp;%26nbsp;%26nbsp;%26nbsp;%26nbsp;%26nbsp;%20Anyway...%3Cbr%20/%3E%0A%26nbsp;%26nbsp;%26nbsp;%26nbsp;%26nbsp;%26nbsp;%26nbsp;%26nbsp;%26nbsp;%26nbsp;%26nbsp;%20I%20have%20high%20hopes%20for%20this%0Aweekend.%26nbsp;%20I%20really%20want%20this%20game%20to%20be%0Afun%20again.%3C/div%3E%0A%3Cdiv%3E%0A%26nbsp;%26nbsp;%20%26nbsp;%20%26nbsp;%20%26nbsp;%20%26nbsp;%20%26nbsp;What%20about%0Ayou?%20What%20are%20you%20hoping%20for?%3C/div%3E%0A%3C/div%3E)
A Shameful Moment of Self-Promotion 16 May 2017 7:30 AM (7 years ago)


%20before.%20Most%20of%20them%20are%20stand-alones,%0Aalthough%20you%20may%20find%20hints%20to%20a%20few%20things%20I%E2%80%99ve%20written%20in%20the%20past%20(or%20may%20be%0Aplanning%20for%20the%20future).%26nbsp;%20It%E2%80%99s%20an%0AAudible%20exclusive%E2%80%94no%20print,%20no%20ebook,%20no%20special%20kanji%20edition%E2%80%94it%E2%80%99s%20audiobook%0Aonly.%26nbsp;%20%3C/div%3E%0A%3Cdiv%3E%0A%26nbsp;%26nbsp;%26nbsp;%26nbsp;%26nbsp;%26nbsp;%26nbsp;%26nbsp;%26nbsp;%26nbsp;%26nbsp;%20Because%0Athey%20wanted%20to%20publish%20it%20and%20they%20do%20fantastic%20work,%20that%E2%80%99s%20why!%26nbsp;%20%3C/div%3E%0A%3Cdiv%3E%0A%26nbsp;%26nbsp;%26nbsp;%26nbsp;%26nbsp;%26nbsp;%26nbsp;%26nbsp;%26nbsp;%26nbsp;%26nbsp;%20You%20can%0Apick%20it%20up%20using%20your%20%3Ca%20href%3D%22http://www.audible.com/pd/Sci-Fi-Fantasy/Dead-Men-Cant-Complain-and-Other-Stories-Audiobook/B06XX21WQN/ref%3Da_search_c4_1_1_srTtl%22%3EAudible%20credits%3C/a%3E%20(if%20you%E2%80%99re%20a%20member)%20or%20straight%20through%20%3Ca%20href%3D%22http://a%2520shameful%2520moment%2520of%2520self-promotion/%22%3EAmazon%3C/a%3E.%26nbsp;%20And%20one%20of%20the%20great%20things%20about%20audiobooks%E2%80%94you%0Acan%20listen%20to%20them%20while%20you%20build%20and%20paint.%3C/div%3E%0A%26nbsp;%26nbsp;%26nbsp;%26nbsp;%26nbsp;%26nbsp;%26nbsp;%26nbsp;%26nbsp;%26nbsp;%26nbsp;%20Hint-hint.%3Cbr%20/%3E%0A%3C!--%5Bendif%5D--%3E%3C/div%3E)


Genestealer Cultists 22 Jan 2017 2:13 PM (8 years ago)

 I had some extra neophyte weapons for my genestealer cult,
and I wanted to use them all up. My lovely lady had gotten me the Armored Claw
for Christmas, so I figured I could put them on the Cadian bodies. Extra weapons, plus the change of arms and
shoulders helps to move them a bit further away from Guardsmen and closer to
mine-workers, visually.
I had some extra neophyte weapons for my genestealer cult,
and I wanted to use them all up. My lovely lady had gotten me the Armored Claw
for Christmas, so I figured I could put them on the Cadian bodies. Extra weapons, plus the change of arms and
shoulders helps to move them a bit further away from Guardsmen and closer to
mine-workers, visually.However... the Cadian torsos have really narrow shoulders. I tried a few different ways of putting the weapon-arms on them, but no matter how I angled it I ended up with a sizeable gap. Then I tried a couple of spare Catachan torsos I had—not much better. They were wider, but that gap was still pretty big.
 Meet some of my old, scratchbuilt genestealer cultists. They’re built from the original
plastic guardsmen, circa 1994 (I think).
I found a couple of them floating in the bitz bin way back when and used
them to bulk out my (at the time) all-metal Genestealer Cult army. Which, believe it or not, also came from the
bitz bins...
Meet some of my old, scratchbuilt genestealer cultists. They’re built from the original
plastic guardsmen, circa 1994 (I think).
I found a couple of them floating in the bitz bin way back when and used
them to bulk out my (at the time) all-metal Genestealer Cult army. Which, believe it or not, also came from the
bitz bins...A few quick slices and those old cultists had all new arms on them. Heads were a bit trickier—I needed to make some neck sockets. I used the thinnest drill bit I had for my pin vise, found the center, and gave myself a pilot hole (maybe just 1/8” deep) on each model. Then I swapped out bits to my largest, which gave me a nice, centered socket.
 Helpful Hint—when you need to center something like this, take
your time. Check and double-check. Heads are always going to be a focus point
for a model. We all know how bodies go
together, so even on this scale we’ll pick up on things that don’t line up.
Helpful Hint—when you need to center something like this, take
your time. Check and double-check. Heads are always going to be a focus point
for a model. We all know how bodies go
together, so even on this scale we’ll pick up on things that don’t line up. You may notice (like I mentioned above) that the new limbs are slightly out of
proportion on the older body. The arms,
notably, are a bit long. There’s a few
ways to adjust for this, but I’m not going to worry about it much in
this particular case. Genestealer
cultists have a lot of distorted body parts, so these won’t stand out much.
You may notice (like I mentioned above) that the new limbs are slightly out of
proportion on the older body. The arms,
notably, are a bit long. There’s a few
ways to adjust for this, but I’m not going to worry about it much in
this particular case. Genestealer
cultists have a lot of distorted body parts, so these won’t stand out much.Next time—swear to Tzeentch—I’m going to finish up that Destroyer.
.%26nbsp;%0AAnd%20we%20end%20up%20with%20lots%20of%20leftovers.%3C/div%3E%0A%3Cdiv%3E%0A%3Cbr%20/%3E%3C/div%3E%0A%3Cdiv%3E%0A%3Ca%20href%3D%22https://blogger.googleusercontent.com/img/b/R29vZ2xl/AVvXsEhaIRQ3uZIwB4YiGFsudMj6MKCKYBakhMcBJlnXkmM2zeY2o3yVIwhAbDmzq-VnwC_bOyr9ZrtiUfqXASjOjTNhYnk7o-yy6h5ZMc7opSdvONpwYV_ugaz8vyHUgpoRuEtrNfAJ8fgI70UA/s1600/genestealer-cults-neophyte-hybrid-armoured-claw.jpg%22%20imageanchor%3D%221%22%3E%3Cimg%20border%3D%220%22%20height%3D%22200%22%20src%3D%22https://blogger.googleusercontent.com/img/b/R29vZ2xl/AVvXsEhaIRQ3uZIwB4YiGFsudMj6MKCKYBakhMcBJlnXkmM2zeY2o3yVIwhAbDmzq-VnwC_bOyr9ZrtiUfqXASjOjTNhYnk7o-yy6h5ZMc7opSdvONpwYV_ugaz8vyHUgpoRuEtrNfAJ8fgI70UA/s200/genestealer-cults-neophyte-hybrid-armoured-claw.jpg%22%20width%3D%22200%22%20/%3E%3C/a%3EI%20had%20some%20extra%20neophyte%20weapons%20for%20my%20genestealer%20cult,%0Aand%20I%20wanted%20to%20use%20them%20all%20up.%20My%20lovely%20lady%20had%20gotten%20me%20the%20Armored%20Claw%0Afor%20Christmas,%20so%20I%20figured%20I%20could%20put%20them%20on%20the%20Cadian%20bodies.%26nbsp;%20Extra%20weapons,%20plus%20the%20change%20of%20arms%20and%0Ashoulders%20helps%20to%20move%20them%20a%20bit%20further%20away%20from%20Guardsmen%20and%20closer%20to%0Amine-workers,%20visually.%3Cbr%20/%3E%0A%3Cbr%20/%3E%0AHowever...%20the%20Cadian%20torsos%20have%20%3Ci%3Ereally%3C/i%3E%20narrow%20shoulders.%20I%20tried%20a%20few%0Adifferent%20ways%20of%20putting%20the%20weapon-arms%20on%20them,%20but%20no%20matter%20how%20I%20angled%0Ait%20I%20ended%20up%20with%20a%20sizeable%20gap.%26nbsp;%20Then%0AI%20tried%20a%20couple%20of%20spare%20Catachan%20torsos%20I%20had%E2%80%94not%20much%20better.%26nbsp;%20They%20were%20wider,%20but%20that%20gap%20was%20still%0Apretty%20big.%3C/div%3E%0A%3Cdiv%3E%0A%3Cbr%20/%3E%3C/div%3E%0A%3Cdiv%3E%0AYou%20can%20spot%20potential%20genestealer%20cultists%20by%20shoulder%0Awidth.%20It%E2%80%99s%20a%20fact.%20Who%20know?%20%3C/div%3E%0A%3Cdiv%3E%0A%3Cbr%20/%3E%3C/div%3E%0A%3Cdiv%3E%0AI%20played%20with%20a%20few%20different%20ideas%20of%20bulking%20out%20shoulders%0Awith%20plasticard%20and%20putty,%20but%20then%20I%20had%20a%20thought%20that%20tied%20back%20to%20one%20of%20my%0A(%3Ca%20href%3D%22http://thegrimcheapness.blogspot.com/2016/12/as-2016-draws-to-close.html%22%3Every%20few%3C/a%3E)%20posts%20from%20last%20year.%20Maybe%20I%20had%20some%20older%20figures%20I%20could%0Arepurpose%20with%20a%20bit%20of%20%3Ca%20href%3D%22http://thegrimcheapness.blogspot.com/2016/06/cultists-and-marauders.html%22%3Ecutting%20and%20scraping%3C/a%3E...%3C/div%3E%0A%3Cbr%20/%3E%0A%3Cdiv%3E%0A%3C/div%3E%0A%3Cdiv%3E%0A%3Ca%20href%3D%22https://blogger.googleusercontent.com/img/b/R29vZ2xl/AVvXsEgRK_LO5EkqgW-W_5oXilEUlOICY06wlrWX6d0YuTJsP-j5_B41V2k0y59Evg12EhKN-xyrFUIEhpwi9yb6rbqs9kc_PPg26Yy4R8d4Dym722dcKQ_XdGFengVT0U8z-fK6AIGMJQghg3sg/s1600/Old+GC.jpg%22%20imageanchor%3D%221%22%3E%3Cimg%20border%3D%220%22%20height%3D%22200%22%20src%3D%22https://blogger.googleusercontent.com/img/b/R29vZ2xl/AVvXsEgRK_LO5EkqgW-W_5oXilEUlOICY06wlrWX6d0YuTJsP-j5_B41V2k0y59Evg12EhKN-xyrFUIEhpwi9yb6rbqs9kc_PPg26Yy4R8d4Dym722dcKQ_XdGFengVT0U8z-fK6AIGMJQghg3sg/s200/Old+GC.jpg%22%20width%3D%22200%22%20/%3E%3C/a%3EMeet%20some%20of%20my%20old,%20scratchbuilt%20genestealer%20cultists.%26nbsp;%20They%E2%80%99re%20built%20from%20the%20%3Ci%3Eoriginal%3C/i%3E%0Aplastic%20guardsmen,%20circa%201994%20(I%20think).%26nbsp;%0AI%20found%20a%20couple%20of%20them%20floating%20in%20the%20bitz%20bin%20way%20back%20when%20and%20used%0Athem%20to%20bulk%20out%20my%20(at%20the%20time)%20all-metal%20Genestealer%20Cult%20army.%26nbsp;%20Which,%20believe%20it%20or%20not,%20also%20came%20from%20the%0Abitz%20bins...%3C/div%3E%0A%3Cdiv%3E%0A%3Cbr%20/%3EA%20few%20quick%20slices%20and%20those%20old%20cultists%20had%20all%20new%20arms%20on%20them.%20Heads%20were%0Aa%20bit%20trickier%E2%80%94I%20needed%20to%20make%20some%20neck%20sockets.%20I%20used%20the%20thinnest%20drill%0Abit%20I%20had%20for%20my%20pin%20vise,%20found%20the%20center,%20and%20gave%20myself%20a%20pilot%20hole%0A(maybe%20just%201/8%E2%80%9D%20deep)%20on%20each%20model.%26nbsp;%0AThen%20I%20swapped%20out%20bits%20to%20my%20largest,%20which%20gave%20me%20a%20nice,%20centered%0Asocket.%3C/div%3E%0A%3Cdiv%3E%0A%3Cb%3E%3Ci%3E%3Cbr%20/%3E%3C/i%3E%3C/b%3E%3C/div%3E%0A%3Cdiv%3E%0A%3Ca%20href%3D%22https://blogger.googleusercontent.com/img/b/R29vZ2xl/AVvXsEgBKTxPWCU7ogpSEvH3uVIIlsShpF_qc7aEpuR_8AeS49dSqdHEwsZL_sGsCW9hb4-vnfoarqJu5YaCI7rtmNw-qbIBhJvJRGSayyKG-cRK2YERbiK7Oi2U8smUCIz2mh3jjrxSKoZAPU_x/s1600/Sockets.jpg%22%20imageanchor%3D%221%22%3E%3Cimg%20border%3D%220%22%20height%3D%22113%22%20src%3D%22https://blogger.googleusercontent.com/img/b/R29vZ2xl/AVvXsEgBKTxPWCU7ogpSEvH3uVIIlsShpF_qc7aEpuR_8AeS49dSqdHEwsZL_sGsCW9hb4-vnfoarqJu5YaCI7rtmNw-qbIBhJvJRGSayyKG-cRK2YERbiK7Oi2U8smUCIz2mh3jjrxSKoZAPU_x/s200/Sockets.jpg%22%20width%3D%22200%22%20/%3E%3C/a%3E%3Cb%3E%3Ci%3EHelpful%20Hint%E2%80%94%3C/i%3E%3C/b%3Ewhen%20you%20need%20to%20center%20something%20like%20this,%20take%0Ayour%20time.%26nbsp;%20Check%20and%20double-check.%26nbsp;%20Heads%20are%20always%20going%20to%20be%20a%20focus%20point%0Afor%20a%20model.%26nbsp;%20We%20all%20know%20how%20bodies%20go%0Atogether,%20so%20even%20on%20this%20scale%20we%E2%80%99ll%20pick%20up%20on%20things%20that%20don%E2%80%99t%20line%20up.%3C/div%3E%0A%3Cdiv%3E%0A%3Cbr%20/%3E%3C/div%3E%0A%3Cdiv%3E%0AAfter%20that,%20it%20was%20just%20gluing%20heads%20on%20and...%20done.%26nbsp;%20Some%20heavy%20weapons%20guys%20who%20will%20blend%20in%0Anicely%20with%20the%20rest%20of%20the%20cult.%26nbsp;%20And%0Aall%20it%20cost%20me%20was%20some%20older%20models%20I%20wasn%E2%80%99t%20going%20to%20use%20anymore.%3Cbr%20/%3E%3C/div%3E%0A%3Cdiv%3E%0A%3Ca%20href%3D%22https://blogger.googleusercontent.com/img/b/R29vZ2xl/AVvXsEgFkHMR8emmuwbAsuzaOSLJvHi1Q6V7EczuECg0G2rzKk9zmSBf7u3EKd3bH-l1qXb2HvTi5DObLKwK2I0OfmKPJVuUPqib6OG1odUGqt23B3Qpv_qfGvVAPkjubD1UPnA9XXEc3MUmOuQ9/s1600/New+GC.jpg%22%20imageanchor%3D%221%22%3E%3Cimg%20border%3D%220%22%20height%3D%22200%22%20src%3D%22https://blogger.googleusercontent.com/img/b/R29vZ2xl/AVvXsEgFkHMR8emmuwbAsuzaOSLJvHi1Q6V7EczuECg0G2rzKk9zmSBf7u3EKd3bH-l1qXb2HvTi5DObLKwK2I0OfmKPJVuUPqib6OG1odUGqt23B3Qpv_qfGvVAPkjubD1UPnA9XXEc3MUmOuQ9/s200/New+GC.jpg%22%20width%3D%22200%22%20/%3E%3C/a%3EYou%20may%20notice%20(like%20I%20mentioned%20above)%20that%20the%20new%20limbs%20are%20slightly%20out%20of%0Aproportion%20on%20the%20older%20body.%26nbsp;%20The%20arms,%0Anotably,%20are%20a%20bit%20long.%26nbsp;%20There%E2%80%99s%20a%20few%0Aways%20%3Ca%20href%3D%22http://thegrimcheapness.blogspot.com/2013/10/space-marine-captain.html%22%3Eto%20adjust%20for%20this%3C/a%3E,%20but%20I%E2%80%99m%20not%20going%20to%20worry%20about%20it%20much%20in%0Athis%20particular%20case.%26nbsp;%20Genestealer%0Acultists%20have%20a%20lot%20of%20distorted%20body%20parts,%20so%20these%20won%E2%80%99t%20stand%20out%20much.%3Cbr%20/%3E%0A%3Cbr%20/%3E%0ANext%20time%E2%80%94swear%20to%20Tzeentch%E2%80%94I%E2%80%99m%20going%20to%20finish%20up%20that%20Destroyer.%3C/div%3E%0A%3Cdiv%3E%0A%3Cbr%20/%3E%3C/div%3E%0A%3Cdiv%3E%0A%3Cbr%20/%3E%3C/div%3E%0A%3C/div%3E)
As 2016 Draws to a Close... 28 Dec 2016 9:37 PM (8 years ago)

When all that’s going on, forcing myself to work on a project just so I can put up a new post isn’t any fun. And that‘s what this blog—hell, this whole hobby—is supposed to be about. Having fun.
 Plus my lady and I have been playing Age of Sigmar on a
fairly regular basis, which eats up a night or two. She’s been trying out her Skaven against my
Ogres (or is it Ogors now...?), the Empire, and my very zombie-heavy Vampire Counts army. All with a
disgusting level of success. We’re
hoping to do a battle report for the Atomic Warlords page sometime in the near
future.
Plus my lady and I have been playing Age of Sigmar on a
fairly regular basis, which eats up a night or two. She’s been trying out her Skaven against my
Ogres (or is it Ogors now...?), the Empire, and my very zombie-heavy Vampire Counts army. All with a
disgusting level of success. We’re
hoping to do a battle report for the Atomic Warlords page sometime in the near
future.But Paperhammer... I hate to admit, but it kind of fell to the side. Because, like I said, it kept feeling like an obligation. And I didn’t want to spend my scarce free time on an obligation if I didn’t have to.
Anyway, I’m hoping to make things work a bit better in the year to come. I need to finish the Destroyer. There’s a few Age of Sigmar scenery bits I want to work on. And I still keep looking at some of those huge templates for Warhounds and Warlords. I mean, you’ve seen what Chaos is up against on the Atomic Warlords’ tables, right? We’ve got a fallen Knight household, but we seriously need a titan or two.
And if there’s something you want to see a cheap, Paperhammer version of... please let me know.
,%20the%20Empire,%20and%20my%20very%20%3Ca%20href%3D%22http://thegrimcheapness.blogspot.com/2016/07/pathetic-fill-in-post.html%22%3Ezombie-heavy%3C/a%3E%20Vampire%20Counts%20army.%20%26nbsp;All%20with%20a%0Adisgusting%20level%20of%20success.%26nbsp;%20We%E2%80%99re%0Ahoping%20to%20do%20a%20battle%20report%20for%20the%20Atomic%20Warlords%20page%20sometime%20in%20the%20near%0Afuture.%3Cbr%20/%3E%0A%3Cbr%20/%3E%0ABut%20Paperhammer...%20I%20hate%20to%20admit,%20but%20it%20kind%20of%20fell%20to%20the%20side.%26nbsp;%20Because,%20like%20I%20said,%20it%20kept%20feeling%20like%20an%0Aobligation.%26nbsp;%20And%20I%20didn%E2%80%99t%20want%20to%20spend%0Amy%20scarce%20free%20time%20on%20an%20obligation%20if%20I%20didn%E2%80%99t%20have%20to.%3C/div%3E%0A%3Cdiv%3E%0A%3Cbr%20/%3E%3C/div%3E%0A%3Cdiv%3E%0AYeah,%20that%E2%80%99s%20a%20contradiction.%20Deal%20with%20it.%26nbsp;%20You%20know%20what%20I%20mean.%3C/div%3E%0A%3Cdiv%3E%0A%3Cbr%20/%3E%3C/div%3E%0A%3Cdiv%3E%0ASo%E2%80%94if%20you%E2%80%99re%20still%20interested%E2%80%94I%20still%20want%20to%20keep%20this%20page%0Agoing.%20I%20really%20love%20the%20sheer%20creativity%20of%20Paperhammer.%26nbsp;%20Plus,%20let%E2%80%99s%20face%20it,%20even%20with%20the%20better%0Adirection%20GW%20has%20been%20taking%20these%20past%20few%20months,%20a%20lot%20of%20folks%20still%20can%E2%80%99t%0Aafford%20this%20hobby.%20And%20if%20I%20can%20help%20them%20into%20it%20with%20s%3Ca%20href%3D%22http://thegrimcheapness.blogspot.com/2016/04/paperhammer-basics.html%22%3Eome%20white%20glue%20and%20cereal%20boxes%3C/a%3E,%20I%20want%20to%20do%20it.%26nbsp;%20Because%0Athe%20more%20of%20us%20there%20are,%20the%20better.%3Cbr%20/%3E%0A%3Cbr%20/%3E%0AAnyway,%20I%E2%80%99m%20hoping%20to%20make%20things%20work%20a%20bit%20better%20in%20the%20year%20to%20come.%20I%20need%0Ato%20finish%20the%20Destroyer.%26nbsp;%20There%E2%80%99s%20a%20few%0AAge%20of%20Sigmar%20scenery%20bits%20I%20want%20to%20work%20on.%26nbsp;%0AAnd%20I%20still%20keep%20looking%20at%20some%20of%20those%20huge%20templates%20for%20Warhounds%0Aand%20Warlords.%20I%20mean,%20you%E2%80%99ve%20seen%20%3Ca%20href%3D%22http://atomicwarlords.blogspot.com/2016/11/painting-frenzy.html%22%3Ewhat%20Chaos%20is%20up%20against%20%3C/a%3Eon%20the%20Atomic%0AWarlords%E2%80%99%20tables,%20right?%26nbsp;%20We%E2%80%99ve%20got%20a%20fallen%20Knight%0Ahousehold,%20but%20we%20seriously%20%3Ci%3Eneed%3C/i%3E%20a%20titan%20or%20two.%3Cbr%20/%3E%0A%3Cbr%20/%3E%0AAnd%20if%20there%E2%80%99s%20something%20you%20want%20to%20see%20a%20cheap,%20Paperhammer%20version%20of...%20please%0Alet%20me%20know.%3C/div%3E%0A%3Cdiv%3E%0A%3Cbr%20/%3E%3C/div%3E%0A%3Cdiv%3E%0AHappy%20New%20Year.%3C/div%3E%0A%3C/div%3E)
Pathetic Fill In Post 12 Jul 2016 8:30 AM (8 years ago)

I’m going to try to get some more work done on the Destroyer before I head down to SDCC—and get it posted. I just wanted to let you know it hasn’t been forgotten.

%20and%20SDCC%20plans%20(I%E2%80%99m%0Adoing%20%3Ca%20href%3D%22https://www.facebook.com/PeterClines/photos/a.10150329385300330.389110.272562625329/10154223108070330/%22%3Ea%20few%20things%20down%20there%20this%20year%3C/a%3E,%20too)%20and%20%3Ca%20href%3D%22http://thoth-amon.blogspot.com/%22%3Emy%20other%20blog%3C/a%3E%20and%20some%0Adoctor%20stuff%20(boring).%26nbsp;%3C/div%3E%0A%3Cdiv%3E%0A%3Cbr%20/%3E%3C/div%3E%0A%3Cdiv%3E%0AAnd,%20yeah,%20in%20all%20fairness,%20building%20a%20few%20other,%0Anon-paperhammery%20things.%26nbsp;%20My%20lovely%20lady%20and%20I%20have%20really%20been%20enjoying%20%3Ca%20href%3D%22http://thegrimcheapness.blogspot.com/2015/07/age-of-sigmar.html%22%3EAge%20of%20Sigmar%3C/a%3E,%20so%20I%E2%80%99ve%20been%20putting%20together%20some%20more%20%3Ca%20href%3D%22http://thegrimcheapness.blogspot.com/2013/09/snap-marines.html%22%3Ebits-bin%3C/a%3E-Skaven%0Afor%20her%20and%20a%20big%20horde%20of%20zombies%20for%20me%20(also%20collected,%20for%20the%20most%20part,%0Afrom%20random%20bitz%20bins%20parts).%26nbsp;%20I%20don%E2%80%99t%0Aget%20to%20play%20that%20often,%20so%20this%20kind%20of%20gets%20my%20focus%20at%20times.%3C/div%3E%0A%3Cdiv%3E%0A%3Cbr%20/%3E%3C/div%3E%0A(I%20may%20also%20do%20a%20post%20in%20the%20near%20future%20about%20a%20really%20simple%20Ogre%0ATyrant%20conversion%20I%20did)%3Cbr%20/%3E%0A%3Cbr%20/%3E%0AI%E2%80%99m%20going%20to%20try%20to%20get%20some%20more%20work%20done%20on%20the%20Destroyer%20before%20I%20head%20down%20to%20SDCC%E2%80%94and%20get%20it%20posted.%26nbsp;%20I%20just%20wanted%0Ato%20let%20you%20know%20it%20hasn%E2%80%99t%20been%20forgotten.%3Cbr%20/%3E%0A%3Cspan%3E%3Cbr%20/%3E%3C/span%3E%0A%3Cbr%20/%3E%0A%3Cdiv%3E%0A%3Ca%20href%3D%22https://blogger.googleusercontent.com/img/b/R29vZ2xl/AVvXsEi59794r8Uexh6OHvIS4oTsw1Ctm2NIVhW0WIlaJsQ2CtBL9HmSx_0uct6g9aJedHUMNW7gNZXwJU4m6DjqDPw34u33T5ap9giDvcBkvMh7cpdohstEWVcf2g0p2P32sovxiCzwAxAub0lT/s1600/Horde.jpg%22%20imageanchor%3D%221%22%3E%3Cimg%20border%3D%220%22%20height%3D%22180%22%20src%3D%22https://blogger.googleusercontent.com/img/b/R29vZ2xl/AVvXsEi59794r8Uexh6OHvIS4oTsw1Ctm2NIVhW0WIlaJsQ2CtBL9HmSx_0uct6g9aJedHUMNW7gNZXwJU4m6DjqDPw34u33T5ap9giDvcBkvMh7cpdohstEWVcf2g0p2P32sovxiCzwAxAub0lT/s400/Horde.jpg%22%20width%3D%22400%22%20/%3E%3C/a%3E%3C/div%3E%0A%3C/div%3E)
Cultists and Marauders 22 Jun 2016 12:40 PM (8 years ago)

 Alas, for years, the only cultist models were half a dozen
or so metal ones, half of which were leaders or special weapons. That’s not a lot of options. Plus, they were metal, so they could cost three
or four dollars apiece! Can you imagine
that? Paying four dollars for a single
GW figure? What craziness. Thank goodness for Finecast, am I right...?
Alas, for years, the only cultist models were half a dozen
or so metal ones, half of which were leaders or special weapons. That’s not a lot of options. Plus, they were metal, so they could cost three
or four dollars apiece! Can you imagine
that? Paying four dollars for a single
GW figure? What craziness. Thank goodness for Finecast, am I right...?Anyway...
 But this still left me with all my old, homemade cultists in
their horned helmets and headbands. They
just don’t mesh well with the new ones.
Sooooo... what to do with about forty figures? And then it struck me that, in Age of Sigmar, it’s possible to field just one or two units and play like that. So
what if I just turned the mostly-Marauder ones back into regular Chaos
Marauders?
But this still left me with all my old, homemade cultists in
their horned helmets and headbands. They
just don’t mesh well with the new ones.
Sooooo... what to do with about forty figures? And then it struck me that, in Age of Sigmar, it’s possible to field just one or two units and play like that. So
what if I just turned the mostly-Marauder ones back into regular Chaos
Marauders?Helpful Hint—The idea of cutting up figs like this might seem intimidating. Just make sure you’ve got a really sharp, clean blade, a good cutting surface, and plenty of light (the seams can vanish in shadows, and I want to be cutting between components, not through components).
 It took about an hour to separate them all and scrape off
any of the white “soft spots” left from the glue. Then I dug up all the leftover Marauder parts
and made a good-sized squad of fifteen armed with axes and shields.
It took about an hour to separate them all and scrape off
any of the white “soft spots” left from the glue. Then I dug up all the leftover Marauder parts
and made a good-sized squad of fifteen armed with axes and shields. And as for the leftover, mostly-Catachan models... Well, as it happens a while back I also ended
up with a bunch of the hooded Adeptus Mechanicus heads. A few head swaps, a few details from the
Marauders and the Kroot, and now these figs will blend in much better with the
newer Alpha Legion cultists.
And as for the leftover, mostly-Catachan models... Well, as it happens a while back I also ended
up with a bunch of the hooded Adeptus Mechanicus heads. A few head swaps, a few details from the
Marauders and the Kroot, and now these figs will blend in much better with the
newer Alpha Legion cultists.
Leman Russ Pt. III 28 May 2016 5:37 PM (8 years ago)

 First up is the little sighting hatch on the front of the
hull. I’m sure somebody knows the real
name for this—feel free to educate me in the comments. I started with the sighting window itself and
added two tabs onto it (at the top and bottom of the template). I glued it and
just held it for a few minutes. Once it
was solid I glued it to the outer panel and held that for a few
minutes. Finally, I clamped all of that
to the outer panel and let it dry while I worked on other things. Once it was good, I put it on the front of
the hull.
First up is the little sighting hatch on the front of the
hull. I’m sure somebody knows the real
name for this—feel free to educate me in the comments. I started with the sighting window itself and
added two tabs onto it (at the top and bottom of the template). I glued it and
just held it for a few minutes. Once it
was solid I glued it to the outer panel and held that for a few
minutes. Finally, I clamped all of that
to the outer panel and let it dry while I worked on other things. Once it was good, I put it on the front of
the hull. In the end, I went with the hole punches.
This is detail work, and I think more people will skim over things that
look really good vs. focusing on things that look okay. The off things draw the eye, in other
words. So I played around with sizes and
put some discs down on the tread wall.
As I mentioned above, some are a bit small, some a hair large, but I
think it’s pretty unquestionably a Leman Russ setup.
In the end, I went with the hole punches.
This is detail work, and I think more people will skim over things that
look really good vs. focusing on things that look okay. The off things draw the eye, in other
words. So I played around with sizes and
put some discs down on the tread wall.
As I mentioned above, some are a bit small, some a hair large, but I
think it’s pretty unquestionably a Leman Russ setup. The first layer of tread links took about an hour. I cut them all at once and then peeled off
the template-paper where I could. There
are ten extras for each side, so there’s some room to pick and choose. Also worth remembering that sixteen of them
are going to be on the bottom, so there’s even more leeway. I set the glue on the tread element section
by section and then set the pieces down, making sure all the best, matching
ones were on the front parts of each tread element.
The first layer of tread links took about an hour. I cut them all at once and then peeled off
the template-paper where I could. There
are ten extras for each side, so there’s some room to pick and choose. Also worth remembering that sixteen of them
are going to be on the bottom, so there’s even more leeway. I set the glue on the tread element section
by section and then set the pieces down, making sure all the best, matching
ones were on the front parts of each tread element. The second layer is a little trickier. This is the one that makes the treads really
pop, though, so it’s worth it. A small
tread link goes between each of the larger ones. I put a drop of glue, spread it a bit between
the two sides, and placed accordingly.
The tricky part is on the corners.
A drop of glue will still hold one, but you need to keep an eye on it
until it dries or gravity can pull them out of line. Once set, they do a great job of
“rounding” out the treads.
The second layer is a little trickier. This is the one that makes the treads really
pop, though, so it’s worth it. A small
tread link goes between each of the larger ones. I put a drop of glue, spread it a bit between
the two sides, and placed accordingly.
The tricky part is on the corners.
A drop of glue will still hold one, but you need to keep an eye on it
until it dries or gravity can pull them out of line. Once set, they do a great job of
“rounding” out the treads.
This weekend is both Memorial Day here in the states and also my birthday weekend. This means I’m going to be playing, not building, all weekend. So I won’t have anything new to show off next week.
But after that... we’re going to turn this Leman Russ body into a Destroyer.
Leman Russ, Pt II 25 May 2016 2:54 PM (8 years ago)

 The hull is pretty straightforward. Two sides and a long
strip that connects them and becomes... well, the part we’ll see. These are all big and simple, so I cut them
all out with scissors. Only took about
ten minutes to have them all done and marked.
The hull is pretty straightforward. Two sides and a long
strip that connects them and becomes... well, the part we’ll see. These are all big and simple, so I cut them
all out with scissors. Only took about
ten minutes to have them all done and marked.

 There’s a raised section on top of the Leman Russ where the
turret usually mounts. The shape is a
bit odd, but it goes together very well.
The worst part is that—even with tiny tabs—you’ll essentially need to
hold the whole thing from all directions until it dries. So make sure you’ve got a good movie on.
There’s a raised section on top of the Leman Russ where the
turret usually mounts. The shape is a
bit odd, but it goes together very well.
The worst part is that—even with tiny tabs—you’ll essentially need to
hold the whole thing from all directions until it dries. So make sure you’ve got a good movie on.  Next up was the engine compartment in the back. This is a little tricky because it runs up
the back section of the hull and the back part of that raised section.
This means there’s a slight angle along the back edge of the compartment. It’s easy to miss, so watch for it.
Next up was the engine compartment in the back. This is a little tricky because it runs up
the back section of the hull and the back part of that raised section.
This means there’s a slight angle along the back edge of the compartment. It’s easy to miss, so watch for it. Once all this was done, I glued the last wall in place and sealed up the hull. It took a tiny bit of wiggling and pressure to make everything line up just right, and then a few more minutes of waiting. Once the glue had a good hold, I set it down on its side with a book to hold it in place.
 On this template, the tread is two sections. Rather than join them, I decided to attach
them to the tread walls individually. I
figured this would give me more space to work the clips and get nice, solid
joins. And it worked. Once I had one attached, I added the second
(the back section), and joined it to both the tread wall and the front section.
On this template, the tread is two sections. Rather than join them, I decided to attach
them to the tread walls individually. I
figured this would give me more space to work the clips and get nice, solid
joins. And it worked. Once I had one attached, I added the second
(the back section), and joined it to both the tread wall and the front section.
Once I had the Vs in place and everything was dry, I glued the layered tread walls in place. I lined them up, wrapped them in an old veggie bag (wax paper works, too) and set them under a few hardcover books. Again—I made sure everything was lined up first. It’d suck to have it dry crooked after all this work. I left these to dry for about three hours and they turned out... well, fantastic. Solid and strong.
 Alas, all of that drying time on some of these pieces needed
means I didn’t get quite as far as I’d hoped to this weekend. The big elements
are done, but there’s still some detail work. So I think I’m going to stretch
the “Leman Russ” portion of this out for one more week before I switch over to
full Destroyer mode. So to speak.
Alas, all of that drying time on some of these pieces needed
means I didn’t get quite as far as I’d hoped to this weekend. The big elements
are done, but there’s still some detail work. So I think I’m going to stretch
the “Leman Russ” portion of this out for one more week before I switch over to
full Destroyer mode. So to speak.
Leman Russ 10 May 2016 8:30 AM (8 years ago)

 So, I’ve had it in my mind to build a Destroyer for a while
now. I’ve always liked the look and idea
of them. Much like the Basilisk (another
favorite) it’s less a tank than it is a mobile platform for a single, massive
weapon. Plus, some of the folks I game
with are starting to assemble (no pun intended) some pretty impressive forces, so having a dedicated super-heavy hunter gives me something that can die
on turn one a lot...
So, I’ve had it in my mind to build a Destroyer for a while
now. I’ve always liked the look and idea
of them. Much like the Basilisk (another
favorite) it’s less a tank than it is a mobile platform for a single, massive
weapon. Plus, some of the folks I game
with are starting to assemble (no pun intended) some pretty impressive forces, so having a dedicated super-heavy hunter gives me something that can die
on turn one a lot... An advantage of the Leman Russ being so popular is there are
lots of different templates out there for it.
And for all the many, many variants of it. Some brilliant ones by Patroch. I dug through my collection and found a nice
one from way back when—one of the first Leman Russ templates I ever saw, to be
honest. I’d love to give credit where
credit is due, but the best I can find on it is a date
(2000-11-15) and the word Bile, which might be a proper name or a handle or
maybe someone created this template as part of an elaborate revenge plot? If you know who created it, please speak up. Regardless, it’s great and up in the STC Archive for your perusal.
An advantage of the Leman Russ being so popular is there are
lots of different templates out there for it.
And for all the many, many variants of it. Some brilliant ones by Patroch. I dug through my collection and found a nice
one from way back when—one of the first Leman Russ templates I ever saw, to be
honest. I’d love to give credit where
credit is due, but the best I can find on it is a date
(2000-11-15) and the word Bile, which might be a proper name or a handle or
maybe someone created this template as part of an elaborate revenge plot? If you know who created it, please speak up. Regardless, it’s great and up in the STC Archive for your perusal. One of the things I love about this template is its relative
simplicity. It has a lot of detail, but
the whole thing is only four pages long. And all that’s on the last page is the
standard turret—it’s really about three and a quarter pages. I managed to fit about 90% of this on a single frozen pizza box. So this is
going to be cheap even from a cardstock point of view.
One of the things I love about this template is its relative
simplicity. It has a lot of detail, but
the whole thing is only four pages long. And all that’s on the last page is the
standard turret—it’s really about three and a quarter pages. I managed to fit about 90% of this on a single frozen pizza box. So this is
going to be cheap even from a cardstock point of view. Helpful Hint—The outer two layers have some
fine detail work at the bottom. The
third layer is just one big ring, really.
Whenever I have to do pieces like this, I always cut out the inner bits before I cut the whole element from cardstock.
It’s much easier to work this way, especially with narrow bits like that
ring. Cut the element out first and it’s
harder to hold and harder to work with.
Helpful Hint—The outer two layers have some
fine detail work at the bottom. The
third layer is just one big ring, really.
Whenever I have to do pieces like this, I always cut out the inner bits before I cut the whole element from cardstock.
It’s much easier to work this way, especially with narrow bits like that
ring. Cut the element out first and it’s
harder to hold and harder to work with.
 I left these under the books for about... four hours? I went out and saw Captain America: Civil War. When I came back, they were
dry, solid, and very flat.
I left these under the books for about... four hours? I went out and saw Captain America: Civil War. When I came back, they were
dry, solid, and very flat.
Paperhammer Basics 26 Apr 2016 7:30 AM (9 years ago)


 The most basic paperhammer shape is a box. It’s something you’ll use all the time, and it’s
kind of the cornerstone of paperhammer.
All you need to remember about boxes is to make edges match—a 1” edge
here meets a 1” edge there. It sounds
simple ‘cause it really is. Check out
this quick diagram. Four sides, a top, a
bottom. This would give me a cube
because all the edges are the same length.
The most basic paperhammer shape is a box. It’s something you’ll use all the time, and it’s
kind of the cornerstone of paperhammer.
All you need to remember about boxes is to make edges match—a 1” edge
here meets a 1” edge there. It sounds
simple ‘cause it really is. Check out
this quick diagram. Four sides, a top, a
bottom. This would give me a cube
because all the edges are the same length.(more or less the same—I sketched it quick in Paint just so we’d have something to look at...)
 If alter the edges, I can alter the shape of the box. Look at this example. I shrink all the side
edges (but not the top and bottom edges) and now I’ll get a square, flat
box. This is the kind of thing I stick
on larger models to add some detail and texture. I could also go the other way—doubling or
tripling the sides to make a long, rectangular box. As I mentioned above, shapes like these are a
cornerstone of the paperbuilding craft.
Even with nothing else, you can use several of them together to build scenery pieces, simple
vehicles, and more.
If alter the edges, I can alter the shape of the box. Look at this example. I shrink all the side
edges (but not the top and bottom edges) and now I’ll get a square, flat
box. This is the kind of thing I stick
on larger models to add some detail and texture. I could also go the other way—doubling or
tripling the sides to make a long, rectangular box. As I mentioned above, shapes like these are a
cornerstone of the paperbuilding craft.
Even with nothing else, you can use several of them together to build scenery pieces, simple
vehicles, and more. This is probably a good time to mention tabs. Trying to glue cardstock edge-to-edge with
white glue is pretty much impossible, so it’s always good to add extra tabs on
to the basic shapes. These are just the parts I bend and slip into the model so
the glue has something to grab onto. Some
templates have them, but often they’re tiny little things that are all but
useless. Others don’t have them at
all. I add or enlarge on a case-by-case
basis, and try to make note of where I do.
This is probably a good time to mention tabs. Trying to glue cardstock edge-to-edge with
white glue is pretty much impossible, so it’s always good to add extra tabs on
to the basic shapes. These are just the parts I bend and slip into the model so
the glue has something to grab onto. Some
templates have them, but often they’re tiny little things that are all but
useless. Others don’t have them at
all. I add or enlarge on a case-by-case
basis, and try to make note of where I do.Helpful Hint--Always remember that tabs can be pretty much any size or shape because they’ll end up hidden inside the shape you’re building. The only thing I need to be careful of is overlap.
 Now, you can use these same techniques to build an elaborate
box, something with a more irregular shape to it. This diagram shows how I built the engine for the Gargant. I used the
five-edged side as my starting point, and that told me what all the other
panels and edges needed to be, size-wise—remember, boxes are just about making
the edges the same length. I mirrored
the other side, added some tabs, and put it together. The triangular boxes I added on either side went
together the same way. Also remember
that some shapes which look really complicated on their own (like that Gargant
engine) become a lot simpler if you break them down into component shapes.
Now, you can use these same techniques to build an elaborate
box, something with a more irregular shape to it. This diagram shows how I built the engine for the Gargant. I used the
five-edged side as my starting point, and that told me what all the other
panels and edges needed to be, size-wise—remember, boxes are just about making
the edges the same length. I mirrored
the other side, added some tabs, and put it together. The triangular boxes I added on either side went
together the same way. Also remember
that some shapes which look really complicated on their own (like that Gargant
engine) become a lot simpler if you break them down into component shapes.
Otherwise—two weeks until tanks.
Pathetic Excuses Post 22 Feb 2016 7:30 AM (9 years ago)


%20modeling%20and%20gaming%20is%20what%E2%80%99s%20taken%20the%20hit.%26nbsp;%26nbsp;%20I%20wanted%20to%20be%20working%20on%20a%20paperhammer%0ADestroyer%20by%20now%20(%3Ca%20href%3D%22http://atomicwarlords.blogspot.com/2016/01/something-big-on-way.html%22%3EI%E2%80%99m%20going%20to%20need%20it%3C/a%3E),%20or%20at%20least%20some%20Tyranid%0Ascenery%20(also%20paperhammer%E2%80%94it%E2%80%99s%20going%20to%20be%20great).%3C/div%3E%0A%3Cdiv%3E%0A%3Cbr%20/%3E%3C/div%3E%0A%3Cdiv%3E%0APretty%20much%20all%20I%E2%80%99ve%20managed%20to%20do%20is%20prime%20a%20few%0Athings.%26nbsp;%20But%20I%20thought%20some%20of%20you%20might%0Alike%20this%E2%80%94it%E2%80%99s%20%3Ca%20href%3D%22http://thegrimcheapness.blogspot.com/2015/11/warm-liquid-goo-phase.html%22%3Ethe%20Imperial%20Knight%3C/a%3E%20I%20made%20last%20year.%26nbsp;%20I%20don%E2%80%99t%20put%20up%20pictures%20of%20painted%20things%0Athat%20often,%20and%20I%20know%20sometimes%20it%E2%80%99s%20easy%20to%20write%20off%20paperhammer%20projects%0Awhen%20they%20just%20look%20like...%20well,%20cardboard.%26nbsp;%0ABut%20even%20just%20a%20basic%20coat%20of%20primer%20shows%20how%20great%20these%20models%20can%0Alook.%3C/div%3E%0A%3Cdiv%3E%0A%3Cbr%20/%3E%3C/div%3E%0A%3Cdiv%3E%0A%3Ca%20href%3D%22https://blogger.googleusercontent.com/img/b/R29vZ2xl/AVvXsEg-lQBTpgpyfgao32Bt1QbiFFBaxT2lnNpYiZUArqNxkXbtRbb1MWMzbh652pHA3IxKncpWeYlXRe1VAiQHonxKyITKk6jRMPgBabPFzMTdS5W82vSjBtZBI-ZBxHUQ_90UihR0TlyZDF_s/s1600/Knight+Primed.jpg%22%20imageanchor%3D%221%22%3E%3Cimg%20border%3D%220%22%20height%3D%22292%22%20src%3D%22https://blogger.googleusercontent.com/img/b/R29vZ2xl/AVvXsEg-lQBTpgpyfgao32Bt1QbiFFBaxT2lnNpYiZUArqNxkXbtRbb1MWMzbh652pHA3IxKncpWeYlXRe1VAiQHonxKyITKk6jRMPgBabPFzMTdS5W82vSjBtZBI-ZBxHUQ_90UihR0TlyZDF_s/s320/Knight+Primed.jpg%22%20width%3D%22320%22%20/%3E%3C/a%3E%3C/div%3E%0A%3Cdiv%3E%0AI%E2%80%99ll%20put%20up%20a%20few%20more%20shots%20as%20it%20gets%20some%20color%20on%20it,%0Abut%20I%20wanted%20to%20give%20you%20a%20look%20at%20it%20right%20now.%3C/div%3E%0A%3Cdiv%3E%0A%3Cbr%20/%3E%3C/div%3E%0AAnd%20next%20time,%20I%20thought%20I%20could%20go%20over%20some%20basics%20before%20diving%20into%0Athat%20Destroyer.%3C/div%3E)
Gaming on the Cheap 12 Jan 2016 8:00 AM (9 years ago)

 Then I found Paperhammer.
It’s like finding the light of the Emperor, just... cheaper. I’d worked in the film industry for a bunch
of years as a prop guy, so I had some passable art/craft skills. I dug around online (using the internet at the library) and found templates for Rhinos, Land Raiders,
Baneblades, Monoliths... even Titans. And
there are some great templates out there. Almost identical to the company models once
they’re painted. Suddenly 40K was
affordable again! The big expense was
white glue and paper for the printer.
Then I found Paperhammer.
It’s like finding the light of the Emperor, just... cheaper. I’d worked in the film industry for a bunch
of years as a prop guy, so I had some passable art/craft skills. I dug around online (using the internet at the library) and found templates for Rhinos, Land Raiders,
Baneblades, Monoliths... even Titans. And
there are some great templates out there. Almost identical to the company models once
they’re painted. Suddenly 40K was
affordable again! The big expense was
white glue and paper for the printer.So being able to build a lot of these models on the cheap means keeping the game open and available to a lot more folks. That’s a good thing. And I’m glad to share my tips and experience with you. Read another way, I’ve screwed up so you don’t have to.
If any of that interests you... thanks for being here.
I’ll try to be semi-interesting.
%20and%20found%20templates%20for%20%3Ca%20href%3D%22http://thegrimcheapness.blogspot.com/2015/07/rhino-redux.html%22%3ERhinos%3C/a%3E,%20%3Ca%20href%3D%22http://thegrimcheapness.blogspot.com/2010/02/mk1-land-raider-part-three.html%22%3ELand%20Raiders%3C/a%3E,%0ABaneblades,%20%3Ca%20href%3D%22http://thegrimcheapness.blogspot.com/2010/09/awakened-monolith-part-ii.html%22%3EMonoliths%3C/a%3E...%20even%20Titans.%26nbsp;%20And%0A%3Ca%20href%3D%22http://thegrimcheapness.blogspot.com/2015/11/new-stc-data-discovered.html%22%3Ethere%20are%20some%20%3Ci%3Egreat%3C/i%3E%26nbsp;templates%20out%20there%3C/a%3E.%26nbsp;%20Almost%20identical%20to%20the%20company%20models%20once%0Athey%E2%80%99re%20painted.%26nbsp;%20Suddenly%2040K%20was%0Aaffordable%20again!%26nbsp;%20The%20big%20expense%20was%0Awhite%20glue%20and%20paper%20for%20the%20printer.%3C/div%3E%0A%3Cdiv%3E%0A%3Cbr%20/%3E%3C/div%3E%0A%3Cdiv%3E%0AAlas,%20while%20I%E2%80%99ve%20managed%20to%20claw%20my%20way%20back%20into%20the%20middle%0Aclass,%20I%20know%20there%20are%20still%20some%20folks%20who%20haven%E2%80%99t.%26nbsp;%20Worse%20yet,%20Games%20Workshop%E2%80%99s%20prices%20have%0Askyrocketed%20over%20the%20past%20few%20years.%26nbsp;%0AThirty%20dollars%20per%20figure?%26nbsp;%20Fifty%0Adollars%20for%20bare-basic%20tanks?%26nbsp;%20I%20remember%0Awhen%20$150%20would%20pretty%20much%20get%20you%20a%20solid%20army%E2%80%94and%20that%20wasn%E2%80%99t%20so%20long%0Aago.%26nbsp;%20Now%20it%E2%80%99s%20a%20lucky%20thing%20if%20that%20same%0A$150%20can%20round%20out%20your%20Heavy%20Support%20choices.%26nbsp;%0A%3Cbr%20/%3E%0A%3Cbr%20/%3E%0ASo%20being%20able%20to%20build%20a%20lot%20of%20these%20models%20on%20the%20cheap%20means%20keeping%20the%0Agame%20open%20and%20available%20to%20a%20lot%20more%20folks.%26nbsp;%0AThat%E2%80%99s%20a%20good%20thing.%26nbsp;%20And%20I%E2%80%99m%20glad%0Ato%20share%20my%20tips%20and%20experience%20with%20you.%26nbsp;%0ARead%20another%20way,%20I%E2%80%99ve%20screwed%20up%20so%20you%20don%E2%80%99t%20have%20to.%3C/div%3E%0A%3Cdiv%3E%0A%3Cbr%20/%3E%3C/div%3E%0A%3Cdiv%3E%0AOn%20another%20level,%20though...%20The%20hobby%20part%20of%20this%20game%0Adoesn%E2%80%99t%20just%20mean%20buying%20the%20boxed%20set,%20putting%20it%20together%20with%20company%20glue,%0Aand%20painting%20it%20with%20company%20paints.%20In%20fact,%20there%20was%20a%20time%20when%20said%0Acompany%20encouraged%20creativity%20and%20offered%20tips%20to%20players%20who%20couldn%E2%80%99t%20afford%0Ato%20drop%20a%20lot%20of%20money.%20%26nbsp;%3Ca%20href%3D%22http://thegrimcheapness.blogspot.com/2015/10/kroot-encampment.html%22%3EMaking%20terrain%20out%20of%20cardboard%20%3C/a%3Eand%20styrofoam%20used%20to%20be%20a%20regular%20feature%20in%20%3Ci%3EWhite%20Dwarf%3C/i%3E%26nbsp;%20articles.%26nbsp;%0ABlack%20Gobbo%20ran%20a%20great%20piece%20(remember%20Black%20Gobbo?)%20showing%20how%20to%20mix%0Aparts%20from%20a%20Basilisk%20and%20a%20Leman%20Russ%20to%20create%26nbsp;%20a%20very%20passable%20Salamander%20and%20Destroyer.%26nbsp;%20Heck,%20I%20remember%20when%20the%20Ogre%20line%20was%20first%0Aintroduced%20for%20Fantasy,%20%3Ci%3EWhite%20Dwarf%3C/i%3E%20ran%20a%20whole%20article%20about%20how%20to%0Aconvert%20Hero%20characters%20from%20basic%20ogres%20(just%20in%20case%20you%20couldn%E2%80%99t%20afford%20the%0Abig%20metal%20models.%20%3C/div%3E%0A%3Cdiv%3E%0A%3Cbr%20/%3E%3C/div%3E%0A%3Cdiv%3E%0A(I%E2%80%99ll%20touch%20on%20this%20again%20in%20a%20few%20weeks)%3C/div%3E%0A%3Cdiv%3E%0A%3Cbr%20/%3E%3C/div%3E%0A%3Cdiv%3E%0AThing%20is,%20I%20%3Ci%3Elike%3C/i%3E%20making%20my%20own%20models%20and%20scenery%20pieces.%0A%26nbsp;I%20enjoy%20it.%26nbsp;%20I%E2%80%99m%20proud%20of%20the%20fact%20that%20I%20turned%20three%0ATony%E2%80%99s%20Pizza%20boxes%20into%20a%20very%20solid%3Ca%20href%3D%22http://thegrimcheapness.blogspot.com/2015/02/imperial-knights-part-xii-end.html%22%3E%20Imperial%20Knight%3C/a%3E%20and%20some%20bargain-store%0AHalloween%20decorations%20into%20%3Ca%20href%3D%22http://thegrimcheapness.blogspot.com/2011/10/skull-rock.html%22%3Emulti-use%20scenery%3C/a%3E.%26nbsp;%0AI%20like%20being%20able%20to%20turn%20some%20random%20pieces%20I%20dug%20out%20of%20my%20local%0Agaming%20store%E2%80%99s%20bitz%20bins%20into%20a%20unique%20and%20impressive%20%3Ca%20href%3D%22http://thegrimcheapness.blogspot.com/2013/10/space-marine-captain.html%22%3ECaptain%20for%20my%20Relictors%3C/a%3E%0Aor%20a%20character%20for%20an%20%3Ca%20href%3D%22http://thegrimcheapness.blogspot.com/2015/07/age-of-sigmar.html%22%3EAge%20of%20Sigmar%3C/a%3E%20game.%3C/div%3E%0A%3Cdiv%3E%0A%3Cbr%20/%3E%3C/div%3E%0A%3Cdiv%3E%0ASo,%20that%E2%80%99s%20that%20this%20is%20all%20about.%26nbsp;%20For%20me,%20anyway.%26nbsp;%20Making%20the%20game%20accessible%20to%20a%20lot%20more%0Apeople%20and%20giving%20those%20people%20a%20chance%20to%20do%20something%20a%20lot%20more%20personal%20and%0Aunique%20with%20the%20units%20in%20their%20army.%3Cbr%20/%3E%0A%3Cbr%20/%3E%0AIf%20any%20of%20that%20interests%20you...%20thanks%20for%20being%20here.%26nbsp;%20%3Cbr%20/%3E%0A%3Cbr%20/%3E%0AI%E2%80%99ll%20try%20to%20be%20semi-interesting.%3C/div%3E%0A%3C/div%3E)
Defiler Weapons 29 Dec 2015 5:00 PM (9 years ago)

Anyway, in these last days of the year, I thought we could go over the final weapons options for the Defiler. Yeah, only three years late. Or a few weeks late, depending on how you look at it. Either way, not too impressive, I know.
 A quick recap.
I built the hull and legs of a Chaos Defiler entirely from
cardstock. The only non-paper part is
the ball-and-socket joints, made from some wooden balls I got at my local hobby
shop for about two bucks. I designed one to be more of a
Nurgle firebase while the other was going to be a Khorne close-combat monster.
A quick recap.
I built the hull and legs of a Chaos Defiler entirely from
cardstock. The only non-paper part is
the ball-and-socket joints, made from some wooden balls I got at my local hobby
shop for about two bucks. I designed one to be more of a
Nurgle firebase while the other was going to be a Khorne close-combat monster. The twin autocannons are using the template from Newobmij‘s Imperial
Knight—it comes with a heavy stubber, and a few subtle tweaks will let it work
as an autocannon. That template’s
available in the STC archive if you want to check that.
The twin autocannons are using the template from Newobmij‘s Imperial
Knight—it comes with a heavy stubber, and a few subtle tweaks will let it work
as an autocannon. That template’s
available in the STC archive if you want to check that.
 While the main body was drying, I made a simple axe-blade by cutting out a chisel shape and
then layering smaller chisels on either side of it. If you really wanted to go crazy, you could put more of a curve to this, but just remember it's really important to make the curves on all three pieces line up. I mounted this on the bottom
barrel of the autocannon as the standard
chaos underslung blade.
While the main body was drying, I made a simple axe-blade by cutting out a chisel shape and
then layering smaller chisels on either side of it. If you really wanted to go crazy, you could put more of a curve to this, but just remember it's really important to make the curves on all three pieces line up. I mounted this on the bottom
barrel of the autocannon as the standard
chaos underslung blade. I cut some 1/8” strips and added trim along the edges of the armor, and also a few little Chaos “barbs,” or whatever you might like to call them. The little jags and triangles that show up on most Chaos armor and weaponry. I used the 1/16" and 1/8" hole punch to create a bit of "corrosion" on one corner of the armor plate. As a final touch, I used some 1/4" discs to add a Nurgle icon.
 Once I had the five spots, I just mirrored them above and
below to give me a 1-2-1-2-1 pattern.
Seven silos. I added a 45 degree
line off each corner and that gave me the front plate of my Nurglesque havoc
launcher. I cut it out, traced it, and
now I had a back plate. Measuring the
edges gave me the lengths of all six faces of the sides (which were 3/4” and
just a hair over 9/16”). I’d be more
exact about it except the whole body is going to be covered by another armor
plate. I gave it the same trim, jags, and icon as the autocannon.
Once I had the five spots, I just mirrored them above and
below to give me a 1-2-1-2-1 pattern.
Seven silos. I added a 45 degree
line off each corner and that gave me the front plate of my Nurglesque havoc
launcher. I cut it out, traced it, and
now I had a back plate. Measuring the
edges gave me the lengths of all six faces of the sides (which were 3/4” and
just a hair over 9/16”). I’d be more
exact about it except the whole body is going to be covered by another armor
plate. I gave it the same trim, jags, and icon as the autocannon. Important Note—in retrospect, these are a little small for
Defiler shoulders. Not horribly so, but
just enough that it gnaws at me a bit.
It wasn’t clear until the whole thing was together. If you wanted to use this same method, I’d
use a 40mm for my tracing template. I
still might pull it apart and do new ones before the warm liquid goo phase.
Important Note—in retrospect, these are a little small for
Defiler shoulders. Not horribly so, but
just enough that it gnaws at me a bit.
It wasn’t clear until the whole thing was together. If you wanted to use this same method, I’d
use a 40mm for my tracing template. I
still might pull it apart and do new ones before the warm liquid goo phase. While the shoulders were drying I decided to go back and add
some rivets to the whole model. Looking
back, I guess I never got to the rivet stage before. I know I had the 1/16” hole punch at that
point because the corroded effects were done with it. Anyway, I glued a few
rivets on at some key points.
While the shoulders were drying I decided to go back and add
some rivets to the whole model. Looking
back, I guess I never got to the rivet stage before. I know I had the 1/16” hole punch at that
point because the corroded effects were done with it. Anyway, I glued a few
rivets on at some key points.(ignoring the three year gap)

Cheap Helbrute Conversion 18 Nov 2015 7:30 AM (9 years ago)

 For example...
 Once this was in place, I stretched the putty out on either
side to help hold it in place. Again, I had to be careful so I didn’t force it
into the teeth/claws on the other side. This was tricky and I had to try
twice. Fortunately, on something this
simple, messing up just means pulling the blob out and rolling it smooth again.
So don’t panic too much. It maybe took
ten minutes from starting to mix the green stuff to having it in place. I let it
dry for another fifteen minutes—face up! I didn’t want its own weight
to make a flat spot on the ball—and then assembled the Helbrute as normal.
Once this was in place, I stretched the putty out on either
side to help hold it in place. Again, I had to be careful so I didn’t force it
into the teeth/claws on the other side. This was tricky and I had to try
twice. Fortunately, on something this
simple, messing up just means pulling the blob out and rolling it smooth again.
So don’t panic too much. It maybe took
ten minutes from starting to mix the green stuff to having it in place. I let it
dry for another fifteen minutes—face up! I didn’t want its own weight
to make a flat spot on the ball—and then assembled the Helbrute as normal.
 I didn’t glue the front plate-armor-hull piece in place
because I want to paint the eye without too many extra bits around it. So I’ll
prime those seperately and assemble them later.
As one last bit of detail, I added a centered horn to the armor
plate. It’s something I pulled from the bits bins at one point—I think it might be from the Chaos Terminators
set. Central horns are distinctively
Nurgle in 40K (and related games).
I didn’t glue the front plate-armor-hull piece in place
because I want to paint the eye without too many extra bits around it. So I’ll
prime those seperately and assemble them later.
As one last bit of detail, I added a centered horn to the armor
plate. It’s something I pulled from the bits bins at one point—I think it might be from the Chaos Terminators
set. Central horns are distinctively
Nurgle in 40K (and related games).
New STC Data Discovered 11 Nov 2015 8:30 AM (9 years ago)

 Anyway, everything should be current now, including templates for the promethium pipes and the Kroot tents (there's a whole Scenery folder in the archive now).
I’ll try to be a lot better about keeping it up to date. Maybe even pre-updated, so the templates are uploaded
before I start new projects.
Anyway, everything should be current now, including templates for the promethium pipes and the Kroot tents (there's a whole Scenery folder in the archive now).
I’ll try to be a lot better about keeping it up to date. Maybe even pre-updated, so the templates are uploaded
before I start new projects.
%3C/div%3E%0A%3Cdiv%3E%0A%3Cbr%20/%3E%3C/div%3E%0A%3Cdiv%3E%0A%3Ca%20href%3D%22https://blogger.googleusercontent.com/img/b/R29vZ2xl/AVvXsEhLCzWfg0eTG1Yks79E4e0rj1xuejmY7MEZLLsXQhHIGFiI_9lxv3i0rqPK1exrwFki4rq_ZVj_mHxIFv-4l4SpWJKleEINrrdycRXrKMNId_8VLwn31RHyxmGG3jglIAvnTTcSEOz26eVB/s1600/20150419_141440.jpg%22%20imageanchor%3D%221%22%3E%3Cimg%20border%3D%220%22%20height%3D%22137%22%20src%3D%22https://blogger.googleusercontent.com/img/b/R29vZ2xl/AVvXsEhLCzWfg0eTG1Yks79E4e0rj1xuejmY7MEZLLsXQhHIGFiI_9lxv3i0rqPK1exrwFki4rq_ZVj_mHxIFv-4l4SpWJKleEINrrdycRXrKMNId_8VLwn31RHyxmGG3jglIAvnTTcSEOz26eVB/s200/20150419_141440.jpg%22%20width%3D%22200%22%20/%3E%3C/a%3EAnyway,%20everything%20should%20be%20current%20now,%20including%20%3Ca%20href%3D%22https://drive.google.com/folderview?id%253D0B7fZpQcx1UEMQ3MwWWpudXE5Vm8%2526usp%253Dsharing%22%3Etemplates%3C/a%3E%26nbsp;for%20%3Ca%20href%3D%22http://thegrimcheapness.blogspot.com/2015/04/promethium-pipes.html%22%3Ethe%20promethium%20pipes%3C/a%3E%20and%20%3Ca%20href%3D%22http://thegrimcheapness.blogspot.com/2015/10/kroot-encampment.html%22%3Ethe%20Kroot%20tents%3C/a%3E%26nbsp;(there's%20a%20whole%20%3Cb%3EScenery%20%3C/b%3Efolder%20in%20the%20archive%20now).%26nbsp;%0AI%E2%80%99ll%20try%20to%20be%20a%20lot%20better%20about%20keeping%20it%20up%20to%20date.%26nbsp;%20Maybe%20even%20pre-updated,%20so%20the%20templates%20are%20uploaded%0Abefore%20I%20start%20new%20projects.%3C/div%3E%0A%3Cdiv%3E%0A%3Cbr%20/%3E%3C/div%3E%0A%3Cdiv%3E%0AOver%20the%20next%20few%20weeks,%20I%E2%80%99m%20hoping%20to%20finish%20off%20an%20old%0Aproject%20that%E2%80%99s%20been%20sitting%20here%20for...%20well,%20about%20four%20years%20waiting%20for%0Afinal%20touches.%26nbsp;%20Maybe%20dabble%20with%20some%0Acheap%20or%20easy%20conversions.%26nbsp;%20A%20few%20tricks%0Aand%20techniques.%26nbsp;%20And%20I%E2%80%99m%20going%20to%20get%0Aback%20to%20a%20basic%20Paperhammer%20tank.%26nbsp;%0ASomething%20to%20deal%20with%20all%20the%20%3Ca%20href%3D%22http://thegrimcheapness.blogspot.com/2015/02/imperial-knights-part-xii-end.html%22%3EKnights%3C/a%3E%20and%20%3Ca%20href%3D%22http://thegrimcheapness.blogspot.com/2015/09/part-nine.html%22%3EGargants%3C/a%3E.%3C/div%3E%0A%3C/div%3E)