Looking For Something? 13 Mar 2016 5:00 PM (9 years ago)
If you've ended up here and this isn't what you were expecting, I've probably unpublished the post you were looking for.
I stopped posting here around the end of 2014 after 9 years of craft-blogging. Since then, I've unpublished most of the posts (900+), leaving the ones people still find useful (~50).
REMAINING POSTS:
- tutorials
- video crochet-a-longs
- details about my patterns
REASONS YOU MIGHT HAVE LANDED HERE:
- in my heyday, a lot of bloggers linked to (pinned etc.) my posts
- my remaining post may have links to unpublished content
- Google Search may still index some of the unpublished content
Sorry if what you were looking for is gone!
*** visit this post to leave a comment or share via social media ***


Introducing the Lucky Wristlet 28 Jul 2014 5:00 AM (10 years ago)
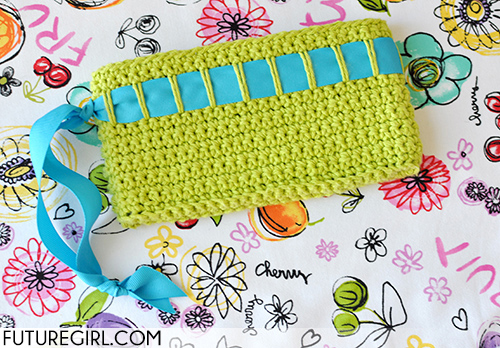
I can't wait to see all the creative personal twists that you put on the pattern. There are so many ways to customize this using colors, materials, ribbons, etc. Plus it's a very quick project. You could have it done in a weekend. So far, no one's posted a project on Ravlery. Will you be the first? ;)
*** visit this post to leave a comment or share via social media ***
%20%20%3Cbr%20/%3E%3Cbr%20/%3E***%20%3Ca%20href%3D%22http://www.futuregirl.com/craft_blog/2014/7/intro-to-lucky-wristlet.aspx%23postlove%22%3Evisit%20this%20post%3C/a%3E%20to%20leave%20a%20comment%20or%20share%20via%20social%20media%20***)
Tutorial: Make a Ribbon Strap for the Lucky Wristlet 4 Jul 2014 9:01 PM (10 years ago)
This is the photo tutorial for making a ribbon strap for the Lucky Wristlet.
Detailed instructions (text is above its corresponding photo)
1. You'll need a crocheted Lucky Wristlet using my free PDF crochet pattern and one yard of ribbon.
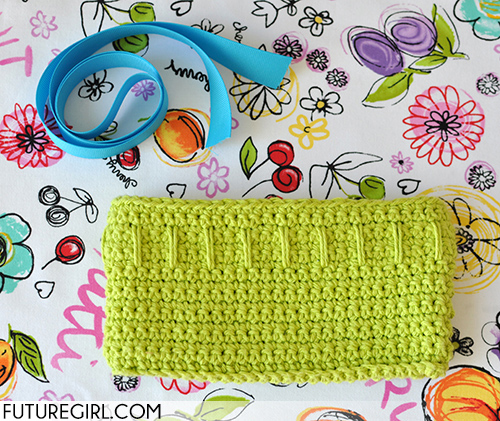
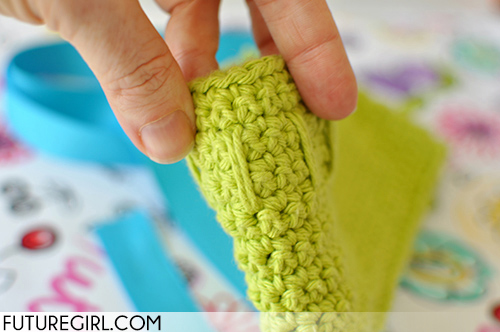
2. Find the side of your wristlet that doesn't have a spike crochet "belt loop" for your ribbon. This side has a spike.
There's more! Read the full post -->
*** visit this post to leave a comment or share via social media ***
%3Cbr%20/%3E%3Cbr%20/%3E1.%20%20You'll%20need%20a%20crocheted%20Lucky%20Wristlet%20using%20my%20%3Ca%20href%3D%22http://www.futuregirl.com/craft_blog/downloads.aspx%22%3Efree%20PDF%20crochet%20pattern%3C/a%3E%20and%20one%20yard%20of%20ribbon.%3Cbr%20/%3E%3Cdiv%20align%3D%22center%22%3E%3Cimg%20src%3D%22http://www.futuregirl.com/craft_blog/images/2014/06/wristlet-ribbon-tutorial_001.jpg%22%20/%3E%3C/div%3E%3Cbr%20/%3E%3Cbr%20/%3E2.%20%20Find%20the%20side%20of%20your%20wristlet%20that%20doesn't%20have%20a%20spike%20crochet%20%22belt%20loop%22%20for%20your%20ribbon.%20%20This%20side%20has%20a%20spike.%3Cbr%20/%3E%3Cdiv%20align%3D%22center%22%3E%3Cimg%20src%3D%22http://www.futuregirl.com/craft_blog/images/2014/06/wristlet-ribbon-tutorial_003.jpg%22%20/%3E%3C/div%3E%3Cbr%20/%3E%3Cbr%20/%3E%3Cbr%20/%3EThere's%20more!%20%20%3Ca%20href%3D%22http://www.futuregirl.com/craft_blog/2014/7/tutorial-lucky-wristlet-strap.aspx%22%3ERead%20the%20full%20post%3C/a%3E%20--%3E%3Cbr%20/%3E%3Cbr%20/%3E***%20%3Ca%20href%3D%22http://www.futuregirl.com/craft_blog/2014/7/tutorial-lucky-wristlet-strap.aspx%23postlove%22%3Evisit%20this%20post%3C/a%3E%20to%20leave%20a%20comment%20or%20share%20via%20social%20media%20***)
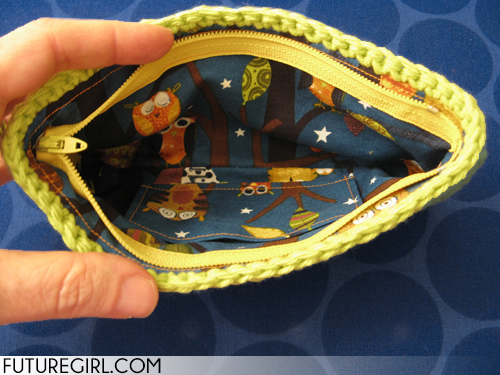
Tutorial: Make a Zippered Lining for the Lucky Wristlet 4 Jul 2014 5:00 AM (10 years ago)
This is the photo tutorial for making a zippered lining for the Lucky Wristlet.
Detailed instructions (text is above its corresponding photo)
1. You'll need a crocheted Lucky Wristlet using my free PDF crochet pattern, fabric for the lining, and a zipper that is about 3 inches longer (or more) than your wristlet.
CUT FABRIC PIECES
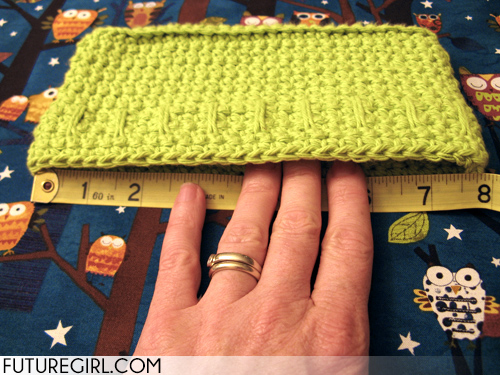
2. To figure out the size of the fabric pieces you need to cut, you need to measure your wristlet. Measure the width of the inside opening. In this photo, my interior wristlet width is 7.5"
There's more! Read the full post -->
*** visit this post to leave a comment or share via social media ***
%3Cbr%20/%3E%3Cbr%20/%3E1.%20%20You'll%20need%20a%20crocheted%20Lucky%20Wristlet%20using%20my%20%3Ca%20href%3D%22http://www.futuregirl.com/craft_blog/downloads.aspx%22%3Efree%20PDF%20crochet%20pattern%3C/a%3E,%20fabric%20for%20the%20lining,%20and%20a%20zipper%20that%20is%20about%203%20inches%20longer%20(or%20more)%20than%20your%20wristlet.%3Cbr%20/%3E%3Cbr%20/%3E%3Cstrong%3ECUT%20FABRIC%20PIECES%3C/strong%3E%3Cbr%20/%3E%3Cbr%20/%3E2.%20%20To%20figure%20out%20the%20size%20of%20the%20fabric%20pieces%20you%20need%20to%20cut,%20you%20need%20to%20measure%20your%20wristlet.%20%20Measure%20the%20width%20of%20the%20inside%20opening.%20%20In%20this%20photo,%20my%20interior%20wristlet%20width%20is%207.5%22%3Cbr%20/%3E%3Cdiv%20align%3D%22center%22%3E%3Cimg%20src%3D%22http://www.futuregirl.com/craft_blog/images/2014/06/wristlet-lining-tutorial_0001_o.jpg%22%20/%3E%3C/div%3E%3Cbr%20/%3E%3Cbr%20/%3E%3Cbr%20/%3EThere's%20more!%20%20%3Ca%20href%3D%22http://www.futuregirl.com/craft_blog/2014/7/tutorial-lucky-wristlet-lining.aspx%22%3ERead%20the%20full%20post%3C/a%3E%20--%3E%3Cbr%20/%3E%3Cbr%20/%3E***%20%3Ca%20href%3D%22http://www.futuregirl.com/craft_blog/2014/7/tutorial-lucky-wristlet-lining.aspx%23postlove%22%3Evisit%20this%20post%3C/a%3E%20to%20leave%20a%20comment%20or%20share%20via%20social%20media%20***)
Tutorial: Crochet a Lucky Wristlet 3 Jul 2014 5:00 AM (10 years ago)
This is the photo tutorial for crocheting my Lucky Wristlet pattern.
First things first: download the PDF pattern for the Lucky Wristlet.
Detailed instructions (text is above its corresponding photo)
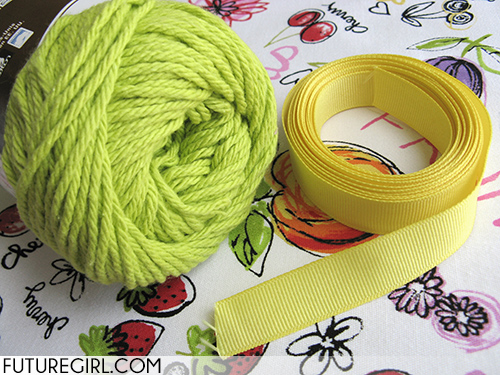
1. Gather your supplies: yarn, ribbon, and your crochet hook. I highly recommend doing a gauge swatch, but it's not required. For this project, size isn't a concern, but you might want to make sure the fabric your yarn-hook combo makes will work for the wristlet you're imaging (not too thin, thick, etc).
Don't be confused by the yellow ribbon. I originally thought I'd use the yellow, but I ultimately decided to use the blue you see in the top photo. Luckily, grosgrain ribbon comes in standardized widths in a wide range of colors so it was easy to find the blue I wanted in a 1" width to swap with the yellow.
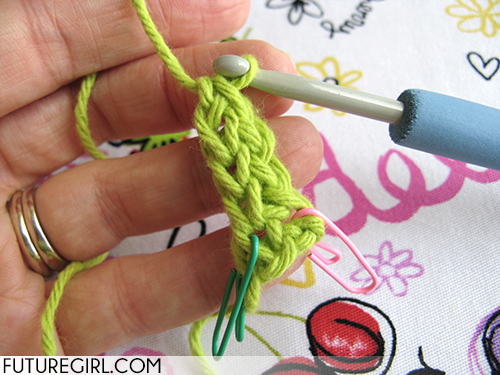
2. Start the foundation row of foundation single crochet (FSC) stitches. Never done FSC stitches before? Learn how from my FSC Tutorial.
After a I make a couple of FSC, I always put a stitch marker in the top and bottom of the first FSC. In the photo, I have put a pink stitch marker in the top of the FSC and a green stitch marker in the bottom or the FSC.
There's more! Read the full post -->
*** visit this post to leave a comment or share via social media ***
%3Cbr%20/%3E%3Cbr%20/%3E1.%20%20Gather%20your%20supplies:%20%20yarn,%20ribbon,%20and%20your%20crochet%20hook.%20%20I%20highly%20recommend%20doing%20a%20gauge%20swatch,%20but%20it's%20not%20required.%20%20For%20this%20project,%20size%20isn't%20a%20concern,%20but%20you%20might%20want%20to%20make%20sure%20the%20fabric%20your%20yarn-hook%20combo%20makes%20will%20work%20for%20the%20wristlet%20you're%20imaging%20(not%20too%20thin,%20thick,%20etc).%3Cbr%20/%3E%3Cbr%20/%3EDon't%20be%20confused%20by%20the%20yellow%20ribbon.%20%20I%20originally%20thought%20I'd%20use%20the%20yellow,%20but%20I%20ultimately%20decided%20to%20use%20the%20blue%20you%20see%20in%20the%20top%20photo.%20%20Luckily,%20grosgrain%20ribbon%20comes%20in%20standardized%20widths%20in%20a%20wide%20range%20of%20colors%20so%20it%20was%20easy%20to%20find%20the%20blue%20I%20wanted%20in%20a%201%22%20width%20to%20swap%20with%20the%20yellow.%3Cbr%20/%3E%3Cdiv%20align%3D%22center%22%3E%3Cimg%20src%3D%22http://www.futuregirl.com/craft_blog/images/2014/05/wristlet-tutorial_0003.jpg%22%20/%3E%3C/div%3E%3Cbr%20/%3E%3Cbr%20/%3E2.%20%20Start%20the%20foundation%20row%20of%20foundation%20single%20crochet%20(FSC)%20stitches.%20%20Never%20done%20FSC%20stitches%20before?%20%20Learn%20how%20from%20my%20%3Ca%20href%3D%22http://www.futuregirl.com/craft_blog/2009/3/tutorial-foundation-single-crochet.aspx%22%3EFSC%20Tutorial%3C/a%3E.%3Cbr%20/%3E%3Cbr%20/%3EAfter%20a%20I%20make%20a%20couple%20of%20FSC,%20I%20always%20put%20a%20stitch%20marker%20in%20the%20top%20and%20bottom%20of%20the%20first%20FSC.%20%20In%20the%20photo,%20I%20have%20put%20a%20pink%20stitch%20marker%20in%20the%20top%20of%20the%20FSC%20and%20a%20green%20stitch%20marker%20in%20the%20bottom%20or%20the%20FSC.%3Cbr%20/%3E%3Cdiv%20align%3D%22center%22%3E%3Cimg%20src%3D%22http://www.futuregirl.com/craft_blog/images/2014/05/wristlet-tutorial_0005.jpg%22%20/%3E%3C/div%3E%3Cbr%20/%3E%3Cbr%20/%3E%3Cbr%20/%3EThere's%20more!%20%20%3Ca%20href%3D%22http://www.futuregirl.com/craft_blog/2014/7/tutorial-crochet-lucky-wristlet.aspx%22%3ERead%20the%20full%20post%3C/a%3E%20--%3E%3Cbr%20/%3E%3Cbr%20/%3E***%20%3Ca%20href%3D%22http://www.futuregirl.com/craft_blog/2014/7/tutorial-crochet-lucky-wristlet.aspx%23postlove%22%3Evisit%20this%20post%3C/a%3E%20to%20leave%20a%20comment%20or%20share%20via%20social%20media%20***)
Crochet Heart Scarf 25 Jan 2013 4:00 AM (12 years ago)
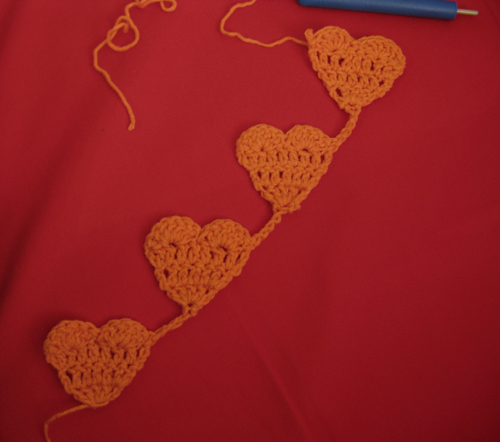
Last year CRAFT Magazine commissioned me to design a Valentine's Day crochet pattern. I designed the Crochet Heart Scarf for them. If you want the free pattern, click on over.

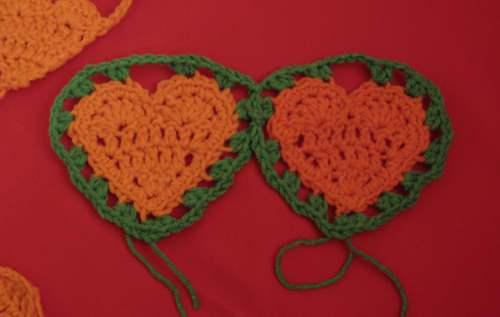
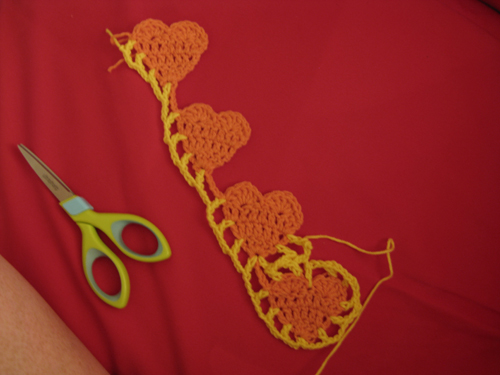
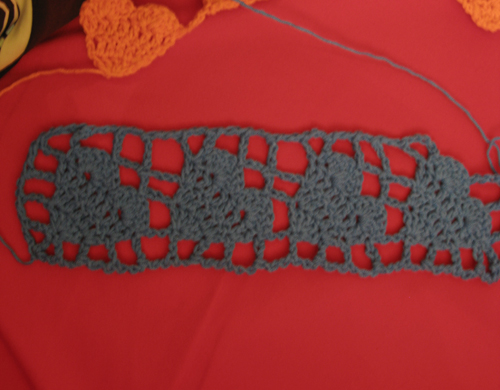
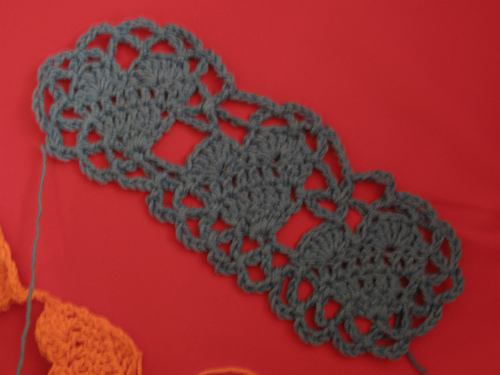
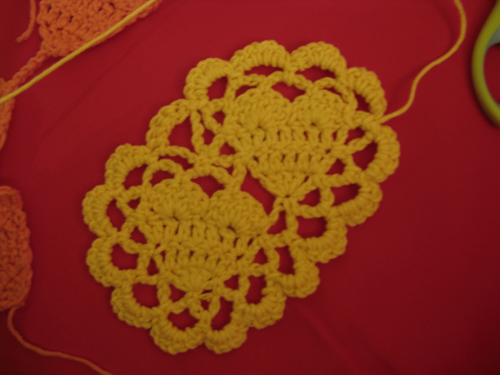
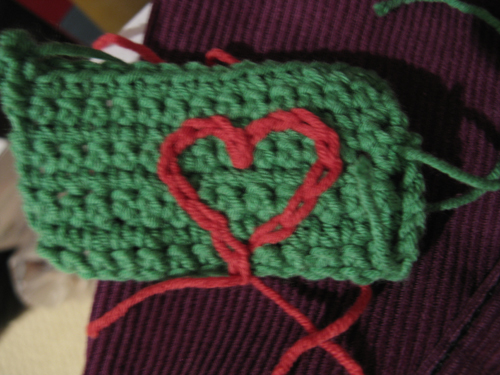
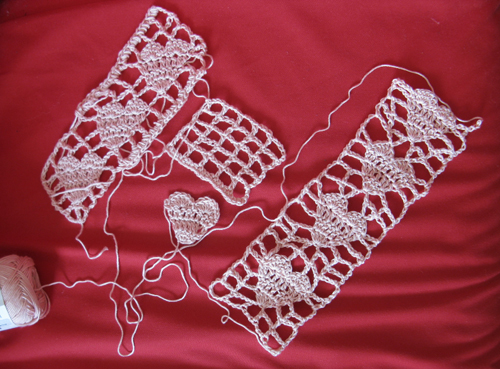
Some of these are sort of cute, but too bulky or stiff. Some just suck. All of them were a part of the path for getting to my final design. I couldn't have skipped any of them. Not even when I almost gave up and thought, "Hey, why not just surface crochet the damn hearts on single crochet." Ha!
In the last photo, you can see in the swatch on the right that at the end I was messing around with the connector thread placement to get them exactly where I wanted them.
*** visit this post to leave a comment or share via social media ***
,%20and%20with%20a%20recognizable%20heart%20motif.%3Cbr%20/%3E%3Cbr%20/%3ESome%20of%20these%20are%20sort%20of%20cute,%20but%20too%20bulky%20or%20stiff.%20%20Some%20just%20suck.%20%20All%20of%20them%20were%20a%20part%20of%20the%20path%20for%20getting%20to%20my%20final%20design.%20%20I%20couldn't%20have%20skipped%20any%20of%20them.%20%20Not%20even%20when%20I%20almost%20gave%20up%20and%20thought,%20%22Hey,%20why%20not%20just%20surface%20crochet%20the%20damn%20hearts%20on%20single%20crochet.%22%20%20Ha!%20%20%3Cbr%20/%3E%3Cbr%20/%3EIn%20the%20last%20photo,%20you%20can%20see%20in%20the%20swatch%20on%20the%20right%20that%20at%20the%20end%20I%20was%20messing%20around%20with%20the%20connector%20thread%20placement%20to%20get%20them%20exactly%20where%20I%20wanted%20them.%20%3Cbr%20/%3E%3Cbr%20/%3E%3Cdiv%20align%3D%22center%22%3E%3Cimg%20src%3D%22http://www.futuregirl.com/craft_blog/images/2013/01/heartswatch01_o.jpg%22%20/%3E%3C/div%3E%3Cbr%20/%3E%3Cdiv%20align%3D%22center%22%3E%3Cimg%20src%3D%22http://www.futuregirl.com/craft_blog/images/2013/01/heartswatch02_o.jpg%22%20/%3E%3C/div%3E%3Cbr%20/%3E%3Cdiv%20align%3D%22center%22%3E%3Cimg%20src%3D%22http://www.futuregirl.com/craft_blog/images/2013/01/heartswatch03_o.jpg%22%20/%3E%3C/div%3E%3Cbr%20/%3E%3Cdiv%20align%3D%22center%22%3E%3Cimg%20src%3D%22http://www.futuregirl.com/craft_blog/images/2013/01/heartswatch04_o.jpg%22%20/%3E%3C/div%3E%3Cbr%20/%3E%3Cdiv%20align%3D%22center%22%3E%3Cimg%20src%3D%22http://www.futuregirl.com/craft_blog/images/2013/01/heartswatch05_o.jpg%22%20/%3E%3C/div%3E%3Cbr%20/%3E%3Cdiv%20align%3D%22center%22%3E%3Cimg%20src%3D%22http://www.futuregirl.com/craft_blog/images/2013/01/heartswatch06_o.jpg%22%20/%3E%3C/div%3E%3Cbr%20/%3E%3Cdiv%20align%3D%22center%22%3E%3Cimg%20src%3D%22http://www.futuregirl.com/craft_blog/images/2013/01/heartswatch07_o.jpg%22%20/%3E%3C/div%3E%3Cbr%20/%3E%3Cdiv%20align%3D%22center%22%3E%3Cimg%20src%3D%22http://www.futuregirl.com/craft_blog/images/2013/01/heartswatch08_o.jpg%22%20/%3E%3C/div%3E%3Cbr%20/%3E%3Cbr%20/%3E***%20%3Ca%20href%3D%22http://www.futuregirl.com/craft_blog/2013/1/crochet-heart-scarf.aspx%23postlove%22%3Evisit%20this%20post%3C/a%3E%20to%20leave%20a%20comment%20or%20share%20via%20social%20media%20***)
Starling Handbag Pattern Now Available in Italian 25 Sep 2012 5:00 AM (12 years ago)
I can now offer the Starling Handbag pattern in Italian. The translation was completed by crafteemom (crafteemom on ravelry), who volunteered her time. I've updated the Starling Handbag Ravelry page and my free downloads page to include the new version.
*** visit this post to leave a comment or share via social media ***
Starling Handbag Pattern in French and German 2 May 2012 5:00 AM (12 years ago)
I am so excited about being able to offer the Starling Handbag in French and German. The translations were done by two amazing people, Ambre and Laura, who volunteered their skills. I've updated the Starling Handbag Ravelry page and my free downloads page to include the new versions.
This is actually part of a bigger project. I completely redesigned and recoded my free downloads page. The updated look and feel is accompanied by a completely new delivery engine that should eliminate the problems some people had trying to get my downloads.
I figured if I was going to release the writstlet pattern soon, I had to update that page to work for everyone or I would drown under the "I can't get the pdf" emails once it's out. :)
*** visit this post to leave a comment or share via social media ***
Crochet Heart Scarf - Free Pattern 13 Feb 2012 4:00 AM (13 years ago)
You may have already seen this over on CRAFT's site, but just in case you didn't, I designed a crochet pattern for them ... this cute crochet heart scarf.
I know I'm not giving you much lead time if you want to make one for V-day, but it's a quick crochet, so you could make one tonight if you don't have anything else planned. Grab some yarn out of your stash, put on The Princess Bride, and get stitching!
*** visit this post to leave a comment or share via social media ***

Intarsia Knitting Tutorial on craftzine.com 28 Sep 2011 5:00 AM (13 years ago)
Woo hoo! Check out my Intarsia 101 tutorial on CRAFT Magazine's site.
*** visit this post to leave a comment or share via social media ***

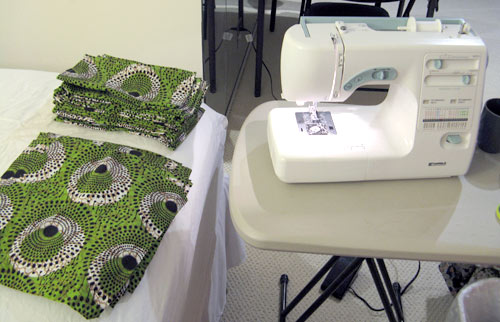
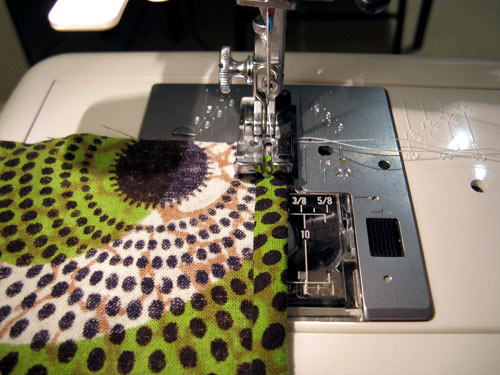
Tutorial: Cloth Napkins 5 May 2011 5:00 AM (13 years ago)
Things in our home sometimes get names that make no sense. It's a part of our language shorthand that we understand, but when you think about it, is unexplainable. That weird place is where the name "face cloths" comes from.
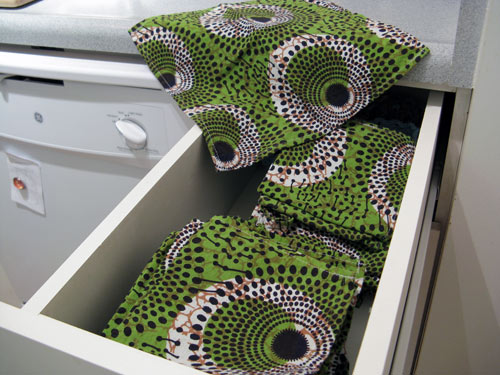
They are made from a queen-sized sheet I got at Urban Outfitters years ago during a 50% off sale. I thought I'd use it as a purse linings, then I thought I'd use it as an actual sheet, but I never ended up using it for anything at all. I've been saving it to become face cloths, it seems.
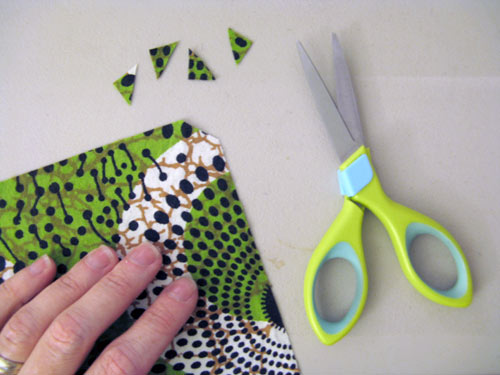
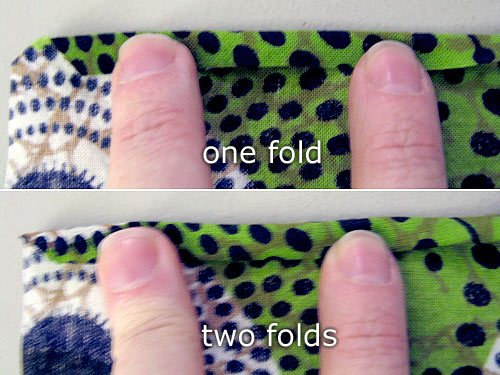
Here's the quick and dirty tutorial:
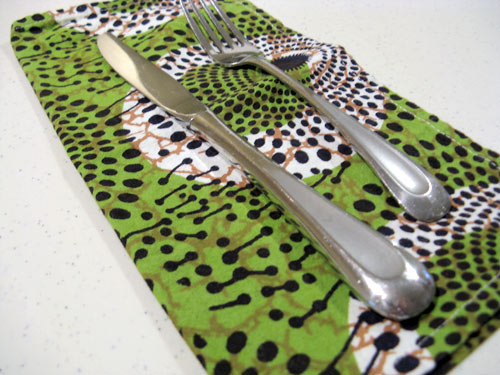
I bought a small $1.50 trash can at Daiso (the Japanese one yen store in town) and put it next to the dirty clothes basket to hold the dirty face cloths. They don't really get that dirty, though. Anything supergross that needs to be done still gets done by a paper towel that I can throw away.
They fit in the same washer load as all the towels, so they don't make me do any extra loads of laundry. So far, I'm really happy with them.
*** visit this post to leave a comment or share via social media ***
%20and%20put%20it%20next%20to%20the%20dirty%20clothes%20basket%20to%20hold%20the%20dirty%20face%20cloths.%20%20They%20don't%20really%20get%20that%20dirty,%20though.%20%20Anything%20supergross%20that%20needs%20to%20be%20done%20still%20gets%20done%20by%20a%20paper%20towel%20that%20I%20can%20throw%20away.%3Cbr%20/%3E%3Cbr%20/%3EThey%20fit%20in%20the%20same%20washer%20load%20as%20all%20the%20towels,%20so%20they%20don't%20make%20me%20do%20any%20extra%20loads%20of%20laundry.%20%20So%20far,%20I'm%20really%20happy%20with%20them.%3Cbr%20/%3E%3Cbr%20/%3E***%20%3Ca%20href%3D%22http://www.futuregirl.com/craft_blog/2011/5/face-cloths.aspx%23postlove%22%3Evisit%20this%20post%3C/a%3E%20to%20leave%20a%20comment%20or%20share%20via%20social%20media%20***)
The Hex Tote Video Crochet-A-Long - Episode 6 30 Mar 2011 5:00 AM (14 years ago)
Episode 6 - Finishing touches: three rows of single crochet at the top of the bag and attaching the granny straps.
Here are tutorials for some of the techniques mentioned in this post:
- seamles single crochet
- weaving in the last end
- granny straps
- sew a lining for a crochet bag
- sew a lining into a crochet bag
That's everything. Let me know if you need any help! And definitely send me pix if you make a Hex Tote.
*** visit this post to leave a comment or share via social media ***
The Hex Tote Video Crochet-A-Long - Episode 5 29 Mar 2011 5:00 AM (14 years ago)
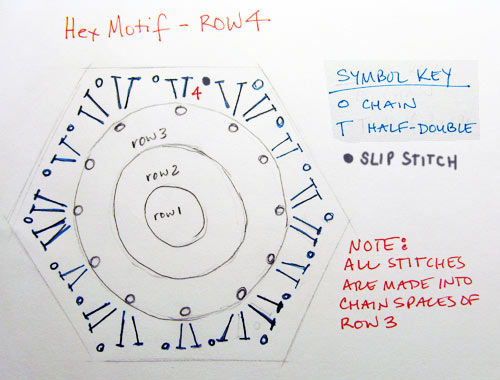
Episode 5 - Row 4 of a half hex motif when you join it to the tote.
See chart below.
*** visit this post to leave a comment or share via social media ***

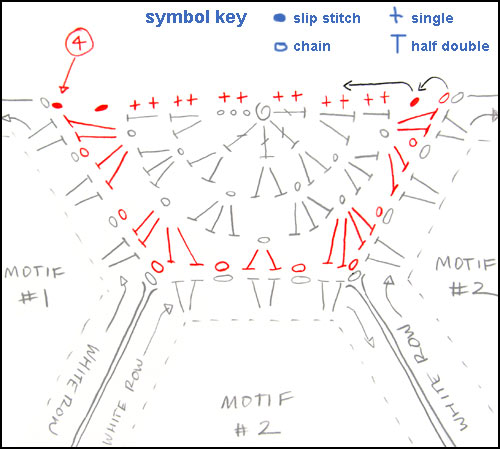
The Hex Tote Video Crochet-A-Long - Episode 4 28 Mar 2011 5:00 AM (14 years ago)
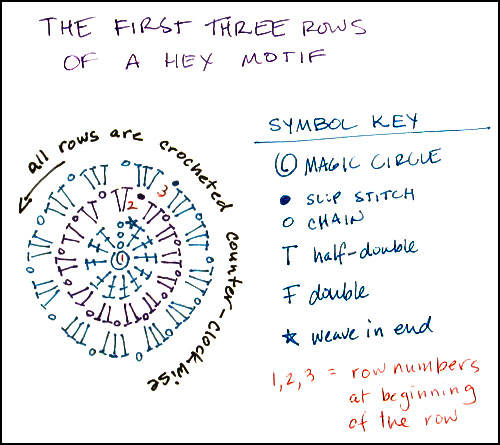
Episode 4 - The first three rows of a half hex motif. Make 4 half hexes.
Visit planetjune.com for a magic circle tutorial (for right and left handers).
See the chart below.
*** visit this post to leave a comment or share via social media ***
.%3Cbr%20/%3E%3Cbr%20/%3ESee%20the%20chart%20below.%3Cbr%20/%3E%3Cbr%20/%3E%3Cdiv%20align%3D%22center%22%3E%3Cimg%20src%3D%22http://www.futuregirl.com/craft_blog/images/2011/03/halfhex01_o.jpg%22%20/%3E%3C/div%3E%3Cbr%20/%3E%3Cbr%20/%3E***%20%3Ca%20href%3D%22http://www.futuregirl.com/craft_blog/2011/3/hex-crochet-a-long-4.aspx%23postlove%22%3Evisit%20this%20post%3C/a%3E%20to%20leave%20a%20comment%20or%20share%20via%20social%20media%20***)
The Hex Tote Video Crochet-A-Long - Episode 3 9 Mar 2011 4:00 AM (14 years ago)
Episode 3 - How to join a corner hex.
The two corner hexes are 3 and 17 in the chart below.
*** visit this post to leave a comment or share via social media ***

The Hex Tote Video Crochet-A-Long - Episode 2 25 Feb 2011 4:00 AM (14 years ago)
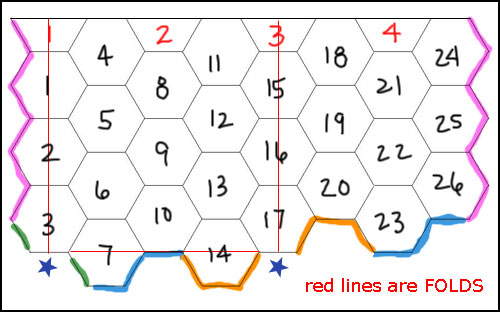
Episode 2 - How to crochet row 4 of a hex motif and how to join as you go.
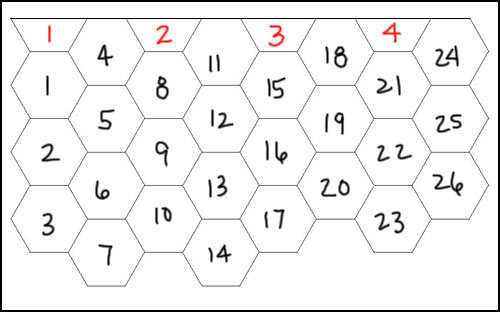
Black numbers are full hexes. Red numbers are half-hexes. Half-hexes will be covered in a later episode.
You don't have to attach your hexes in this order. Connect them up however you'd like. I do suggest that you lay your hexes on the floor and arrange them before you start assembling your tote.
Be sure to move one edge's hexes to the other edge before you settle on the final placement (meaning, move 24, 25, & 26 over to the left edge -- and 7 & 14 to the other side's bottom edge) to make sure there are no color conflicts.
Or, you can just put them in a pile and connect them one at a time by pulling the next one out. It 's a granny hex tote, not brain surgery. You don't have to over-think it. :)
Red lines are the side and bottom folds.
The colored painted lines are where hexes match up. The colors don't mean anything in particular. I used different colors so you could see what matches up where: pink to pink - blue to blue - green to green - and gold to gold.
The blue stars under Hex 3 and Hex 17 are where the bottom corners are. I will cover this in the next episode, but for those of you that want to attempt this ...
Hex 3 and Hex 17 are folded in half and the bottom edge is not attached to anything when you crochet Row 4 (as you can see since there is no colored painted line along the bottom edge).
I had trouble attaching the corner hexes, so don't feel bad if you have to wait for the video to get it. It's tricky.
*** visit this post to leave a comment or share via social media ***
%20to%20make%20sure%20there%20are%20no%20color%20conflicts.%3Cbr%20/%3E%3Cbr%20/%3EOr,%20you%20can%20just%20put%20them%20in%20a%20pile%20and%20connect%20them%20one%20at%20a%20time%20by%20pulling%20the%20next%20one%20out.%20%20It%20's%20a%20granny%20hex%20tote,%20not%20brain%20surgery.%20%20You%20don't%20have%20to%20over-think%20it.%20:)%3Cbr%20/%3E%3Cbr%20/%3E%3Cdiv%20align%3D%22center%22%3E%3Cimg%20src%3D%22http://www.futuregirl.com/craft_blog/images/2011/02/hex02_2_o.jpg%22%20/%3E%3C/div%3EHere%20is%20the%20ridiculously%20overly-noted%20chart.%20:)%3Cbr%20/%3E%3Cbr%20/%3ERed%20lines%20are%20the%20side%20and%20bottom%20folds.%20%20%3Cbr%20/%3E%3Cbr%20/%3EThe%20colored%20painted%20lines%20are%20where%20hexes%20match%20up.%20%20The%20colors%20don't%20mean%20anything%20in%20particular.%20%20I%20used%20different%20colors%20so%20you%20could%20see%20what%20matches%20up%20where:%20pink%20to%20pink%20-%20blue%20to%20blue%20-%20green%20to%20green%20-%20and%20gold%20to%20gold.%3Cbr%20/%3E%3Cbr%20/%3EThe%20blue%20stars%20under%20Hex%203%20and%20Hex%2017%20are%20where%20the%20bottom%20corners%20are.%20%20I%20will%20cover%20this%20in%20the%20next%20episode,%20but%20for%20those%20of%20you%20that%20want%20to%20attempt%20this%20...%20%3Cbr%20/%3E%3Cbr%20/%3EHex%203%20and%20Hex%2017%20are%20folded%20in%20half%20and%20the%20bottom%20edge%20is%20not%20attached%20to%20anything%20when%20you%20crochet%20Row%204%20(as%20you%20can%20see%20since%20there%20is%20no%20colored%20painted%20line%20along%20the%20bottom%20edge).%3Cbr%20/%3E%3Cbr%20/%3EI%20had%20trouble%20attaching%20the%20corner%20hexes,%20so%20don't%20feel%20bad%20if%20you%20have%20to%20wait%20for%20the%20video%20to%20get%20it.%20%20It's%20tricky.%3Cbr%20/%3E%3Cbr%20/%3E***%20%3Ca%20href%3D%22http://www.futuregirl.com/craft_blog/2011/2/hex-crochet-a-long-2.aspx%23postlove%22%3Evisit%20this%20post%3C/a%3E%20to%20leave%20a%20comment%20or%20share%20via%20social%20media%20***)
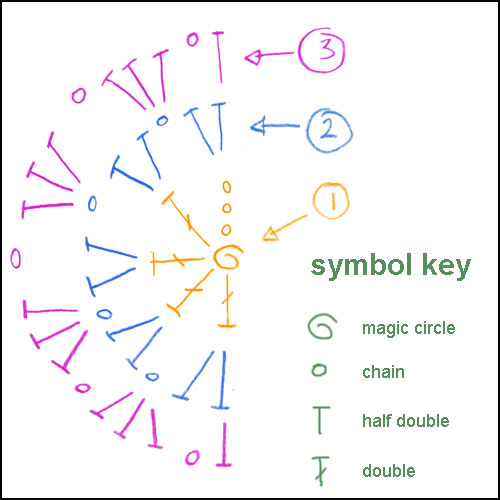
The Hex Tote Video Crochet-A-Long - Episode 1 18 Feb 2011 4:00 AM (14 years ago)
Episode 1 - The first three rows of a hex motif. Make 26 to start The Hex Tote.
After all the wonderful name suggestions (OMG, Bagasaurus Hex?! So amazing), I settled on a simple "The Hex" as the name. And since it's a tote ... The Hex Tote.
Here are tutorials for some of the techniques mentioned in this post:
- magic circle (for right and left handers)
- weaving in the last end
For my bag, I used Lily brand Sugar 'n Cream worsted weight cotton yarn. I used what I had on hand, which is why the colors aren't used equally. I'm not sure how much yarn it takes, but the nice thing about granny motifs is that if you have to pick up more yarn later, the dye lot doesn't matter since the same color is never touching itself.
I used a 3.75mm hook so the stitches would be super dense. I didn't want a lot of the lining peeking through my motifs.
You can make this bag with any size/type yarn and any size hook you'd like, there are no rules. Let me know if you have any more initial questions.
*** visit this post to leave a comment or share via social media ***
,%20I%20settled%20on%20a%20simple%20%22The%20Hex%22%20as%20the%20name.%20%20And%20since%20it's%20a%20tote%20...%20The%20Hex%20Tote.%3Cbr%20/%3E%3Cbr%20/%3EHere%20are%20tutorials%20for%20some%20of%20the%20techniques%20mentioned%20in%20this%20post:%3Cbr%20/%3E%3Cul%3E%3Cli%3E%3Ca%20href%3D%22http://www.planetjune.com/blog/magic-ring-for-amigurumi/%22%3Emagic%20circle%3C/a%3E%20(for%20right%20and%20left%20handers)%3C/li%3E%3Cli%3E%3Ca%20href%3D%22http://www.futuregirl.com/craft_blog/2008/12/weaving-in-the-last-end.aspx%22%3Eweaving%20in%20the%20last%20end%3C/a%3E%3C/li%3E%3C/ul%3E%3Cbr%20/%3E%3Cdiv%20align%3D%22center%22%3E%3Cimg%20src%3D%22http://www.futuregirl.com/craft_blog/images/2011/02/hex01_01_o.jpg%22%20/%3E%3C/div%3E%3Cbr%20/%3EFor%20my%20bag,%20I%20used%20Lily%20brand%20Sugar%20'n%20Cream%20worsted%20weight%20cotton%20yarn.%20%20I%20used%20what%20I%20had%20on%20hand,%20which%20is%20why%20the%20colors%20aren't%20used%20equally.%20%20I'm%20not%20sure%20how%20much%20yarn%20it%20takes,%20but%20the%20nice%20thing%20about%20granny%20motifs%20is%20that%20if%20you%20have%20to%20pick%20up%20more%20yarn%20later,%20the%20dye%20lot%20doesn't%20matter%20since%20the%20same%20color%20is%20never%20touching%20itself.%3Cbr%20/%3E%3Cbr%20/%3EI%20used%20a%203.75mm%20hook%20so%20the%20stitches%20would%20be%20super%20dense.%20%20I%20didn't%20want%20a%20lot%20of%20the%20lining%20peeking%20through%20my%20motifs.%3Cbr%20/%3E%3Cbr%20/%3EYou%20can%20make%20this%20bag%20with%20any%20size/type%20yarn%20and%20any%20size%20hook%20you'd%20like,%20there%20are%20no%20rules.%20%20Let%20me%20know%20if%20you%20have%20any%20more%20initial%20questions.%3Cbr%20/%3E%3Cbr%20/%3E***%20%3Ca%20href%3D%22http://www.futuregirl.com/craft_blog/2011/2/hex-crochet-a-long-1.aspx%23postlove%22%3Evisit%20this%20post%3C/a%3E%20to%20leave%20a%20comment%20or%20share%20via%20social%20media%20***)
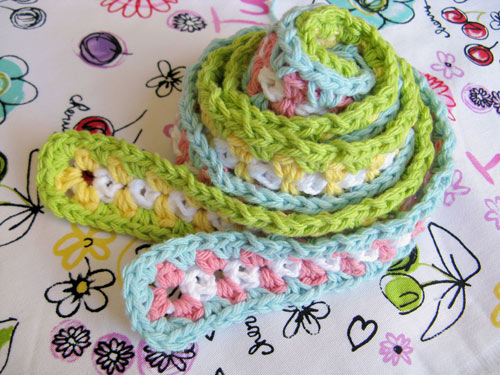
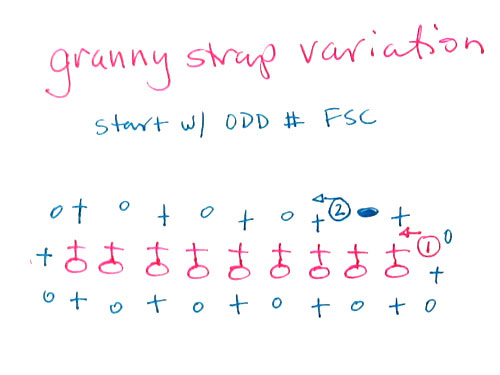
How To Make Granny Straps 1 Jan 2011 4:00 AM (14 years ago)
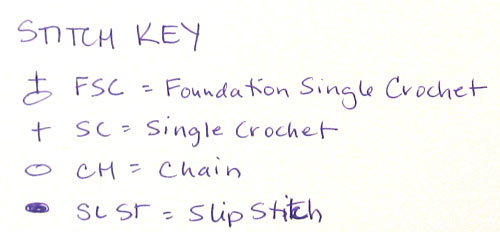
These are the straps I designed for the secret hex bag. Below are charts, written instructions, and a video. Plus a bonus alternate two-row version. Yay!
My suggestion is that you look at the chart, watch the video, and go for it. If you absolutely must, read the written directions, but they are super-wordy even though the straps are pretty simple to make.
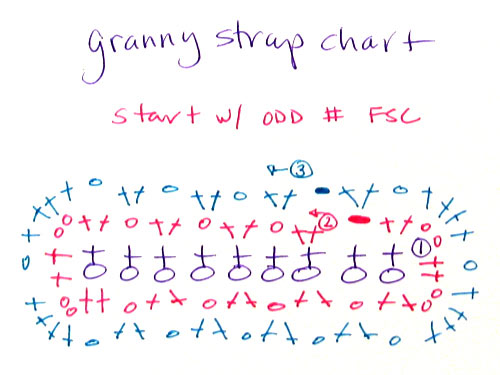
Granny Strap Written Directions
Row 1: Make an odd number of foundation single crochet (fsc) stitches.
Stop making that face ... it's easy! If you don't believe me, click through to my tutorial and read all the comments that say how happy everyone is that they finally learned to do fsc. You can do it. Trust me!!! My tutorial has a video and step-by-step photos. And, you can ALWAYS email me. I bet you'll have it mastered in 10 minutes, tops.
Row 2: Make two single crochet (sc) stitches in the top of the third fsc, chain 1, * skip 1 fsc, 2 sc in next fsc , chain 1 repeat from * until you get to the last fsc. In the last fsc make 2 sc (in the top of the fsc), chain 2, 2 sc (in the side/end of the fsc), chain 2, 2 sc (in the bottom of the fsc making sure to catch center bar of fsc so there is no yarn between the 2 sc in the top of the fsc and the 2 sc in the bottom of the fsc), chain 1. Along the bottom of the fsc row * skip 1 fsc, 2 sc in next fsc , chain 1 repeat from * until you get to the last fsc. In the last fsc make 2 sc, chain 2, 2 sc, chain 2, 2 sc, chain 1. Skip an fsc, 2sc in next fsc, slip stitch to top of first sc of Row 2, pull a loop through the last stitch, cut yarn and pull end through, and tie a square knot on the back of the strap with the beginning and ending yarn ends.
Row 3: In the chain space to the left of the start of row 2, make 2 sc, chain 1, * skip 1 fsc, 2 sc in next fsc , chain 1 repeat from * until you get to the 2 chain corner. In the 2 chain corner make 4 sc, chain 1, in the next 2 chain corner, make 4 sc, chain 1. Along the bottom edge * skip 1 fsc, 2 sc in next fsc , chain 1 repeat from * until you get to the 2 chain corner. In the 2 chain corner make 4 sc, chain 1, in the next 2 chain corner, make 4 sc, chain 1. Make 2 sc over the slip stitch that completed Row2 trying to hide the knot, if you can, slip stitch to top of first sc of Row 3, pull a loop through the last stitch, cut yarn and pull end through, and tie a square knot on the back of the strap with the beginning and ending yarn ends.
Finishing: Weave in yarn ends.
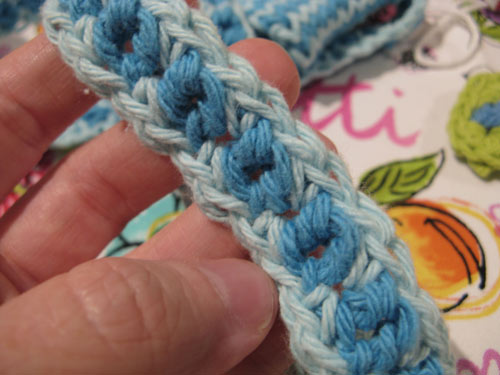
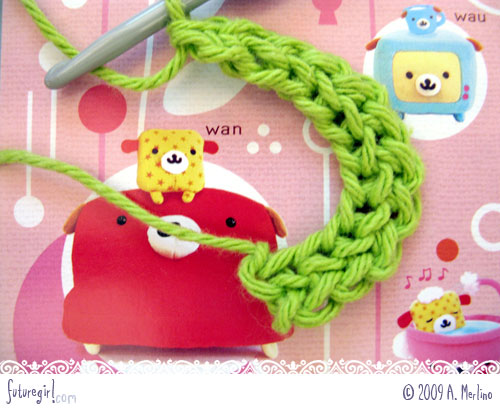
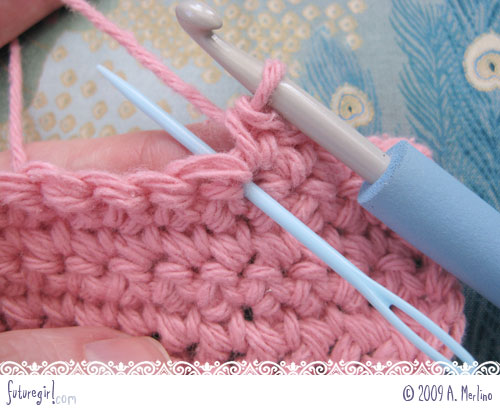
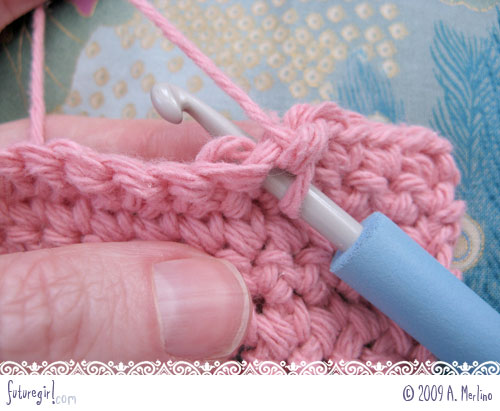
ALTERNATE TWO-ROW VERSION OF GRANNY STRAP
Here is a two-row version I used on the phone cozy I made.
Row 1: Make an odd number of foundation single crochet (fsc) stitches.
Row 2: Start with top of third fsc, make one *single crochet, chain one, skip an fsc, repeat from * until you get to then last fsc. In the last fsc, sc, chain 1, sc, chain 1, 1 sc to work around the end of the fsc row. Along the bottom of the sc (be sure to catch the center piece of yarn) chain 1, skip one fsc, *single crochet, chain one, skip an fsc, repeat from * until you get to then last fsc. In the last fsc, sc, chain 1, sc, chain 1, 1 sc to work around the end of the fsc row. Slip stitch to the first sc.
Feedback welcome and encouraged!
Let me know if you have any questions or anything is confusing.
*** visit this post to leave a comment or share via social media ***
%20%20stitches.%20%20%3Cbr%20/%3E%3Cbr%20/%3E%3Cspan%3EStop%20making%20that%20face%20...%20it's%20easy!%20%20If%20you%20don't%20believe%20me,%20click%20through%20to%20my%20tutorial%20and%20read%20all%20the%20comments%20that%20say%20how%20happy%20everyone%20is%20that%20they%20finally%20learned%20to%20do%20fsc.%20%20You%20can%20do%20it.%20%20Trust%20me!!!%20%20My%20tutorial%20has%20a%20video%20and%20step-by-step%20photos.%20%20And,%20you%20can%20ALWAYS%20email%20me.%20%20I%20bet%20you'll%20have%20it%20mastered%20in%2010%20minutes,%20tops.%3C/span%3E%3Cbr%20/%3E%3Cbr%20/%3ERow%202:%20Make%20two%20single%20crochet%20(sc)%20stitches%20in%20the%20top%20of%20the%20third%20fsc,%20chain%201,%20*%20skip%201%20fsc,%202%20sc%20in%20next%20fsc%20,%20chain%201%20repeat%20from%20*%20%20until%20you%20get%20to%20the%20last%20fsc.%20%20In%20the%20last%20fsc%20make%202%20sc%20(in%20the%20top%20of%20the%20fsc),%20chain%202,%202%20sc%20(in%20the%20side/end%20of%20the%20fsc),%20chain%202,%202%20sc%20(in%20the%20bottom%20of%20the%20fsc%20making%20sure%20to%20catch%20center%20bar%20of%20fsc%20so%20there%20is%20no%20yarn%20between%20the%202%20sc%20in%20the%20top%20of%20the%20fsc%20and%20the%202%20sc%20in%20the%20bottom%20of%20the%20fsc),%20chain%201.%20Along%20the%20bottom%20of%20the%20fsc%20row%20*%20skip%201%20fsc,%202%20sc%20in%20next%20fsc%20,%20chain%201%20repeat%20from%20*%20%20until%20you%20get%20to%20the%20last%20fsc.%20In%20the%20last%20fsc%20make%202%20sc,%20chain%202,%202%20sc,%20chain%202,%202%20sc,%20chain%201.%20Skip%20an%20fsc,%202sc%20in%20next%20fsc,%20slip%20stitch%20to%20top%20of%20first%20sc%20of%20Row%202,%20pull%20a%20loop%20through%20the%20last%20stitch,%20cut%20yarn%20and%20pull%20end%20through,%20and%20tie%20a%20square%20knot%20on%20the%20back%20of%20the%20strap%20with%20the%20beginning%20and%20ending%20yarn%20ends.%3Cbr%20/%3E%3Cbr%20/%3ERow%203:%20In%20the%20chain%20space%20to%20the%20left%20of%20the%20start%20of%20row%202,%20make%202%20sc,%20chain%201,%20*%20skip%201%20fsc,%202%20sc%20in%20next%20fsc%20,%20chain%201%20repeat%20from%20*%20%20until%20you%20get%20to%20the%202%20chain%20corner.%20%20In%20the%202%20chain%20corner%20make%204%20sc,%20chain%201,%20in%20the%20next%202%20chain%20corner,%20make%204%20sc,%20chain%201.%20Along%20the%20bottom%20edge%20*%20skip%201%20fsc,%202%20sc%20in%20next%20fsc%20,%20chain%201%20repeat%20from%20*%20%20until%20you%20get%20to%20the%202%20chain%20corner.%20%20In%20the%202%20chain%20corner%20make%204%20sc,%20chain%201,%20in%20the%20next%202%20chain%20corner,%20make%204%20sc,%20chain%201.%20%20Make%202%20sc%20over%20the%20slip%20stitch%20that%20completed%20Row2%20trying%20to%20hide%20the%20knot,%20if%20you%20can,%20slip%20stitch%20to%20top%20of%20first%20sc%20of%20Row%203,%20pull%20a%20loop%20through%20the%20last%20stitch,%20cut%20yarn%20and%20pull%20end%20through,%20and%20tie%20a%20square%20knot%20on%20the%20back%20of%20the%20strap%20with%20the%20beginning%20and%20ending%20yarn%20ends.%3Cbr%20/%3E%3Cbr%20/%3EFinishing:%20Weave%20in%20yarn%20ends.%3Cbr%20/%3E%3Cbr%20/%3E%3Cbr%20/%3E%3Cbr%20/%3E%3Cbr%20/%3E%3Cstrong%3EALTERNATE%20TWO-ROW%20VERSION%20OF%20GRANNY%20STRAP%3C/strong%3E%3Cbr%20/%3E%3Cbr%20/%3EHere%20is%20a%20two-row%20version%20I%20used%20on%20the%20phone%20cozy%20I%20made.%3Cbr%20/%3E%3Cdiv%20align%3D%22center%22%3E%3Cimg%20src%3D%22http://www.futuregirl.com/craft_blog/images/2011/01/grannystrap05_o.jpg%22%20/%3E%3C/div%3E%3Cbr%20/%3E%3Cdiv%20align%3D%22center%22%3E%3Cimg%20src%3D%22http://www.futuregirl.com/craft_blog/images/2011/01/grannystrap03_o.jpg%22%20/%3E%3C/div%3E%3Cbr%20/%3E%3Cdiv%20align%3D%22center%22%3E%3Cimg%20src%3D%22http://www.futuregirl.com/craft_blog/images/2011/01/grannystrap04_o.jpg%22%20/%3E%3C/div%3E%3Cbr%20/%3E%3Cbr%20/%3ERow%201:%20Make%20an%20odd%20number%20of%20%3Ca%20href%3D%22http://www.futuregirl.com/craft_blog/2009/3/tutorial-foundation-single-crochet.aspx%22%3Efoundation%20single%20crochet%3C/a%3E%20(fsc)%20%20stitches.%3Cbr%20/%3E%3Cbr%20/%3ERow%202:%20Start%20with%20top%20of%20third%20fsc,%20make%20one%20*single%20crochet,%20chain%20one,%20skip%20an%20fsc,%20repeat%20from%20*%20until%20you%20get%20to%20then%20last%20fsc.%20%20In%20the%20last%20fsc,%20sc,%20chain%201,%20sc,%20chain%201,%201%20sc%20to%20work%20around%20the%20end%20of%20the%20fsc%20row.%20%20Along%20the%20bottom%20of%20the%20sc%20(be%20sure%20to%20catch%20the%20center%20piece%20of%20yarn)%20chain%201,%20skip%20one%20fsc,%20*single%20crochet,%20chain%20one,%20skip%20an%20fsc,%20repeat%20from%20*%20until%20you%20get%20to%20then%20last%20fsc.%20In%20the%20last%20fsc,%20sc,%20chain%201,%20sc,%20chain%201,%201%20sc%20to%20work%20around%20the%20end%20of%20the%20fsc%20row.%20%20Slip%20stitch%20to%20the%20first%20sc.%3Cbr%20/%3E%3Cbr%20/%3E%3Cstrong%3EFeedback%20welcome%20and%20encouraged!%3C/strong%3E%3Cbr%20/%3ELet%20me%20know%20if%20you%20have%20any%20questions%20or%20anything%20is%20confusing.%3Cbr%20/%3E%3Cbr%20/%3E***%20%3Ca%20href%3D%22http://www.futuregirl.com/craft_blog/2011/1/granny-straps.aspx%23postlove%22%3Evisit%20this%20post%3C/a%3E%20to%20leave%20a%20comment%20or%20share%20via%20social%20media%20***)
Starling Handbag Video Crochet-A-Long - Episode 5 21 Jul 2010 5:55 AM (14 years ago)
Episode 5 covers handles of the Starling Handbag.
Here are all of the Starling Crochet-A-Long videos.
Here is the foundation single crochet bridge tutorial.
This is the last video! Big thanks to karin @ madebyk for telling me about the video software (Movie Maker. Free!) that I used to edit together and add titles and music to this video. See what I mean about the sparkles in my theme song?
I also learned how to better make videos now that I can edit parts together and add transitions between bits so you can see fsc 1,2,3 (nice fade) 23,24, 25. The actual recording time for this one was MUCH shorter. The software was super easy to use and made putting the whole thing together so fast.
Now I just need a camera that doesn't make me sound like I lisp. :)
When you're done I have a tutorial for sewing a fabric lining and sewing that lining into your bag.
*** visit this post to leave a comment or share via social media ***
Starling Handbag Video Crochet-A-Long - Episode 4 14 Jul 2010 5:55 AM (14 years ago)
Episode 4 covers side rows of the Starling Handbag.
Here are all of the Starling Crochet-A-Long videos.
OK, I've got to get on the ball this weekend and record AT LEAST the next one ... but hopefully I get them all finished up. There can't be that many more that needs to be done ... starting the handles, crocheting the handles, and finishing the handles are the only steps left. Think I can fit that into 5-6 minutes?
*** visit this post to leave a comment or share via social media ***
Starling Handbag Video Crochet-A-Long - Episode 3 6 Jul 2010 9:11 PM (14 years ago)
Episode 3 covers the bottom row3 and beyond of the Starling Handbag. Be thankful I hadn't lined up any jokes for this one. ;)
Here are all of the Starling Crochet-A-Long videos.
*** visit this post to leave a comment or share via social media ***
Starling Handbag Video Crochet-A-Long - Episode 2 30 Jun 2010 5:22 AM (14 years ago)
Episode 2 covers the bottom row 2 of the Starling Handbag.
Here are all of the Starling Crochet-A-Long videos. Ta da!
*** visit this post to leave a comment or share via social media ***
Starling Handbag Video Crochet-A-Long - Episode 1 23 Jun 2010 5:00 AM (14 years ago)
Episode 1 covers the foundation row and the first row of the Starling Handbag.
Download the Starling Handbag crochet pattern for free.
Learn foundation single crochet (video and photo tutorial).
Here are all of the Starling Crochet-A-Long videos.
I just rediscovered these videos! I made a TON of them in December. Many end right in the middle of the hot crochet action with my phone ringing, expletives (usually in German), or the camera turning off because the batteries ran out.
I thought *all* the videos were in a state of not-so-usefulness, but there are four that are A-OKish. In this one I make a couple goofy jokes, laugh dumb, my camera makes me sound like a lisper, and I have major stitch marker issues right at the end, but otherwise, it's golden (->>bling<<-).
The upside is that I can publish one a week for the next 4 weeks, which gives me time to make the rest of the videos showing the final steps of making a Starling Handbag. A race against myself! Get ready ... get set ... Go!
I hope you enjoy the theme song Andrew wrote for me! FYI, you can't hear the sparkles at the end of the theme song that I refer to because the camera is about 10 feet from the computer. Once I get a video editing software (recommendations for the PC, anyone?), you'll hear the sparkles ... oh, yes you will.
Gah! I just noticed that I called it a Video Tutorial in the snazzy title cards. I like Video Crochet-A-Long better. Do you think anyone will notice. Nah ...
*** visit this post to leave a comment or share via social media ***
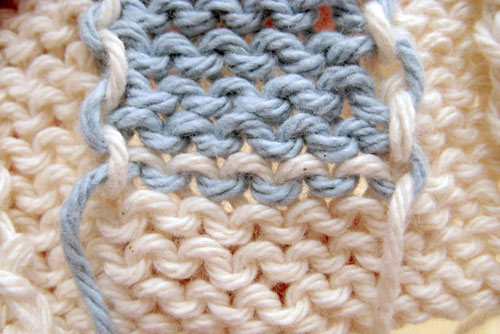
FSC - Are You Curling? 14 Jun 2009 5:39 PM (15 years ago)
When I was first learning foundation single crochet (fsc), I found that I made the chain part of the stitch very tightly. This is because I wasn't pushing my hook through the loops all the way; I was just using the tip when I made the chain. When the chain part is tight, your fsc row will to curve in on itself, like so:
To keep you from making the same mistake, I added a note to the foundation single crochet tutorial.
*** visit this post to leave a comment or share via social media ***
,%20I%20found%20that%20I%20made%20the%20chain%20part%20of%20the%20stitch%20very%20tightly.%20%20This%20is%20because%20I%20wasn't%20pushing%20my%20hook%20through%20the%20loops%20all%20the%20way;%20I%20was%20just%20using%20the%20tip%20when%20I%20made%20the%20chain.%20%20When%20the%20chain%20part%20is%20tight,%20your%20fsc%20row%20will%20to%20curve%20in%20on%20itself,%20like%20so:%3Cbr%20/%3E%3Cbr%20/%3E%3Cdiv%20align%3D%22center%22%3E%3Cimg%20src%3D%22http://www.futuregirl.com/craft_blog/images/2009/06/fsc_curl_o.jpg%22%20/%3E%3C/div%3EThree%20or%20four%20people%20have%20emailed%20saying,%20%22What%20am%20I%20doing%20wrong?!?%22%20and%20every%20time,%20they%20are%20doing%20the%20same%20thing%20I%20did.%3Cbr%20/%3E%3Cbr%20/%3ETo%20keep%20you%20from%20making%20the%20same%20mistake,%20I%20added%20a%20note%20to%20the%20%3Ca%20href%3D%22http://www.futuregirl.com/craft_blog/2009/3/tutorial-foundation-single-crochet.aspx%22%3Efoundation%20single%20crochet%20tutorial%3C/a%3E.%3Cbr%20/%3E%3Cbr%20/%3E***%20%3Ca%20href%3D%22http://www.futuregirl.com/craft_blog/2009/6/fsc-are-you-curling.aspx%23postlove%22%3Evisit%20this%20post%3C/a%3E%20to%20leave%20a%20comment%20or%20share%20via%20social%20media%20***)
Tutorial: Foundation Single Crochet - Supplement 5 Jun 2009 7:20 AM (15 years ago)
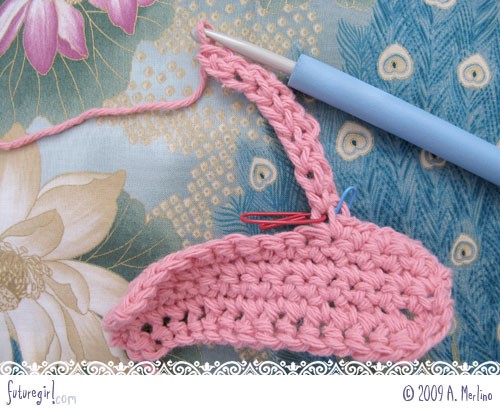
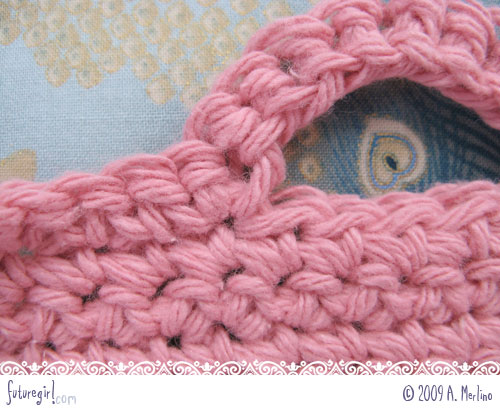
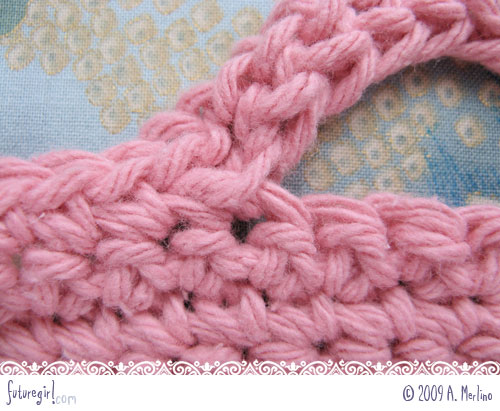
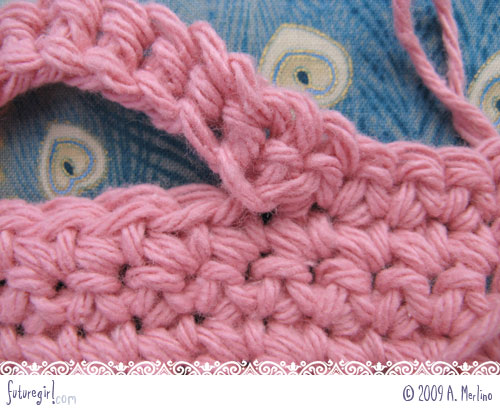
This is a supplement to the original foundation single crochet tutorial. Here I show you how to make a foundation single crochet bridge in the middle of your work. I first used this when making the Icelandic Turtleneck for the arm holes. I also use it to make the handles on my handbags.
The tutorial is broken down by each teeny-tiny step and includes a quick video demonstration at the end.
Detailed instructions (text is above its corresponding photo)
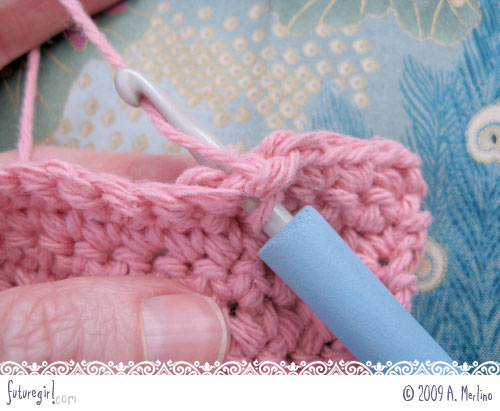
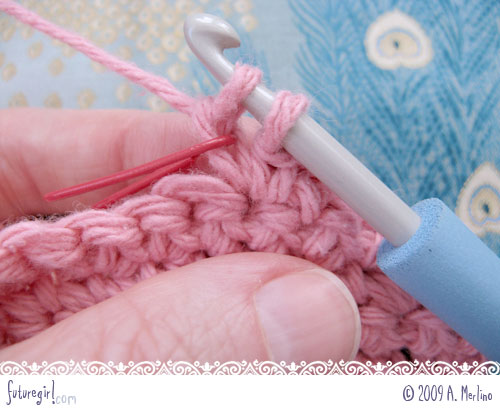
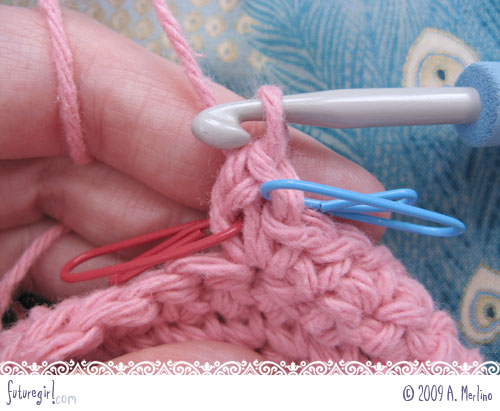
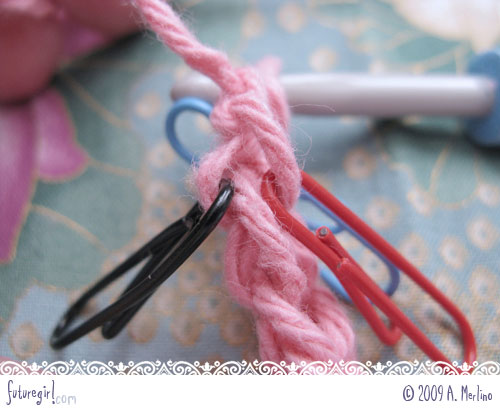
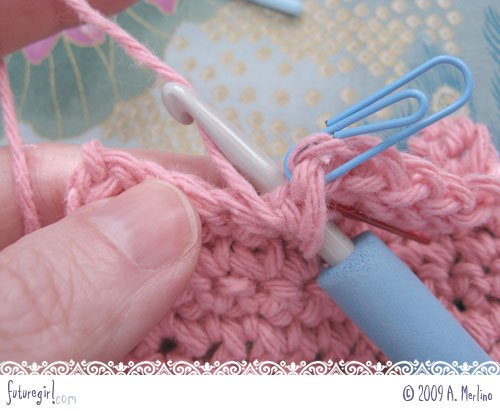
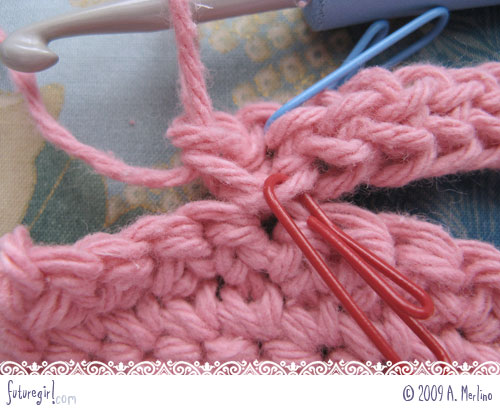
1. To start your fsc you will put your hook in the place where you made the previous single crochet. I've marked that hole with the blue yarn needle.
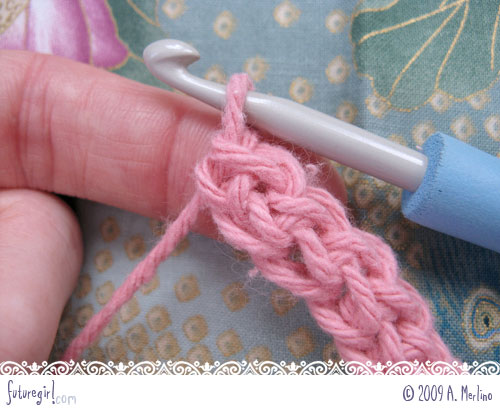
2. Put your hook through where you made the previous single crochet.
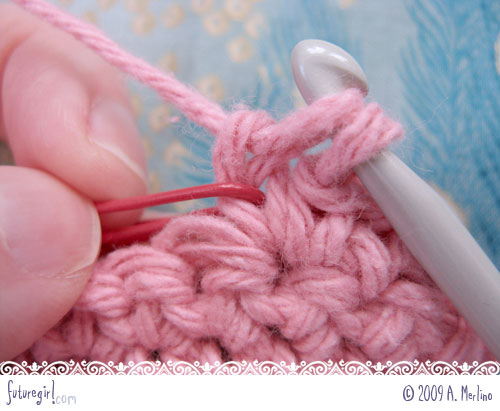
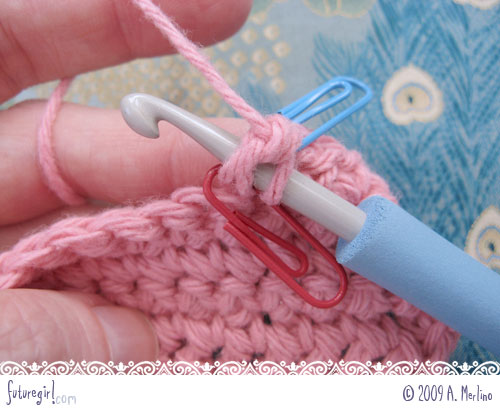
3. Yarn over.
4. Pull through one loop. This is the link part of the fsc.
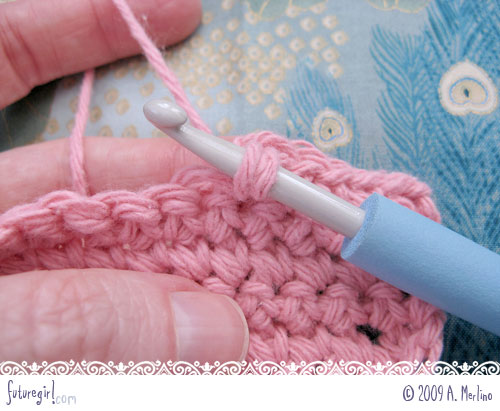
5. Yarn over.
6. Pull through one loop. This is the chain part of the fsc.
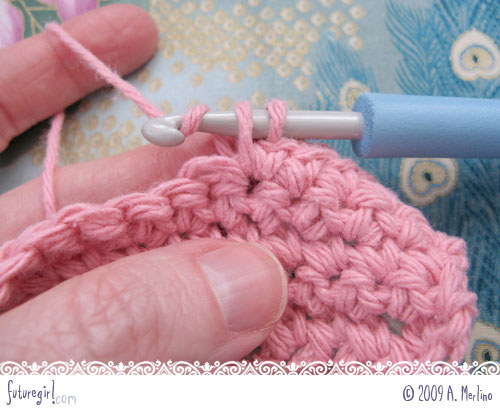
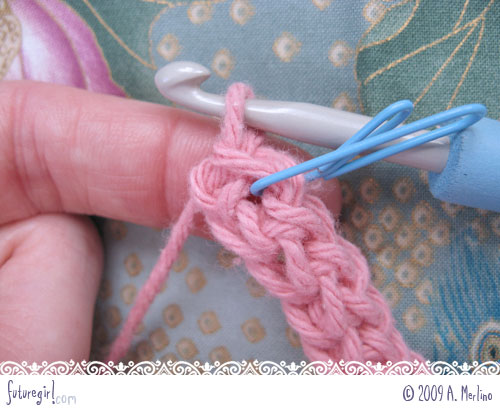
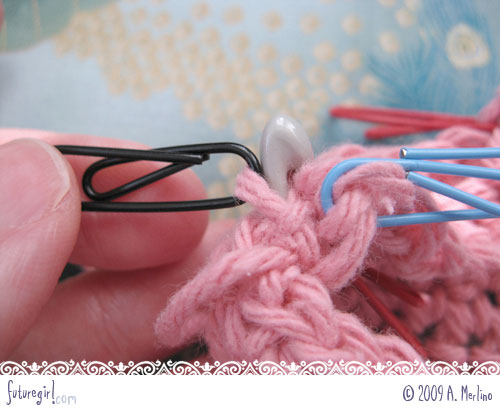
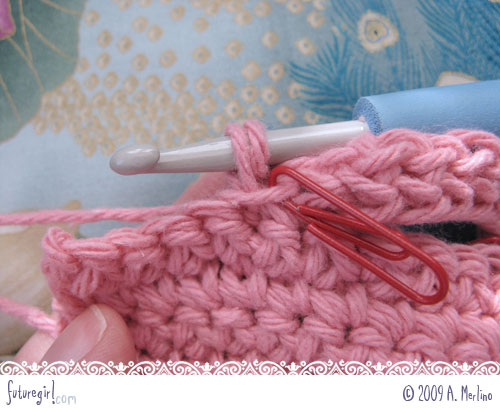
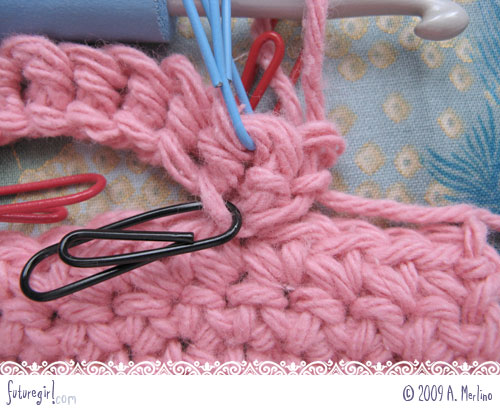
7. Put a stitch marker around the left and middle strand of the chain. This marks where you will put your hook in to start the next fsc.
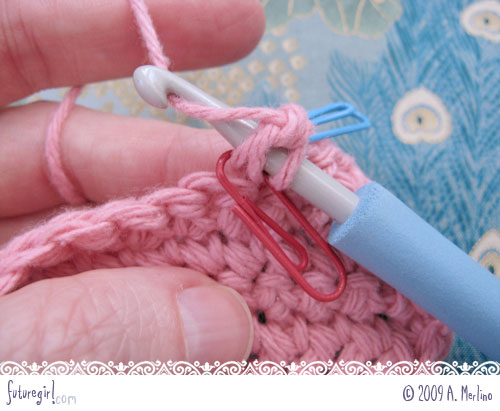
8. Close up. Same as step 7.
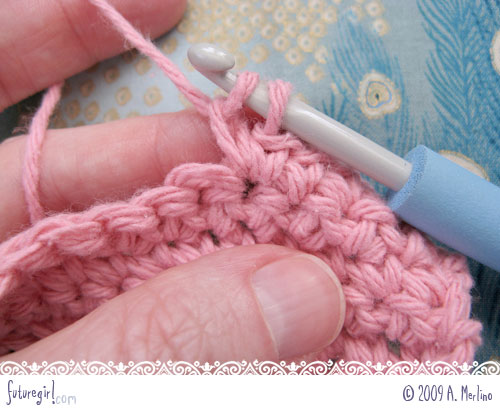
9. Yarn over.
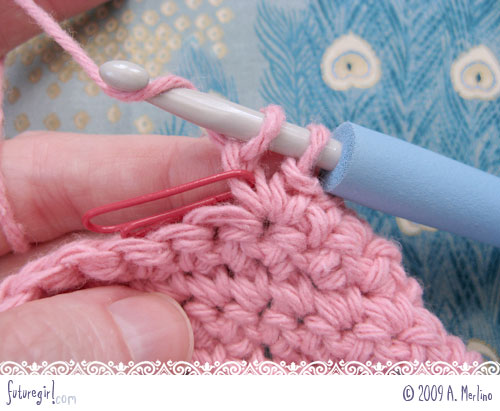
10. Pull through two loops. This is the single crochet part of the fsc. First fsc completed.
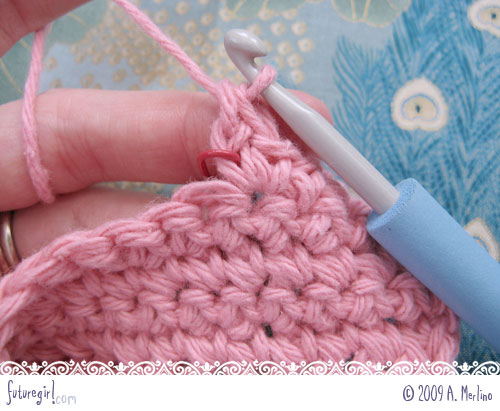
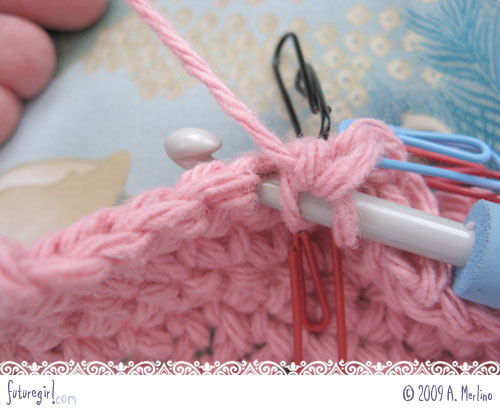
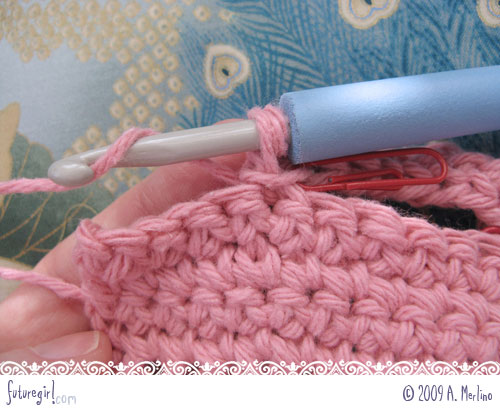
11. Put a stitch marker in the top of the first fsc, so you know where it is.
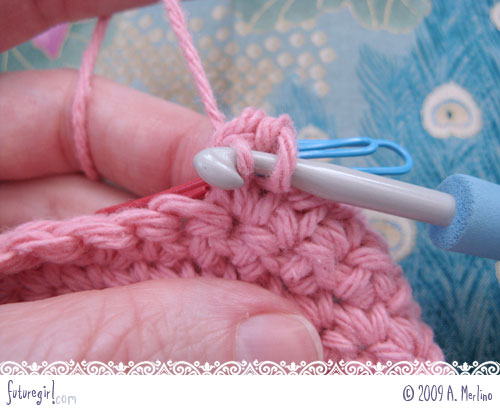
12. Put your hook in the chain part of the first fsc where the stitch marker is.
13. Yarn over.
14. Pull through. This is the link part of the fsc. Continue fsc stitches as normal.
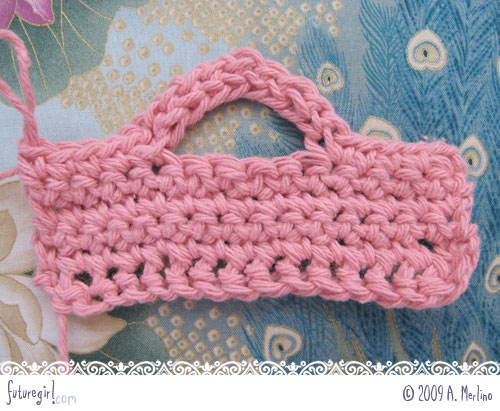
15. This is a bridge of ten fsc.
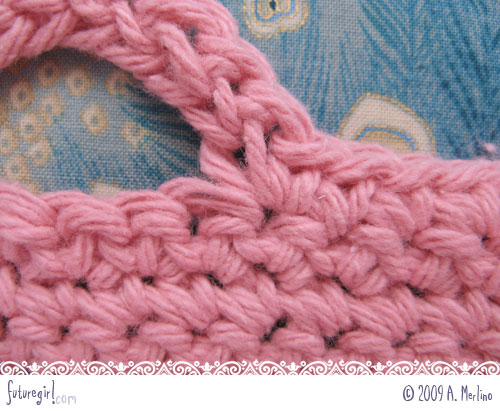
16. Close up of the last fsc in the bridge.
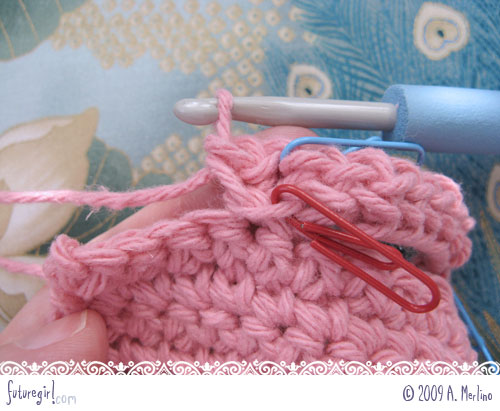
17. Put a stitch marker in the top.
18. Put two stitch markers in the bottom to mark the left and right bars of the bottom of the stitch.
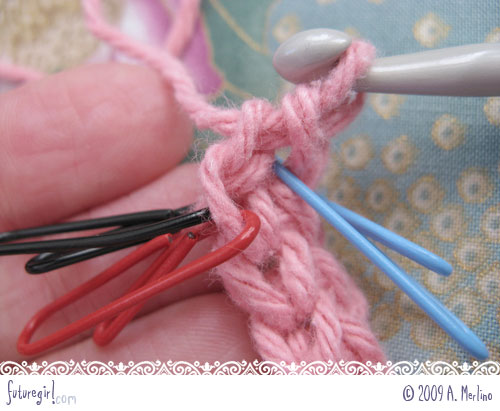
19. Close up of step 18.
20. The blue yarn needle marks where I'll be attaching the fsc bridge to my work.
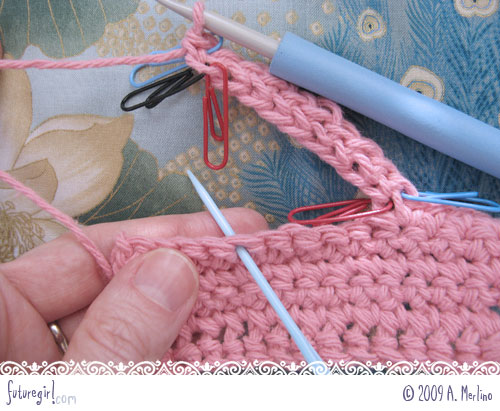
21. Put your hook through the chain bar closest to you.

22. Put your hook through the crochet piece.
23. Put your hook through the other chain bar. You've just made a yarn sandwich on your hook. The chain bars are the bread and the crochet piece is the peanut butter and jelly.
24. Yarn over.
25. Pull through the sandwich ... aka the two chain parts and the crochet piece. You should have two loops on your hook.
26. Yarn over.
27. Pull through two loops. This completes the single crochet.
28. Close up of step 27.
29. Close up of the back of the stitch.
30. Complete the rest of the row using normal single crochet stitches.
31. Close up of the front of the start of the bridge.
32. Close up of the back of the start of the bridge.
33. Close up of the front of the end of the bridge.
34. Close up of the back of the end of the bridge.
Movie Time!
Well, I still haven't gotten around to my title cards, crafty montage opening, or theme song. Oh, well. You've got 5minutes 34seconds of crochety goodness to watch, and that's good enough for now. :)
As always, I'd love any feedback (good or bad) you have about this tutorial.
*** visit this post to leave a comment or share via social media ***