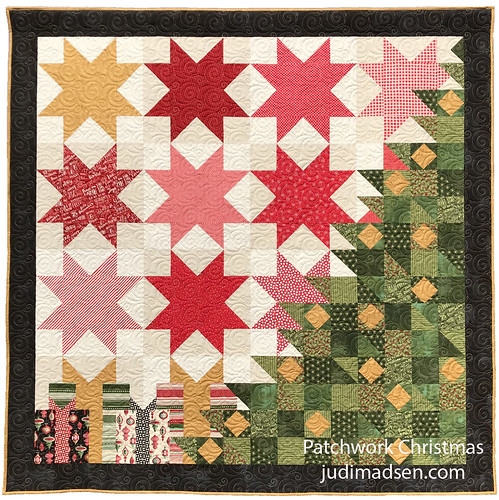
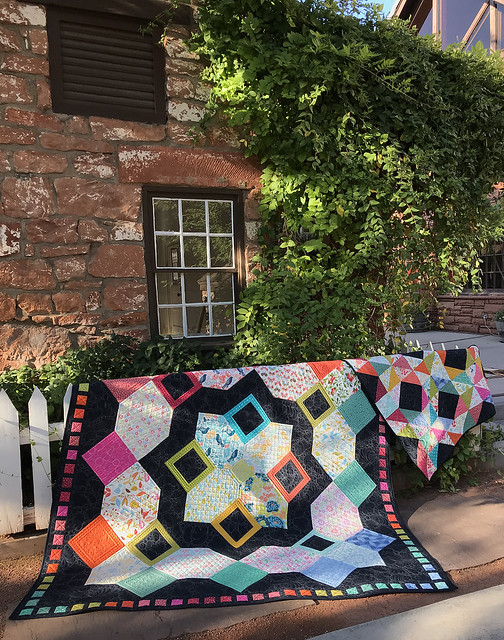
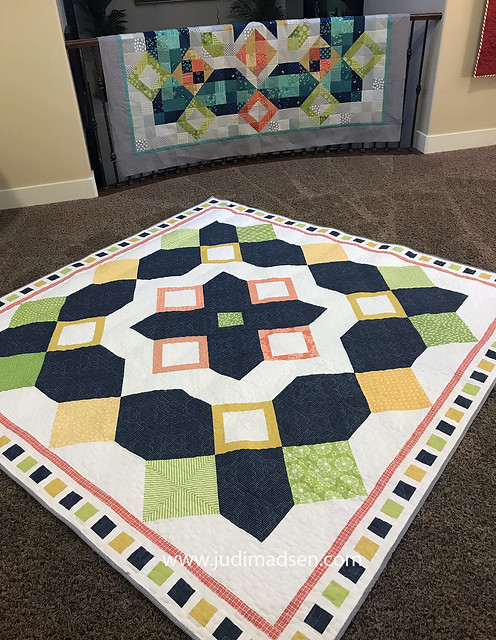
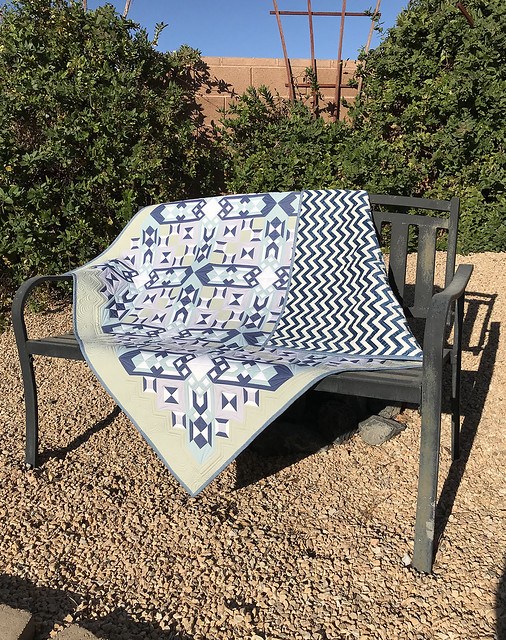
All new pattern! This amazing pattern is based off my very popular "Patchwork Christmas" design. I thought it was time to make this quilt a bit smaller so it could be enjoyed on a wall or on the couch.
I had a lot of fun piecing and sewing this wall hanging together.
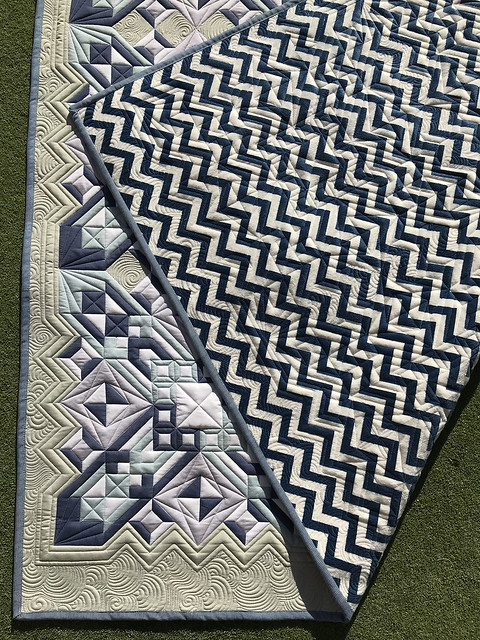
The quilted border design made this quilt just pop.
I love how the corners came together.
The process...just divide the space and draw out the design. All of these designs are available in the
pattern.
And did I forget to mention mirrored pillows? Um, yes, thank you very much! They are so darling!
I used 60wt thread and all one color (cream) for the entire project.
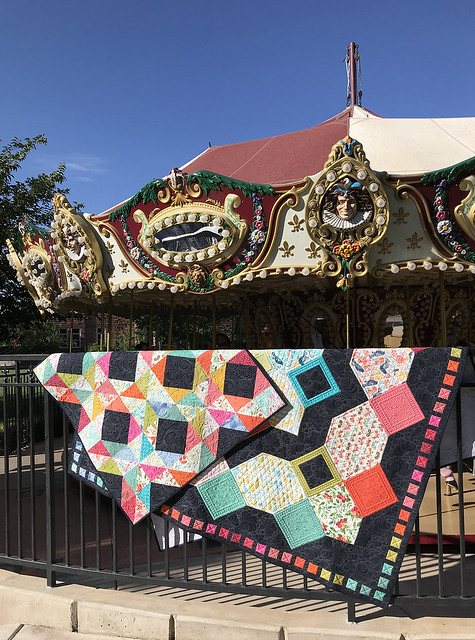
It is fun to see the
two sizes together. Have so much fun putting these darling quilts together!


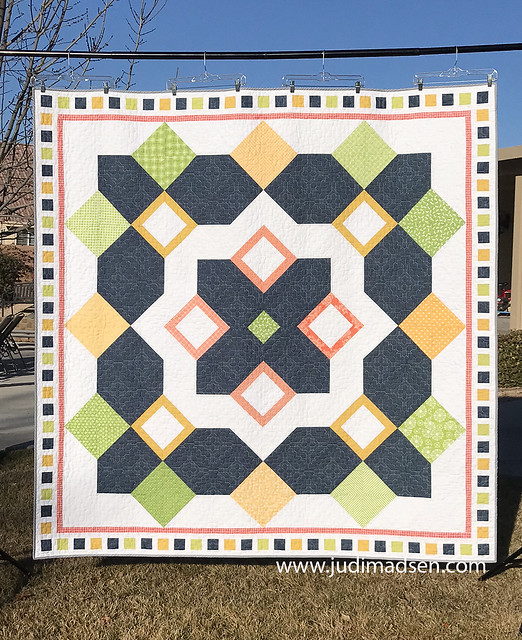
I am so excited to share with you my newest pattern,
Patchwork Tillie - now available in
paper and
PDF versions for $5 as a new release introductory sale for a limited time.
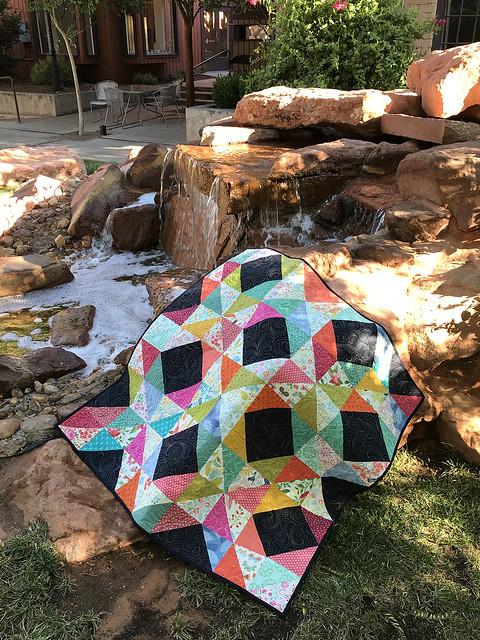
This quilt was a labor of love! I had so much fun pulling
fat quarters to make this darling quilt. This is a very scrappy quilt and I probably used about five different fabric lines to come up with the version here. I used Rosa and Nova for the majority of the quilt, both collections are from Moda Fabrics.
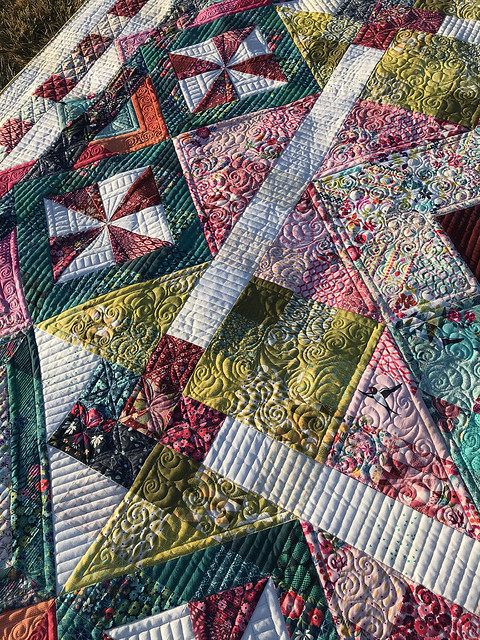
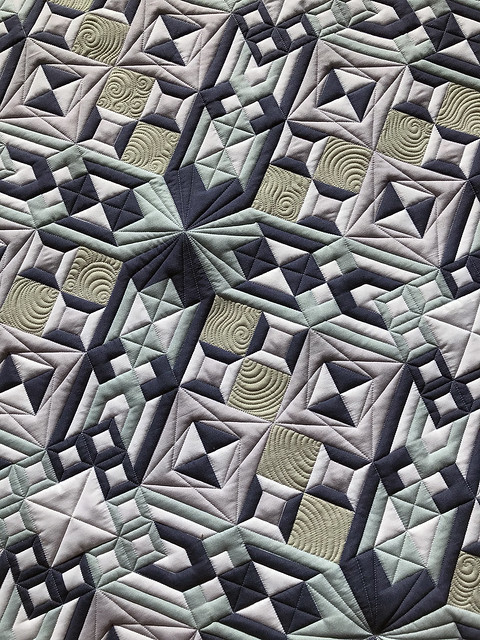
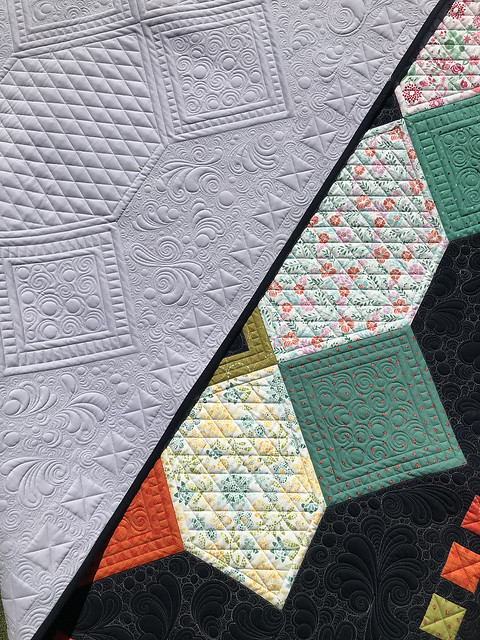
The quilting is a simple custom for me. I wanted to really show off the design of the quilt itself. I think there is a perfect balance between straight lines and curves for the quilt.
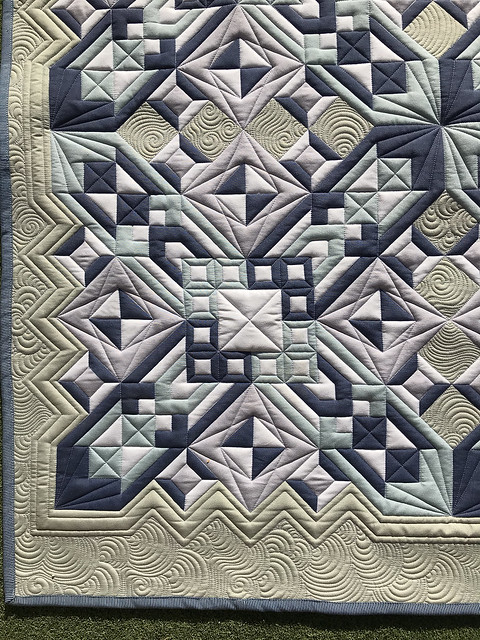
My favorite part of this quilt is the ribbon effect of the outside border.
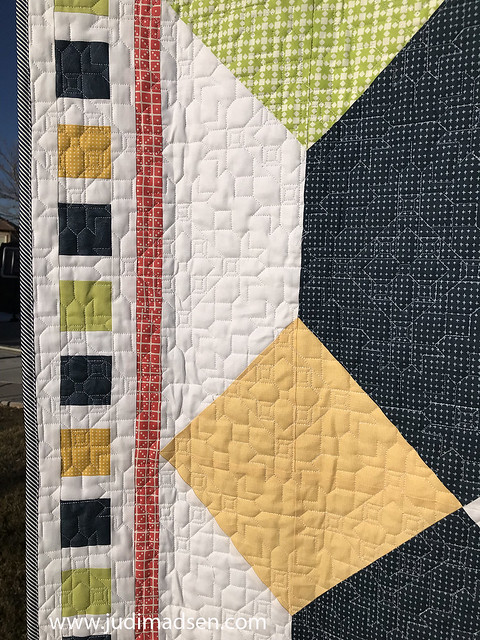
This quilting texture is perfect!
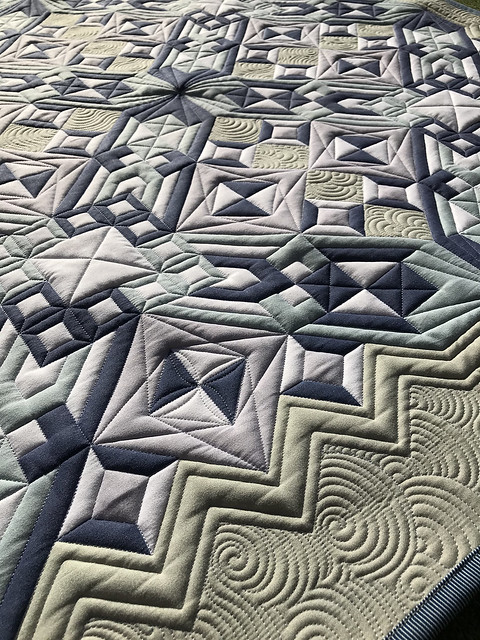
I used white Glide 60wt for the entire quilt.
The sunshine captures the quilting texture just perfectly.
I hope you enjoy making this quilt as I did.
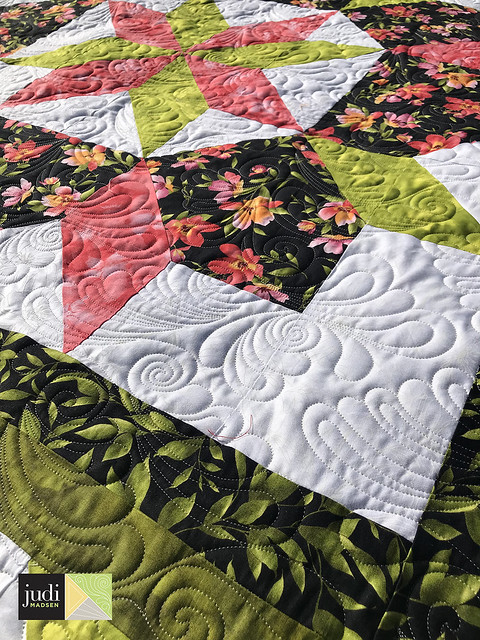
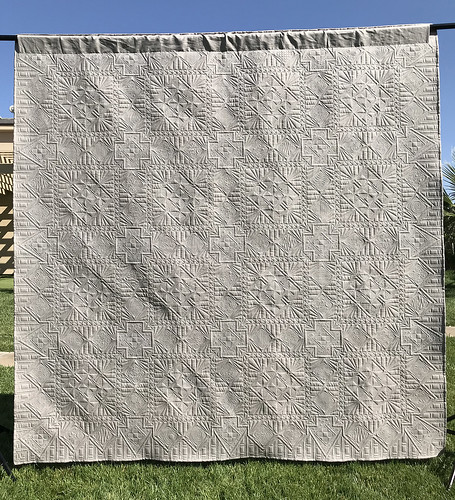
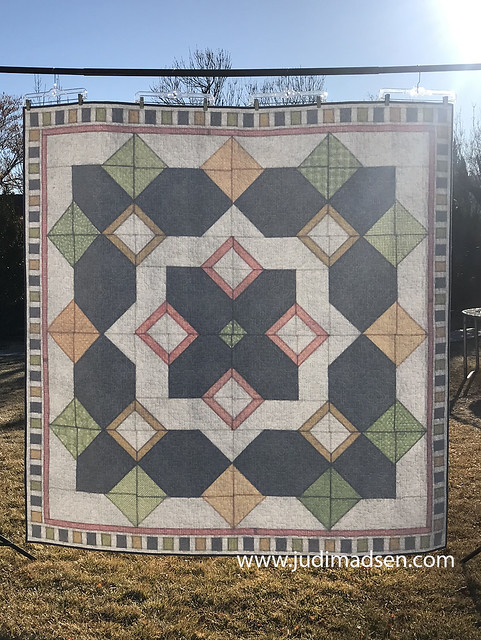
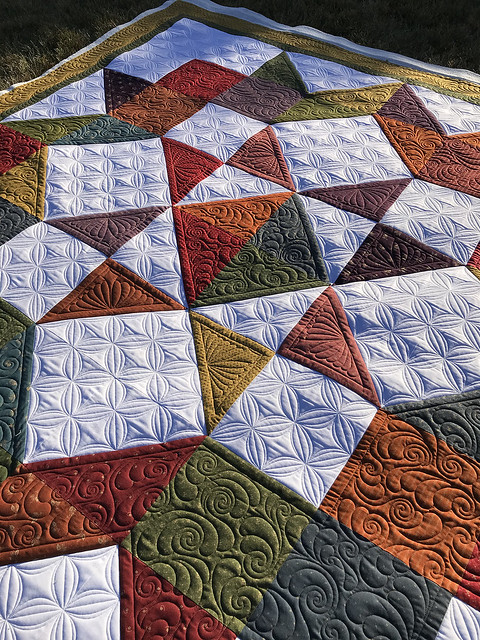
I had a lot of fun with this beautiful carpenter's wheel quilt made by Elaine. I love her color choices. The leaves are falling around here and this quilt makes me think of fall. The fabrics are Flower Gatherings by Lisa Bongean of Primitive Gatherings and the pattern she used was from a
Moda Love In sew along. You can get the
pattern and info here. It is a
layer cake pattern, conveniently we have lots of those at
Green Fairy Quilts.
I saw a lot of
Secondary Design options for this quilt, but I did have to contain myself and keep this a simple custom quilting job. I feel like I have gone back to my roots and just played with this darling quilt.
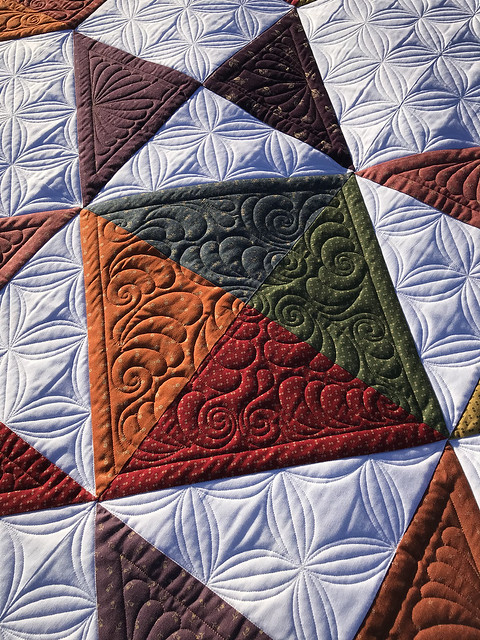
I just outline the main areas of the quilt and filled it with the free motion feather swirl.
The white fabric was treated as the background throughout the top and a large connecting double curve was perfect for this.
The center star triangle shapes were given a slightly different feather - love how they turned out.
The goal was to show of the shape of the carpenter's wheel and just enhance the piecing.
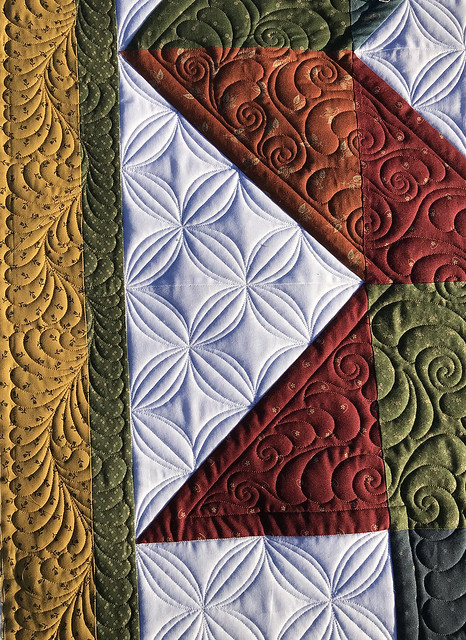
The free-motion feather border was so much fun! I loved playing with it.
I used white and military gold
60wt glide thread. Changing threads was a little bit annoying, but I am glad I made the time for it.
I love how the sunlight catches all the texture of the beautiful feathers.
This was a fun project! I designed this digital panel a while back for
Honest Fabric and finally got a chance to quilt it up. This is a 51 x 60 panel and the
Moss version of my
Unhinged design. I have 5 different colorways to choose from for this design, also available in 3 different sizes.
This design has a lot going on with the block, so I decided that simple ruler work would be the best for the quilting. I didn't want to take away from this design, I wanted to just show off the block. I didn't have to mark anything, I just used the points in the design to quilt each straight line.
The green areas of the quilt are quilted to be the background design. You will see how the design pulls together with the border.
I did end up with more fabric for the top and bottom of the quilt, but I love how it turned out. The wavy lines in the border work well with the on-point squares in between each block.
It turned out just fabulous!
This panel is perfect for working on your ruler skills and then you end up with a darling quilt top as well.
I used 2 layers of Hobbs 80/20 batting for this quilt top and
Glide 60wt white for the thread.
Minky for the back! This made the quilt extra soft and fun.
This
panel is darling, and while it is polyester - I still enjoy quilting it up. I used a size 16 needle for that reason and the 60wt white thread so that I didn't have to change the thread color throughout the quilt. It really is a beautiful quilt top.
It has been fun posting about my
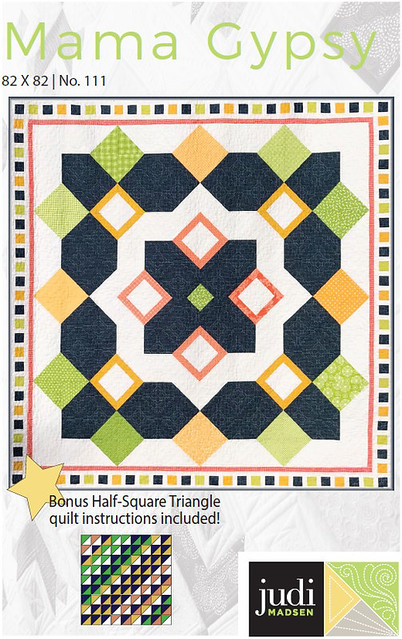
Mama Gypsy, and the
QAL that y'all participated in. It has been so great to see the projects and finished quilt tops in my
Mama Gypsy Group.
The above photo is a picture of the bonus HST quilt that I made with the leftover half-square triangles from
Mama Gypsy top. I had a lot of fun putting the scraps together and creating this fun design. I also loved quilting it as well.
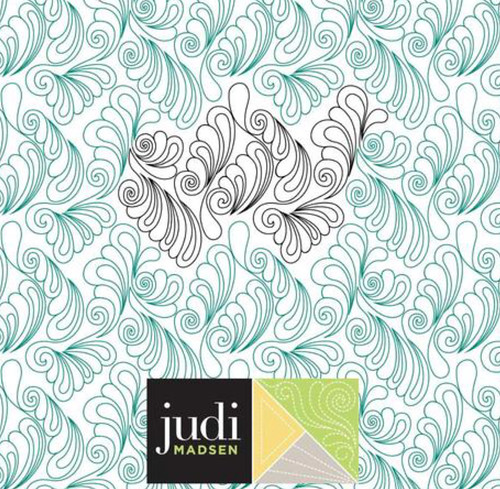
I free-motion quilted my
feather swirl design using
So Fine white thread. This is one of my favorite quilting designs. I do have it available as a
digital design, but I also shared it as a tutorial a few years back, you can see that
here.
I have been enjoying my
Mama Gypsy quilt folded at the foot of my bed, so I apologize for the fold marks in the pictures. I hope you will enjoy the pictures despite that. LOL
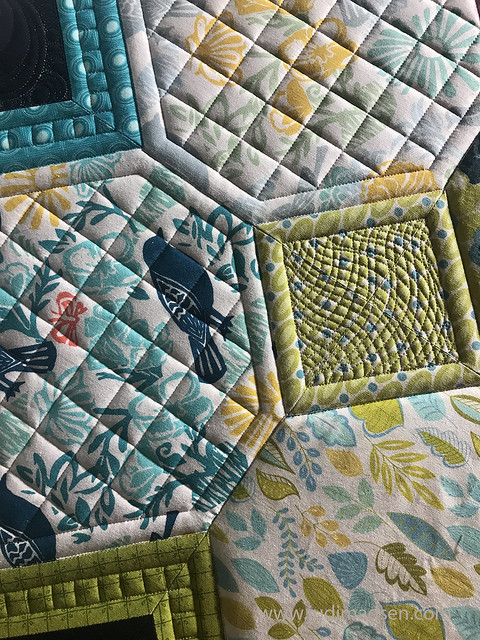
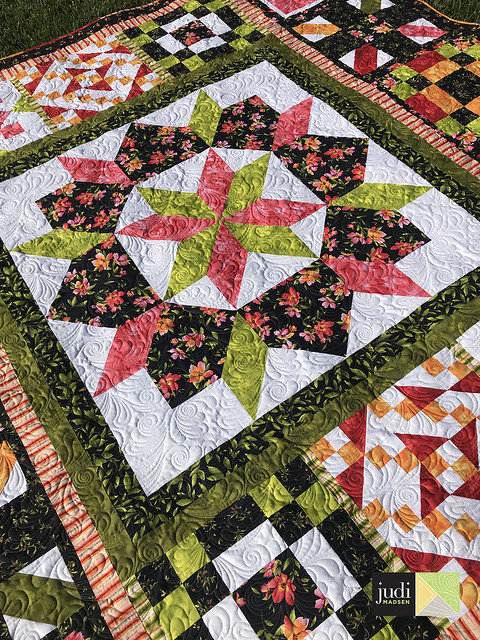
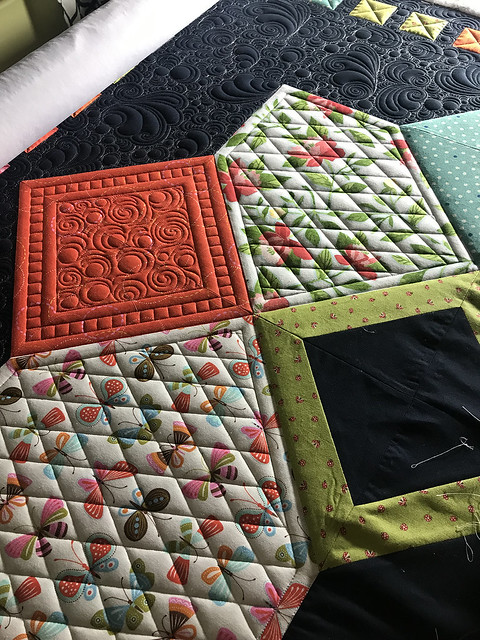
I had a lot of fun quilting this top. The large floral prints don't lend themselves to a lot of detailed quilting, and that is okay because I wanted the prints to be showcased as is. A simple one inch diagonal cross-hatch was perfect for that.
The accent blocks were fun to quilt up with the 1/2 inch square borders. The free-motion swirl pebbles were fun in the center. I love the texture that it brings to the quilt.
Each of the blocks/sections were framed with a 1/2 inch line and then had the added texture. The center motif is my favorite though.
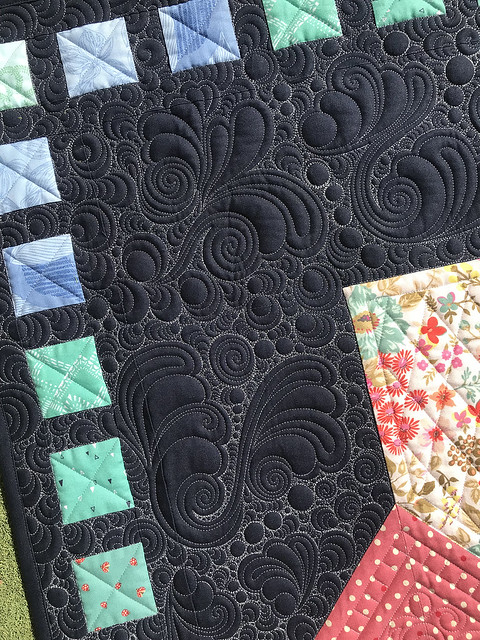
I wanted to play in the dark background of the quilt with a free-motion feather filler design. I absolutely loved playing with this design. It is freeing to quilt without thinking too much and enjoying the motion of it. I used a
cool grey glide 60 wt thread for the quilting in the top as well as the bobbin.
The simple X in the border blocks is a perfect balance between the dense background - this helps to set the border blocks apart.
My
Gypsy backing is perfect for this quilt. It shows off the quilting quite nicely.
This is a nice shot showing the border blocks being showcased perfectly within the dense quilting.
Ahh, isn't this texture amazing?
I love it so much.
As far as quilting goes, this
backing has to be my favorite. I love being able to see my work on both sides of the quilt.
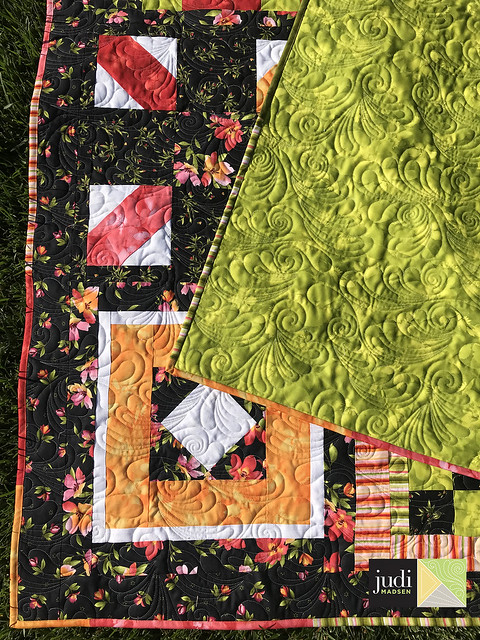
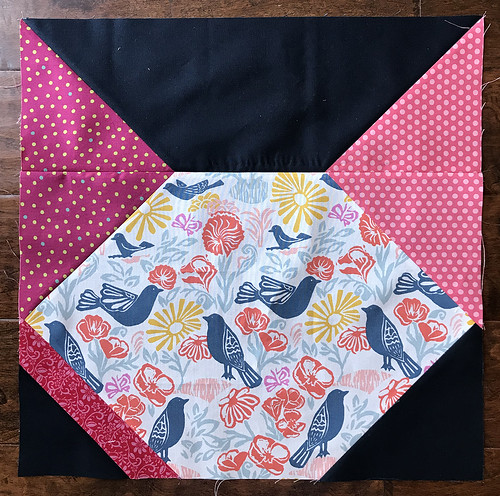
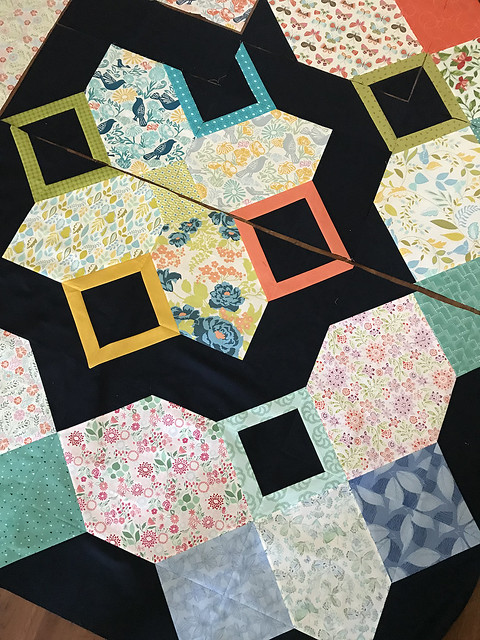
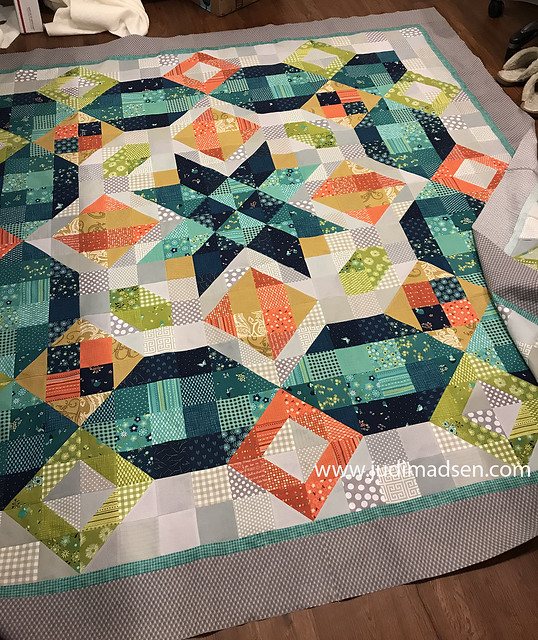
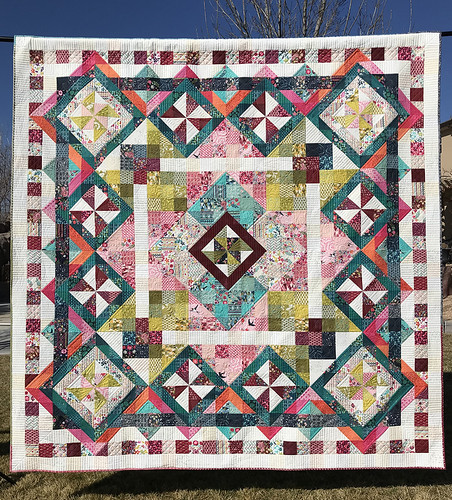
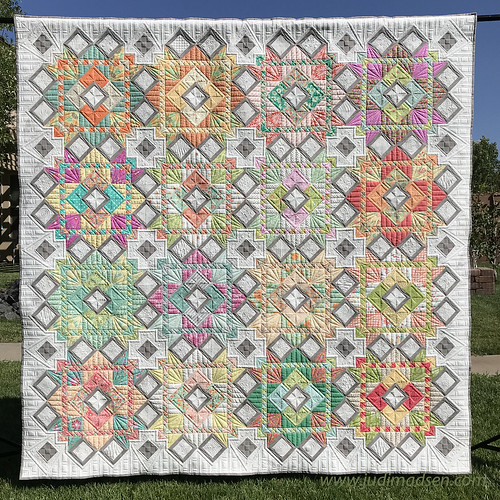
Oh my word!! I am so excited to share
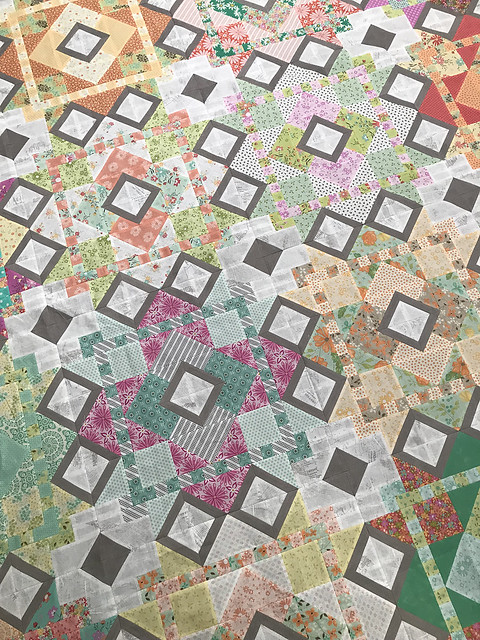
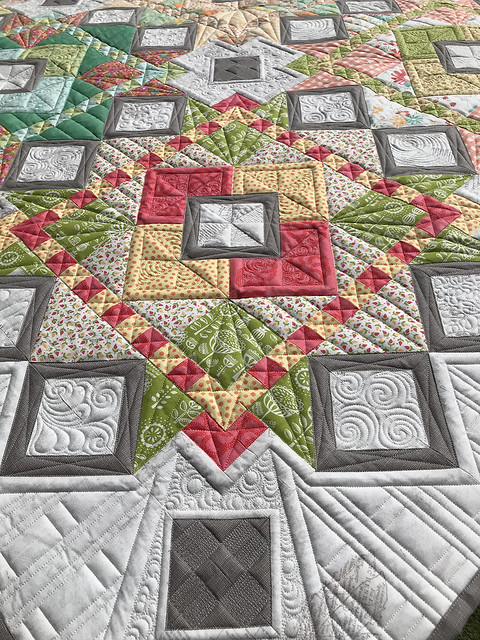
Tillie with you! Isn't she darling? She's been in the works for months - it's one of those
quilt patterns that takes time, but is so worth it in the end. I used several fabric lines from Moda designers in this quilt by pulling
fat quarters from my stash together. The result is this fantastically happy colored quilt.
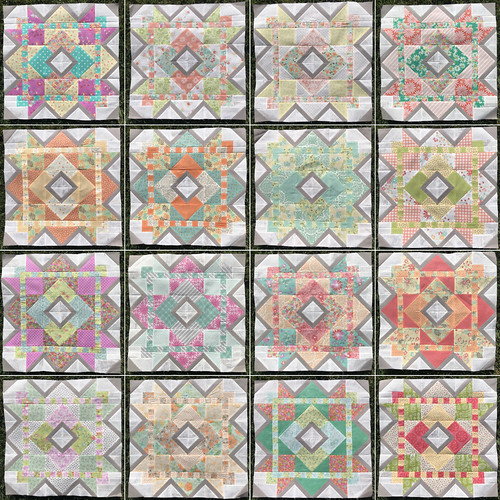
So, each one of these blocks took me roughly 5 hours to complete. There are a lot of pieces. I love the detail though and I am so happy I took the time to piece all 16 blocks. The quilt is put together using traditional piecing methods. The
pattern is fabulously written and in full color. I hope you will have as much fun as I did making it.
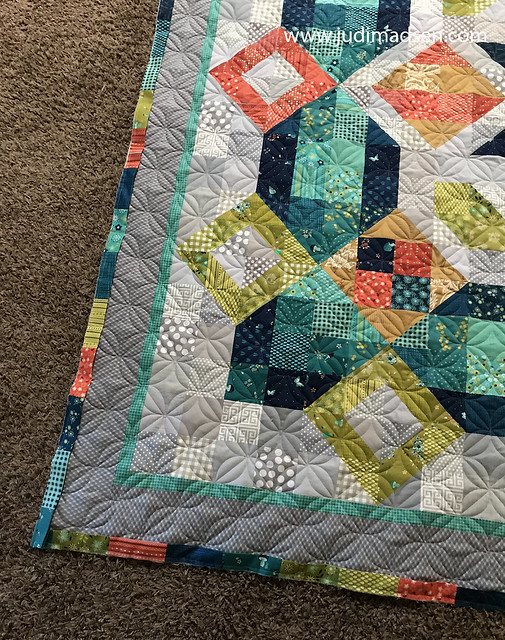
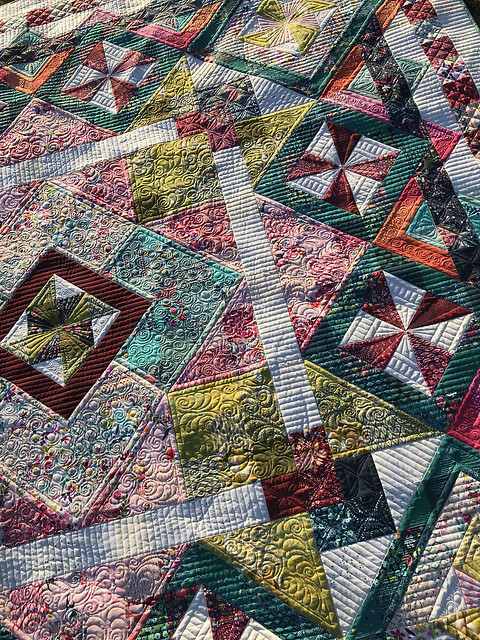
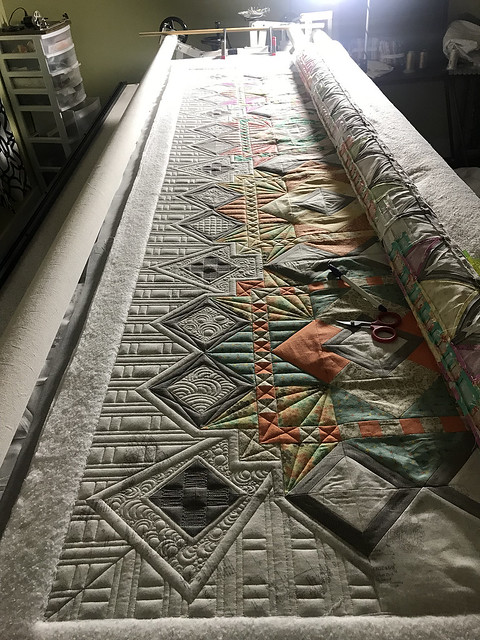
When the top was finally all together - I breathed a sigh of relief, then got it on the quilting frames. I wanted to custom quilt it because I had spent so much time on the piecing - it deserved time spent on the quilting.
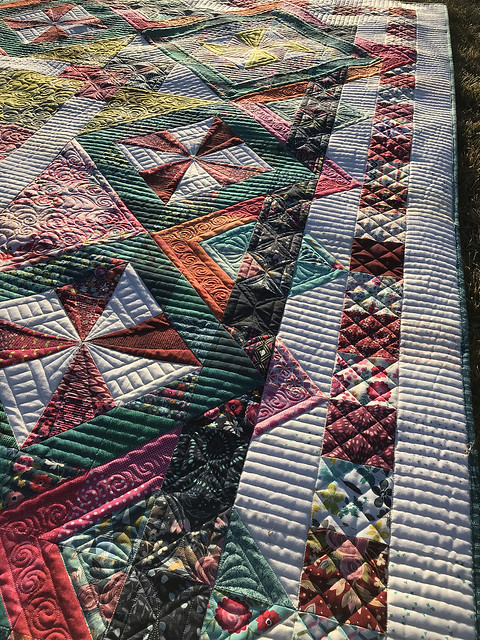
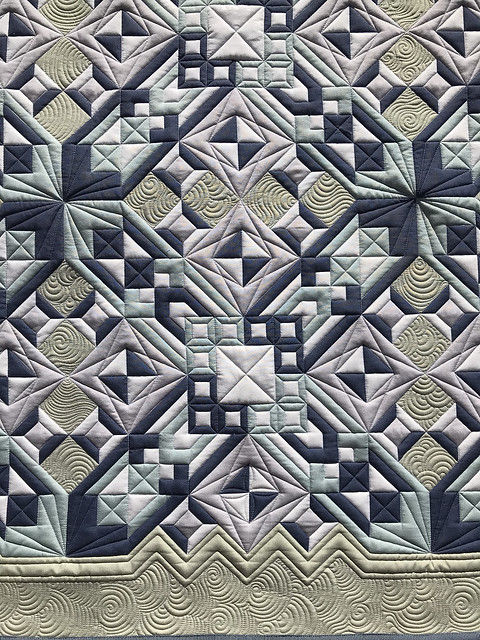
The goal was to have a "simple" custom quilting job. I think I achieved that. If you know my quilting style, this is "bare bones detail" compared to my other quilts. I wanted the quilting to emphasize the piecing and not to take away from it. The piecing is the detail that needs to be shown off. I was able to play a bit more in the border though, and it looks beautiful.
I used two layers of Hobbs 80/20 batting to get the plush or puffy look. I think my favorite time to quilt is at night when I have my lights on - the texture is dreamy and it makes my creative heart happy.
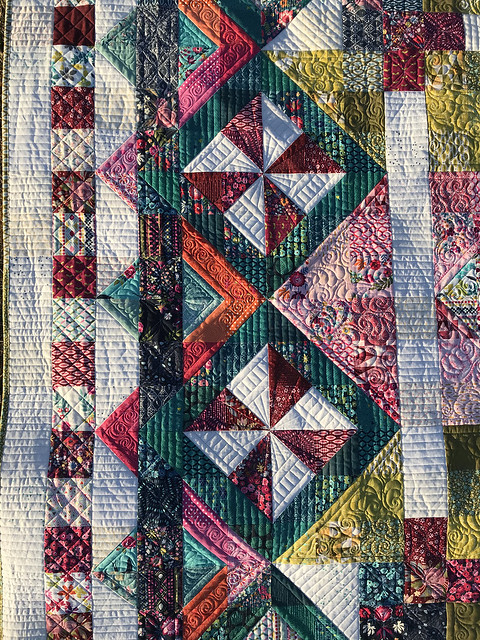
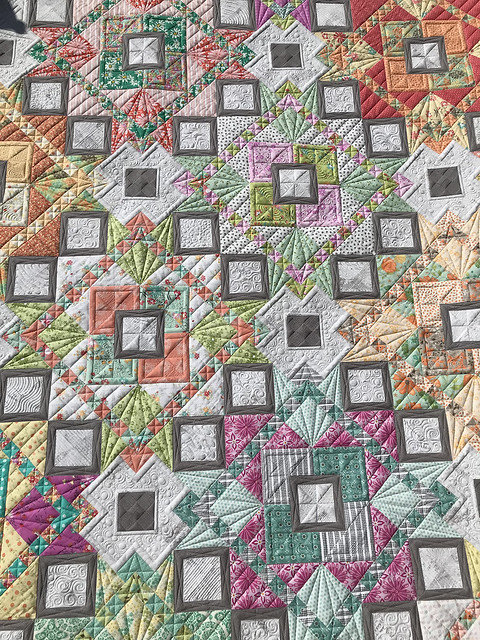
As far as the quilting design, I just winged it, as they say. I played with lines from the piecing in the quilt and this was the end result. I wanted the blocks to be showcased, this border design helps with that because I created a 1/2" border mimicking the pieced block lines.
You can see above that the simple lines show off the shape of the piecing.
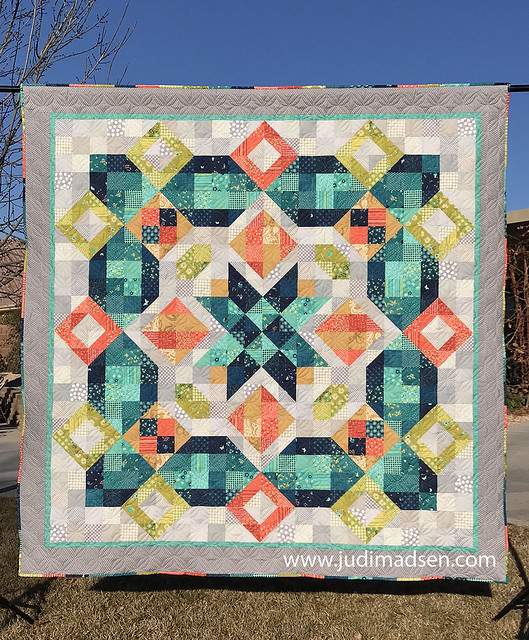
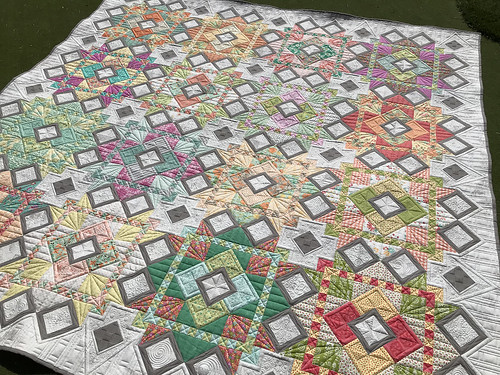
I didn't keep track of the hours on this quilt, but my best guess is that it took me 25-30 hours of quilting. That is great timing for me. Clint was out of town this last week, so I took advantage of the nighttime hours to finish this a lot faster than I normally would.
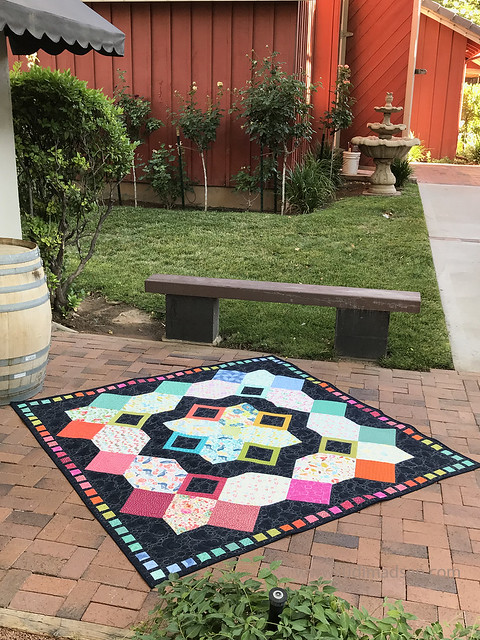
It is such a happy quilt - I am so thrilled with it.
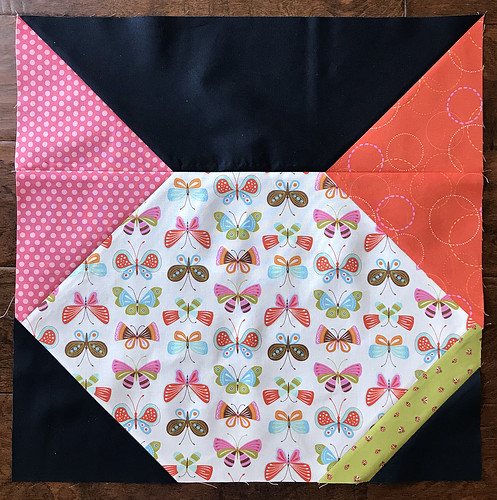
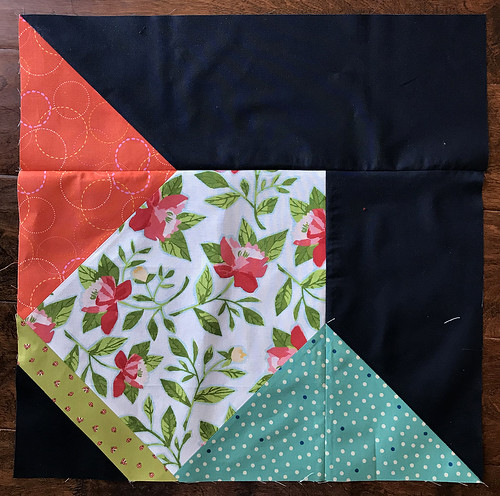
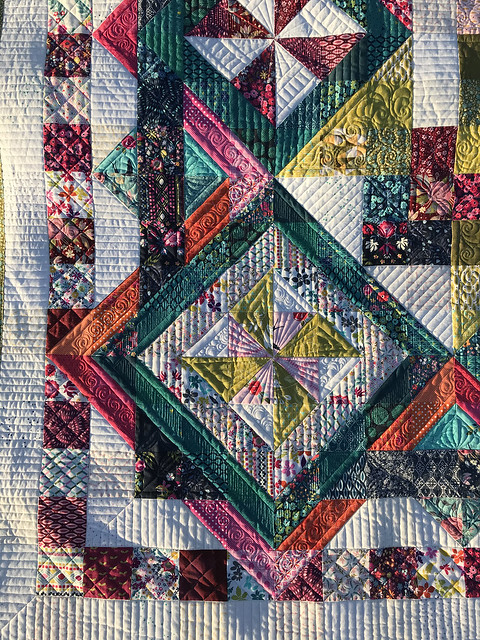
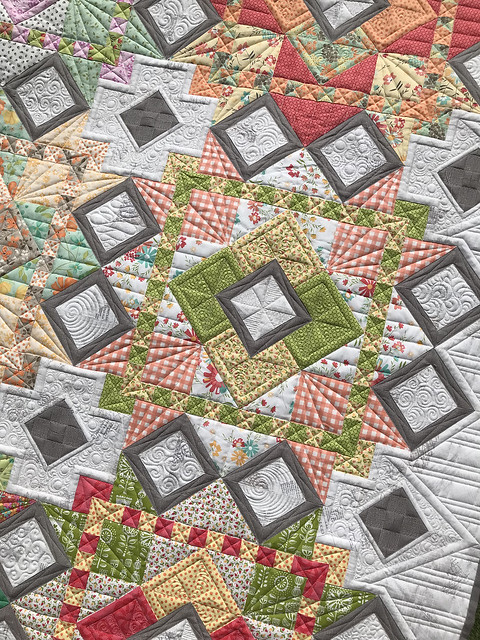
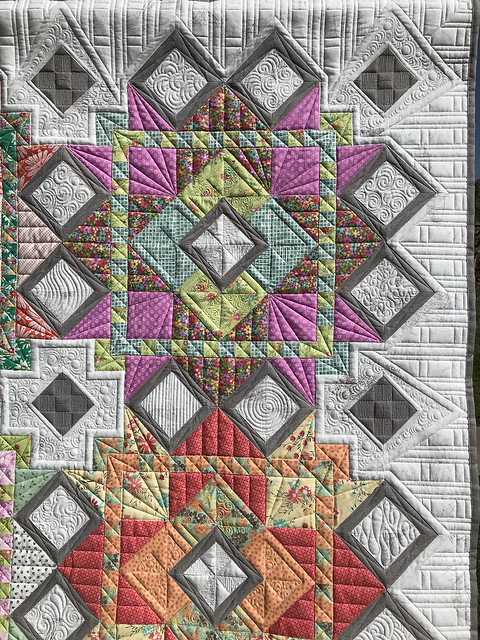
It's hard to pick a favorite block, but the above one is probably it. I love the arrow affect in the border design as well.
Okay, I lied - this one is my favorite.
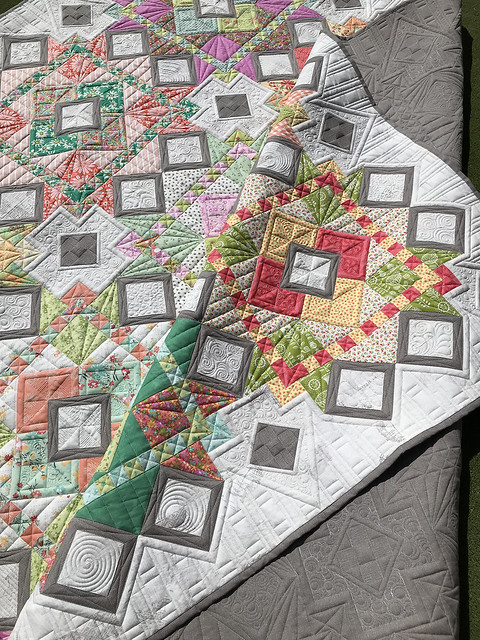
The corner is so beautiful, I love it.
I hope you have been able to notice my enthusiasm for this quilt. I put my heart and soul into all of my
designs. I want the quilt to be a journey, one that teaches patience and satisfaction. I felt both of those things as I made this quilt and I cannot begin to tell you how amazing it was to finish this quilt.
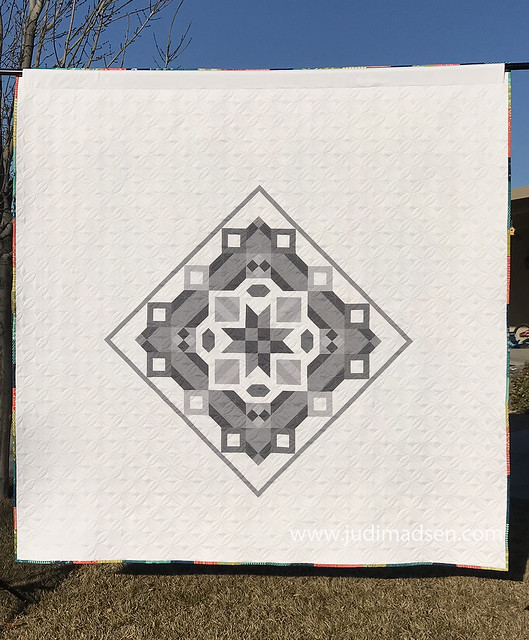
The back is so much fun.
So, I have the
pattern available for an introductory price of $5 - not for long though, so be sure to grab yours. I have it available in
PDF form now and
paper patterns will be shipping next week.
This quilt can also be a show stopping solid quilt - I think I know what I want to make next! I can't wait to see your quilts. Be sure to share your process and your own
Tillie quilt by tagging me and using the hashtag #tilliequilt

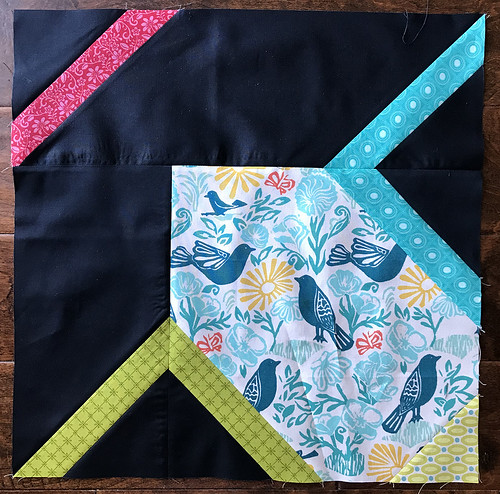
(Block 13)
Week 4 and final assembly of your own
Mama Gypsy should be happening - if not, no worries! Keep going at your own pace. It has been fun to see the progress on so many darling quilt tops.
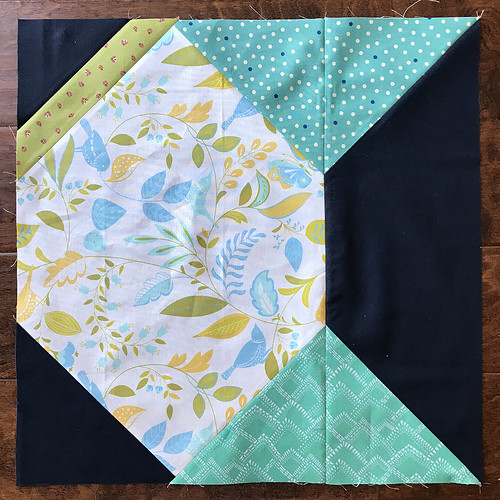
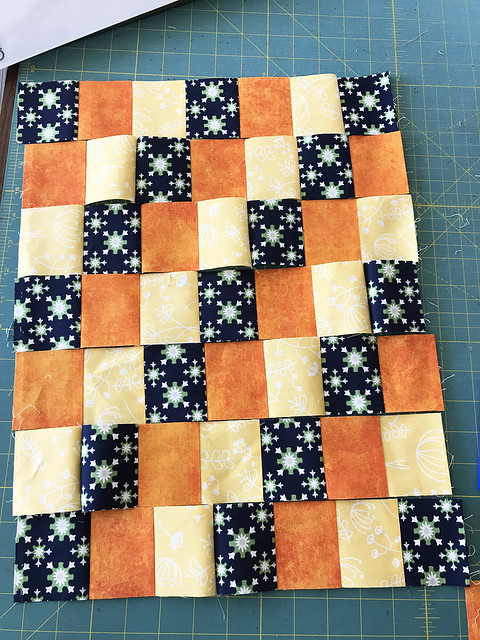
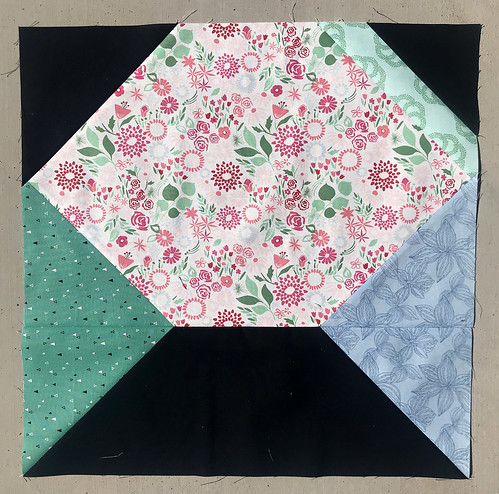
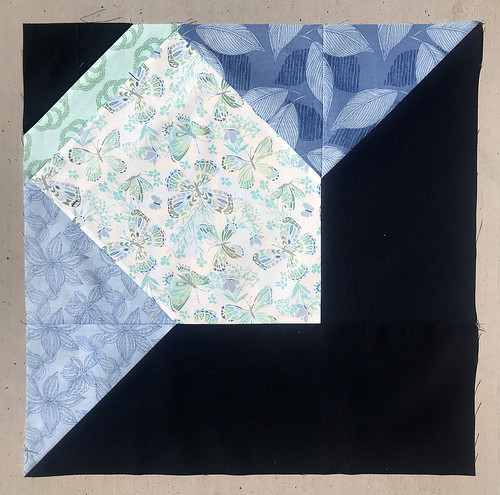
(Block 14)
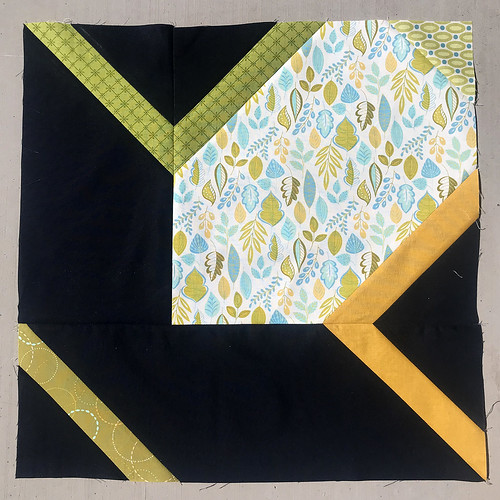
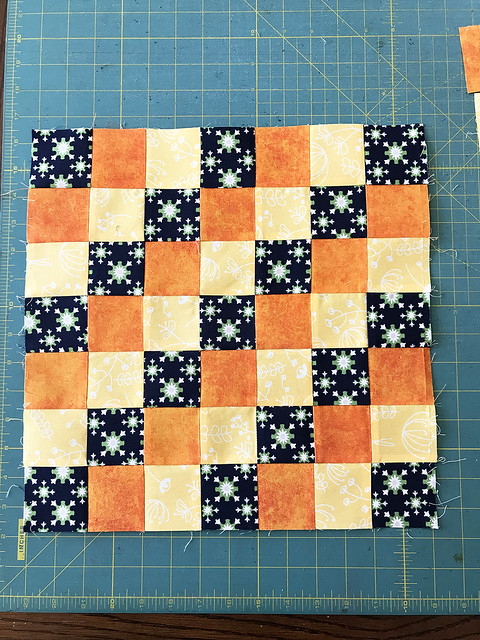
(Block 15)
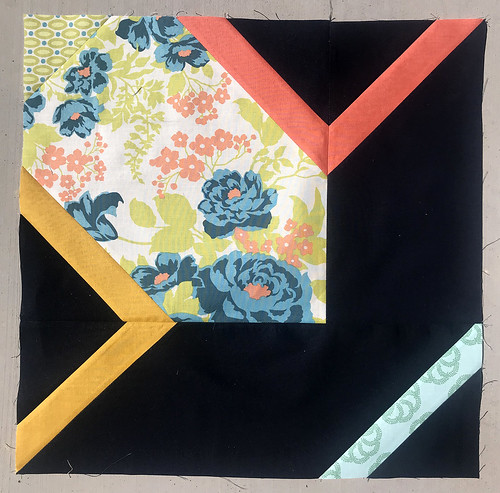
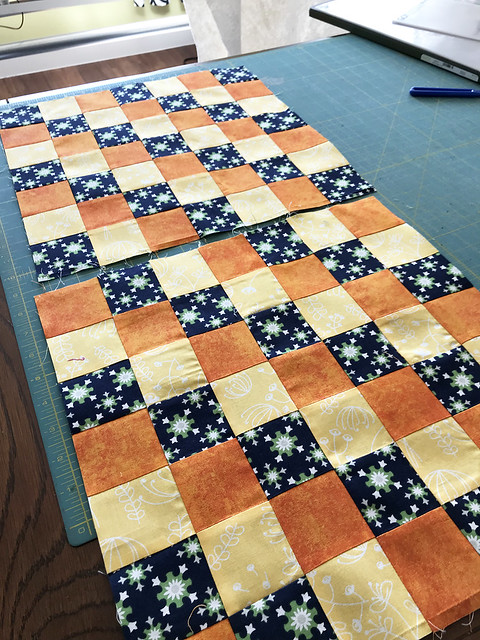
(Block 16)
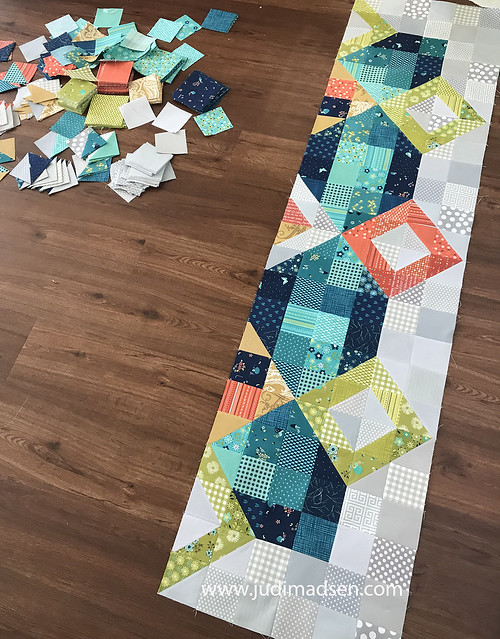
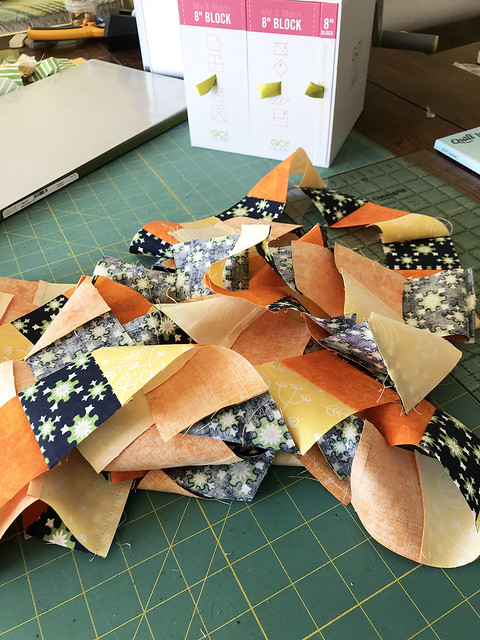
When you are ready to piece the top - I like to piece 2 rows together, then piece the two halves together. It is easier to maneuver that way.

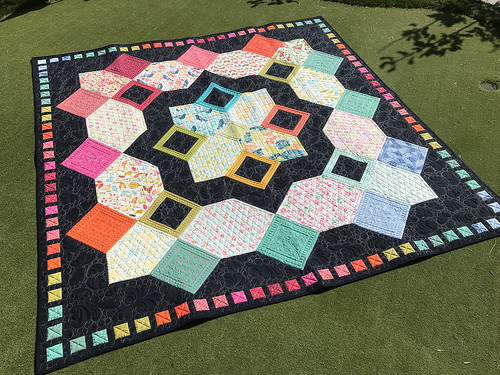
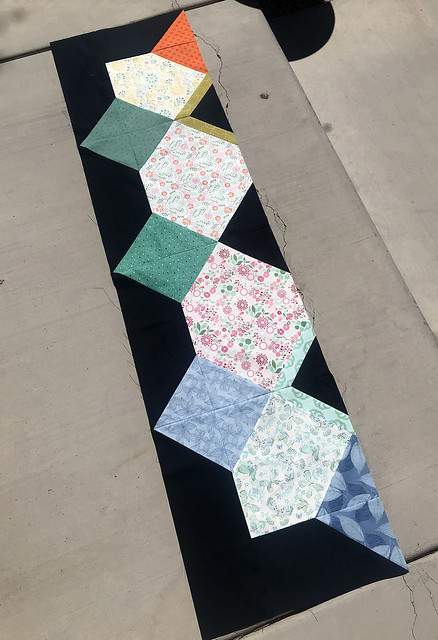
My border for this
quilt had to be pieced individually and not strip pieced. You will find in my directions in my pattern that it doesn't explain strip piecing options, but you can certainly do that if you would like to make it easier. There are sixteen color choices I used - they came from the accent colors from the blocks. I wanted to have the corners of the quilt go from light to dark, a bit of a rainbow affect.

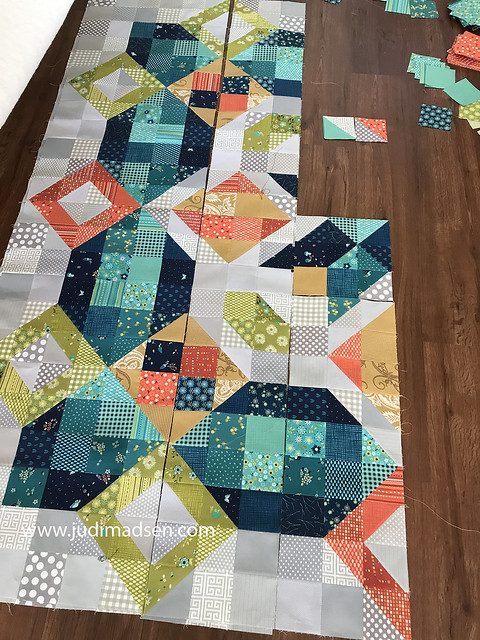
You can see how these border blocks come together so nicely. It gives the final finishing touches for
Mama Gypsy that just look so amazing.
Stay tuned for next weeks post about the quilting.
It has been so much fun seeing all the progress on your quilts! They are being shared in my Facebook group
here and on
Instagram using the #mamagypsyquiltqal - be sure to check them out.
You can still join my QAL - get your
paper pattern here, or the
PDF pattern here.
Don't forget to be cutting and squaring up your bonus HST's so that you will have the blocks needed to put together a darling HST quilt.
(Block 9)
(Block 10)

(Block 11)
(Block 12)
The blocks come together quickly - some of you may be ahead of schedule or some of you have just started. Either way I hope you are enjoying the process and having fun with it. Next week I will share the last 4 blocks, but also talk about my design decision on the border blocks. I had a lot of fun with the border on my
Mama Gypsy. So, stay tuned, enjoy! I will have a winner for a prize from Moda sometime next week.

(Block 5)
I hope you are having a fun time putting
Mama Gypsy together! I am happy to announce that Dory Miller has won the $50 gift certificate to
Green Fairy Quilts for this
quilt along. Thank you for joining my
quilt along!
So, we are working on row 2 for this week. Thank you for sharing your progress on
Facebook and
Instagram - your fabric choices and blocks are amazing! Keep them coming!
(Block 6)
(Block 7)

(Block 8)

(Row 2)
Now that you have, or will have two rows completed - sew the two rows together. We are half-way done! Hooray!!
It's not too late to start making your own
Mama Gypsy - get your paper pattern
here or your PDF pattern
here. Looking forward to seeing your quilts!
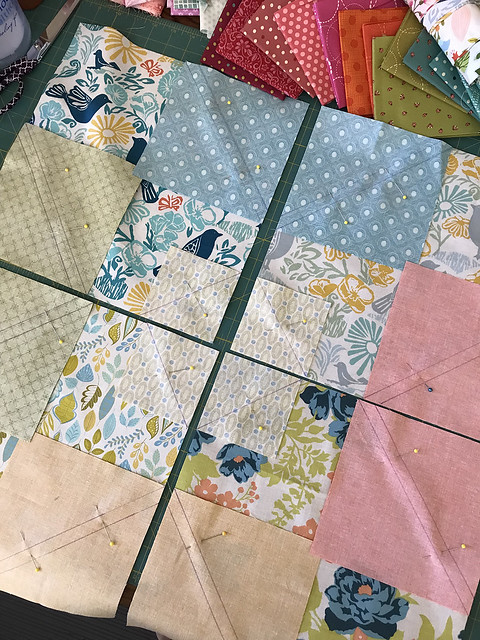
It has been so fun watching the fabric choices coming along and many of you have started cutting and working on blocks. That is so great! I am going to go over how I pieced my
Mama Gypsy. The color choices for my quilt made it so I had to start in the center and build from there.
You can see in the picture above that I cut the 4 center large print blocks, then cut the accent squares. I drew on the necessary lines that make the triangle in the block, and the bonus HST for each section. All of those instructions are in the
pattern. Make sure you are pinning because the quilt pieces are quite large - this will help with keeping the fabric from shifting.
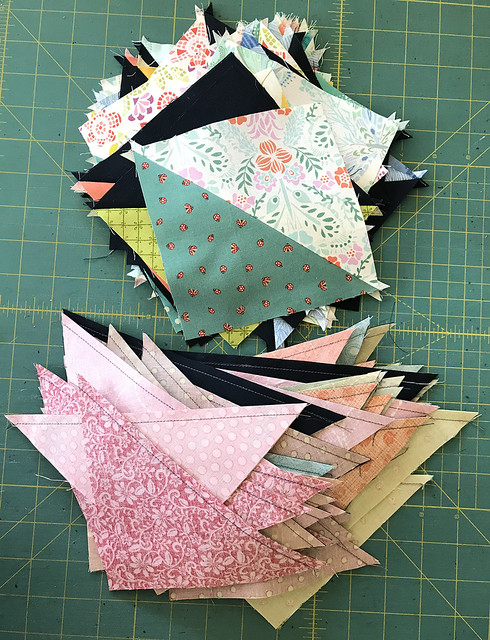
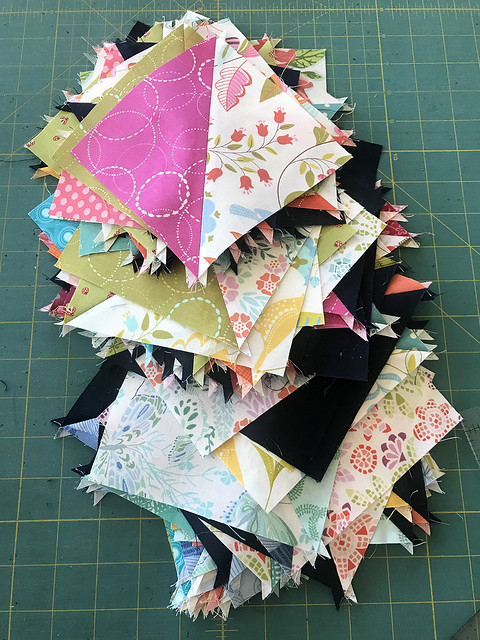
You can see above that the HST do add up as you put the quilt blocks together. It is so fun to see the colors coming together, especially with the scrappy feel of the fabrics I used.
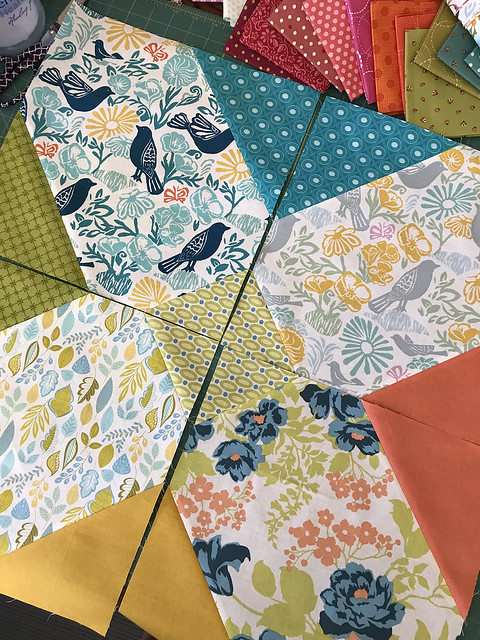
Once the blocks are trimmed and pressed, you can see how fun they come together. I didn't worry about adding the other elements to these center blocks (above) - you will see that they are incomplete by looking through the pattern. I put the center of the blocks together first so I could build on my accent colors. I do better myself laying my pieces out on the floor, or design wall if you have one, and playing with placement. I am a little more hands-on in that department. You also have the option to color out your fabrics on the black and white design page provided in my
pattern.
(Block 1)
Okay, so now that I know where my accent colors will be in the center of the quilt, I know how I want to play with the outside block accent colors. You will see on my entire quilt how I have the warmer colors in one corner of the quilt and the cooler colors on the opposite corner. It was all just a little bit of trial and error before I had the placement I wanted.
(Block 2)
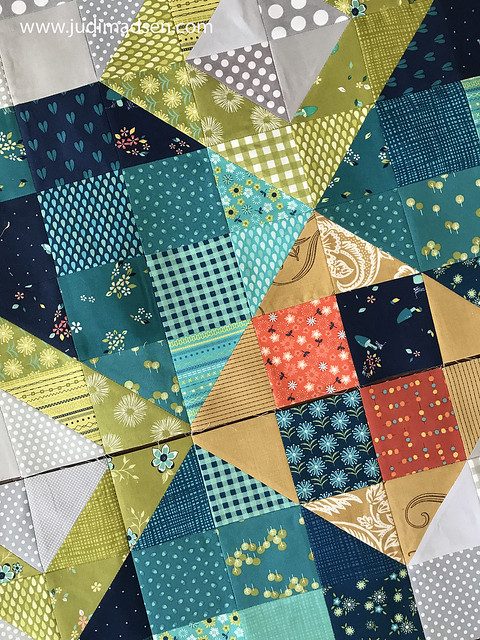
You can see I am building the quilt from the bottom row to the top - it doesn't matter which order you do it in, that is just what I did for this quilt. I have to admit it was hard for me to place all these prints together, but the end result was worth it.
(Block 3)
If you look closely at the teal/green fabric above, it is directional. I take the time to make sure that the prints are going the same way - there will be 4 triangles coming together once the blocks are sewn into a row. I prefer to have the same prints coming together in the same direction. It takes a little bit more time, but is definitely worth the effort.
(Block 4)
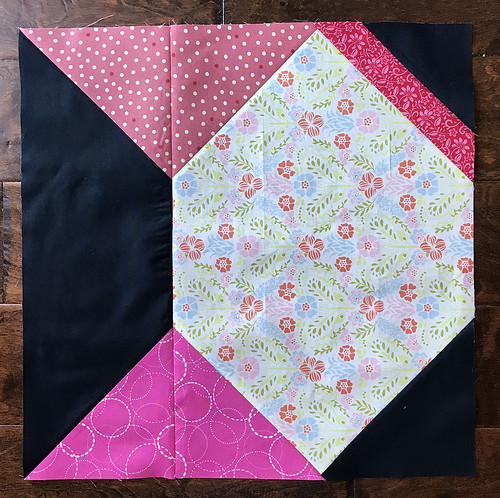
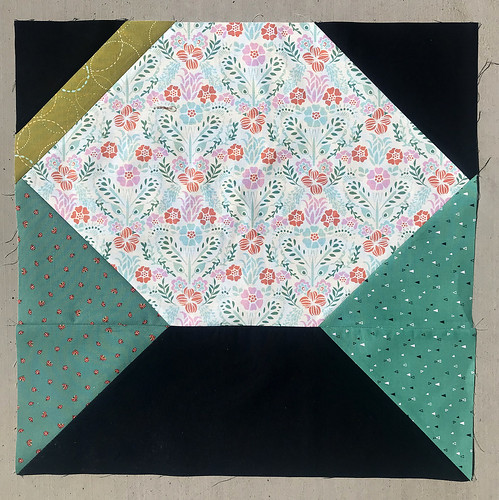
It is fun how each block has its own personality, I love the way each of these prints come together against the dark background fabric. I have the directions for pressing the seams in my pattern, but I opted to press the seams open for this particular quilt. I knew I would be quilting it and would be able to navigate the seams and where to stitch. More on that later.
Okay, so once you have the first 4 blocks completed - sew them together. Isn't this darling? I love it!
Those of you following along on
Instagram - share your blocks using #mamagypsyquiltqal and those of you on Facebook, you can share in my
group. I will pick a winner for the $50
Green Fairy Quilts gift card Friday or Saturday night for one lucky participant who has shared their progress. So, be sure to share, even if you are just now picking your fabrics.
For those of you who haven't started yet, don't worry! You can still join. All the info for the quilt along will be
here. I will post again next Friday!
Thanks everyone!
Alright! Here we go! I hope you are as excited as I am about this fun
Mama Gypsy QAL - it is going to be fun! So, for those of you who are still on the fence and haven't purchased your pattern yet, you still have time! Get your
paper pattern here (with free collector pin) or if you want to just get started, purchase the
PDF version here.
For those of you on Facebook - I have created a
group to share what we are doing throughout each week. For those of you on Instagram - please use the
#mamagypsyquiltqal to share your quilt process.
Read all the way down to see my sponsors ;-)
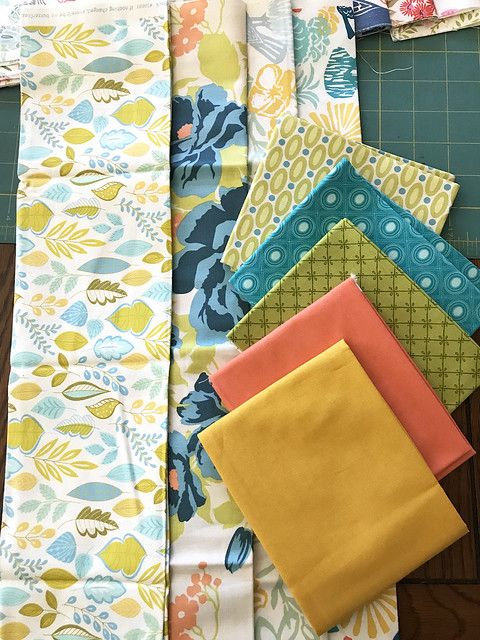
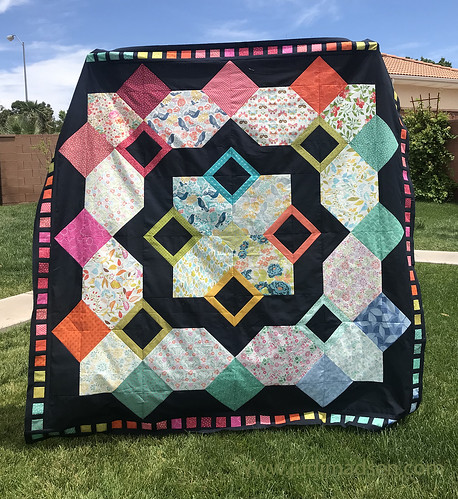
Okay - talking fabric choices. This quilt was a bit of a challenge for me because I took a different approach to the overall look of the quilt. Most of the time I go safe and choose a few different colors that blend well and typically go with yardage instead of fat quarters. However, this quilt is made entirely of fat quarters, except for the background fabric. In that case, I used
Peacoat - a fabulous Moda Bella Solids color - not quite black, not quite navy.
The idea for the quilt was to showcase the white (floral) printed fabrics. When I am putting a quilt together, these large prints are not ever chosen for a quilt of mine because I typically focus on the quilting - large prints don't showcase well for that. The idea to change the focal fabrics to the large floral prints created an opportunity for me to use the prints I love, but don't typically use in my projects.
I started with the center of the quilt picking 4 fat quarters that blended well together, then added 4 complimentary colors for the on-point squares accents and one print for the center. Picking the accent colors is as simple as pulling colors from the prints.
I quilted the large white florals in the center with 1 inch squares. This gives the quilt dimension without taking away from the printed design.
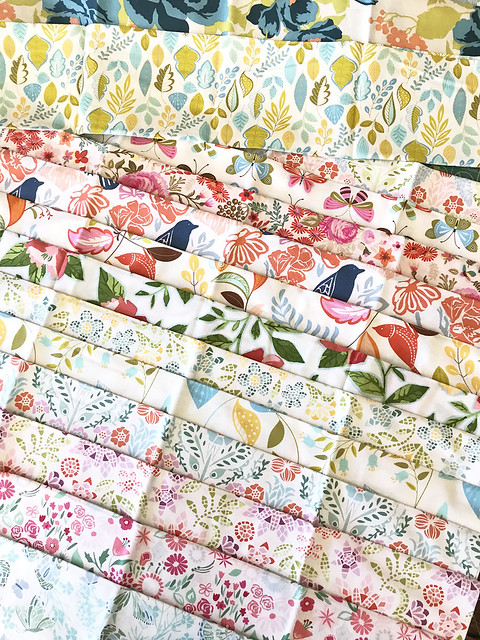
For the outside large areas of the quilt, choose 12 fat quarters that blend well together. I went through all of my stash of fat quarters and auditioned several white background large prints and these were the final choices. You can see that there are several Moda designers represented in these choices.

Once you have the printed fabric chosen, the accent colors need to be chosen. You will need 16 different accent colors, I had fun choosing colors that I like, but also going dark to light. I planned on using these accent colors for the border trim, but more on that in the coming weeks.
Once you have all your fabric chosen, it is time to prepare your fabric for cutting. I like to spray my fat quarters with spray starch and let the fabric air
dry. After that I spray the fabric again and iron it. Now, you are ready to cut your fabric.
So, this week - gather and prep your fabric, then start cutting. If you are doing a scrappy quilt like this one, then you will want to use the drawing page in the pattern to make a reference for fabric placement. OR - you can start with the center blocks and the color placement and build on from there.
Next week I will share with you the first row and 4 blocks that I put together. Please be sure to share your fabric choices with us on social media.
Also, next week I will announce the winner of the $50 gift card to
Green Fairy Quilts for one lucky participant. Please stayed tuned for another winner in the weeks to come for a prize from Moda Fabrics - I am so grateful that they have sponsored my fun QAL.
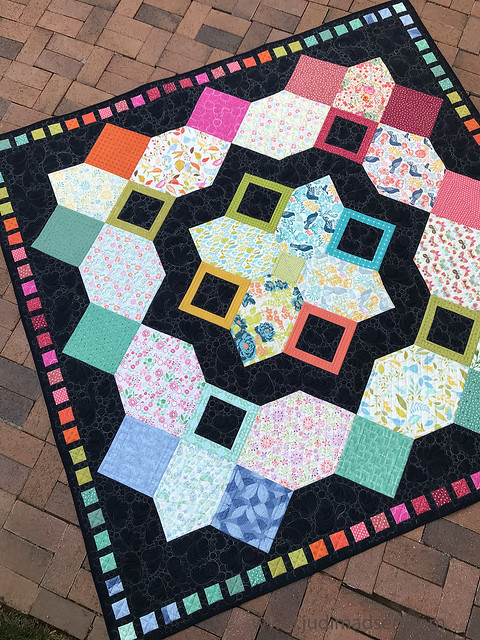
I have some fun planned for a Quilt Along making my
Mama Gypsy Quilt. If you remember my
first quilt, it was made with a white background and dark focal pieces. This quilt has taken on a whole new look with a dark background and bright border, I absolutely love it!
The fun thing about this
quilt pattern is that there are enough half-square triangles to make a bonus quilt. I changed the layout for this quilt, but the same pieces are there.
Isn't this the perfect setting for these darling quilts?

So, who wants to join me? I know it is winding down as the summer comes to an end, so this is going to be the best project to get going for the fall. It is a fairly quick project, which makes it even more fun! The plan is to start the quilt along on August 2nd. I will be posting here, as well as on
Instagram and
Facebook each Friday in August.
So, get your pattern
here - buy a
paper pattern and you will receive a
Mama Gypsy Collector Pin for free during this quilt along. I will also be doing a giveaway for the participants in the Quilt Along, including a $50 gift card to Green Fairy Quilts and a surprise prize to another winner from my sponsor Moda Fabrics.
I will be using #mamagypsyqal to share the photos, be sure to share using that hashtag as well.
I thought it would be fun to do my own black and white picture challenge for this post. It really has been so hard to keep up blogging and I miss it. Seems like Instagram and Facebook is where I hang out most of the time now. Anyway - I just went to Paducah for QuiltWeek and had a wonderful time teaching 6 sold out classes. I am always so honored to be with so many quilters - it really makes my job easier, knowing that everyone is happy to be there.
It takes weeks of prep work and pre-shipping everything ahead of time for these events, so when the week arrives and flies by - it seems like all a blur. Does that make sense?
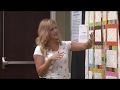
Up above is a picture my darling sister Amy took of me during my Secondary Design class - hands down my favorite topic to teach. I absolutely love it. I am also very grateful to Stewart Plank for providing the A1 quilting machine for that lecture/demo class. There is nothing so great as demonstrating how to quilt on a machine I am familiar with and absolutely love.
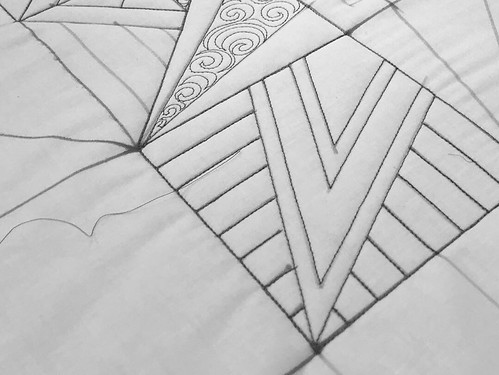
This picture is fun because it's hard to know what is drawn and what is quilted - and I just love the simplicity of the design itself.
I am so lucky to have my sister, Amy come with me. She is the best "sistant" I could ever ask for. She puts up with a lot and knows exactly what I need to keep going. There is so much planning and work to be done, and since we have been traveling together for 4 years - she knows what to do. I am so blessed to have such a great sister.
On top of that, I have another adopted sister - Kimberly Einmo - she is a riot and we have so much fun together and with her husband Kent. So glad we made time to go out to dinner one of the evenings I had off from teaching.
Roses sent from my husband, Clint. He was so sweet to send them to me and I feel so lucky to have him in my life. These were - I am proud of you - roses. So grateful for him.
It is always so fun to catch up with Jenny from SewKindofWonderful - seriously! I love this girl and her amazing talent. I made sure to grab some of her patterns to add to my site, you can check those out here.
Amy and I had more time this trip to allow some time to check out the city. It was fun to walk around on a beautiful Saturday afternoon - this church was absolutely beautiful!
Last, but not least, my exhibit - Ordinary Quilts, Extraordinary Quilting was shown at QuiltWeek - it still is surreal thinking about having 18 of my quilts hanging in the show for Spring Paducah QuiltWeek. I am so grateful for the experiences I have had and still can't believe where this road has taken me. Thanks so much to all of you for being around for the ride.
I am happy to share my quilt,
Celebrate, with you today. You may have seen sneak peeks of this darling top on Social Media, but today is the final reveal. I mentioned a few months ago that I design for a new company,
Honest Fabric, and this is one of those
designs. Right now, until tomorrow, you can get all of my designs at 25% off by using the code, ILOVEJM25 during checkout at
Honest Fabric.
I talked a lot about how I feel quilting with polyester fabric in
this post and
this one, so check those out and then come back and finish reading about my
Celebrate quilt.
I really spent time
marking out this beautiful quilt top using my
QuickMark Assist ruler - I had fun coming up with several designs and the borders turned out to be my favorite part of the quilt. I measured out 4 inches from the edge of the rows of squares to make the border even, my
QuickMark ruler was perfect for that measurement.
The quilt that I quilted is the Celebrate Fall White, the one that isn't quilted is the Summer White panel. Both colorways are totally fun and there are 9 colors to choose from. Which one will you quilt?
The quilting is free-motion with a little
ruler work and a whole lot of fun! I used
MicroQuilter thread for the top, I love the thinness of this
thread.
Minky as backing for the win! This quilt top is so darling and with the minky, it is super soft - even with all my quilting.
This is my current project, my
Magic Windmill Orange panel, just a little sneak peek for you. I am absolutely loving it so far! Stay tuned for updates and don't forget to go and get a quilt panel and start quilting! I cannot wait to see what you create!
I am so excited to share with you 2 new quilt
patterns! These 2 designs have been in the works for a while, ever since
Gypsy was first
designed. The first one,
Mama Gypsy is a fabulous quilt. This design takes the Gypsy block and makes it the focal point of the quilt. I used yardage for this particular quilt, but it could easily be a stash buster/fat quarter quilt. The large pieces could also be used with fabric with large prints, making the fabric a showcase within the pattern itself. Oooo, that makes me want to make another quilt!
This pattern makes for a striking quilt and that border, wow! It really finishes off the quilt perfectly. With my
directions, anyone could make this darling quilt. All my
patterns are full color and written well - so be sure to try them out!
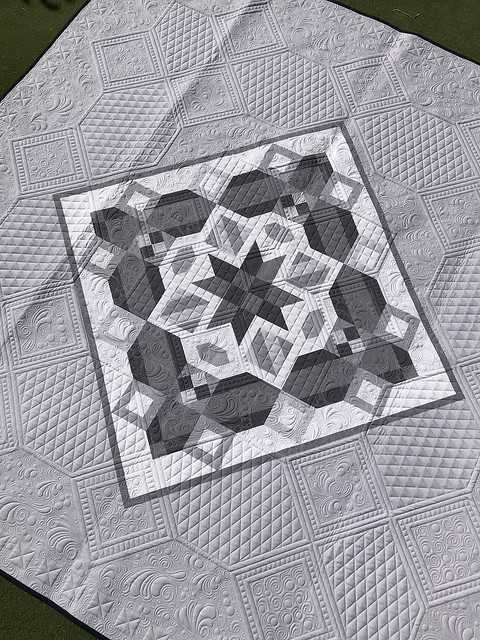
I tried something a little different with the quilting on this quilt. I digitized the
Gypsy block - so you can see the darling block stitched on-point in this quilt top. The digital quilting design is available
here. On sale for a limited time.
The back is fun to see with the sun shining through, it almost looks like a negative of a picture. You can see that all the seams are pressed to one side, those instructions are also in the
pattern.
The best thing about
Mama Gypsy is that there are bonus instructions for a second quilt included. There are some triangles left over from piecing the quilt top, which make for the perfect HST (half-square triangle) quilt. Mama Gypsy is available in
Paper or
PDF version at an introductory price of $5. Paper patterns will ship next week.
Okay, so my next pattern is
Patchwork Gypsy - and it's just that - patchwork! This quilt was so much fun to design and to piece and completes my
Gypsy series. I used
fat quarters from
Well Said and
Woodland Secrets for the majority of the fabric of this quilt top. The background fabrics were also from different Moda lines, I just grabbed what was in my stash.
This quilt has a lot of squares and HST, but the assembly is really fun and the instructions are easy to follow. I thought it would be fun to share my process and lack of design wall. The floor works great, right?
I absolutely love how this quilt top came together. I have to admit, this was a difficult quilt for me. Only because I am used to using very specific colors, so adding random fabrics together was a new stretch for me. I couldn't be happier with the results though.
One of my favorite elements of this design is the star in the center - that just makes the quilt. Seriously.
I used a simple Orange Peel by Karlee Porter for the quilting on this quilt. I think it looks great with the pattern. I didn't want to go too crazy with the quilting - which would have taken away from the design itself.
I had a lot of leftover pieces from cutting this design out. When I am designing, I cut the fabric pieces out before I count out the actually pieces required in a quilt top. So, you won't have the extra pieces in your own top like me. However, it would be fun to cut out extra pieces to make this fabulous binding. The pieces are 4 1/2" x 2 1/2" rectangles sewn end to end with seams pressed open. It did take a bit of time to do this, lol.
 Here
Here she is in all her glory! AH, isn't she beautiful?

I really hope you enjoy making this
quilt top as I did.
Seriously, it was so much fun to make.
Now let's talk about the backing. Oh, I think I like it, a lot! This is a
custom printed panel called
Gypsy - available on my website
here in
three different color options. The panel is 100% polyester and so soft to the touch. It pairs beautifully with my cotton pieced top and I absolutely love this backing fabric.
Hi Everyone! I am excited to share with you my
QuickMarkAssist Ruler which is designed to compliment - or assist, the
QuickMarkRuler. The difference between
this ruler and the
QuickMark ruler is that there are 1/2" cut outs, the
ruler is 6 1/2" x 12 1/2" x 1/8" - so it is for marking only. It is not to be used with the quilting, but will help you tremendously when you are marking your quilts. This is a time saver for me, you know how I love marking my quilt tops.
I have been using my favorite
purple marker with the
QuickMarkAssist to draw out my designs on the quilt. I cannot wait to get this one finished! It really is so great to have more lines to be able to mark everything at once - plus the neon green color of the ruler helps so much!
The quilting is turning out so beautifully! I cannot wait to share the entire quilt when I'm finished. In the meantime, be sure to pre-order your own
QuickMarkAssist - they will start to ship after the Christmas Holiday.
Okay, so I am happy to finally reveal my
Ticky Tack quilt - another custom printed panel design that was designed and quilted by me. This was the first time for me using a printed panel for custom quilting and the fabric is 100% polyester, so it has a new feel for me. The fabric has a soft feel to it and because it is printed on a tight weave fabric, I needed to use a smaller needle (90/14) while quilting, and I used a 60wt glide thread to stitch.
This quilt design,
Ticky Tack, comes in 4 different colorways. Surely there is a colorway that works for you.
There was a little bit of a learning curve for me using this fabric, because it is so different from a pieced 100% cotton quilt and the movement is different. However, different isn't bad, it's just something that needs to be tried and tested. I will definitely be quilting up my other
design tops as well, I am looking forward to it - I mean, check out that texture! The quilt seriously feels like butter....it's so nice.
What I loved most about this quilt is that every color is a separate part of the design and I didn't have to worry about seams taking away from the quilting. I was able to really play with the quilting design and not have to worry about the distraction of the seams used in traditional piecing.
I used my
Quickmark Ruler for the straight line quilting as well as the marking. It was really nice to have the 1 inch slots to work the lines into the design. I had the 1 inch cross-hatch in the yellow areas, the diagonal lines in the yellow and green areas, and the rest of the straight line quilting. It truly is a great
ruler to work with during custom quilting and designing. Also, I didn't have any issues with marking this quilt top - I used a
purple disappearing marker, which worked on all the colors of the quilt, including the dark blue. The lines came out with a little water and the fabric does not bleed AT ALL - hooray!!
I had a lot of fun with the free-motion quilting as well.
This was the quilting design I used for the majority of the blocks, and it definitely took the longest amount of time. It was worth it though, ahh - that texture!!
The center yellow block was fun because I like to change things up in my quilting designs. It still works with all the other designs, but has its own little flare - and because it is the center of the quilt, it draws your attention to that, which creates a nice balance.
This was the easiest block to quilt up because I quilted the free-motion swirls with a 1/2 inch break line to show off the shape of the
Ticky Tack block. The quilting in the white area creates a nice
secondary design.
Close up! So gorgeous!
It's hard to not just jump up and down with excitement when looking at this picture! Seriously! I love it, the texture is just amazing and it really brings this quilt top to life.
Of course the back is just as amazing.
I hope you enjoyed reading about this darling quilt top. I hope you quilt up your own! When you do, please share it with me and on social media using the hashtags #tickytackquilt #judimadsen and #honestfabric. You can purchase your own quilt top
here.
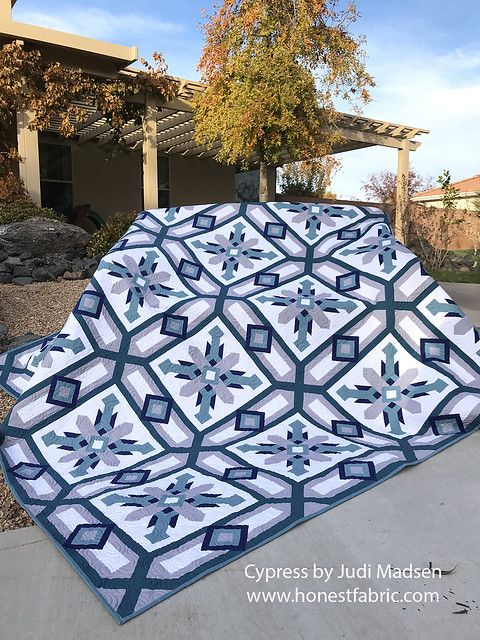
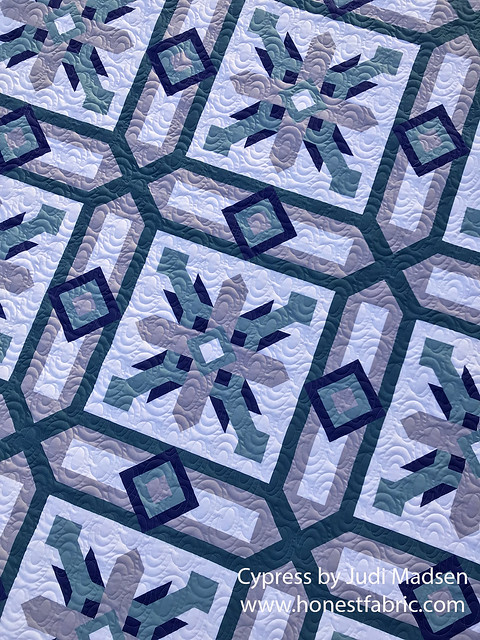
I am so excited to share with you my
Cypress quilt top. This is a fabulous design that is now available as a custom printed quilt top, no piecing necessar! Some of you may say - cheater quilt ;-) but it so much more than that. I am excited to say that I have joined the
www.honestfabric.com design team and I currently have
6 designs in several colorways available. These are designs that are perfect for the advanced quilter who wants to just start quilting, or the new beginner quilter who wants to practice - or the person who just loves the design so much they want it on their bed right away. I have 8 colorways available on this design - they are all so beautiful. Check them out
here.
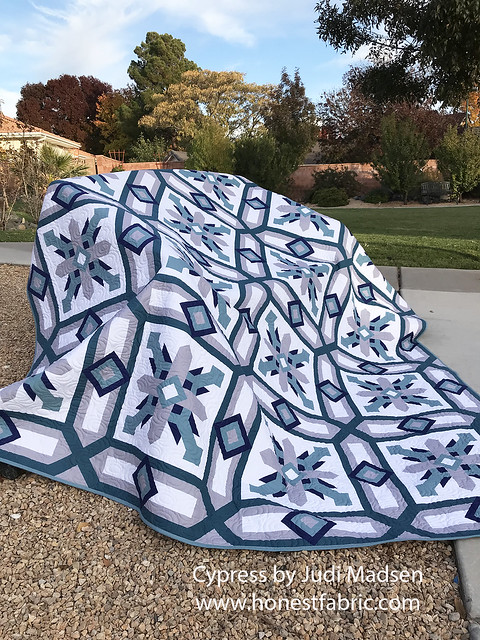
What is fabulous about my designs is that they are square quilts and the extra fabric that comes on the top and bottom of the quilt are perfect for the binding. That is what I have done with this quilt. I quilted an allover Gravity design on this quilt - just to show you it can be done this way, but I am looking forward to custom quilting another colorway soon.
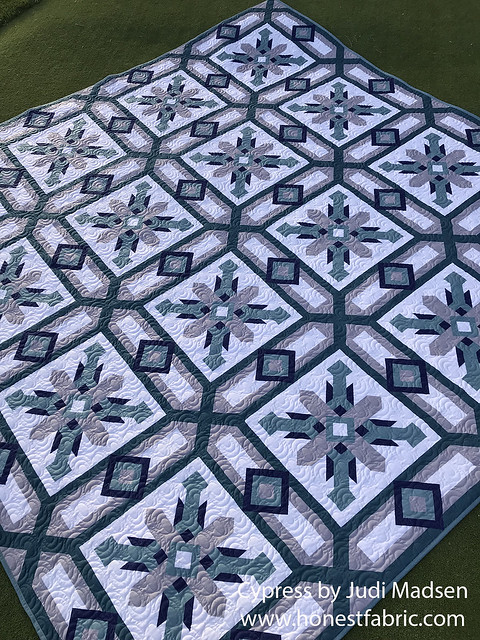
I am just in complete awe of this design, it is so striking and so beautiful and I know you will find a
colorway that works for you!
Stay tuned for more highlights of my quilts designed with
www.honestfabric.com - I have my
Ticky Tack quilt custom quilted, and that will be shared with a giveaway soon. Looking forward to that!
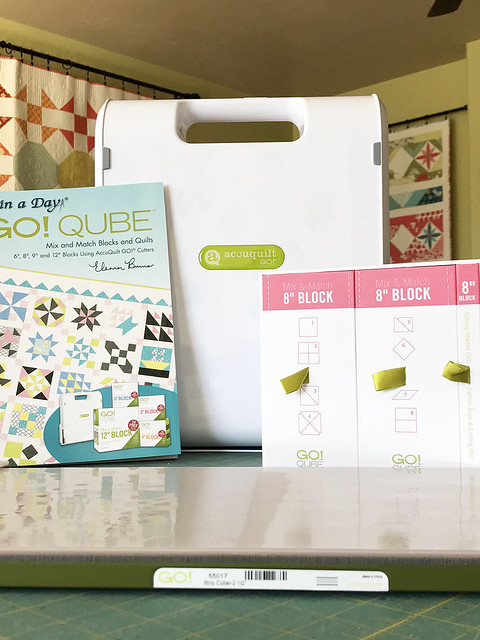
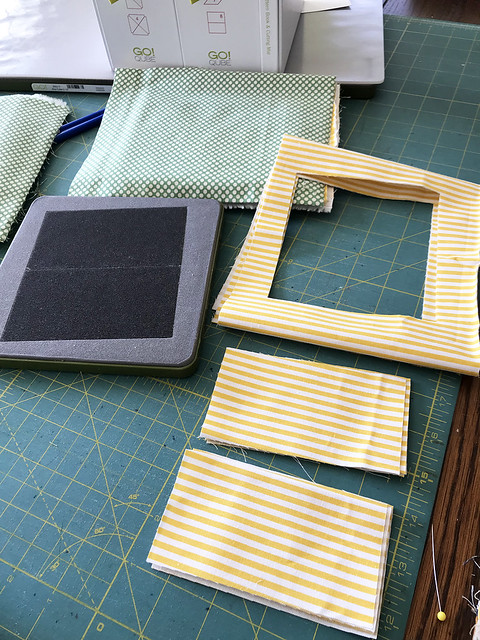
I have had the last couple of days to try out the AccuQuilt GO! and now I can let y'all know how I feel about it. The
Ready. Set. GO! Ultimate Fabric Cutting System starter kit comes with the following: GO! Fabric Cutter, GO! Qube 8" Mix & Match Block, GO! Strip Cutter - 2 1/2" (2" Finished), GO! Cutting Mats: 6" x 6" and 10" x 24", GO! Qube Book by Eleanor Burns, with Die Pick and Over 70 free patterns.
This arrived in a beautiful box and is wrapped nicely, the packaging is so inviting - makes you want to create right away. Most of the cuts that come in this starter kit are the sizes I use on a regular basis for my
designs. I wanted to compare whether this would be something that was helpful or something that is just a different way to do things.
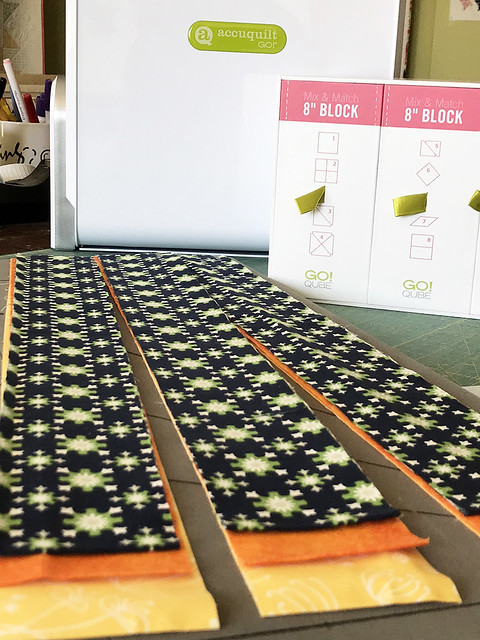
The first thing I tried out was the Strip Cutter - this will cut up to 6 layers of fabric and will make the strips 2 1/2" x 44" or 2" finished - it's like having the tool to make your own
jelly rolls. I picked out 3 different fabrics and set them on top of each other and loaded the AccuQuilt GO! and rolled the strips through. I loved being able to have a perfectly straight cut for each strip and I was able to cut 3 different fabrics folded at the same time.
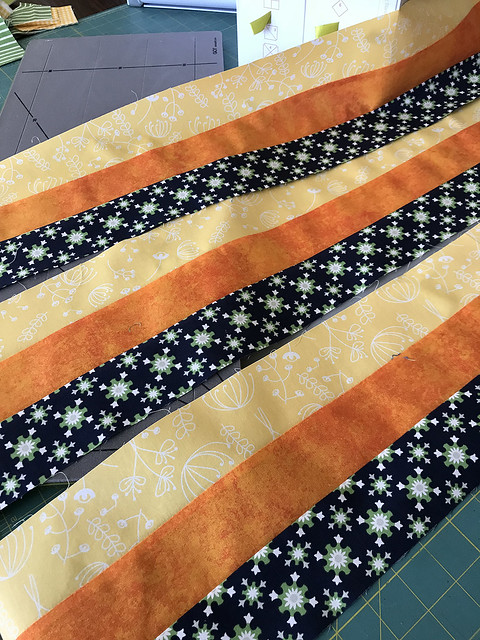
After that I sewed the strips together in 3 groups, then sewed those strip sections together.
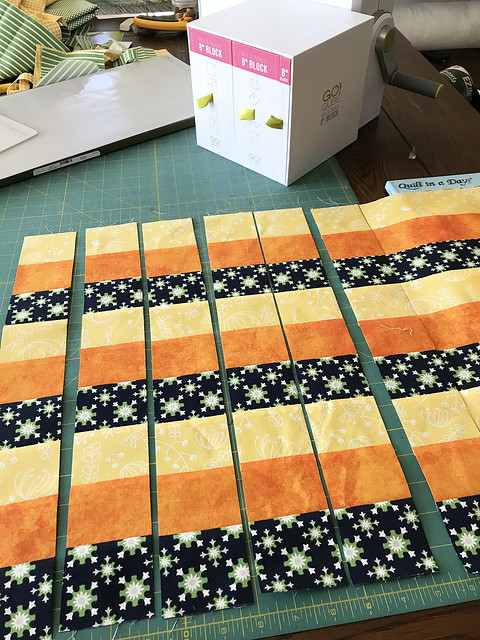
Once the strips were ironed I cut them out vertically to create strips of 2 inch squares. I didn't dare use the strip cutter on this part, because I wanted to make sure I could see the seams to make sure the cut was straight, so I ended up using my
rotary cutter and straight ruler for that step.
After that, I sewed all the strips end to end. You get 17 cuts from a 44 inch strip, so you end up with a really long strip sewn together. After that I unpicked the seams at each 7 squares and created the following block.
7 strips create one 14 1/2" block and with the accuracy of the GO! - the blocks were exactly the size I needed them to be.
Here it is all sewn together in a block.
From these strips, equaling about 1/4 yard of 3 different fabrics, I can get 3 blocks at 14 1/2" - if you just triple that, using 1 yard each - you could get 9 blocks finished. Add a large sashing and you have a perfect quilt top.
So, I would use the strip cutter again - I liked being able to cut more than 2 fabrics at once, which is what I normally do. However, I would use my other rulers and rotary cutter with it as well. So, this is a great way to make sure those strips are just the right size, but it doesn't replace all my tools.
The other cuts in the Qube block are fun to use as well - up to 6 layers without a problem. The only thing is - you have a bit of waste. I could have cut the fabric down, so there wasn't as much waste, but then I might as well just cut it myself. The above cut is the 4 1/2" x 2 1/2" rectangle die, I use this size a lot. So, it is fun to get 12 cuts in one run.
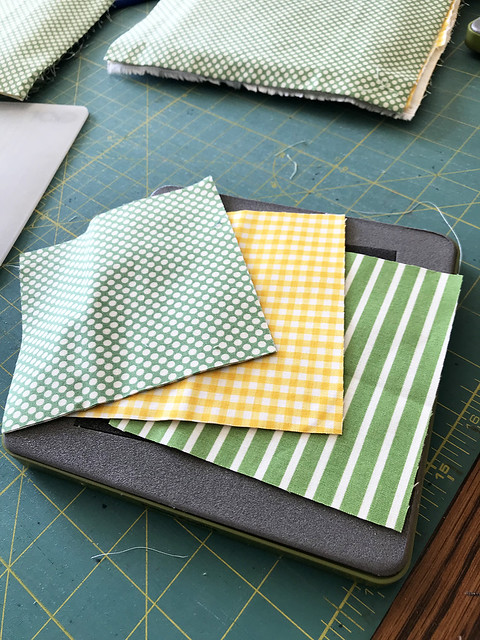
The other cut I used is 4 1/2" for a 4" finished square. Again, I loved being able to cut 6 layers at a time.
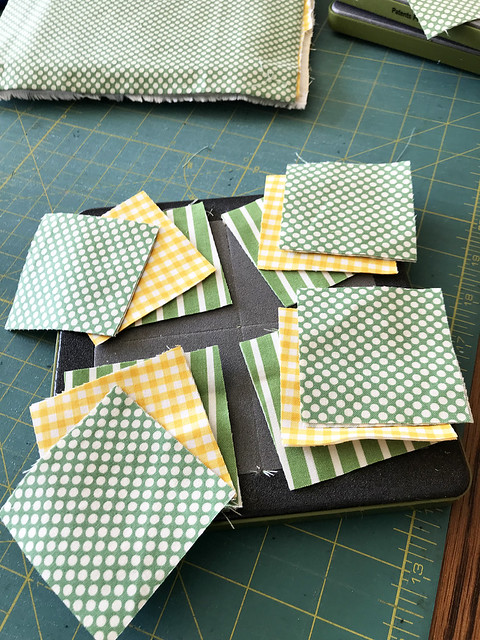
I really like the idea of the 2 1/2" square - you can get 4 squares per cut, times that by 6 layers and you have 24 squares cut in one run.
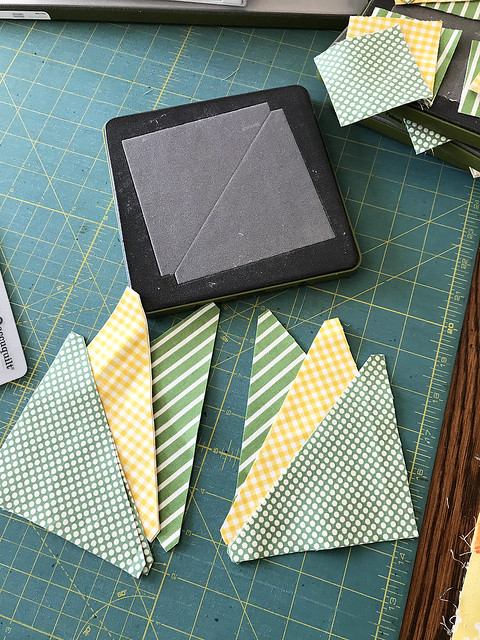
The half square triangle cut is great for those times when you don't use the square method or only have a few half square triangles to do in a project.
Okay, I have thought a lot about what this tool could do for me. As far as the square cuts that come with the 8" Qube starter kit - I would only use the AccuQuilt GO! if I am making a scrappy quilt, like my
Patchwork Christmas quilt, and if I am using precuts or my stash to sew a quilt top. The reason for this is because I would be able to cut off a small piece of fabric and use what I need and cut several fabrics all at once. So, scrappy quilt - yes, I would definitely use this again - in fact, I am looking forward to it. On the other hand, if I am using yardage - I might as well use my ruler and rotary cutter because I would be adding a step with the GO!.
As far as the Strip Cutter - I love it and will definitely be using it again. I love being able to have the strips be perfectly consistent with each cut - knowing they are accurate and ready for strip piecing.
What I would love to use with this AccuQuilt GO! is the other templates - like the
curved piecing or the
geometric dies. There are a lot of options as far as those dies and I think I would have more fun with this GO! knowing that each one of those cuts is perfect - I know that would save me time and a lot of headache making curved designs or geometric designs.
This system is great for kids or beginner quilters as well - I would feel comfortable letting my kids cut out fabric with the GO! and with all the amazing free patterns that come with the GO! they would have plenty of projects to make.
I hope you'll give the
GO! a chance and have fun making some amazing, accurate and beautiful quilt projects. I am happy to add this to my studio as a new and innovative tool. More amazing quilts to come!

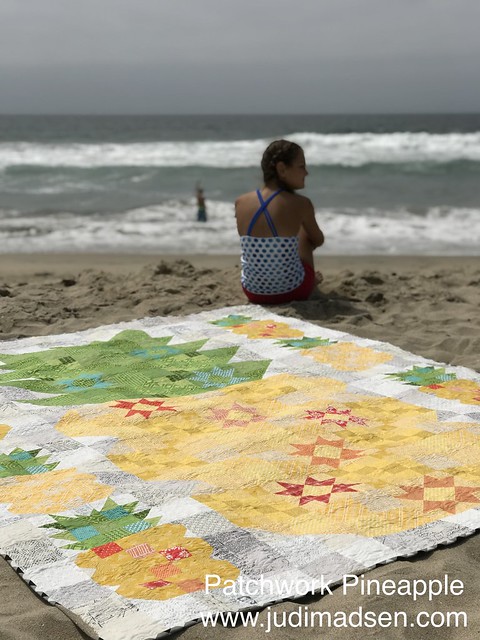
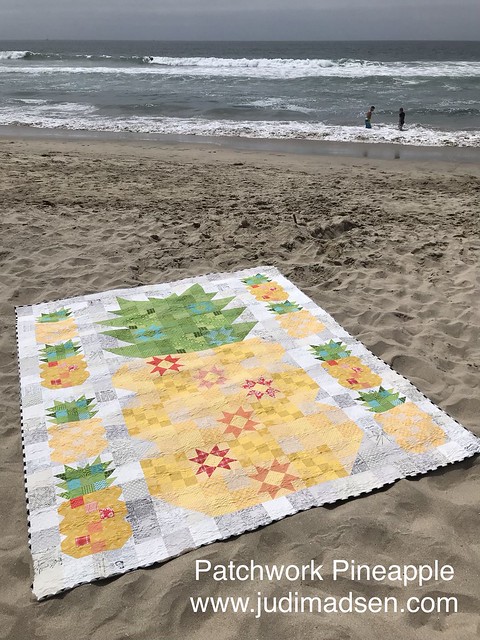
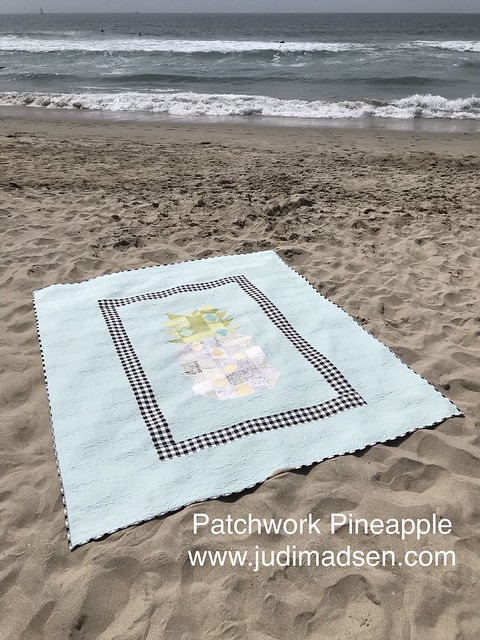
I am so thrilled to finally share what I have been working on for the last several months. I have wanted to make a pineapple quilt forever. I drew one up at the beginning of the year and made that design up into a quilt, but - it didn't look good, or work right for what I wanted. So, I started over and decided on the design,
Patchwork Pineapple, that you see now. This is such a fun quilt to put together. The design is exactly what I envisioned with this second attempt and I am so excited to share it with you now.
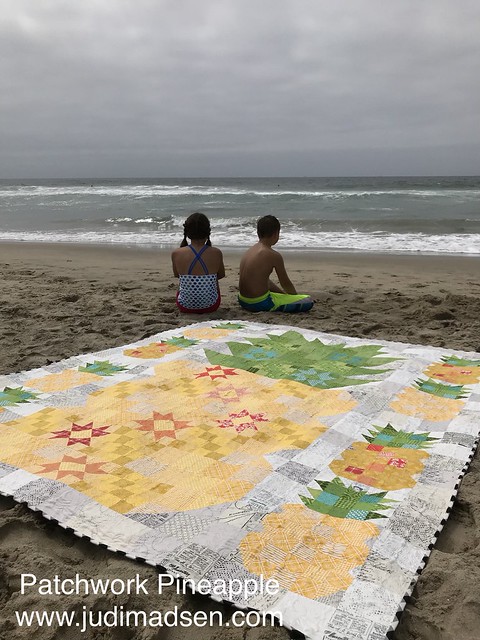
My family just recently went to California and I figured the Coast would be the perfect backdrop for my
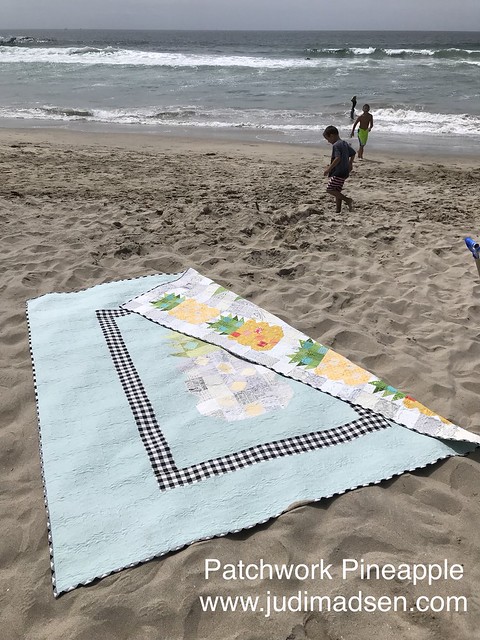
Patchwork Pineapple quilt. We had to wait until the middle of the day for the sun to come out, but thank heavens it did. The quilt and the backdrop look amazing! My kids were good sports as they modeled for the pattern cover.
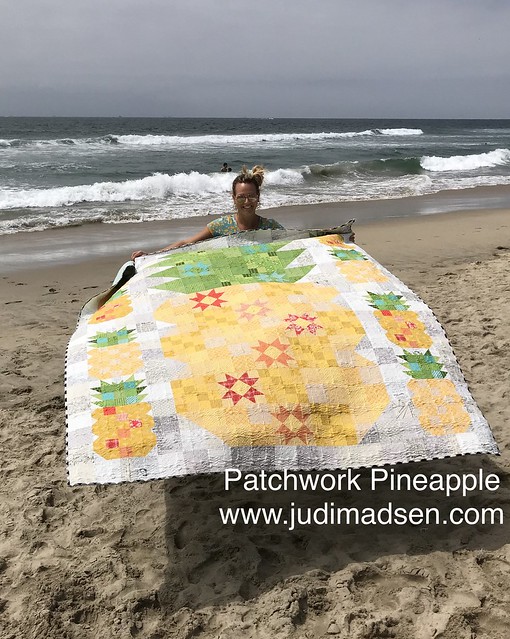
It was a super windy day and we had to really move the quilt around, but it's fun to see the quilt in action.
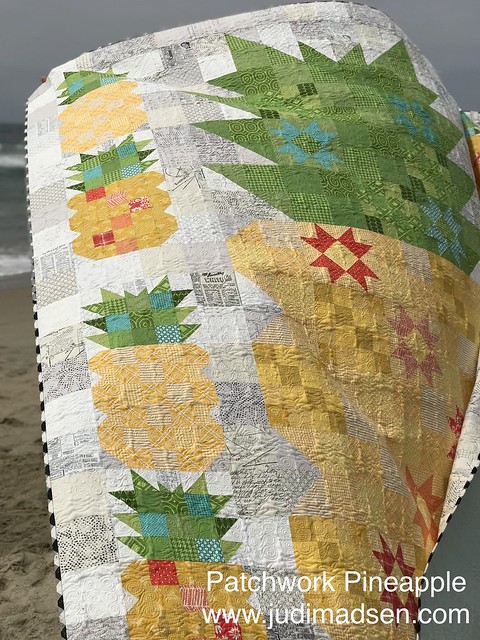
I used
fat quarters from my stash to make the quilt. The background fabrics were from a fat quarter bundle of
Zen Chic's Modern Background fabric line - it looks perfect as the background.
I wanted the pineapple blocks to look more like a pineapple than the quilts I have seen around, and with just a little extra piecing involved - I was able to achieve that look. The stars with the accent colors are so fun in the large block as well as the square accents in the small pineapple blocks.
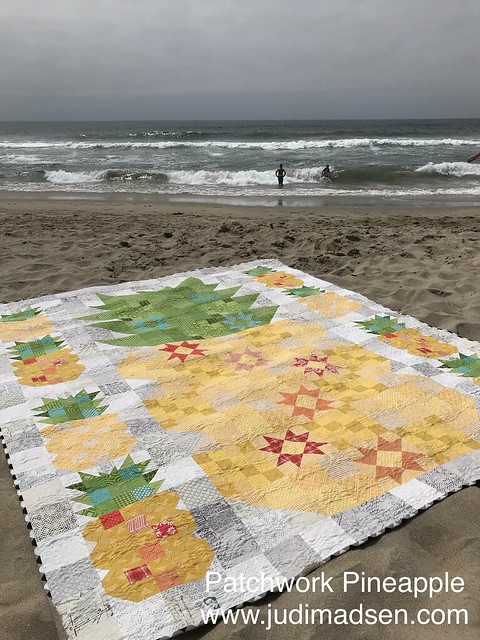
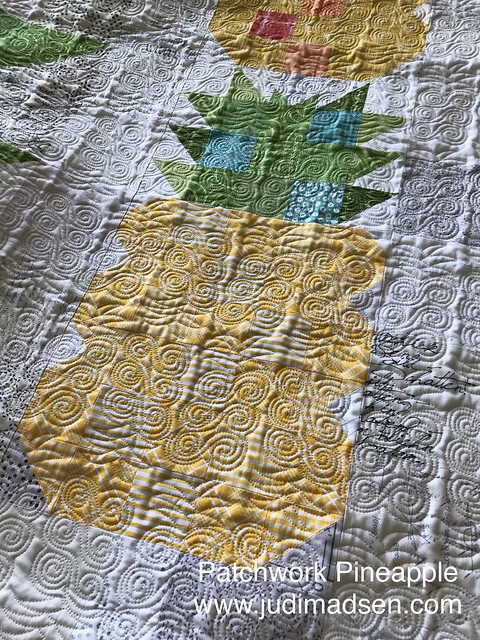
This action shot shows the quilting a little bit better. I designed an edge to edge computerized
Pineapple Quilting design that quilts up very nicely on the quilt. This is shown as a small quilting design, but it can be adjusted to a bigger size.
All my computerized quilting friends, you can get the design
here - it's on sale right now for a limited time.
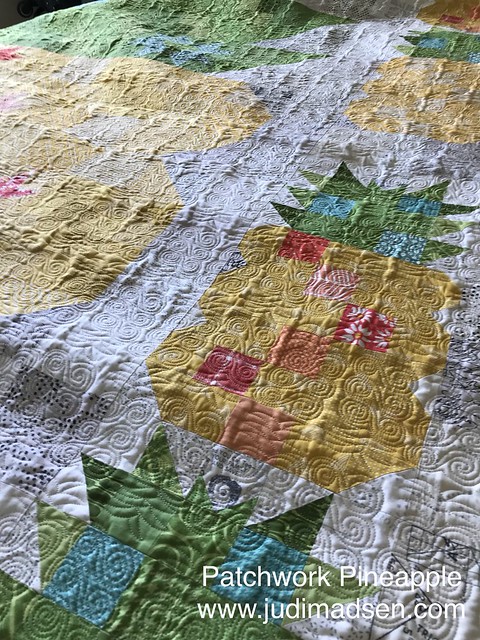
Okay, and the best part about this quilt is that it is reversible. The instructions include how to make this gorgeous back. This is the medium sized pineapple block, and I think it is just darling!
So, here you go! I hope you like making this quilt as much as I did. The
pattern is available now as a
PDF and the
paper version will start shipping on September 17th. The introductory price is only $6.00 - so get yours today before the price goes up. Happy Quilting!!
10 years
15 Aug 2018 4:01 PM (6 years ago)
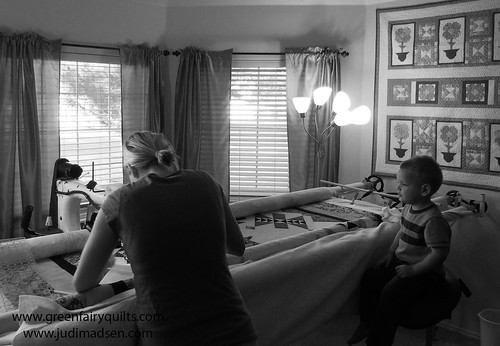
This picture has so much meaning for me, especially with the little guy watching me quilt. It was 10 years ago this week that I was pregnant with our 3rd child, we had just sold our home and we were awaiting the arrival of Jonah so that we could head down to Saint George, Utah from Salt Lake to make a fresh start. Clint had quit his job and we decided that we would take
Green Fairy Quilts to a new level by making it our full time business.
I can still see the faces of family and friends as they tried to be supportive, but I knew deep down they thought we were crazy. I mean, who quits their job, sells their home, has a baby and moves 4 hours away from any family? At the time Clint and I were desperate for a change and knew this was right for us. We did have the money from the sale of our home to make this work and we had about a year to do it. At the time we knew our kids were young enough, they would not have any clue if we failed - our oldest was 3 at the time.
The back story is that my mom and I had been working together and going to shows to sell my patterns and quilt kits. I had also learned to free motion quilt, not very well I might say, on my mom's machine and with our move, we would buy a quilting machine. Clint and I saw the potential in the business and we had always wanted to work for ourselves, so one day when Clint was working down here in Saint George, he looked around and said it felt like home. He immediately called me and said, "do you think we could sell the house and start the business down here?" I was desperate for a change and agreed. It was really hard to tell my mom, but she understood and was supportive.
So, the house was put on the market, For Sale by Owner - we bought low and sold high. This was 2008 - we got every last drop of equity in that house and then waited to move after Jonah was born. We were in the house for 3 days and then moved down to Saint George. It was 2 weeks later that the housing market crashed - and it crashed hard in our area. This was the first miracle, we knew that God had been taking care of us and allowed timing to be perfect.
In October 2008 we finally got my own A1 longarm and I started quilting. I never had any lessons, so I had to teach myself, I knew a little free motion from using my mom's machine. I relied a lot on pictures I could find, but there really weren't a lot of resources back then. I said a lot of prayers and worked hard to build a clientele, the big breaks were the word of mouth references and blogging. I started this blog and shared what I was doing and looking back, I had no idea what I was doing. I spent hours and hours researching how to blog, how to make great photos, anything I could think of to make it better, I was doing. Meanwhile, Clint was building the website and he started adding precuts to the website. I remember in January 2009 our total sales on the website were just over $100.00 - definitely not an income for a family of 5 - but Clint was determined to make it work. I remember telling him several times that it wasn't working and that he needed to find a job, but he kept going, kept persisting and working harder and harder. He had the faith and determination to make this work and he helped me realize that we could do this.
So many things have happened in the 10 years since that first move. Clint has built and maintained an incredible
website, he works so hard. I have been able to take quilting to a whole new level with
free-motion, ruler work and
secondary designs. I feel like I have grown so much in my artistry and I know that this creative outlet has given me more than I could ever ask for. I went into this
business wanting to just design quilt patterns, but it has turned into so much more. God has given us a better outcome than we could have ever imagined and for that I will forever be grateful.
We have been blessed to have helped people in Romania with our
charity, so many donations and quilts have been given and distributed, several trips have been taken to help those in need. We couldn't have done all of this without all of you. So many wonderful customers and friends we have gained along the way. There are so many wonderful memories I have and this anniversary has made me really reflect on those. There have been hard times, but the good times far outweigh the bad times. We work hard and have had to learn to juggle business, marriage, kids, religious obligations and extended family.
I look back at the travels I have made to teach quilting - I didn't even know this was an option when I first started. I look back and realize the first 3 "no's" on book proposals were a huge blessing because it led me to AQS publishing and they couldn't have been more incredible to work with on my
first and
second book. Then, we filmed 3
iquilt classes - it's all crazy to think about. I really just wanted to work from home, and I have had more opportunities to travel than any WAHM could ever want. I have learned so much and grown in so many ways.
Thank you so much for following us on our journey and for making the dreams we had come true. Life is a gift and we are so blessed. Thanks for listening. 10 years! Here's to 10 more! Who knows what the next 10 will bring, I can't imagine it being any better than it already is.
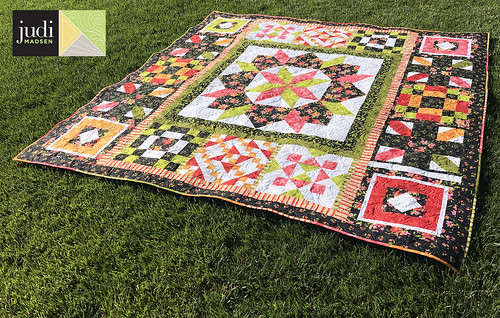
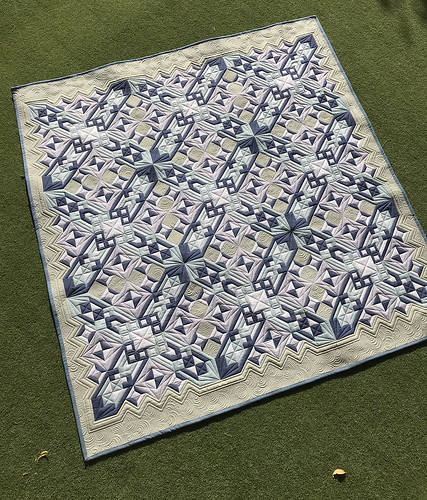
I have had this quilt top sitting in my studio unfinished for over 4 years now. My thoughts at the time were that I was going to custom quilt it, however, my life and schedule have not allowed the time needed to do so. I am a little sad about that, but I think having the quilt finished and being able to gift it finally, is a better option.
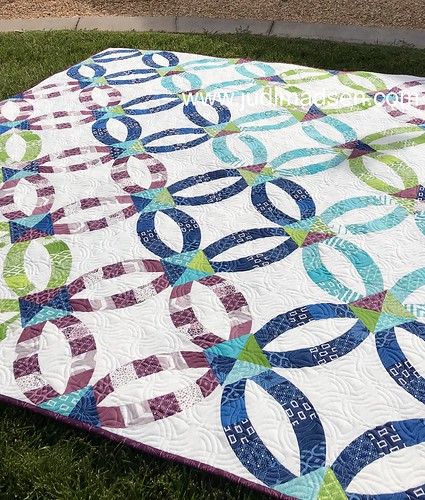
I quilted this with a computerized edge to edge pattern on my A1 longarm. I now have 2 quilting machines, one for my custom work and one for edge to edge quilting. You can read all about that, and get in line for quilting services
here.
I used Axel by Keryn Emmerson edge to edge quilting pattern. However, my designs available for quilting have been updated as of yesterday, please take a look at those
here.
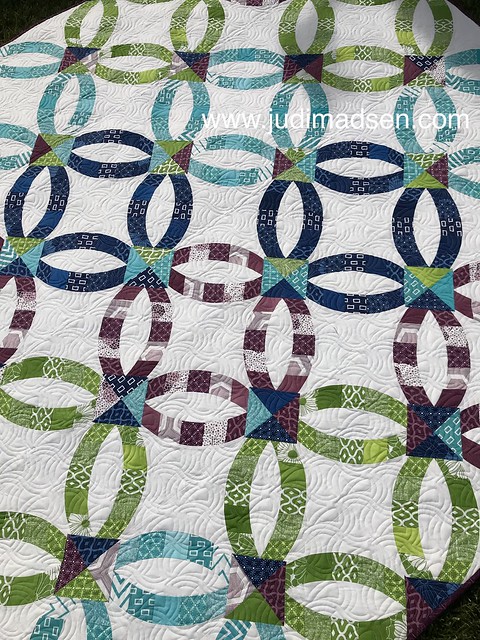
What I like most about this quilt is the color placement. I wanted to create my own take on the design by placing the colors in a very specific way. The end result is absolutely beautiful.
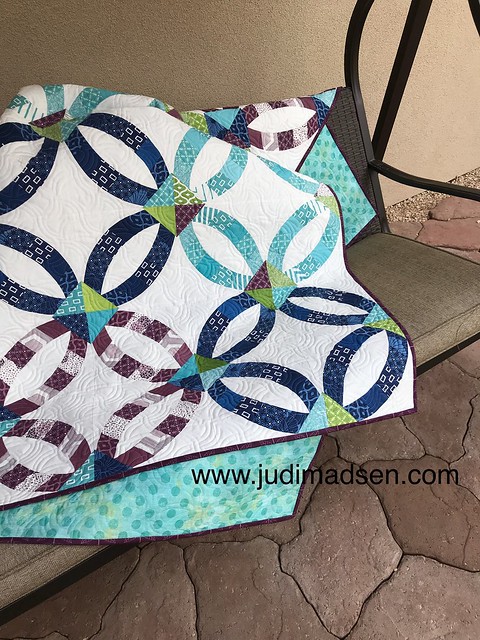
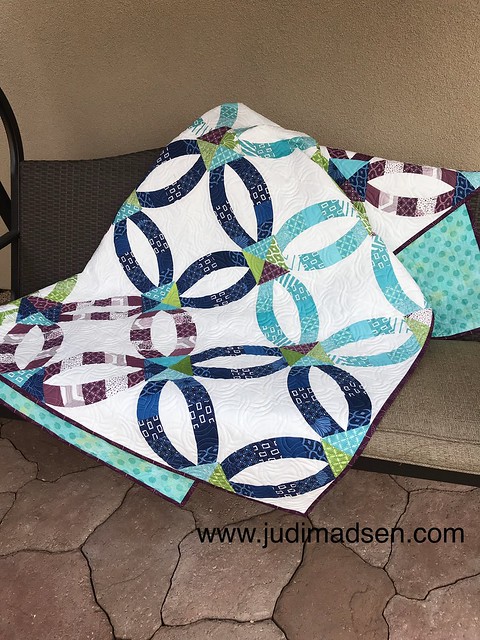
Clint and the kids gave me a beautiful spot in our yard for a garden swing. I like to read here and enjoy a little bit of serenity every now and again. I think the contrast of the quilt colors and the tans of the swing and patio make for a perfect backdrop to show the quilt. Even then, the colors in the picture do not give this quilt any justice at all.
So, sew beautiful!! Thanks for reading! I have a lot of good things coming up, including an all new design that I think you will love. I haven't even shared a sneak peek of it, so it's going to be a surprise for everyone. I can't wait to release the
pattern. Also, I have a custom quilt on the frames that has some pretty amazing never done before quilting. Be sure to follow me here and on social media to know when updates are available. Have a wonderful week!
This beautiful quilt was made by my mom, Gayla. She finished this beautiful "Block of the Month" pattern designed by Peggy McDonald for her local quilt shop just before she suffered a stroke. It has been one of those crazy life events that puts everything into perspective. Mom has given me the love of quilting and she really was the reason I have been able to do all I have done with quilting. She bought the longarm that I learned on, she encouraged me to write
patterns, she traveled with me to peddle my patterns years ago. She's been a huge influence in my life, not just in quilting, but in every aspect and the miracles that happened just over a month ago that have kept her here with us is something I am so grateful for.
Mom is doing better, but she is having to re-learn a lot of things, including sewing. So, when I realized that she couldn't sew as well - or at all - like she used to, I wanted to finish her quilt. I sewed the backing together, I quilted it using my computerized A1 longarm and in my new design,
Feather Swirl. It turned out beautiful!
This
design is so great and looks nice, especially if you love feathers and swirls together.
Binding would have been impossible for Mom, so I put together her scraps of fabric in 12 inch strips to make this fabulous binding. It really turned out beautiful!
The back is perfect and shows off the quilting beautifully!
This is me with Mom and Amy, my sister. I was up in Salt Lake last week and was able to take Mom to speech therapy. She has a long road ahead in recovery, but she is doing well. We are so grateful that she is with us. She is slowly getting back to stitching. I was able to get her longarm loaded and had her practice while I was there and she did wonderful. She was a little critical of herself, but I quickly reminded her that it will take time to get back to where she used to be. I am just so glad I was able to help her finish this beautiful quilt top.
This is my
Feather Swirl design - if you haven't looked around my digital designs, you can do so
here. Use the code "digital15" to receive a discount off your order. Code expires at the end of the month. Also, don't forget to grab your
patterns - $5 until the end of the month.
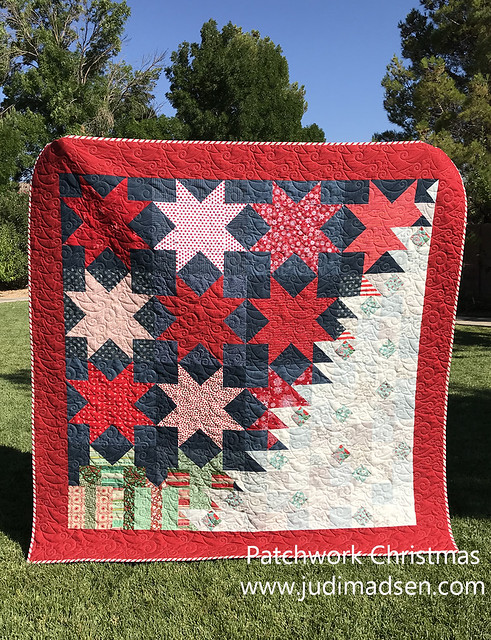
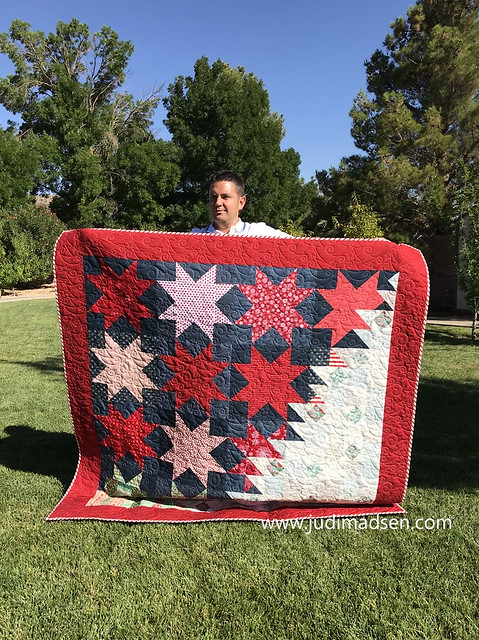
Okay, so I had the bug to make another
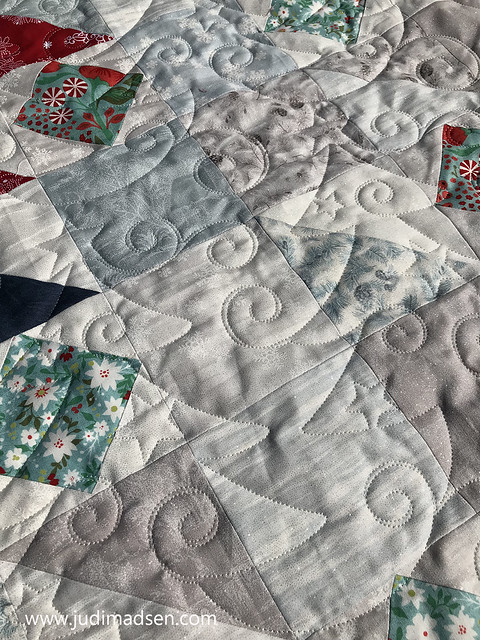
Patchwork Christmas and I wanted to make this new quilt in a totally different colorway. I wanted to have the Christmas Tree looked like it was flocked by using white, blue and grey fabrics. Of course I used a
Fat Quarter Bundle from
Green Fairy Quilts. The bundle used is called Forest Frost Glitter by Sentimental Studios, which unfortunately we don't have any more, but worked perfectly for this tree. This
pattern is so fabulous and right now I have it on sale for only $5! As well as all my
patterns for the month of July.
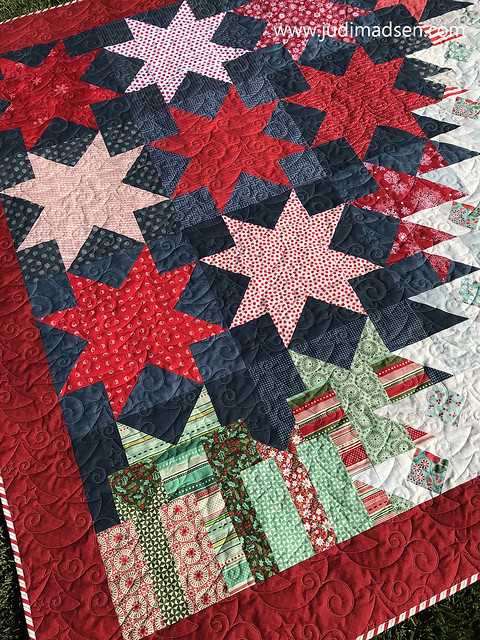
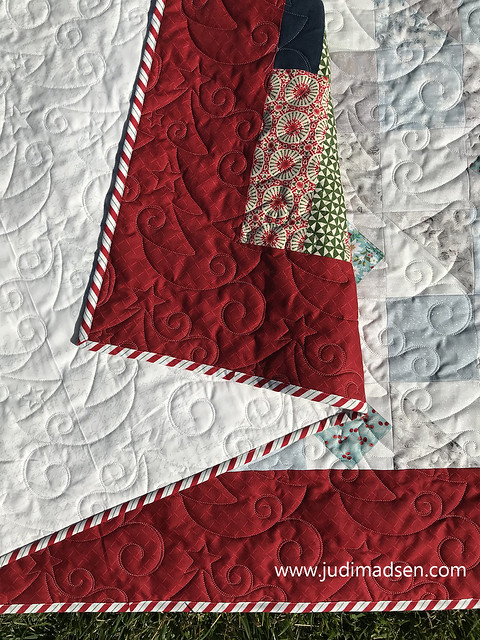
All of this quilt top was made using my stash of fat quarters, except of course the yardage for the binding and the red border. The fabric used for the presents came from
Basic Grey Christmas prints. I quilted it using a cute Christmas tree edge to edge panto by Patricia Ritter.
This picture does not show the glitter in the fabric as well as I would like, but in person it glistens and is so beautiful - like freshly fallen snow, something I hardly get to see because I live in the desert.
The candy cane binding was the perfect finish to this adorable quilt. I had so much fun making this quilt again, and I hope that you enjoy making yours too! Make sure to share your quilt on social media using the hashtags #patchworkchristmas and #patchworkchristmasquilt and #judimadsen
I am always grateful for my darling husband, Clint - he's in the background a lot, but it's fun when I can actually get a picture of him. He's a great holder for my quilts!
This is the
original quilt, which I love, but now I have 2 quilts to love, use and enjoy during the Christmas season. It will be here before you know it!
 (Disclosure for new followers: This is free motion ruler work and non-computerized quilting.)
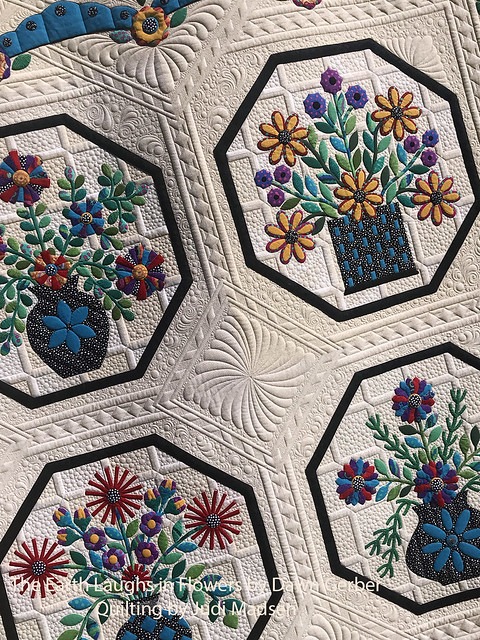
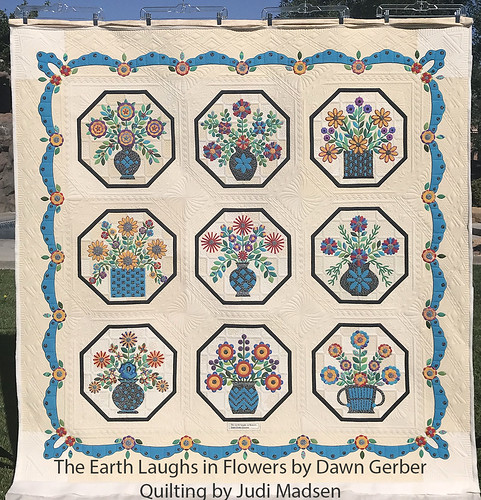
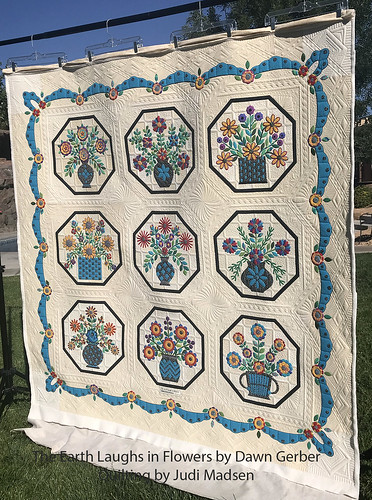
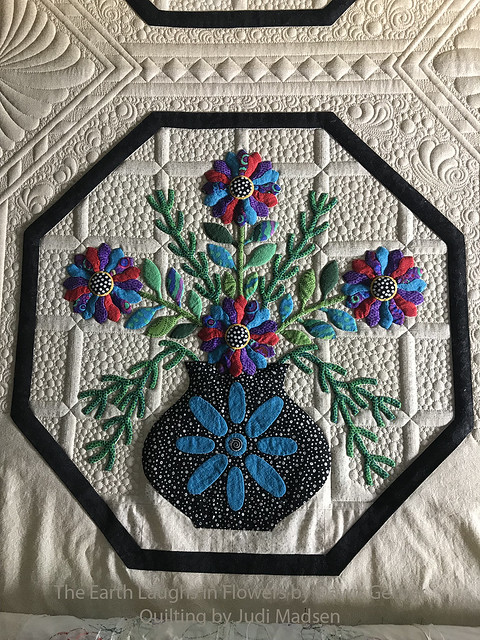
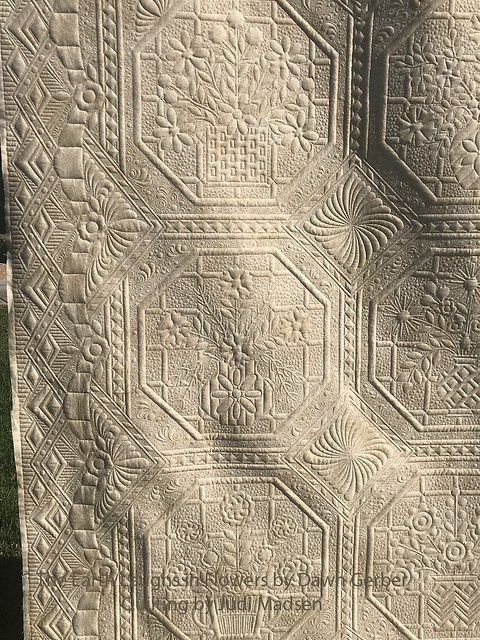
I'm so happy to finally be able to share this quilt with you. The is an original design by Dawn Gerber. She did an amazing job creating this fabulous quilt and her applique is perfect! It was a pleasure and a challenge to work on this quilt. Here is Dawn's own words on her original design:
"Yes, the quilt is an original
design. My Great Aunt Amy, a Pennsylvania Dutch farmers’s wife, had the
most extraordinary combination vegetable/ flower garden. A beautifully
arranged vase of flowers always graced her kitchen table from spring
through autumn. Unfortunately, I’m lacking the artistic ability to
translate my memories into realistic fabric flowers. Therefore, I tried
to make them the bright, happy splash of color I remember. Great Aunt
Amy, like her flowers, seemed to always be laughing. Hence, the Ralph
Waldo Emerson quote.
She
would place her surplus vegetables by the roadside to sell. She didn’t
have the time or inclination to just sit, so she would place some money
with her vegetables if change was needed. On a few occasions, the
money and vegetables would disappear. Great Aunt Amy’s response: “If
they’re hungry, they are welcome to it. If they are thieves, that’s
their problem, not mine. I wish them well.” A great life philosophy.
I
surrounded each vase with an octagon in honor of the stop sign. When
leaving my gym in the morning, there is a two stop sign intersection
that many see / feel as a four way stop. After yet another exercise in
defensive driving, I started to plan how to join my blocks. The
question, “Do you see an octagonal stop sign here?”was still looping
through my brain. By the time I was finished with my first octagon, I
was over the stop sign thing. Now they are just a special frame for
Great Aunt Amy’s flowers."
Thanks Dawn!
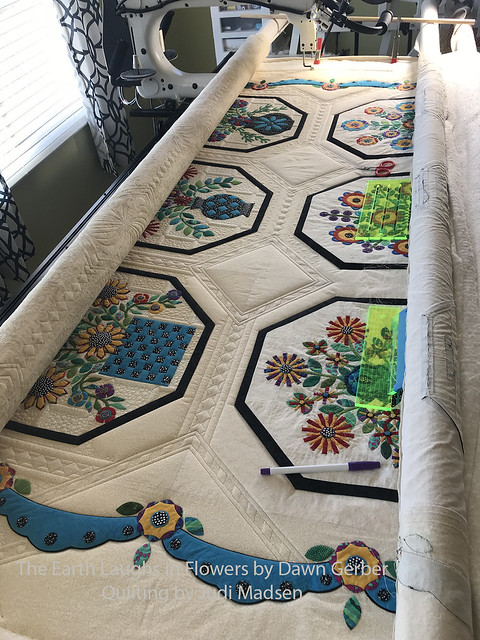
Now I can talk about my part of this beautiful quilt. This picture shows the quilting detail a little better. I loved that I basically had a blank canvas to play on. The quilting inspiration came as I was up close and personal with the quilt while it was on the frames. I did not plan anything ahead of the quilt, but I did have a picture of the quilt so I could reference the layout while it was on the frames.
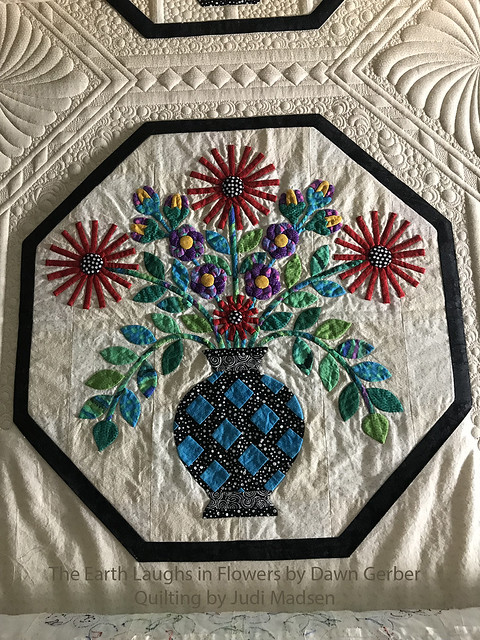
I wanted to show you the "before" on the flower blocks. I used 2 layers of batting to help make the texture pop. In this case I used 100% cotton and 80/20 cotton/poly blend.
As you can see I did a lot of pebbling. This created the perfect textured background for the flower blocks. The background on the flower blocks was divided by 2 different fabrics and the seams were pressed open. The way I quilted this made it so I didn't have to stitch in the ditch, which is difficult when seams are pressed open. Going in between the appliqued flowers was time consuming, but worth the effort.
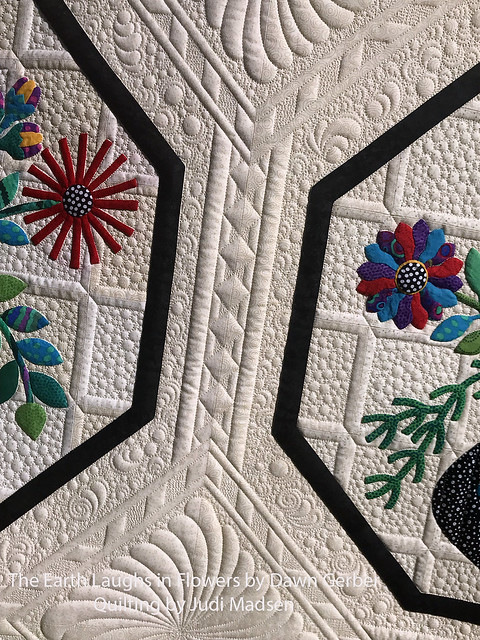
Each one of the blocks created a line that I could follow and divide to make a bit of a quilting sash detail. The on-point squares created the perfect setting for feathers motifs and worked well with the other feather motifs in the quilt top. I used my
QuickMark ruler and my
A1 ruler for my marking and straight stitching. I used my favorite disappearing
purple marker for all the marked lines.
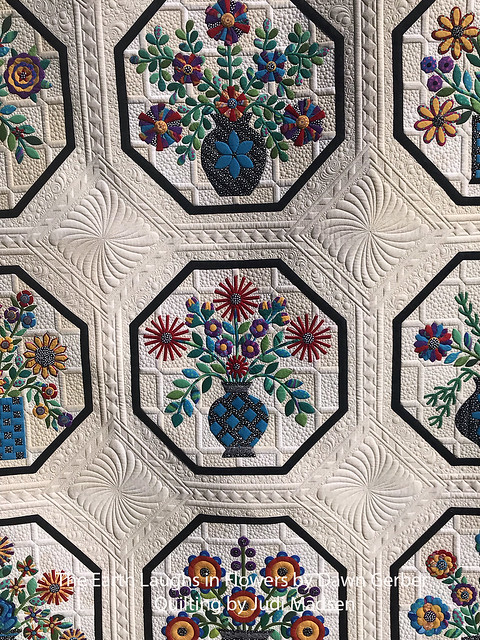
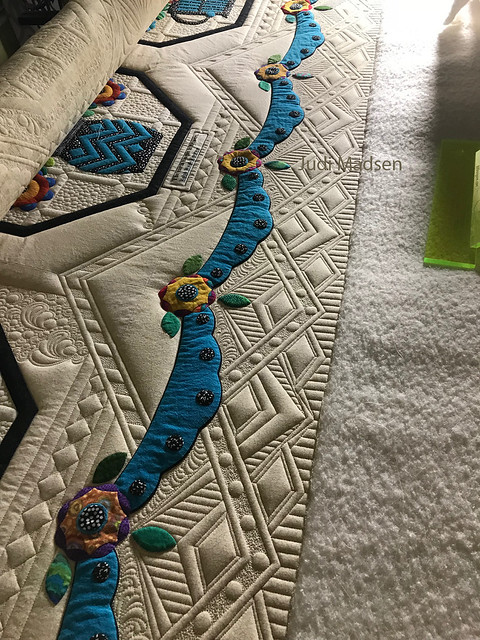
The detail is just so fun and amazing. I had so much fun connecting each one of the quilting elements together with each advance of the quilt.
I used
Glide 60 wt thread for the top and bottom threads. I really like the 60 wt thread now, it's my new favorite weight of thread because it's the perfect thickness for detail, not too thin and not too thick. It hides well in the fabric too.
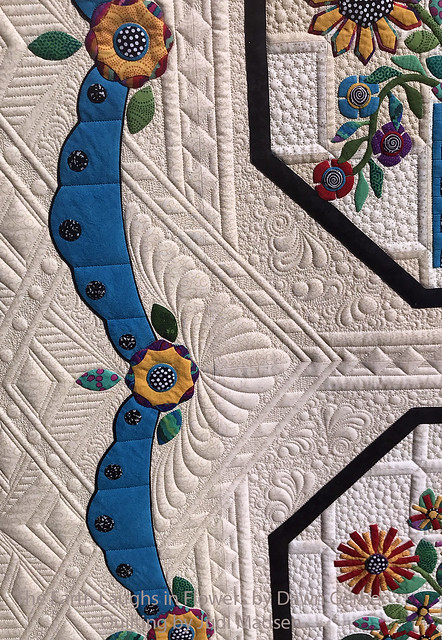
The frames and feather motif around the scalloped flower edge is the perfect touch.
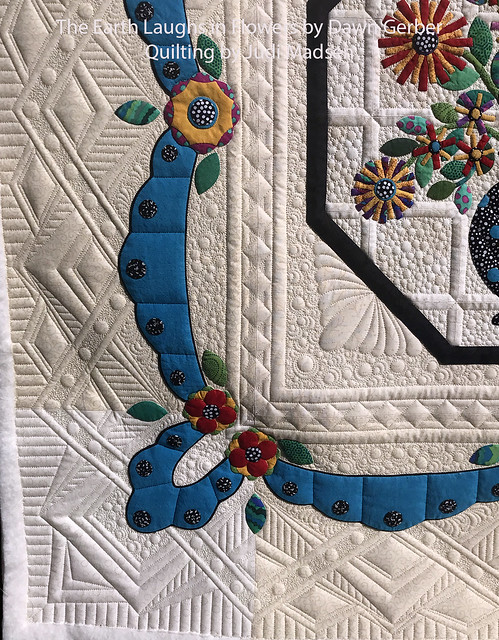
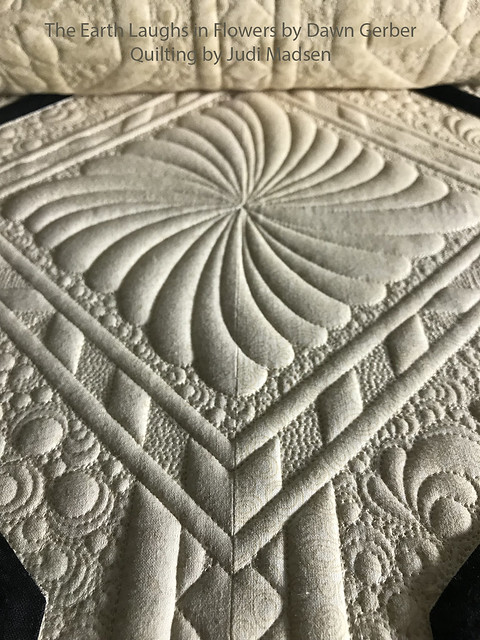
The corners as well as the outside border was so much fun. It definitely took the most time, but was totally worth it.
This shows the border design a little better as I was finishing off the quilt.

My goal for this quilt was to play in the background while enhancing the applique work. Everything about this quilt works together and I am so proud to have been a part of it.
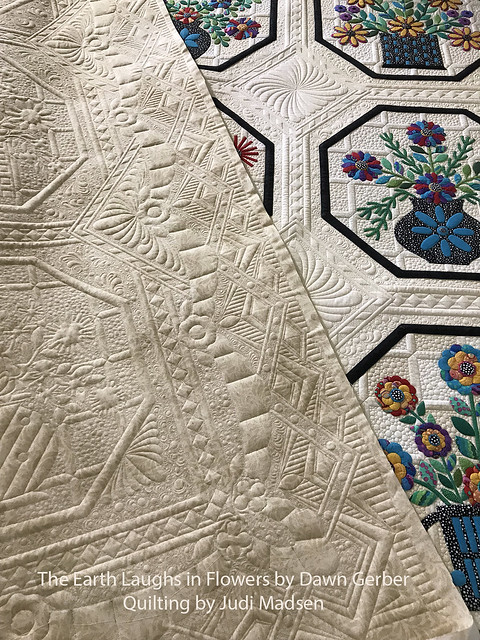
The back!!

I always love the texture created on the back of the quilt.
Well, there you go! I hope you enjoyed looking at the pictures and enjoying my journey of this beautiful quilt. Every quilt that I quilt is another link on my creative journey, I give my absolute best to each one and I hope that the next quilt will be even better!
For my friends in Canada, I will be heading back to Sparrow Quilt Co. this October. All the info is at the link
here.


%20for%20the%20entire%20project.%26nbsp;%3C/div%3E%3Cbr%20/%3E%3Cdiv%3E%3Ca%20href%3D%22https://www.judimadsen.com/collections/paper-patterns/products/patchwork-christmas-wall-hanging-mini-quilt-and-pillows-pattern%22%20imageanchor%3D%221%22%3E%3Cimg%20border%3D%220%22%20data-original-height%3D%223354%22%20data-original-width%3D%223021%22%20height%3D%22400%22%20src%3D%22https://blogger.googleusercontent.com/img/b/R29vZ2xl/AVvXsEjAHz4xINgNrXjyzFch8vAx0SZudn6mjg2Ew_DWXouTBQRnUPWhpJYBYoIOGWvJHRUnvQeWF2f8T_OD5jodLgyaWSyGrpFuBcBDmSGYaGsRrHoKwWBThtYO1L1RX_FJ5ggy0I4tdzwagsnjaMu69Kkd5FMvglpKJJsAzOv3BkrK9A_879hcYWJVz9rXMy6Q/w360-h400/53574612345_0f6e719561_o.jpg%22%20width%3D%22360%22%20/%3E%3C/a%3E%3C/div%3E%3Cdiv%3E%3Cbr%20/%3E%3C/div%3E%3Cdiv%3EIt%20is%20fun%20to%20see%20the%20%3Ca%20href%3D%22https://www.judimadsen.com/collections/paper-patterns/products/patchwork-christmas-wall-hanging-mini-quilt-and-pillows-pattern%22%3Etwo%20sizes%3C/a%3E%20together.%20Have%20so%20much%20fun%20putting%20these%20darling%20quilts%20together!%26nbsp;%3C/div%3E)


%20%3Cbr%20/%3E%0AWeek%204%20and%20final%20assembly%20of%20your%20own%20%3Ca%20href%3D%22https://www.judimadsen.com/collections/paper-patterns/products/mama-gypsy-pattern%22%3EMama%20Gypsy%20%3C/a%3Eshould%20be%20happening%20-%20if%20not,%20no%20worries!%26nbsp;%20Keep%20going%20at%20your%20own%20pace.%20It%20has%20been%20fun%20to%20see%20the%20progress%20on%20so%20many%20darling%20quilt%20tops.%20%3Cbr%20/%3E%0A%26nbsp;%3Cbr%20/%3E%0A%3Cbr%20/%3E%3C/div%3E%0A%3Cdiv%3E%0A%3Ca%20data-flickr-embed%3D%22true%22%20href%3D%22https://www.flickr.com/photos/gfquilts/48645403171/in/dateposted-public/%22%20nbsp%3D%22%22%20title%3D%22MamaGypsyBlocks21%22%3E%3Cimg%20alt%3D%22MamaGypsyBlocks21%22%20height%3D%22496%22%20src%3D%22https://live.staticflickr.com/65535/48645403171_1083d2d708.jpg%22%20width%3D%22500%22%20/%3E%3C/a%3E%3Cbr%20/%3E%0A(Block%2014)%3Cbr%20/%3E%0A%3Cbr%20/%3E%3C/div%3E%0A%3Cdiv%3E%0A%3Ca%20data-flickr-embed%3D%22true%22%20href%3D%22https://www.flickr.com/photos/gfquilts/48645539757/in/dateposted-public/%22%20nbsp%3D%22%22%20title%3D%22MamaGypsyBlocks22%22%3E%3Cimg%20alt%3D%22MamaGypsyBlocks22%22%20height%3D%22500%22%20src%3D%22https://live.staticflickr.com/65535/48645539757_e0a9c3f923.jpg%22%20width%3D%22497%22%20/%3E%3C/a%3E%3Cbr%20/%3E%0A(Block%2015)%3Cbr%20/%3E%0A%3Cbr%20/%3E%3C/div%3E%0A%3Cdiv%3E%0A%3Ca%20data-flickr-embed%3D%22true%22%20href%3D%22https://www.flickr.com/photos/gfquilts/48645045643/in/dateposted-public/%22%20nbsp%3D%22%22%20title%3D%22MamaGypsyBlocks23%22%3E%3Cimg%20alt%3D%22MamaGypsyBlocks23%22%20height%3D%22496%22%20src%3D%22https://live.staticflickr.com/65535/48645045643_ef2b7a4764.jpg%22%20width%3D%22500%22%20/%3E%3C/a%3E%3Cbr%20/%3E%0A(Block%2016)%3Cbr%20/%3E%0A%3Cbr%20/%3E%3C/div%3E%0A%3Cdiv%3E%0A%3Ca%20data-flickr-embed%3D%22true%22%20href%3D%22https://www.flickr.com/photos/gfquilts/48645539677/in/dateposted-public/%22%20nbsp%3D%22%22%20title%3D%22MamaGypsyBlocks24%22%3E%3Cimg%20alt%3D%22MamaGypsyBlocks24%22%20height%3D%22640%22%20src%3D%22https://live.staticflickr.com/65535/48645539677_bf0520b19c_z.jpg%22%20width%3D%22480%22%20/%3E%3C/a%3E%3Cbr%20/%3E%0AWhen%20you%20are%20ready%20to%20piece%20the%20top%20-%20I%20like%20to%20piece%202%20rows%20together,%20then%20piece%20the%20two%20halves%20together.%26nbsp;%20It%20is%20easier%20to%20maneuver%20that%20way.%3Cbr%20/%3E%0A%3Cbr%20/%3E%3C/div%3E%0A%3Cdiv%3E%0A%3Ca%20data-flickr-embed%3D%22true%22%20href%3D%22https://www.flickr.com/photos/gfquilts/48645539642/in/dateposted-public/%22%20nbsp%3D%22%22%20title%3D%22MamaGypsyBlocks25%22%3E%3Cimg%20alt%3D%22MamaGypsyBlocks25%22%20height%3D%22500%22%20src%3D%22https://live.staticflickr.com/65535/48645539642_371b6936fc.jpg%22%20width%3D%22398%22%20/%3E%3C/a%3E%3Cbr%20/%3E%0AMy%20border%20for%20this%20%3Ca%20href%3D%22https://www.judimadsen.com/collections/paper-patterns/products/mama-gypsy-pattern%22%3Equilt%20%3C/a%3Ehad%20to%20be%20pieced%20individually%20and%20not%20strip%20pieced.%26nbsp;%20You%20will%20find%20in%20my%20directions%20in%20my%20pattern%20that%20it%20doesn't%20explain%20strip%20piecing%20options,%20but%20you%20can%20certainly%20do%20that%20if%20you%20would%20like%20to%20make%20it%20easier.%20There%20are%20sixteen%20color%20choices%20I%20used%20-%20they%20came%20from%20the%20accent%20colors%20from%20the%20blocks.%26nbsp;%20I%20wanted%20to%20have%20the%20corners%20of%20the%20quilt%20go%20from%20light%20to%20dark,%20a%20bit%20of%20a%20rainbow%20affect.%20%3Cbr%20/%3E%0A%3Cbr%20/%3E%3C/div%3E%0A%3Cdiv%3E%0A%3Ca%20data-flickr-embed%3D%22true%22%20href%3D%22https://www.flickr.com/photos/gfquilts/48645539592/in/dateposted-public/%22%20nbsp%3D%22%22%20title%3D%22MamaGypsyBlocks26%22%3E%3Cimg%20alt%3D%22MamaGypsyBlocks26%22%20height%3D%22640%22%20src%3D%22https://live.staticflickr.com/65535/48645539592_5d6c01cbf5_z.jpg%22%20width%3D%22480%22%20/%3E%3C/a%3E%3Cbr%20/%3E%0AYou%20can%20see%20how%20these%20border%20blocks%20come%20together%20so%20nicely.%26nbsp;%20It%20gives%20the%20final%20finishing%20touches%20for%20%3Ca%20href%3D%22https://www.judimadsen.com/collections/paper-patterns/products/mama-gypsy-pattern%22%3EMama%20Gypsy%3C/a%3E%20that%20just%20look%20so%20amazing.%3Cbr%20/%3E%0A%3Cbr%20/%3E%0AStay%20tuned%20for%20next%20weeks%20post%20about%20the%20quilting.%3Cbr%20/%3E%0A%3Cbr%20/%3E%0A%3Cbr%20/%3E%3C/div%3E%0A%3Cbr%20/%3E)
%3Cbr%20/%3E%0A%3Cbr%20/%3E%3C/div%3E%0A%3Cdiv%3E%0A%3Ca%20data-flickr-embed%3D%22true%22%20href%3D%22https://www.flickr.com/photos/gfquilts/48600739891/in/dateposted-public/%22%20nbsp%3D%22%22%20title%3D%22MamaGypsyBlocks15%22%3E%3Cimg%20alt%3D%22MamaGypsyBlocks15%22%20height%3D%22494%22%20src%3D%22https://live.staticflickr.com/65535/48600739891_baa2f4b3c4.jpg%22%20width%3D%22500%22%20/%3E%3C/a%3E%3Cbr%20/%3E%0A(Block%2010)%3Cbr%20/%3E%0A%3C/div%3E%0A%3Cdiv%3E%0A%3Ca%20data-flickr-embed%3D%22true%22%20href%3D%22https://www.flickr.com/photos/gfquilts/48600875552/in/dateposted-public/%22%20nbsp%3D%22%22%20title%3D%22MamaGypsyBlocks16%22%3E%3Cimg%20alt%3D%22MamaGypsyBlocks16%22%20height%3D%22500%22%20src%3D%22https://live.staticflickr.com/65535/48600875552_3dfa7dcbf2.jpg%22%20width%3D%22496%22%20/%3E%3C/a%3E%3Cbr%20/%3E%0A(Block%2011)%3Cbr%20/%3E%0A%3C/div%3E%0A%3Cdiv%3E%0A%3Ca%20data-flickr-embed%3D%22true%22%20href%3D%22https://www.flickr.com/photos/gfquilts/48600739796/in/dateposted-public/%22%20nbsp%3D%22%22%20title%3D%22MamaGypsyBlocks17%22%3E%3Cimg%20alt%3D%22MamaGypsyBlocks17%22%20height%3D%22500%22%20src%3D%22https://live.staticflickr.com/65535/48600739796_14c3007b2d.jpg%22%20width%3D%22500%22%20/%3E%3C/a%3E%3Cbr%20/%3E%0A(Block%2012)%3Cbr%20/%3E%0A%3Cbr%20/%3E%0AThe%20blocks%20come%20together%20quickly%20-%20some%20of%20you%20may%20be%20ahead%20of%20schedule%20or%20some%20of%20you%20have%20just%20started.%26nbsp;%20Either%20way%20I%20hope%20you%20are%20enjoying%20the%20process%20and%20having%20fun%20with%20it.%20Next%20week%20I%20will%20share%20the%20last%204%20blocks,%20but%20also%20talk%20about%20my%20design%20decision%20on%20the%20border%20blocks.%26nbsp;%20I%20had%20a%20lot%20of%20fun%20with%20the%20border%20on%20my%20%3Ca%20href%3D%22https://www.judimadsen.com/collections/paper-patterns/products/mama-gypsy-pattern%22%3EMama%20Gypsy.%3C/a%3E%20So,%20stay%20tuned,%20enjoy!%26nbsp;%20I%20will%20have%20a%20winner%20for%20a%20prize%20from%20Moda%20sometime%20next%20week.%20%3Cbr%20/%3E%0A%3Cbr%20/%3E%0A%3Cbr%20/%3E%0A%3Cbr%20/%3E%3C/div%3E%0A%3Cbr%20/%3E)
%20%3Cbr%20/%3E%0AI%20hope%20you%20are%20having%20a%20fun%20time%20putting%20%3Ca%20href%3D%22https://www.judimadsen.com/collections/paper-patterns/products/mama-gypsy-pattern%22%3EMama%20Gypsy%3C/a%3E%20together!%26nbsp;%20I%20am%20happy%20to%20announce%20that%20Dory%20Miller%20has%20won%20the%20$50%20gift%20certificate%20to%20%3Ca%20href%3D%22https://greenfairyquilts.com/%22%3EGreen%20Fairy%20Quilt%3C/a%3Es%20for%20this%20%3Ca%20href%3D%22https://www.judimadsen.com/blogs/news/tagged/quilt-along%22%3Equilt%20along%3C/a%3E.%26nbsp;%20Thank%20you%20for%20joining%20my%20%3Ca%20href%3D%22https://www.judimadsen.com/blogs/news/tagged/quilt-along%22%3Equilt%20along%3C/a%3E!%3Cbr%20/%3E%0A%3Cbr%20/%3E%0ASo,%20we%20are%20working%20on%20row%202%20for%20this%20week.%26nbsp;%20Thank%20you%20for%20sharing%20your%20progress%20on%20%3Ca%20href%3D%22https://www.facebook.com/groups/1439825289493815/%22%3EFacebook%20%3C/a%3Eand%20%3Ca%20href%3D%22https://www.instagram.com/judi.madsen/%22%3EInstagram%3C/a%3E%20-%20your%20fabric%20choices%20and%20blocks%20are%20amazing!%26nbsp;%20Keep%20them%20coming!%20%3Cbr%20/%3E%0A%3Cbr%20/%3E%3C/div%3E%0A%3Cdiv%3E%0A%3Ca%20data-flickr-embed%3D%22true%22%20href%3D%22https://www.flickr.com/photos/gfquilts/48548307876/in/dateposted-public/%22%20nbsp%3D%22%22%20title%3D%22MamaGypsyBlocks10%22%3E%3Cimg%20alt%3D%22MamaGypsyBlocks10%22%20height%3D%22500%22%20src%3D%22https://live.staticflickr.com/65535/48548307876_a79bfe4353.jpg%22%20width%3D%22500%22%20/%3E%3C/a%3E%3Cbr%20/%3E%0A(Block%206)%20%3Cbr%20/%3E%0A%3Cbr%20/%3E%3C/div%3E%0A%3Cdiv%3E%0A%3Ca%20data-flickr-embed%3D%22true%22%20href%3D%22https://www.flickr.com/photos/gfquilts/48548451212/in/dateposted-public/%22%20nbsp%3D%22%22%20title%3D%22MamaGypsyBlocks11%22%3E%3Cimg%20alt%3D%22MamaGypsyBlocks11%22%20height%3D%22493%22%20src%3D%22https://live.staticflickr.com/65535/48548451212_ac834a1a9c.jpg%22%20width%3D%22500%22%20/%3E%3C/a%3E%3Cbr%20/%3E%0A(Block%207)%3Cbr%20/%3E%0A%3Cbr%20/%3E%3C/div%3E%0A%3Cdiv%3E%0A%3Ca%20data-flickr-embed%3D%22true%22%20href%3D%22https://www.flickr.com/photos/gfquilts/48548451172/in/dateposted-public/%22%20nbsp%3D%22%22%20title%3D%22MamaGypsyBlocks12%22%3E%3Cimg%20alt%3D%22MamaGypsyBlocks12%22%20height%3D%22500%22%20src%3D%22https://live.staticflickr.com/65535/48548451172_3fb3539004.jpg%22%20width%3D%22494%22%20/%3E%3C/a%3E%3Cbr%20/%3E%0A(Block%208)%3Cbr%20/%3E%0A%3Cbr%20/%3E%3C/div%3E%0A%3Cdiv%3E%0A%3Ca%20data-flickr-embed%3D%22true%22%20href%3D%22https://www.flickr.com/photos/gfquilts/48548307761/in/dateposted-public/%22%20nbsp%3D%22%22%20title%3D%22MamaGypsyBlocks13%22%3E%3Cimg%20alt%3D%22MamaGypsyBlocks13%22%20height%3D%221024%22%20src%3D%22https://live.staticflickr.com/65535/48548307761_c3278c6b66_b.jpg%22%20width%3D%22500%22%20/%3E%3C/a%3E%3Cbr%20/%3E%0A(Row%202)%3Cbr%20/%3E%0A%3Cbr%20/%3E%0ANow%20that%20you%20have,%20or%20will%20have%20two%20rows%20completed%20-%20sew%20the%20two%20rows%20together.%26nbsp;%20We%20are%20half-way%20done!%20Hooray!!%3Cbr%20/%3E%0A%3Cbr%20/%3E%0AIt's%20not%20too%20late%20to%20start%20making%20your%20own%20%3Ca%20href%3D%22https://www.judimadsen.com/collections/paper-patterns%22%3EMama%20Gyps%3C/a%3Ey%20-%20get%20your%20paper%20pattern%20%3Ca%20href%3D%22https://www.judimadsen.com/collections/paper-patterns%22%3Ehere%3C/a%3E%20or%20your%20PDF%20pattern%20%3Ca%20href%3D%22https://www.judimadsen.com/collections/pdf-patterns/products/mama-gypsy-pattern-pdf%22%3Ehere%3C/a%3E.%26nbsp;%20Looking%20forward%20to%20seeing%20your%20quilts!%3Cbr%20/%3E%0A%3Cbr%20/%3E%3C/div%3E)

%20or%20if%20you%20want%20to%20just%20get%20started,%20purchase%20the%20%3Ca%20href%3D%22https://www.judimadsen.com/collections/pdf-patterns/products/mama-gypsy-pattern-pdf%22%3EPDF%20version%20here%3C/a%3E.%3C/div%3E%0A%3Cdiv%3E%0A%3Cbr%20/%3E%3C/div%3E%0A%3Cdiv%3E%0AFor%20those%20of%20you%20on%20Facebook%20-%20I%20have%20created%20a%20%3Ca%20href%3D%22https://www.facebook.com/groups/1439825289493815/%22%3Egroup%3C/a%3E%20to%20share%20what%20we%20are%20doing%20throughout%20each%20week.%20For%20those%20of%20you%20on%20Instagram%20-%20please%20use%20the%20%3Cb%3E%23mamagypsyquiltqal%3C/b%3E%20to%20share%20your%20quilt%20process.%3Cbr%20/%3E%0A%3Cbr%20/%3E%0ARead%20all%20the%20way%20down%20to%20see%20my%20sponsors%20;-)%20%3C/div%3E%0A%3Cdiv%3E%0A%3Cbr%20/%3E%3C/div%3E%0A%3Cdiv%3E%0A%3Cbr%20/%3E%3C/div%3E%0A%3Cdiv%3E%0A%3Ca%20data-flickr-embed%3D%22true%22%20href%3D%22https://www.flickr.com/photos/gfquilts/48426689771/in/dateposted-public/%22%20nbsp%3D%22%22%20title%3D%22MamaGypsy2%22%3E%3Cimg%20alt%3D%22MamaGypsy2%22%20height%3D%22640%22%20src%3D%22https://live.staticflickr.com/65535/48426689771_686ff99751_z.jpg%22%20width%3D%22480%22%20/%3E%3C/a%3E%26nbsp;%3C/div%3E%0A%3Cdiv%3E%0AOkay%20-%20talking%20fabric%20choices.%26nbsp;%20This%20quilt%20was%20a%20bit%20of%20a%20challenge%20for%20me%20because%20I%20took%20a%20different%20approach%20to%20the%20overall%20look%20of%20the%20quilt.%26nbsp;%20Most%20of%20the%20time%20I%20go%20safe%20and%20choose%20a%20few%20different%20colors%20that%20blend%20well%20and%20typically%20go%20with%20yardage%20instead%20of%20fat%20quarters.%26nbsp;%26nbsp;%20However,%20this%20quilt%20is%20made%20entirely%20of%20fat%20quarters,%20except%20for%20the%20background%20fabric.%26nbsp;%20In%20that%20case,%20I%20used%20%3Ca%20href%3D%22https://greenfairyquilts.com/item_8808/Moda-Bella-Solids-Peacoat-9900-44-Yardage.htm%22%3EPeacoat%3C/a%3E%20-%20a%20fabulous%20Moda%20Bella%20Solids%20color%20-%20not%20quite%20black,%20not%20quite%20navy.%3Cbr%20/%3E%0AThe%20idea%20for%20the%20quilt%20was%20to%20showcase%20the%20white%20(floral)%20printed%20fabrics.%26nbsp;%20When%20I%20am%20putting%20a%20quilt%20together,%20these%20large%20prints%20are%20not%20ever%20chosen%20for%20a%20quilt%20of%20mine%20because%20I%20typically%20focus%20on%20the%20quilting%20-%20large%20prints%20don't%20showcase%20well%20for%20that.%26nbsp;%20The%20idea%20to%20change%20the%20focal%20fabrics%20to%20the%20large%20floral%20prints%20created%20an%20opportunity%20for%20me%20to%20use%20the%20prints%20I%20love,%20but%20don't%20typically%20use%20in%20my%20projects.%3Cbr%20/%3E%0AI%20started%20with%20the%20center%20of%20the%20quilt%20picking%204%20fat%20quarters%20that%20blended%20well%20together,%20then%20added%204%20complimentary%20colors%20for%20the%20on-point%20squares%20accents%20and%20one%20print%20for%20the%20center.%20Picking%20the%20accent%20colors%20is%20as%20simple%20as%20pulling%20colors%20from%20the%20prints.%3Cbr%20/%3E%0A%3Cbr%20/%3E%0A%3Ca%20data-flickr-embed%3D%22true%22%20href%3D%22https://www.flickr.com/photos/gfquilts/48435632942/in/dateposted-public/%22%20nbsp%3D%22%22%20title%3D%22MamaGypsy8%22%3E%3Cimg%20alt%3D%22MamaGypsy8%22%20height%3D%22640%22%20src%3D%22https://live.staticflickr.com/65535/48435632942_00c0193699_z.jpg%22%20width%3D%22480%22%20/%3E%3C/a%3E%3Cbr%20/%3E%0AI%20quilted%20the%20large%20white%20florals%20in%20the%20center%20with%201%20inch%20squares.%26nbsp;%20This%20gives%20the%20quilt%20dimension%20without%20taking%20away%20from%20the%20printed%20design.%20%3Cbr%20/%3E%0A%3Cbr%20/%3E%0A%3Cbr%20/%3E%3C/div%3E%0A%3Cdiv%3E%0A%3Ca%20data-flickr-embed%3D%22true%22%20href%3D%22https://www.flickr.com/photos/gfquilts/48426829207/in/dateposted-public/%22%20nbsp%3D%22%22%20title%3D%22MamaGypsy1%22%3E%3Cimg%20alt%3D%22MamaGypsy1%22%20height%3D%22640%22%20src%3D%22https://live.staticflickr.com/65535/48426829207_bdcab177af_z.jpg%22%20width%3D%22480%22%20/%3E%3C/a%3E%26nbsp;%3C/div%3E%0A%3Cdiv%3E%0AFor%20the%20outside%20large%20areas%20of%20the%20quilt,%20choose%2012%20fat%20quarters%20that%20blend%20well%20together.%20I%20went%20through%20all%20of%20my%20stash%20of%20fat%20quarters%20and%20auditioned%20several%20white%20background%20large%20prints%20and%20these%20were%20the%20final%20choices.%20You%20can%20see%20that%20there%20are%20several%20Moda%20designers%20represented%20in%20these%20choices.%3Cbr%20/%3E%0A%3Cbr%20/%3E%3C/div%3E%0A%3Cdiv%3E%0A%3Ca%20data-flickr-embed%3D%22true%22%20href%3D%22https://www.flickr.com/photos/gfquilts/48426689716/in/dateposted-public/%22%20nbsp%3D%22%22%20title%3D%22MamaGypsy3%22%3E%3Cimg%20alt%3D%22MamaGypsy3%22%20height%3D%22640%22%20src%3D%22https://live.staticflickr.com/65535/48426689716_b6d65112be_z.jpg%22%20width%3D%22480%22%20/%3E%3C/a%3E%26nbsp;%3C/div%3E%0A%3Cdiv%3E%0AOnce%20you%20have%20the%20printed%20fabric%20chosen,%20the%20accent%20colors%20need%20to%20be%20chosen.%26nbsp;%20You%20will%20need%2016%20different%20accent%20colors,%20I%20had%20fun%20choosing%20colors%20that%20I%20like,%20but%20also%20going%20dark%20to%20light.%26nbsp;%20I%20planned%20on%20using%20these%20accent%20colors%20for%20the%20border%20trim,%20but%20more%20on%20that%20in%20the%20coming%20weeks.%26nbsp;%3Cbr%20/%3E%0A%3Cbr%20/%3E%0AOnce%20you%20have%20all%20your%20fabric%20chosen,%20it%20is%20time%20to%20prepare%20your%20fabric%20for%20cutting.%20I%20like%20to%20spray%20my%20fat%20quarters%20with%20spray%20starch%20and%20let%20the%20fabric%20air%3Cbr%20/%3E%0A%26nbsp;dry.%26nbsp;%20After%20that%20I%20spray%20the%20fabric%20again%20and%20iron%20it.%26nbsp;%20Now,%20you%20are%20ready%20to%20cut%20your%20fabric.%20%3Cbr%20/%3E%0A%3Cbr%20/%3E%0ASo,%20this%20week%20-%20gather%20and%20prep%20your%20fabric,%20then%20start%20cutting.%20If%20you%20are%20doing%20a%20scrappy%20quilt%20like%20this%20one,%20then%20you%20will%20want%20to%20use%20the%20drawing%20page%20in%20the%20pattern%20to%20make%20a%20reference%20for%20fabric%20placement.%26nbsp;%20OR%20-%20you%20can%20start%20with%20the%20center%20blocks%20and%20the%20color%20placement%20and%20build%20on%20from%20there.%20%3Cbr%20/%3E%0A%3Cbr%20/%3E%0ANext%20week%20I%20will%20share%20with%20you%20the%20first%20row%20and%204%20blocks%20that%20I%20put%20together.%26nbsp;%20Please%20be%20sure%20to%20share%20your%20fabric%20choices%20with%20us%20on%20social%20media.%20%3Cbr%20/%3E%0A%3Cbr%20/%3E%0AAlso,%20next%20week%20I%20will%20announce%20the%20winner%20of%20the%20$50%20gift%20card%20to%20%3Ca%20href%3D%22https://greenfairyquilts.com/%22%3EGreen%20Fairy%20Quilts%3C/a%3E%20for%20one%20lucky%20participant.%26nbsp;%20Please%20stayed%20tuned%20for%20another%20winner%20in%20the%20weeks%20to%20come%20for%20a%20prize%20from%20Moda%20Fabrics%20-%20I%20am%20so%20grateful%20that%20they%20have%20sponsored%20my%20fun%20QAL.%20%3C/div%3E%0A%3Cbr%20/%3E)

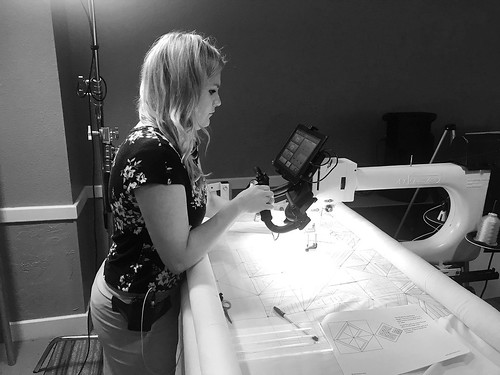
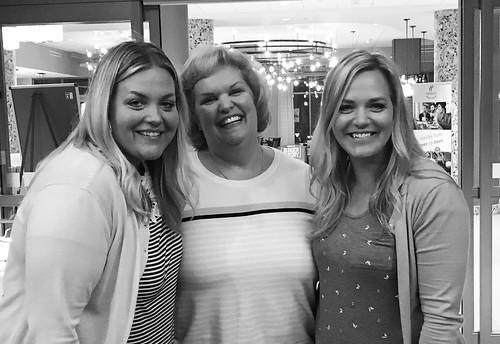
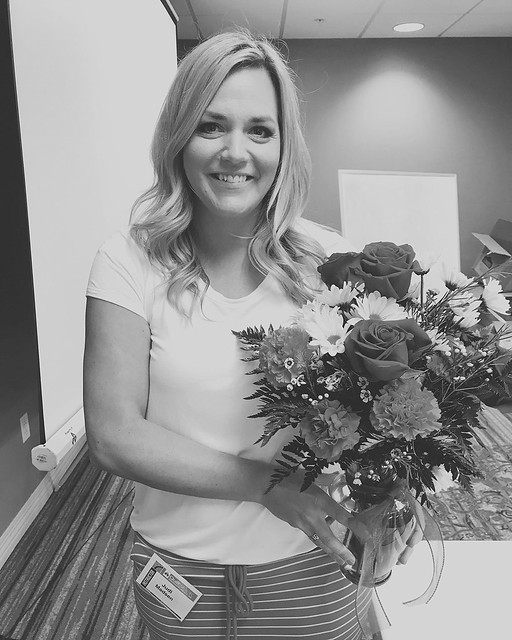

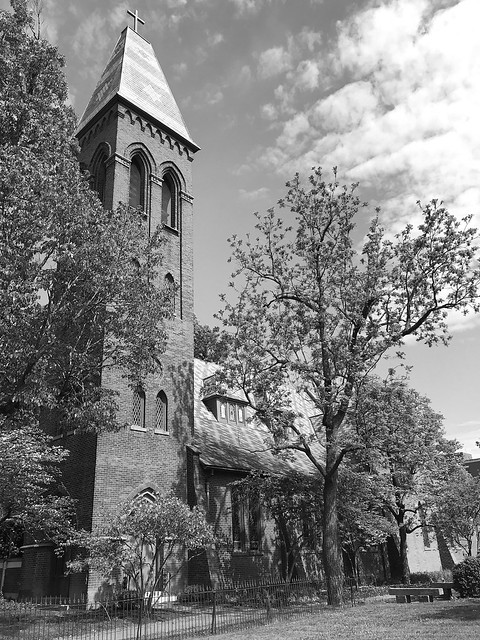

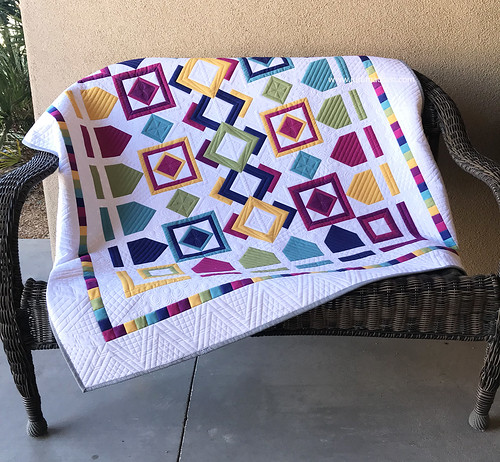
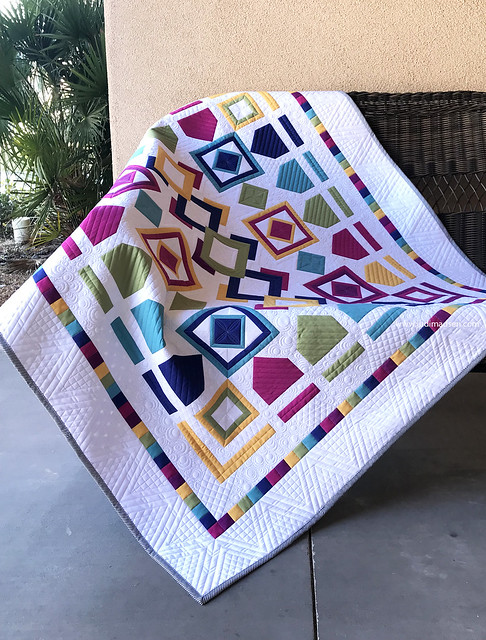
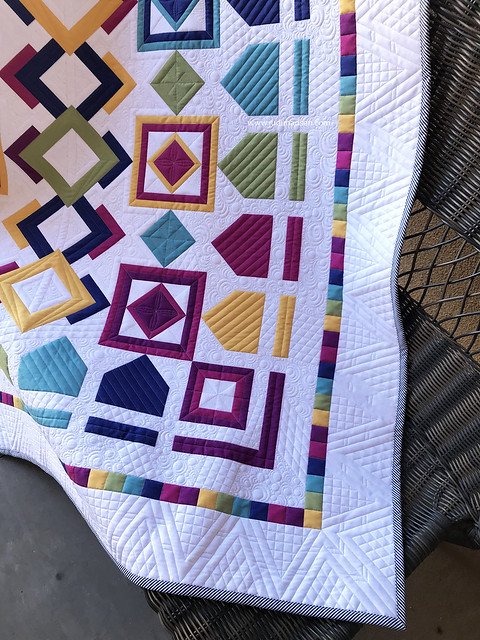
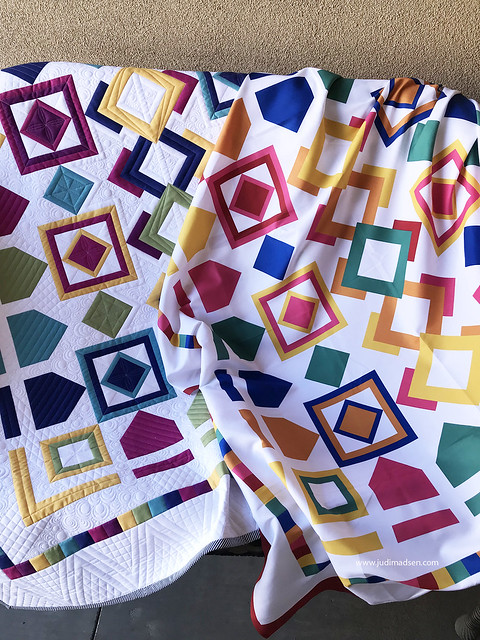
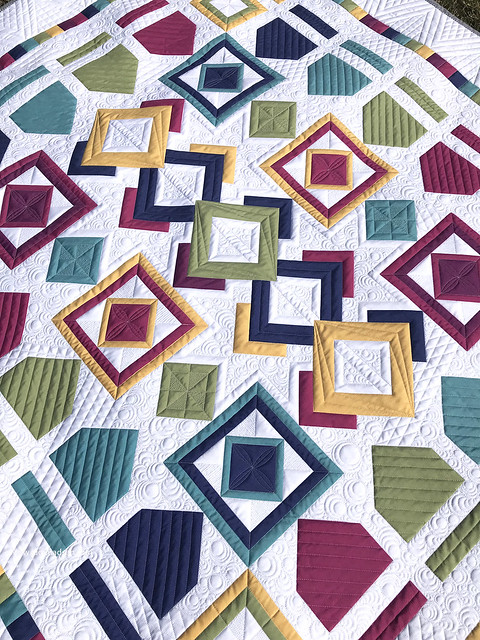
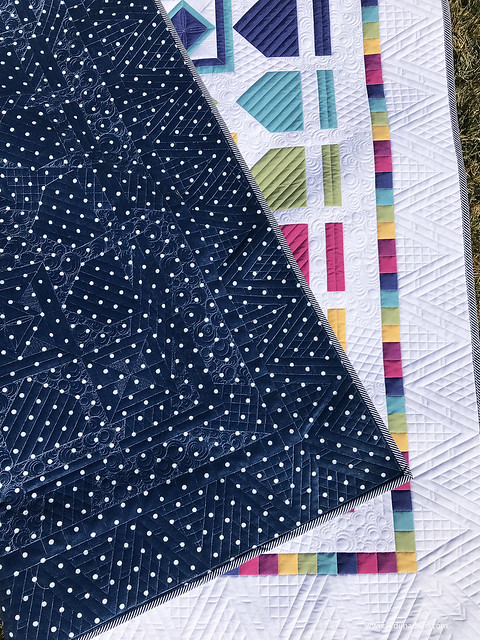
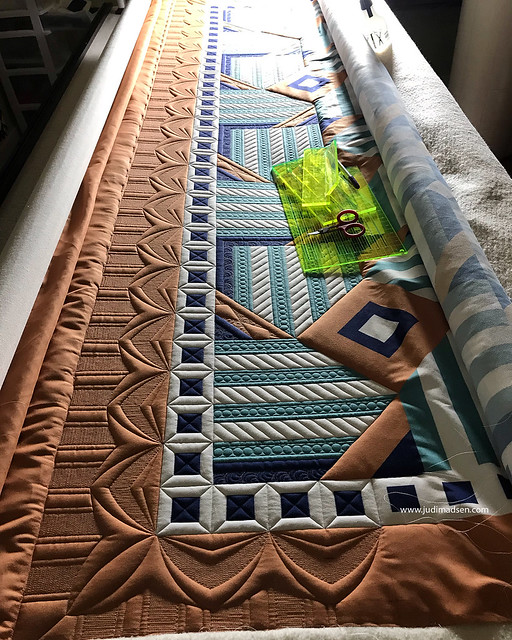

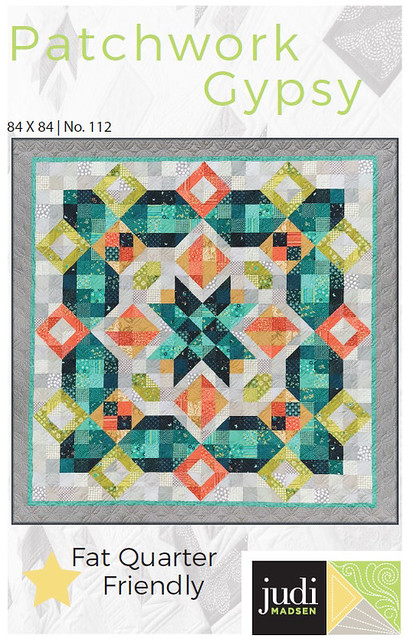
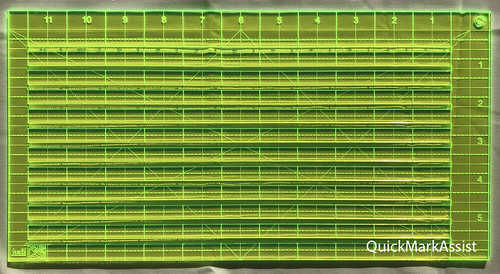
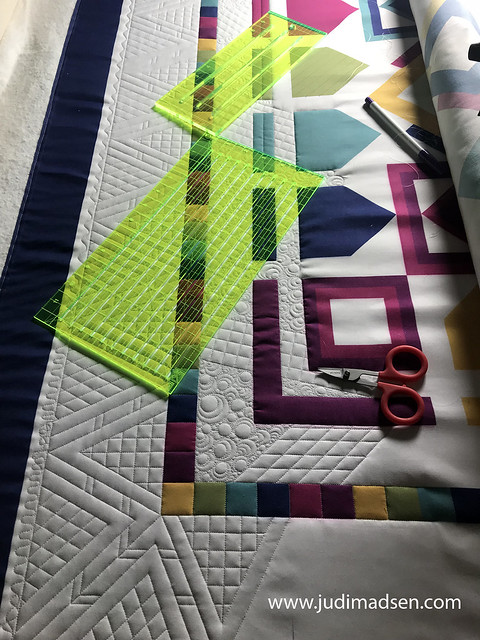
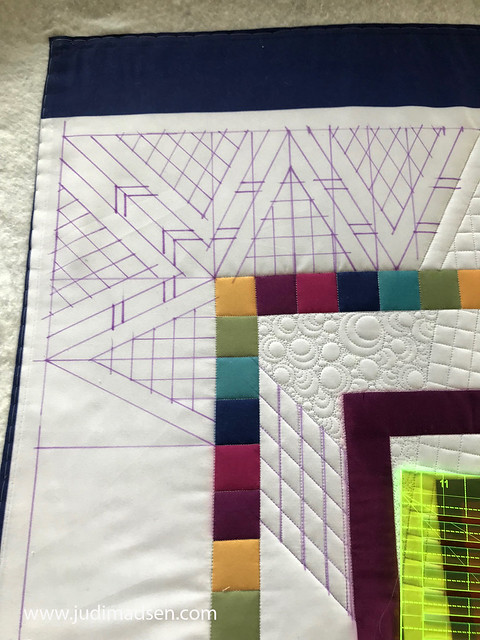
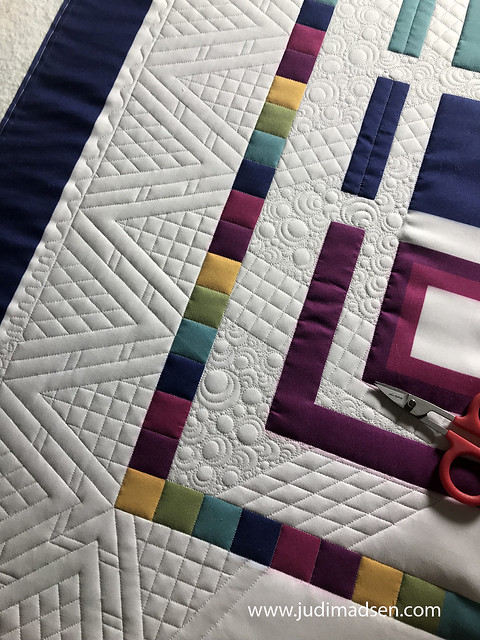

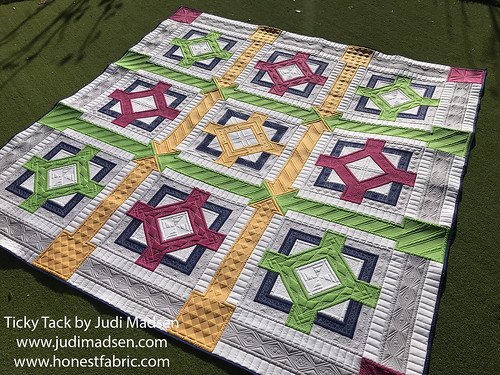
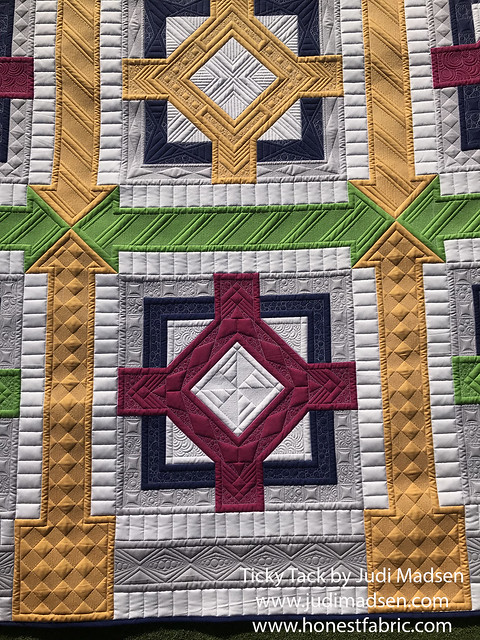
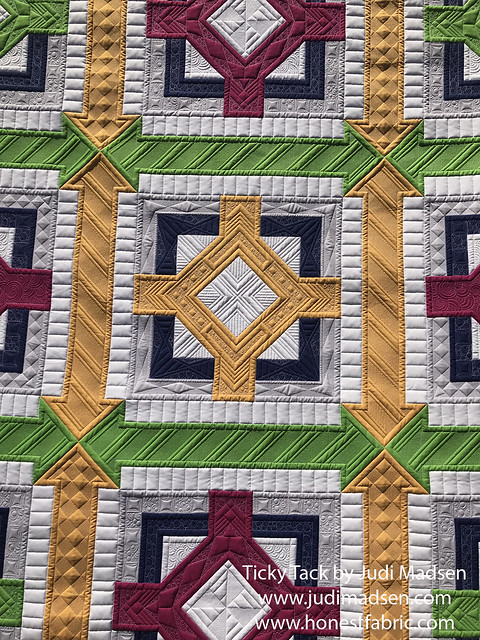
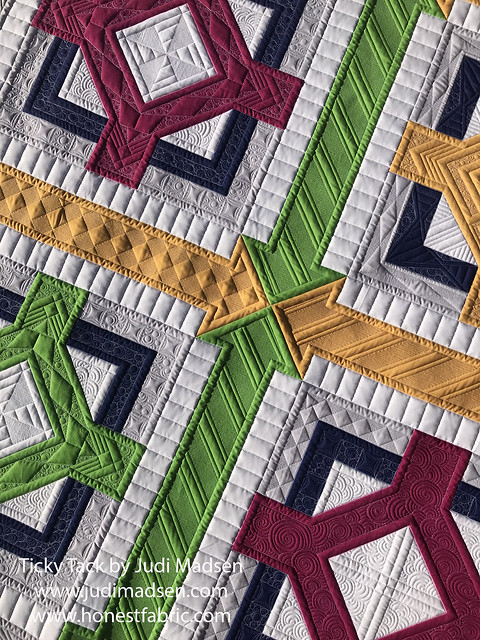
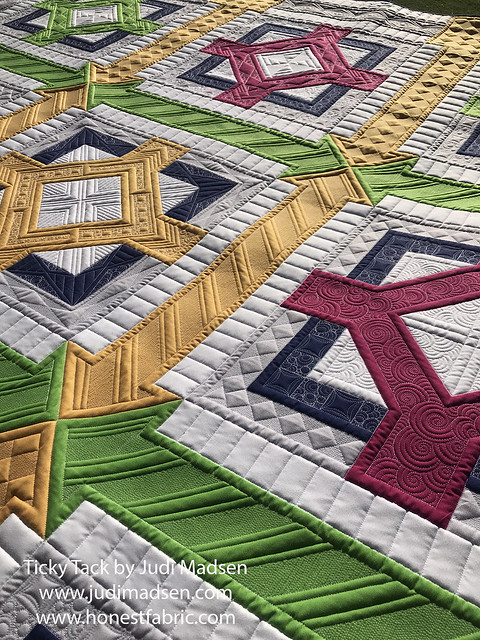
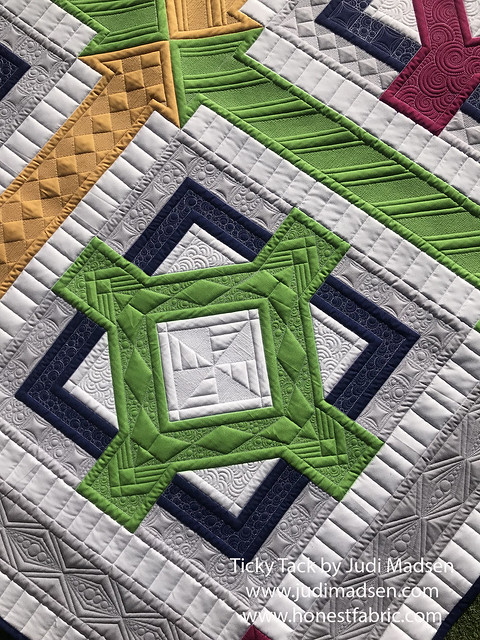
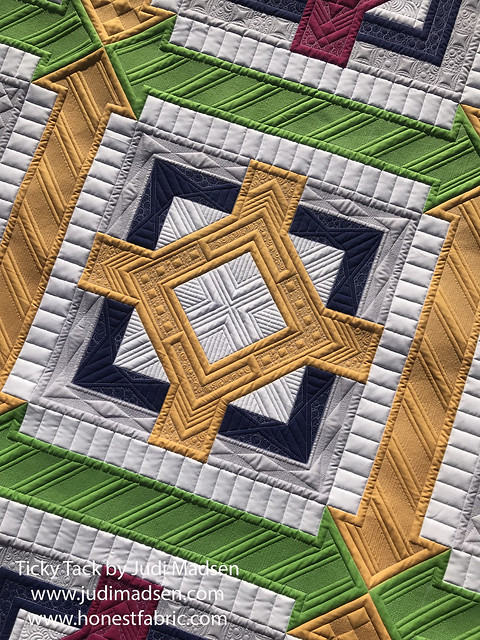
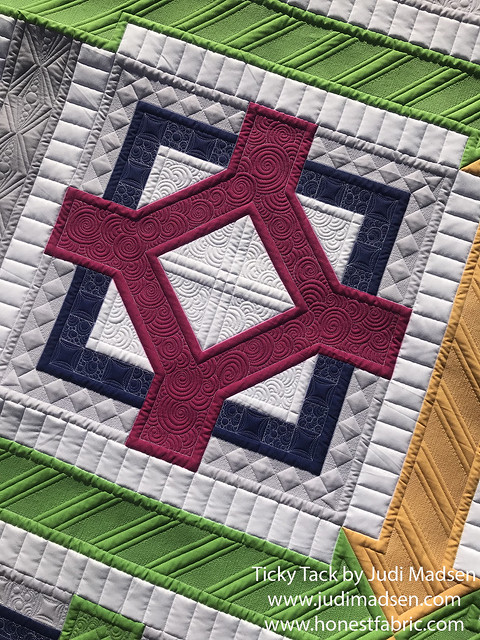
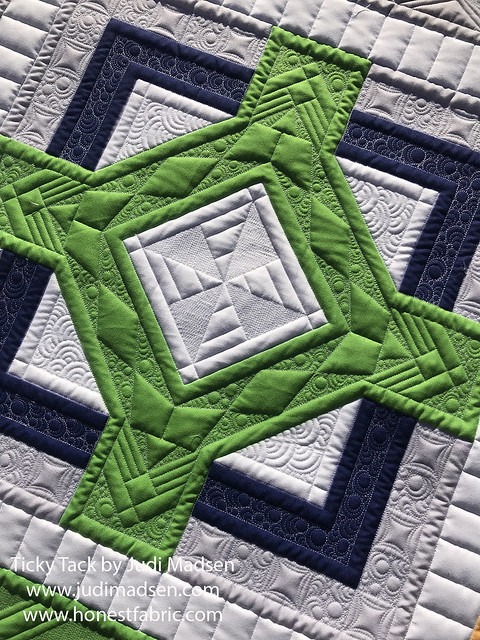
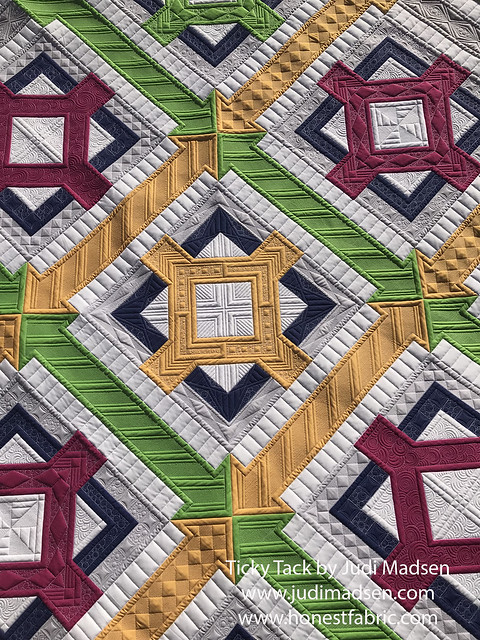
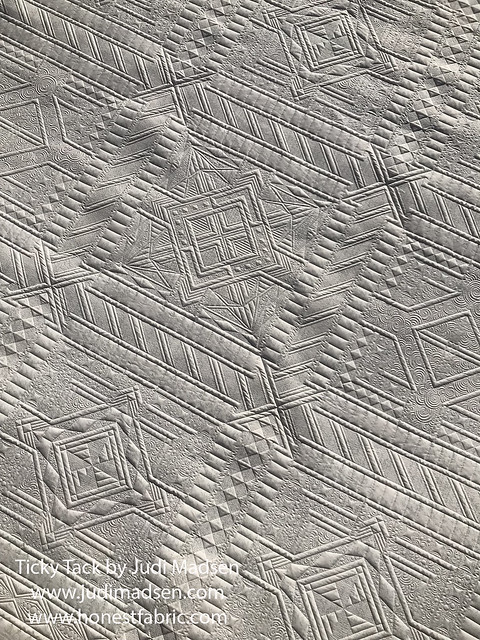
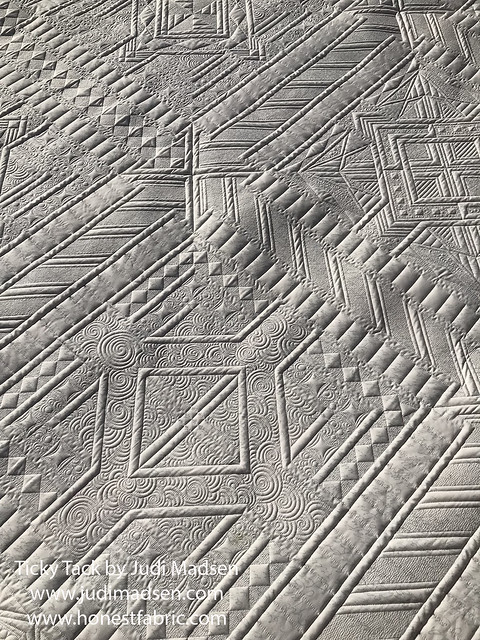
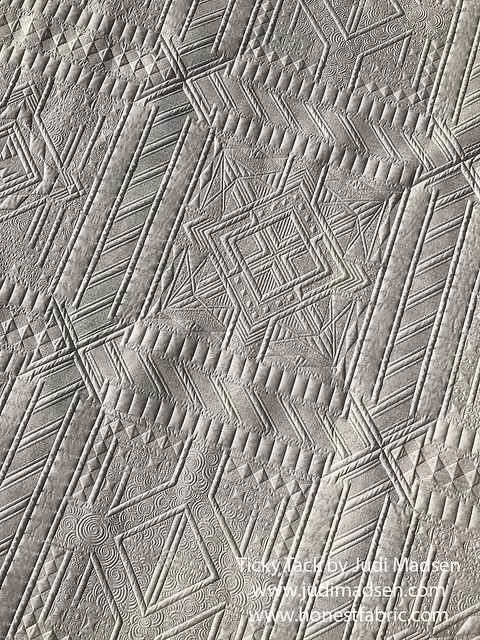
%20but%20it%20so%20much%20more%20than%20that.%26nbsp;%20I%20am%20excited%20to%20say%20that%20I%20have%20joined%20the%20%3Ca%20href%3D%22http://www.honestfabric.com/%22%3Ewww.honestfabric.com%3C/a%3E%20design%20team%20and%20I%20currently%20have%20%3Ca%20href%3D%22https://www.honestfabric.com/product-category/by-designer/judimadsen/%22%3E6%20designs%3C/a%3E%20in%20several%20colorways%20available.%20These%20are%20designs%20that%20are%20perfect%20for%20the%20advanced%20quilter%20who%20wants%20to%20just%20start%20quilting,%20or%20the%20new%20beginner%20quilter%20who%20wants%20to%20practice%20-%20or%20the%20person%20who%20just%20loves%20the%20design%20so%20much%20they%20want%20it%20on%20their%20bed%20right%20away.%26nbsp;%20I%20have%208%20colorways%20available%20on%20this%20design%20-%20they%20are%20all%20so%20beautiful.%26nbsp;%20Check%20them%20out%20%3Ca%20href%3D%22https://www.honestfabric.com/shop/cypress/%22%3Ehere%3C/a%3E.%3Cbr%20/%3E%0A%3Cbr%20/%3E%3C/div%3E%0A%3Cdiv%3E%0A%3Ca%20data-flickr-embed%3D%22true%22%20href%3D%22https://www.flickr.com/photos/gfquilts/45979290472/in/dateposted-public/%22%20nbsp%3D%22%22%20title%3D%22Cypress2%22%3E%3Cimg%20alt%3D%22Cypress2%22%20height%3D%22640%22%20src%3D%22https://farm5.staticflickr.com/4867/45979290472_2741d44960_z.jpg%22%20width%3D%22480%22%20/%3E%3C/a%3E%3Cbr%20/%3E%0AWhat%20is%20fabulous%20about%20my%20designs%20is%20that%20they%20are%20square%20quilts%20and%20the%20extra%20fabric%20that%20comes%20on%20the%20top%20and%20bottom%20of%20the%20quilt%20are%20perfect%20for%20the%20binding.%26nbsp;%20That%20is%20what%20I%20have%20done%20with%20this%20quilt.%26nbsp;%20I%20quilted%20an%20allover%20Gravity%20design%20on%20this%20quilt%20-%20just%20to%20show%20you%20it%20can%20be%20done%20this%20way,%20but%20I%20am%20looking%20forward%20to%20custom%20quilting%20another%20colorway%20soon.%26nbsp;%3Cbr%20/%3E%0A%3Cbr%20/%3E%3C/div%3E%0A%3Cdiv%3E%0A%3Ca%20data-flickr-embed%3D%22true%22%20href%3D%22https://www.flickr.com/photos/gfquilts/44213477410/in/dateposted-public/%22%20nbsp%3D%22%22%20title%3D%22Cypress3%22%3E%3Cimg%20alt%3D%22Cypress3%22%20height%3D%22640%22%20src%3D%22https://farm5.staticflickr.com/4902/44213477410_b393d424a3_z.jpg%22%20width%3D%22480%22%20/%3E%3C/a%3E%3Cbr%20/%3E%0AI%20am%20just%20in%20complete%20awe%20of%20this%20design,%20it%20is%20so%20striking%20and%20so%20beautiful%20and%20I%20know%20you%20will%20find%20a%20%3Ca%20href%3D%22https://www.honestfabric.com/shop/cypress/%22%3Ecolorway%3C/a%3E%20that%20works%20for%20you!%3Cbr%20/%3E%0A%3Cbr%20/%3E%3C/div%3E%0A%3Cdiv%3E%0A%3Ca%20data-flickr-embed%3D%22true%22%20href%3D%22https://www.flickr.com/photos/gfquilts/31090346517/in/dateposted-public/%22%20nbsp%3D%22%22%20title%3D%22Cypress4%22%3E%3Cimg%20alt%3D%22Cypress4%22%20height%3D%22640%22%20src%3D%22https://farm5.staticflickr.com/4835/31090346517_812fe8891b_z.jpg%22%20width%3D%22480%22%20/%3E%3C/a%3E%3Cbr%20/%3E%0AStay%20tuned%20for%20more%20highlights%20of%20my%20quilts%20designed%20with%20%3Ca%20href%3D%22http://www.honestfabric.com/%22%3Ewww.honestfabric.com%3C/a%3E%20-%20I%20have%20my%20%3Ca%20href%3D%22https://www.honestfabric.com/shop/ticky-tack/%22%3ETicky%20Tack%3C/a%3E%20quilt%20custom%20quilted,%20and%20that%20will%20be%20shared%20with%20a%20giveaway%20soon.%26nbsp;%20Looking%20forward%20to%20that!%3Cbr%20/%3E%0A%3Cbr%20/%3E%3C/div%3E%0A%3Cbr%20/%3E)