My House: My Lounge Room 4 Sep 2016 4:42 AM (8 years ago)
 Over 5 years have passed since my original article on my lounge room. In it, I explained how I had voice controlled most of the entertainment equipment in the room. Using the technology, even in these early stages, made it clear to me that I wanted to continue using voice control into the future, so I continued to pursue it. The system made accessing TV, movies, music and games so much simpler and easier to use. I tell the system what I want it to do and it does it.
Where my setup may have looked primitive 6 years ago; using an 17 year old TV, and even older speakers, these were purely aesthetic and the same principles have now been transferred to a newer home entertainment system. I have since purchased a house and extended it to create my lounge room as I wanted. All the components I knew would be necessary to make the system work reliably are in place. What I did not see at the time was the range of things this technology would make possible throughout the rest of the home.
While a number of voice controlled systems have come to the market in recent years, I have not found a reason to include them in my system. None of these systems are able to do all the things I want my system to do now, nor cater for me as I delve deeper into the future. To be fair, they are not designed for this purpose.
There are a number of other reasons why my system better suits my needs:
- The system does not lock me into using certain brands
- It can be modified to cater for any new features I think of into the future
- Voice recognition is mostly processed in house so it responds much faster
- It provides complete privacy as no voice or activity data is sent out of the house
- Advertising is removed from all entertainment
- No ongoing subscription fees
- It works throughout much of the house
- One command to achieve the majority of tasks
- Works when the TV is off or when the speakers are at a high volume
There is a lot of technology in use here that I have not seen elsewhere. There are a number of new concepts and products that combine to make an extremely powerful system. This article is a roundup of all the articles I have written about the technology which I have placed in my lounge room. The video below shows what you may be able to achieve in your own home.
By implementing all of the articles below, you are able to achieve a fully voice controlled entertainment system and start putting technology in place for a voice controlled home. Many of the components you will already have such as a TV and a computer. Combining these with a microphone, free software and a bit of patience, you will be able to acheive what I believe to be the most powerful control system that there will be in the foreseeable future.
| My Projects: My Home Theatre PC: I wanted a computer to look after all of my entertainment. By using a computer, the options of what I can make the system do are almost limitless. Windows Media Center works as a single place to access my music, movies and TV. To keep the system able to deliver all its power for playback and voice control, a second machine records up to four TV channels at once, removing commercials and downloading meta data. As new recordings are processed, the system synchronises and copies the recordings to the other computers in the house, making the load time almost instantaneous. |  |
| How-to: Voice control Windows Media Center: I came to the conclusion that voice controlling the system would be the best way to control the room. This article explains how I went about getting the computer to respond to my voice. It is based upon Windows Speech Recognition Macros and it works really well. The system also has a brain, so it knows which devices need to be turned on or off to carry out the command. There is no way that I will go back to using a traditional remote after seeing how easy it is to control the system with voice. Once I got used to it, traditional remote controls felt very dated and a hassle to use. Updated scripts coming soon. | 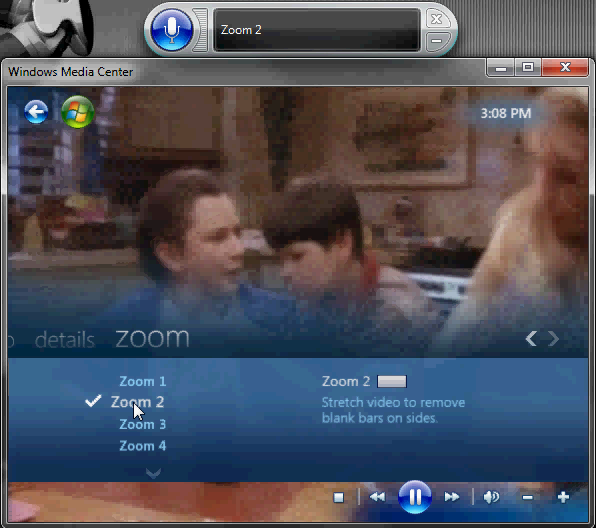 |
| My Projects: My Gadget – One button to control everything around the house: I needed a way to trigger the voice control system so that the system knew when it should start listening to my voice. Without a trigger, the computer would listen to everything, unable to decipher if I was talking to it or another family member. It also serves the purpose of turning the volume of the TV down so that the microphone would pick up my voice instead of the sound coming out of the TV itself, no matter the playback volume. To do this task, I needed a one button IR remote. I was unable to find one on the market, so I made my own by altering the open source TV-B-Gone kit. I have since created a number of other triggers, though my gadget is the only technology that works across all the rooms using the same button. |  |
| How to: Control TV, VCR, DVD, cable and more with voice using USB-UIRT: By using the voice control systems above, I was still lacking the means to turn on my TV and stereo with my voice. That is where the USB-UIRT comes into play. It is an infra red receiver and transmitter that can send codes as defined by the computer. By using a USB-UIRT, I am able to walk into the room, trigger the voice control and then follow that with the voice command “TV on”. This in turn will turn the TV and stereo on. An added advantage of this is that it can be programmed to control my other audio visual gear and a number of appliances. This is a fantastic, but little known piece of hardware. I have not seen it used in this capacity before, though it is perfect for the job. |  |
| How-to: Use an arcade controller in your chair to trigger voice control: I wanted an instant way to trigger the voice control of my home theatre PC as my gadget would have been annoying to find and use regularly, no matter it’s size and ease of use. I figured that the best way to trigger the voice control would be to have a button directly next to my hand while I was sitting in my chair. I achieved this with an arcade controller and an arcade button. The results are everything I hoped they would be. I can control everything electronic in my lounge room/house from my chair using the single button and my voice. |  |
| My Projects: Add lights above the TV to show when voice control is active: (Coming soon) It came clear early on that I needed to have some way of showing when voice control was listening. I tried to show an icon on the screen to show that the system was listening, but I was unable to get it to appear across all programs. I also found that I didn’t always want to turn the TV on to turn on other appliances in the room. By adding lights above the TV, I could see if the system was listening to me and see if the system had recognised my commands. It works in a similar way to a radio “on air” light. |  |
| My Projects: My Remote: (Coming Soon) I wanted an easy way to control the system as I entered the room. While voice control works well, it is nice to be able to set up a DVD or a game before sitting down on the lounge. My Remote serves this purpose. It gives me control of almost everything in the house through a touch screen. My Remote is simple for guests to use where the computer has not been set up to their voice yet. It also comes in handy if there is noise in the house. |  |
| My Projects: My Phone Remote: (Coming soon) It seems to be on trend now, that everyone wants to control their house with their phone. I have set up buttons on my Windows phone home screen to trigger voice control in various rooms, launch application, and control appliances. I very seldom use it, but it works well. I find it most useful when I am outside or away from home, i.e. if I am in the garden, I can turn the kettle on and have it boiling before I reach the room. These are places where voice control is not currently possible, or at least not yet practical. |  |
More to come…
- Microphone: While voice control will work with a cheap microphone, it is clearly more reliable with a high quality microphone with a noise gate. By putting in a substantial microphone network throughout the house, I am able to switch microphones from the various rooms to the appropriate computer.
- Speaker Placement: There are a number of articles online about correct speaker placement. By placing speakers correctly, media playback is improved considerably.
- HDMI switchers/splitters: These let the video and audio to be routed to the various screens in the house.
- Fast network: All the computers are connected with gigabit Ethernet, making synchronisation across computers work at an optimal speed. The network always has bandwidth available for when I need it most.
- Technology hidden away: Not only does this make the room look tidier, it reduces a great deal of the noise computers generate. It has also made the connection of computers over the network and AV signals much simpler.
Does it work?
In short, this entire system works very well. It is reliable and I am confident I will be using it in one form or another throughout the rest of my life. There is no easier way to control my lounge room than using my voice.
The scripts I have written are not yet perfect, though they have had many hundreds of hours of work done on them. Thousands of hours work have gone into this system. Each time I purchase a new game or appliance, I choose to spend some time to program it into the system. On a positive note, the time saved is far greater than the time it would take to manually turn that appliance on or off over the next 10 or so years.
Conclusion:
When I initially setup my lounge room 7 years ago, I knew I was onto something good. Now, having invested both time and money into the project, I am very happy with the result. I use the system daily and now can’t remember how it used to be. I hope that others can benefit from the technology and experience what this technology can do for them.
While this project may be a bit geeky for some, my aim was to explain how to do this so it would be cost effective and simple enough for anyone interested enough to achieve in their home. This is why the articles go into great detail.
If you liked this article, please stick around and check out some of the other articles I have written at Inspect My Gadget.


My House: My Lounge Room 2011 22 Aug 2011 2:00 AM (13 years ago)
 I spend a great deal of my time in my lounge room as it is the space I use to watch TV, movies and listen to music. It is also the space that I use my computer. I thought about what would make it the ultimate room, looking at both the entertainment features it would include and the simplest way to control it. I wanted to reach the practical limits of what technology can do for us. I came to the conclusion that voice control would always be the simplest way to control anything, so I set about voice controlling all the entertainment gear in the room. I wanted to turn my dreams into a practical reality.
It was a lot of fun figuring out how I would achieve each aspect of the room so that it would work best for me. Now that all of the controls for the rooms’ entertainment are in place, the rewards of using the room are fantastic. I will probably be using this system until the day I die. There is only so much technology can do for us as technology is not magic and it has limitations as to what is practical. Saying that, we can achieve pretty much anything we want using today’s technology in a home environment. You may be surprised at what is possible right now, even with a modest budget of less than AUD$1000.
My setup may look primitive using a 13 year old TV, and even older speakers, but these facets are purely aesthetic and the principles can easily be transferred to newer home entertainment systems. What makes this exciting is that it is very cheap to achieve if you are willing to do a bit of DIY. I am not sure if this will ever be possible if you are not willing to install some software and spend some time setting things up. This stuff is not available on the market yet, and if it does make it to market, it is likely to cost a lot more than it should. As with all computer systems, a restart once a week is normally all that is needed to revive the system in the case that it encounters a problem. This system has made watching TV and movies, and listening to music to be much simpler and more relaxing. I simply tell the system what I want it to do.
This article is a roundup of all the articles I have written about the technology I have placed in my Lounge Room. The video below shows what you can achieve in your own home over time on a very limited budget. This system does much more than the current range of smart TV’s. Take a look.
By combining all of the articles below, you can achieve a fully voice controlled entertainment system on a limited budget. All you need to do is plug a few things in, install some software, train yourself to use the system, and train the system to understand you. With a bit of patience and some simple tweaking, you will reach what I believe to be the practical limits of technology for home entertainment use.
| My Projects: My Home Theatre PC: I wanted a computer to look after all of my media. By using a computer, the options of what I can make the system do are limitless. This has significant benefits over what is generally available on the market. By using Windows Media Center, I have one single place to access my music, movies and TV. Impressively, I am able to record four TV channels at once. By installing some extra software on top of Windows Media Center, I am able to remove commercials, download a movies meta data (cover art and other cool stuff), and remotely schedule the system to record when I am not at home. This system lets me do everything I currently want the system to do. If there is a new feature I decide I want in the future, I can install suitable software to achieve the task. | |
| How-to: Voice control Windows Media Center: I came to the conclusion that voice controlling the system would be the best way to control the room. This article explains how I went about getting the computer to respond to my voice. It is based upon Windows Speech Recognition Macros and it works really well. Lots of training was needed before this worked correctly, but now I am really quite impressed with the results. There is no way that I will go back to using a traditional remote after seeing how easy it is to control the system with voice. This article also explains environmental limitations and solutions for these issues, so that you can increase the reliability of the system in your own home environment. | |
| My Projects: My Gadget – One button to control everything around the house: I needed a way to trigger the voice control system so that it would respond to my voice. If I did not use a trigger, the computer would listen to everything I said and it would not be able to decipher if I was talking to it, or another family member. It also served the purpose of turning the volume of the TV down so that the microphone would pick up my voice instead of the sound coming out of the TV itself. I needed a one button IR remote and I couldn’t find one on the market that was appropriate, so I made my own by altering the open source TV-B-Gone kit. | |
| How to: Control TV, VCR, DVD, cable and more with voice using USB-UIRT: By using the systems above, I was still lacking the means to turn on my TV and stereo with my voice. That is where the USB-UIRT comes into play. It is an infra red receiver and transmitter that can send codes as defined by the computer. By using a USB-UIRT, I am able to walk into the room, trigger the voice control and then follow that with the voice command “TV on”. This in turn will turn the TV and Stereo on. An added advantage of this is that it can be programmed to control my other audio visual gear. When I have finished playing a video cassette tape, the command “Return to Media Center” will stop the video, put the tape into rewind and then 2 minutes later eject the tape and turn off the VCR. This is a fantastic, but little known piece of hardware. I have not seen it used for this purpose before, though it is perfect for the job. | |
| How-to: Use an arcade controller in your chair to trigger voice control: I wanted an instant way to trigger the voice control of my home theatre PC as My Gadget would have been annoying to find and use regularly, no matter it’s size and ease of use. I figured that the best way to trigger the voice control would be to have a button directly next to my hand while I was sitting in my chair. I achieved this with an arcade controller and an arcade button. The results are everything I hoped they would be. I can control everything electronic in my lounge room from my chair using the single button and my voice. |  |
Does it work?
In short, this entire system works very well. It is very reliable when it comes to understanding my voice. I feel I will be using it in one form or another throughout the rest of my life. There is no easier way to control my lounge room than using my voice. The costs have been fairly minimal at roughly AUD$150, excluding the PC and TV. While it may be a bit geeky for some, my aim was to explain how to do this so it would be cost effective and simple enough for everyone to achieve in their home. This is why the articles are long and step by step.
It is not perfect yet. I am required to reboot my Home Theatre PC roughly once a week. This refreshes the voice control. Other times I get away with restarting a single program to get things running again. The scripts I have written are also not perfect, though they have had many hours of work done on them. Some individual commands have taken in excess of 20 hours to get working correctly.
I have a few ideas of how to improve the system to make it more reliable, but I will gradually explain these improvements as I am able to test them out. Making the environment suited to voice control, and splitting up the tasks between various cheap computers will greatly improve the reliability of the system.
Conclusion:
This setup has been a great proof of concept of a bunch of ideas I came up with over a year ago. After a lot of hard work, I am now able to enjoy the system daily. Even with the few reliability issues, I am getting far more benefit from the system now than I expected I would. This is not a gimmick.
I am in the process of purchasing my first house where I will start working on phase two of this project. It will incorporate all of the features above and will have a strong focus on reliability and getting technology working for us throughout the rest of the house.
While computer graphics, system reliability and speed are all bound to improve significantly over the next 50 years, I don’t see that there are huge benefits to purchasing whatever is new on the market. I have tried to achieve the perfect home theatre control system, by ignoring the usual market trends, and focusing on what I wanted the technology to do. I have for the most part achieved this, and I am loving it.
I look forward to seeing which of my ideas above become part of our everyday life into the future. This isn’t a bad hobby to have! If you liked this article, please stick around and check out some of the other articles I have written at Inspect My Gadget.
How to: Remove commercials from recorded TV automatically 12 Apr 2011 12:00 AM (14 years ago)
 As technology is evolving, more and more people are recording TV shows to watch at a more convenient time. Fast forwarding or skipping through the commercials is becoming a simple task, but it is still a hassle. This article will show you the tools I use to automatically remove TV commercials from my recorded TV files made by Windows Media Center 7. It is a completely hands off process. I am able to watch any show roughly an hour after it is aired with the commercials completely removed.
By watching recorded TV over live TV, we are more likely to watch what we want, rather than choosing the best of what is on TV at that time. It also lets us control when we watch TV. We no longer need to change our own schedules around when a particular TV show is on, as we can now choose to watch our shows at whatever time is most convenient to us. We are back in control.
I made a video to show the many ways you can either currently use, or will be able to use in the future, for removing commercials. You can view this video further in the article. You will also find out about the software required to remove commercials automatically, and information on the legalities and consequences of using commercial removal technology.
The Software:
WtvWatcher: This program scans my recorded TV folder for the native .wtv file format. It then sends the file through Microsoft’s inbuilt WtvConverter.exe to convert the file to the .dvr-ms format. This is necessary because Lifextender will not be able to interact with the .wtv format.
Lifextender: This program scans my recorded TV folder for new dvr-ms files and scans the file for commercials using Commskip or Show Analyser. It then recreates the file with the commercials removed.
My Script: I wrote this script to move files around based on the name of the file. If the file is a movie, it will be copied to another location to enable Media Center Master to download the DVD cover and other features. My script doesn’t have anything to do with ad removal really, but it is a helpful finishing touch. It will require a little fiddling to get it working though as it is setup for Australian TV. I run this script automatically through a scheduled task.
Click on the title of each for more detail on the setup of each piece of software. Both WtvWatcher and Lifextender have good default settings so they should work straight away. All you will need to do is install the two pieces of software and copy the shortcut of the files into your startup folder.
WtvWatcher and Lifextender work incredibly well together. I found that a quicker computer did achieve better results. There is likely to be the occasional ad or company logo at the end of an ad skip, but the impact is minimal. Much of the time it is hard to notice there was ever an add placed in the gap. Music sometimes even joins up flawlessly, from before the add break, to after.
On the rare cases that commercials haven’t been removed, setting up voice control will enable you to say “skip ads” or “comskip”. This will move the media forward around two and a half minutes, or roughly the length of a commercial break. If there are still ads, you can say “skip” and the media will move forward a further 30 seconds. Alternatively, you could use the “fast forward” command. These make for a very quick and easy way to skim past commercials. You can even do this with VCR’s and external DVD players if you setup a USB-UIRT.
Life with and without commercials:
There are consequences to commercial removal in the long term, though the good far outweigh the bad. We can be highly manipulated by commercials as we watch them. The repetitiveness of them slowly sinks into our minds and subconsciously impacts us. The decisions on what we buy are often based on what a commercial has told us, rather than the quality of a product and common sense. i.e. The iFrenzy. I do not have the same concerns with online advertising because the Ad companies have managed to make ads relevant to the subject matter of interest, and are generally more of a help rather than a hindrance.
If we all remove our commercials, I think a likely outcome will be the advertisers move to other forms of media to promote their products, such as billboards or online advertising. This will reduce commercial TV’s buying power for shows and in turn, the quality of shows may drop. Advertising on TV will become cheaper to fill the spots. This endless cycle could ultimately bring an end to commercial TV. Commercial TV can’t survive if advertisers don’t want to show their commercials on it. If commercial TV does remain as is, product placement within shows is likely to increase greatly.
Commercial removal will have little impact on government and community funded TV stations. Live sporting events will also remain with regular commercials as these events are generally watched live. It should not impact on Pay TV either. Pay TV was advertised as commercial free when it was launched in Australia and now it is flooded with commercials. It’s unreasonable for us to pay to have our mind manipulated.
Commercial TV might be considered good for people who don’t have the money to buy Pay TV, or are unable to afford DVD’s. By watching adverts, they can receive the TV service for free. This is an important point, but commercials aren’t for me, and I am ready to deal with the possible consequences.
Legalities:
From what I can make out, it is legal to remove commercials in my country (Australia), and is likely to remain legal. For it to be made illegal would be the same as making the skip or fast forward buttons on a remote illegal, or in my case, the spoken words Fast Forward and Skip illegal to say. These are the same functions that have been built into our DVD and VCR players since their inception, they have just become much more efficient. I don’t see any way it could be policed if such a law were to come in.
As more people get technology capable of this in their homes, more and more people will start doing this. A similar example is MP3’s as they were around long before the record companies saw that the copying of them would create an issue. I don’t really see why the government would want to have a say on the topic. It’s up to each individual to decide if they want TV commercials in their home. I don’t believe it will be possible for TV stations to install any technology that would make commercial removal impossible, as TV commercials can be removed from shows using a variety of new and old methods.
Conclusion:
Having my house commercial free over the last year has changed my family’s life for the better. I hope that each person will consider the consequences of removing ads from their TV shows before trying this out. Once you have experienced TV without commercials and have seen how easy it is to set up, I don’t think it likely many people would be able to consciously choose to go back to commercials. Removal would be as easy as uninstalling this software.
Windows Software: Automatically convert .wtv to .dvr-ms with WtvWatcher 10 Apr 2011 5:00 PM (14 years ago)
 Windows Media Center 7 saves files by default to the .wtv format. This format is capable of storing the highest quality broadcast. The only problem is that it is not compatible with some programs written for previous versions of Windows Media Center (such as Lifextender which only works with the .dvr-ms format). Lifextender allows all my recorded TV to have the commercials completely removed from all my files without pressing a button. I need to use WtvWatcher if I want to use Lifextender to remove commercials. Lifextender is unable to process the default Windows Media Center 7 formatted files, so WtvWatcher converts the file to a format Lifextender can work with.
 Microsoft has included a .wtv to .dvr-ms converter with it’s Media Center, but it is only capable of converting one file at a time, and it is a manual process. WtvWatcher uses this utility by finding the files that need converting, and sending them to be processed. WtvWatcher looks after this job very well. It sits in your task tray and converts all your recorded video to the dvr-ms format. I have been using this software for well over a year and found it to be very reliable and stable.
From what I can make out, the two formats are identical, but the .wtv format can handle a broadcast format that is rarely used. This is why I have not noticed any drop in the quality of recorded TV, once the conversion has taken place.
There are very few settings. Simply point WtvWatcher to the folder that contains your recorded TV. It will do the rest. You will want to ensure you create a shortcut to WtvWatcher.exe in your startup folder so that it loads when the computer boots up.
I have used version 1.0.0.21 for this review. I tried the latest updates but had poor results. It is worth trying the newest version and downgrading back to this version if it doesn’t work for you. If you downgrade, you will want to untick the Check for Updates tick box in the preferences.
WtvWatcher is available for free from codeplex.
How-to: Use an arcade controller in your chair to trigger voice control 8 Apr 2011 4:00 PM (14 years ago)
 I am very confident that voice control is the way to go when it comes to controlling my home theatre setup into the future, because I am currently using it and benefiting from the huge advantages it offers. I believe a reliable voice control system will be the best way to control any electrical appliance, and that voice control is likely to be in our lives indefinitely. There are huge cultural and environmental problems which need to be addressed for it to work reliably, but the technology that interprets what we say works very well.
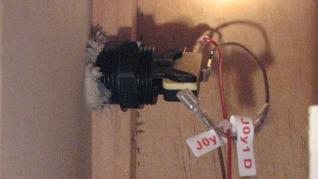
After setting up voice control on my home theatre PC, I realised that there needed to be an instant way to trigger the voice control so it would start listening to me. I needed a way to avoid using a traditional Universal remote, or my gadget. I needed a button that is ultra convenient. This means installing a button right next to my hand that will trigger the voice control. The only way of achieving this is by installing a button into my lounge. This may seem a bit excessive, but once it is done, the benefits we receive from it will last us well into the future. I believe all home theatre seating or lounge suites will eventually have the option to add a button into the arm.
There are many different types of buttons on the market, but I have only seen one that I know will be able to last the lifetime of the lounge. It’s going to take a beating, so I needed a button that was strong and reliable. Arcade machine buttons have proven themselves over the years as being ultra reliable. Fortunately for me, they are also cheap.
The end result is a button sitting immediately next to my hand which can activate and control my whole entertainment system using my voice. It’s not going to get much better than this. I expect this configuration to last the life of the couch, and it is likely to be considerably cheaper than having these factory installed. The only DIY work needed to be done for most lounges will be to drill a hole to install the button, and to click the pieces together. My scripts are not perfect yet, but I hope you will agree that it is pretty exciting stuff.
This article will show you how to install an arcade controller board, and a button into your lounge to trigger voice control of your entertainment.
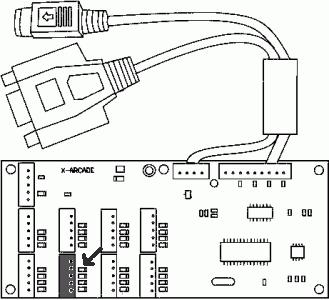
There are probably many ways to achieve the same result, but this solution is cheap enough for me to run with. I purchased a set of 20 buttons for $20 and a BYO arcade encoder board for $50 from X-Arcade. Soon after I received them and started testing them out, it was clear I had made a wise choice. I quickly purchased another two upgrade boards, so that I could install one in each chair. I am going to use them elsewhere in the house now as I have figured out that it would be easy to daisy chain the chairs by running wires from the one board.
This kit comes with almost everything required to install a button in up to 20 seats so long as you are willing to solder some wires to reach from chair to chair, and possibly some plug sockets of some type, to tidy up the wire connections. If you are not comfortable with soldering, you could use an additional separate USB PCB Upgrade kit in each chair at an additional cost of $30 per chair. There may well be cheaper ways of achieving the same result, but a starting cost of around $70 if you are willing to solder from the one controller board, I am not fussed about searching for a cheaper option. The only other costs are a USB hub and possibly an active USB cable used to connect the controller boards to the computer.
This arcade controller board simulates a computer keyboard, so it’s just a case of either connecting the correct wires to a button so that the 0 or [ are the active buttons, or by wiring up your own selected button and changing the AutoHotkey script to respond to that button. It’s all fairly straight forward. The circuitry looks complicated, and there do appear to be a lot of wires, but all we need to care about is that one end has the USB plug that connects to the computer, and the other end is a button. The rest of it we can ignore as it will do it’s job out of the box. A little bit of trial and error in notepad will show you what each button does. I have only come across two minor problems with using this board, though they have little impact on how reliably the system functions. If I set the script to use a keyboard letter, every time I use that letter on the keyboard, the relevant script will run rather than showing the letter on the screen. I need to make sure that I am only using rarely used buttons (such as [ and 0) instead of general letters. Also, this board will not bring the system out of standby, though putting the system into standby is not desirable as it will also stop the media centre from recording and processing TV shows. There are ways around it though, which I will explain in future articles.
Installation Guide
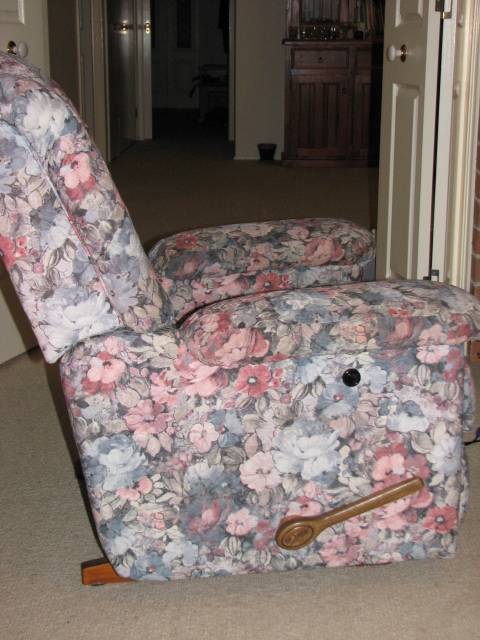
Please read through the entire process before making alterations to your lounge. If you are not careful, it would be easy to do a poor job and effectively destroy the appearance of your expensive lounge suite.
Ensure you do have access to the inside of your lounge. If your arm wont fit in the arm cavity, installation will be near impossible.


You should now be able to test it out. If the script is running and you have wired up the correct button, it should work straight away for you.
Some lounge suite designs may not be appropriate for installing your buttons. You will need to sit in your chair to feel if there is a suitable position for your button on the outside of the lounge where your hand can naturally reach to. You will also need access to this place from beneath the chair. Depending on how you mount it, you may need to make sure you can fit your arm into the arm cavity of the chair. As my arm would not fit, my wife needed to help me attach the button. The chair in the video is a chair my wife bought for $20 from an op shop. This was so that I could practice on it, without ruining the family lounge suite. I recommend going through this same process, doing some thorough research before attempting this on your expensive lounge. Saying that, it is ridiculously easy to install.
My final purchase was $130 plus shipping as I purchased the 20 buttons, the BYO arcade encoder, and 2 USB upgrade kits. Though as explained above, I don’t plan on using the Upgrade kits for this project, so that brings it down to around $70.
Resources:
Pack of 20 buttons: $20
X-Arcade BYO arcade encoder: $50 – Includes wires to attach buttons though these could be made
USB PCB Upgrade Kit: $30 – Same as above without cables
I have no affiliation with X-Arcade. I just found their site and purchased from them by chance, and I found their service and products to be good.
How to: Control TV, VCR, DVD, cable and more with voice using USB-UIRT 26 Mar 2011 12:00 PM (14 years ago)
 Once I was able to voice control my home theatre PC, I still needed to use my remote control to turn on the TV and receiver. I wanted to rid my lounge room of remotes altogether, so I needed to find a way to get my computer to control the rest of my audio visual gear. I wanted to be able to control everything in the lounge room with just my gadget and my voice.
It was logical to use Infra Red (IR) technology for this, because that is the only way we can control most AV gear currently. Often the buttons on a device (such as a TV set) don’t offer as many options as its remote control unit.
The USB-UIRT is a magic device that can send and receive IR signals. It connects to a USB port on our computer and enables us to send IR commands from our computer to our peripheral AV gear. It sits at the back of the room and has good range and reliability. This device removes the need for remote controls in our TV room altogether as we can tag a voice command to tell the USB-UIRT which IR signal or signals we want it to send.
The result is that we can walk into the room, press the trigger button and say “TV on”. This will turn the TV and stereo on. When we say “I’m finished”, the TV and stereo will turn off.
It gets really impressive when we start controlling our VCR, BluRay or cable box with voice. I have added some extra scripting which will enable just this. When I put a video into the video player, I can say “Video Player” and the TV will change the channel to AV, to show the VCR. I can then use the usual play/pause/stop/rewind/fast forward voice commands to navigate through the video. When I return to the media centre, the tape will stop, rewind and 3 minutes later, eject the tape and turn off. This is while all the other media centre voice commands are working as per normal.
This article will show you how to setup the USB-UIRT to control your audio visual gear to control everything in your lounge room/home theatre by voice. The scripts need to be installed, and IR signals learnt, which is thankfully quite easy with to do with EventGhost. The speech macros have also been updated to simplify the commands to their shortest abbreviation. I have also included another speech macro which enables the “Play artist/genre/track” commands. It’s a bit harder for the computer to pick up the new commands, though they do work. The old commands still work and are worth learning because the computer is much more likely to recognise them. The commands will be progressively tweaked until each command is as simple as we can make them. It’s not far off as simple as it can get now.
How it works:
These scripts let us use voice commands to trigger EventGhost commands. When we say “Room on” the keyboard shortcut is sent to EventGhost which in turn sends the series of IR codes to make the TV and stereo turn to the correct channel.
Additionally, we use the command “Video Player”, the script changes modes so that instead of sending keyboard shortcuts to navigate around Windows Media Center, it starts sending IR signals based on our commands, via EventGhost. When we return back to the “Media Center”, the original commands are used.
This could easily be expanded to allow for multiple external devices. It is written in autohotkey, so it’s about as simple as coding can get if you want to tinker around yourself. You will just need to make another componentmode for each device you want to control, and add to your EventGhost tree. I will update the coding myself if there is enough demand or my needs change.
Hardware:
USB-UIRT: This device is what makes it possible to use voice commands to control our AV gear. It sends IR signals to our AV components so that the component will do what we want. With the right scripting, this device can control just about everything in our TV room. The USB-UIRT is $50 plus shipping and is available from the USB-UIRT Website. I am very excited by the things this device makes possible, both currently and into the future. This needs to be placed in your room so it has clear sight of your devices. In my case, this means having it at the back of the room.
Software:
Voice Control.zip: This file contains all of my speech macros and scripts that make the system work. These scripts have been considerably updated to allow for these extra functions, but can still be used if limited functionality is desired while training takes place.
Eventghost: This automation software lets us control the USB-UIRT based on the voice commands we give. I have included my EventGhost Tree in Voice Control.zip so that all you need to do is teach Eventghost what IR commands to use.
Installation:
 There are various components that need to be installed for all of this to work correctly. It follows on from my earlier article on How to: Voice control Windows Media Center, which goes into detail on how to install the voice recognition control script, as well as the speech macros. Please refer to that article for assistance on how to install the various components.
Unzip Voice Control.zip into your Speech Macros folder within your Documents folder.
There are only two new components in Voice Control.zip, and the first is the EventGhost tree, and I will show you how to load it and configure it for your needs. There is no way to bypass the training as each device uses different commands, but luckily it is fairly straight forward. The second component is Video Player WSR Macro which will need to be installed if you want to operate any external AV component, i.e Video Player.
Install EventGhost: The scripts are designed to launch EventGhost from it’s default location. If you change the location, you will need to update a whole bunch of the macros and scripts, though it is not difficult.
- Click File > Open
- Navigate to your speech Macros folder
- Select “My Gadget – USBUIRT Eventghost Tree.xml”
- Click Open
On the left of the screen, we can see a log of what triggers and actions have been acted on by EventGhost. On the right side is a list of all the macros I have setup for my system.
 The macro title is the same as what the macro does. Below that is the trigger event. In all cases, these are currently keyboard shortcuts i.e. how the script calls each action to be performed. Normally, the triggers will be able to be left as is, but if you choose to change the trigger keyboard shortcuts, you will also need to change the scripts.
Below that is the transmitted IR code, and these are the codes we need to change to match your system. There are quite a few things you are going to need to change, but most are simple. It is worth saving frequently while working through this. I frequently got the “not responding” warning, and it usually rectified itself given enough time, but sometimes it would crash. I haven’t had the same crashing when running it.
We will start off with one of the easy ones. Right click on the command USB-UIRT: Pause Video and select configure.
 Click on Learn an IR Code…
Follow the instructions on screen.
In this example, press the pause button your video players remote control unit.
Once a valid signal has been taken, the screen will return to Action Item Settings.
You can test the code to see if it performs the same command you trained it with.
Repeat the training for all the other commands.
There are a few special commands which perform more than one action. These turn the TV on and change video inputs etc. You will need to figure out what buttons you press on your remote and replicate the procedure in EventGhost. You may need to put in some delays as I have.
Once you have set it up, you won’t need to change it until you buy another TV or other AV component. Ensure you save the tree with your own filename to ensure future Voice Control.zip files don’t overwrite your altered file.
Honourable Mention: The USBIRToy may soon be a suitable device to use for this task. It is much cheaper, but currently lacks the power required to get results we want.
Conclusion:
I am very happy with the results this is getting for me. I have found the USB-UIRT to be very reliable. This is a key feature that makes voice control truly valuable. By combining my voice with this device, the whole lounge room is controlled with just one button.
I hope you have enjoyed reading this article and found it useful. Please stick around and check out some of my other articles at Inspect My Gadget.
My Projects: My Gadget – One button to control everything around the house. 7 Mar 2011 12:00 AM (14 years ago)
 Soon after I figured out how to voice control my media centre, I realised that I needed an easier way to trigger it. The trigger would set the volume of my media centre to a level I could naturally talk over, so I could navigate around it using my voice. I was using the 0 button of my remote control for this task, so I still needed to keep my remote control in hand. There was very little to be gained by the voice control if I were to still continue using traditional remotes to trigger it. I only needed the one button as all other commands were given by voice. I needed a one button infrared (IR) remote. The only remotes I could find commercially were for garage doors or car alarms, but these did not use IR technology, so I had to make my own.
Four months have passed since I started working on this project and I have succeeded in getting it working, though aesthetic improvements will still need to be made. I have been enjoying tinkering with it. This is a very simple device compared to many other electronic projects, so someone with experience may have it going in a few hours.
While I was making my gadget, I discovered that it would be capable of doing far more than just enabling the voice control of the home theatre PC. What I made was a very simple tool. A single button that I could point at any computer or robot around the house, to let it know I needed it to start listening to me. This could ultimately mean that I would have a portable button combined with my voice to control any electrical device in my house. The more I think about it, the more likely this is to become a reality, in time.
I have come up with a number of other methods to trigger the voice control systems in my house. I will explain these solutions over the coming weeks, months and (hopefully) years. If these future solutions end up being inadequate, my gadget will become a necessary accessory. The need to carry something around the house with us all the time is a bit of hassle, no matter it’s size and ease of use. I want to be able to trigger the technology with empty hands, hence why I want to avoid using my gadget. One thing is for sure, we do need something to trigger voice control in high noise areas. A computer needs to know if we are talking to it or another family member.
This article will explain how I have gone about making my gadget. While my gadget does currently work reliably, it is at this stage only a proven working prototype. These instructions will show you two possible methods you can use to make it. The first method is simple to get going, and I recommend this option for anyone who wants fast results without too many complications. The second method will achieve the same result, but will allow you to investigate IR technology in more depth. I have not played around with circuit design much yet, but the information in this article should give you enough to start playing around with your own design if you so choose.
All of my future articles will somehow be related to my gadget – a single button to control everything. Much of this is about changing or using current, past and future technology to make my gadget be more useful. I know that it will work as I am currently using the one button approach to control a few things around my house, and I am enjoying the benefits of the technology.
 I had been reading Lifehacker and Make when they were writing about a nifty new device called TV-B-Gone. TV-B-Gone is an invention by Mitch Altman which uses a single button to send IR codes to turn off basically any TV set. Because all the codes are different from brand to brand, it sends one code after another until it has sent all of it’s codes. The result is that pretty much any TV can be turned off with the one button on this device.
After a bunch of TV-B-Gone units were sold, Mitch combined with Adafruit industries to make the code and schematic available to the public to tinker with. The electronics and most of the code of the TV-B-Gone already worked to serve my purpose. In fact, it provided more than I needed.
 There were a number of TV-B-Gone versions made by fans who successfully managed to make the device smaller, though it still functioned as a TV-B-Gone. All I needed to do was make one of these smaller versions (or design my own similar circuit) and then make the device send the 0 code of my remote, instead of the TV off codes. While this sounds like an incredibly simple concept, I was soon to learn that figuring out the IR codes sent from a remote is far from simple.
Why use Infra Red (IR)?:
I believe IR is the only current wireless technology that is suitable for this task. It has proven itself to be very reliable in our lounge rooms for many years. It is also a very cheap option. Most TV tuner cards come with an IR receiver, so I will be making use of the left over IR receivers I have wherever possible. Because the original TV-B-Gone is capable of sending multiple codes, I have the option to use a unique IR code for each room, or identical codes throughout the house. If my gadget slows down after adding multiple codes, I will need to use identical codes and then buy multiple identical receivers of any brand. It doesn’t matter either way.
Other wireless technologies go through walls. Using IR, only the receiver that is meant to see the signal will respond. The other codes will be filtered by walls. If I want to talk to a computer outside my current area, I can identify which computer listens by pressing my gadget and saying the name of the computer I want to talk to. It’s unlikely a robot will understand me if I yell to it from across the house. Instead, I will be able to press my gadget and talk naturally to it from the room I am in. Then the command or audio will be sent clearly through to it using one of the many wireless or wired technologies available to us.
How to make my gadget:
Below are the steps I have taken so far to make my gadget. It involves electronics and some coding, so it may be a bit complicated for beginners. I found the trickiest part is decoding the IR codes, but that is avoidable using Method 1. If you have been interested in electronics, this would be a great kit to start out with. This is my first kit since finishing my electronic study in 2003. It has given me much enjoyment to finally use what I had learnt. I had thought they were wasted years. By making it myself, I can gain a better understanding of how this technology works. The final product costs around $5, but there are various purchases required to make it all possible bringing it up to around $80. This figure is likely to rise.
Hardware: All prices are in US dollars.
TV-B-Gone Kits: I started off by purchasing two TV-B-Gone kits. This is the kit I am basing my gadget on. It already operates exactly as I want, but the codes are not right for my task. I bought one of them in case my soldering was a bit sketchy, but the second turned out to come in handy as I used it to make a simple programming board to program the chips. They are $20 each unassembled and available from Adafruit Industries.
USBtinyISP AVR Programmer kit: This kit is used to program the Attiny85 chips. It plugs directly into a modified TV-B-Gone board so there is no need to run a wire to each leg of the chip. They are $22 each unassembled and are also available from Adafruit Industries. I purchased 2, but have only required 1 of them.
USB-UIRT: This is a very powerful device. It can act as an IR receiver or transmitter. I have found these devices to be of decent quality at a good price.
The following tools are only needed for Method 2.
USBIRToy: This assembled device is what am using to show me IR signals on my computer. The software that works with this device will show the digital output of the remote. This is what I need to decode and add into the chip itself. USBIRToy is $20 assembled and available from Seeed Studio. Amazingly, the price includes shipping.
Open Workbench Logic Sniffer: This is another project from Dangerous Prototypes. This can be attached to the USBIRToy to analyse the codes. I am not sure if this is required because the software with the USBIRToy is pretty good and gives many of the same features, but I purchased one. It is still in it’s packet. This could easily be used in other projects. Logic Analyzers are normally very expensive so this is a great alternative. It is also available from Seeed Studio for $45, and you will need to get some probes for $6 each.
Components: While the TV-B-Gone kit contains all the components needed for this, I did purchase extras of many of the parts for testing. I used the components listed in this kit as a reference for what to buy. I haven’t used many of them yet, but I figure that if my gadget is required, each member of the family will want one or two.
Software: All the software is free, at least for non commercial use.
MyGadget Firmware: I used the original firmware from the TV-B-Gone version 1.2, but I altered it to remove TV-B-Gone references as they aren’t relevant for this. I also removed the code which detects if it uses European or US codes. As we only want a few codes, we do not need to choose between 2 databases. This also removes a resister from the TV-B-Gone kit. I may end up using the original 1.0 version as I don’t need the added features 1.2 delivers. The only thing lacking is the required IR code.
AVRDude: This software is used to program the chip. It is a command line program which works reliably with the USBTinyISP AVR Programmer.
Programmers Notepad: This software is pretty much a notepad, but it is tailored for programmers. It highlights key words and detects which language is being written. It makes programming much easier than using a traditional black and white editor.
Open Logic Sniffer: This Java software shows .ols files in a graphical way. Much the same as you would see on a Logic Analyser display. It works very reliably and should show recorded IR information adequately to manually decode them to different formats.
WinLIRC: I am not sure how useful this will be for this project, but I have been tinkering in it. It does help gain a knowledge on the IR protocol. It lets us use home made USB receivers in Windows. It has a USBIRToy plugin that allows us to send IR codes through it. I have had limited success with it, but it has a huge community support so it is likely I will be using this in some of my projects.
EventGhost: This software can be used to run tasks as it receives a recognised trigger. This software can be used to make any remote control work with any computer. It is very useful for automating anything. I use it to receive a predefined IR signal and when it sees that signal, it emulates the trigger button.
Making my gadget:
I have two methods for making my gadget. By using Method 1, you should end up with a single button remote that can trigger the voice control. While Method 2 hasn’t worked well for me yet, I am fairly confident that it will work for someone willing to put in the time to discover the correct IR code for their individual setup. Both methods require making the TV-B-Gone kit, the AVR programmer and the programming board. The difference between the two methods is the software we put onto the chip.
- Make up one of your TV-B-Gone kits: I soldered mine together and tested it. Amazingly, it worked first try. My TV turned off after around 3 seconds. After a few more successful tests (one from 30 metres away) I knew it would be more than adequate for my needs.
- Make the AVR Programmer kit: This kit also went together with no problems. There is not much to these kits, so taking time and following the step by step instructions on the Adafruit website is likely to result in a good outcome.
- Make the programming board: This uses the second TV-B-Gone kit, but only a few components need to be put on the board. These are C1, C2, X1, ICSP and EBC. Once this is made, the board will plug directly into the AVR Programmer. It is possible to use a breadboard and wires to program the chip, but the programming board was a much simpler option for me.

 Programming the chip:
Once you have a valid .hex file, copy it into the avrdude folder. This is included in mygadget firmware. Open up a command prompt and navigate to your avrdude directory. The command to write to the chip is:
avrdude -c usbtiny -p attiny85 -U flash:w:mygadget.hex
You will see the chip being wiped and flashed with the new .hex file. After fiddling around a bit with this, you will find it very quick to make alterations to the code, make the file and write it to the chip. I was surprised how easy this was to do.
Method 1: Working Reliably – Recommended
This method makes my gadget send out the Sony Off code. As I don’t have a Sony TV, the IR code won’t interfere with any of my gear. You can use any IR code you want using this method. I just chose the first in the list for convenience.
 Plug in a USB-UIRT into your computer and install the drivers.
- Install EventGhost
- Add the USBUIRT plugin
- If installed correctly, EventGhost should show what IR data has been received in the left pane.
- Create a new macro
- Drag the received IR code into the macro
- Create an action to emulate the keystroke [ or 0.

This is a very simple way to get things up and running, and it works as it should.
Honourable mention: The USBIRToy is also suitable for this task as an alternative to the USB-UIRT. It is a third of the price, but it has a delay when receiving the signal of around 1.5 seconds. This doesn’t make it impractical, but instant results are always best.
I am also having considerable problems getting the same code received each time. I am keeping my eye on the Dangerous Prototypes website as the USBIRToy is being constantly given both firmware upgrades and component upgrades. It is a great piece of electronics which will continue to become more useful and reliable as it is developed. For $20, I think it would make an ideal IR receiver as more are needed around the house if extras are required.
A number of other IR receiver could be used for this method. Just add the plugin for HID device and select your receiver.
Method 2: Work in progress
Using this method, I am trying to install the 0 code of my normal remote control into my gadget. The result will be pretty much the same as the method above. There is very little be gained by using this method, though it is probably the right way to do it. This is how I started off trying to make my gadget work as I did not have a USB-UIRT. It is much more complicated.
- Install a USBIRToy, ensuring firmware and drivers are up to date
- Install the USBIRToy record and playback application
- Open a command prompt and navigate to the folder you installed the application
- Run the following command. Change the com port to the com port of your USBIRToy
- irtoy -d com3 -p -f mygadget -o
- You will get to take a sample of the remote button you want to use as a reference, and an ols file will be created.
- Install Open Logic Sniffer
- Open the ols file in Open Logic Sniffer
 Now is where I got stuck. You need to follow the instructions on this page to decode the signal from the ols file to the format compatible with the TV-B-Gone code. A lot of care has gone into the page to lay out the exact process. It is quite timely and complicated, though I don’t see how it could have been written any simpler.
Once you have figured out the code and altered gadgetcodes.c from mygadget firmware, make the file and write it to the chip. Repeat the steps above until it works.
This should logically work. I can’t figure out where any problem could be apart from in my own calculations. Saying all this, Method 1 is a whole lot easier and it should not cause problems. You could use any number of TV off codes as your triggers for around the house, so long as it doesn’t conflict with your current TV sets.
Making my gadget smaller: Work in progress
The TV-B-Gone is far more powerful that we need it to be for this task. It may even be too powerful as it can currently go around walls. If we remove 2 or 3 of the diodes, the signal will drop to a more suitable level. This will also mean that two or three transistors can be removed. The firmware has removed the need for the US/EU selection resister. The whole unit can be powered by a CR2032 button battery. All of a sudden the device is the perfect size to fit comfortably under the thumb.
Making my gadget look good:
There would be various cases that could be used to hold the electronics. You will need to use your imagination and creativity to make it just right for you. I am likely to put it into a wooden shell. If my gadget is a necessary device, it wouldn’t hurt to make it nice to use and to look at. It will spend a lot of time in hand.
I would probably add it onto a retractable chain that I can attach to my belt.
Commercial release:
I have no plans currently to release my gadget commercially. As I said above, I believe that there are better options available to us which I will explain in future articles. How can I sell something I don’t see as being the best option? I don’t want to spend my time dealing with manufacturers and legal issues. I want to progress onto my next projects. Saying that, I wouldn’t be surprised if there are copies made by other companies.
Commercial versions may come out which will learn codes from existing remotes, or which can be programmed through a computer. Bluetooth could be added as it has the benefit of proximity detection, though I do not want to add this because I don’t want my gadget to hold identifiable information. There is no need for anything more than IR. It will not be used solely for any security purposes. If I lose it on a bus, I don’t want to be concerned that anyone can use it. There are lots of ways to change it such as adding an internal microphone, embedding it into a watch, making it rechargable or doubling it up as a USB key. I don’t see these extra features to have much benefit as they will increase the cost, create security concerns and a single button will be more than enough.
References:
TV-B-Gone kit: Design notes: A bunch of useful information about adding your own codes into the TV-B-Gone
$3.50 TV-B-Gone kit: Doesn’t look like much, but its got all the necessary parts and it is small.
TV-B-Gone Micro: Tiny version of the TV-B-Gone
Tutorial on AVR Programming: A detailed look at programming AVR chips
Tutorial on AVR programming boards:
USBIRToy record and playback application: It opens up a lot of automation options, as well as creating .ols files from IR receiver.
Conclusion:
As you can see, it is not the easiest item to create, but it is a challenge for me and look forward to designing it exactly how I want it in the future. I want to emphasize that I hope my gadget is an unnecessary device, though I am not sure yet if it will be possible to remove the need for it. I would prefer not to carry this with me around the house. I have come up with a number of simple solutions to trigger voice control around the house, I am just not sure how all of them will work together as they have not all been made or tested yet. The solutions I have currently tested all work wonderfully well, making my gadget avoidable.
My aim over the next 5 to 10 years is to show how technology can work for us around the home. I also want to show that we already have all the technology we need to make this possible. The final result will ultimately be that we have far more time to do the things we want to do, and to enjoy the technology that gave us grief as we adapted to it over the years. The home we imagined as what would be “the future” is very very close.
I will be automating, or voice controlling everything in my house over this time using comparably cheap electronics and computers, both new and recycled. If you want the same technology in your house, you will have the option to follow my articles and take the cheaper DIY route. My solutions will cost a fraction of the price of current home automation hardware, and each project will link in with the last. I can’t wait to show you my next project.
How-to: Voice control Windows Media Center 28 Feb 2011 2:00 PM (14 years ago)
 I have been interested in the voice control of computers for a long time. My first attempt was around 10 years ago, and I had some success with it. In the right environment, I was able to say commands to my computer and it would respond based on what I said. The problem was that I didn’t have a practical use for it yet. It was clear in this early testing that using a keyboard and mouse was far more convenient, reliable and a quicker option than using voice. It will remain that way for many of the standard interactions (i.e email, facebook) we have with computers, at least in the short term.
The day Microsoft Kinect was launched in Australia, I saw the promotional video showing people waving their arms around to navigate through their media centre. It seemed to me that this would be a fairly unreliable and exhausting way to control anything, apart from games specifically designed for the technology. I was way too lazy to consider using this technology into the future.
I concluded that voice is the simplest way to control anything, and that it always will be. This led me to start playing around with voice control again. I ran through the voice tutorials and was able to get the computer to understand my voice some of the time. It did stuff up on me a whole lot, but it was clearly much more reliable than software I had used in the past.
Now around 6 months on, I have written an AutoHotkey script and a WSR macro that interact with Windows Media Center and Windows Speech Recognition software, allowing my media centre to be controlled completely by voice. This is a practical use for voice control. I can navigate faster with my voice than I can with a remote control. Instead of needing to know which button to press on my remote (or remotes), I simply speak my mind. I no longer use a remote at all. This is something I have wanted for a long time and I am excited about this outcome.
This system far exceeds any other voice control setup on the market today in terms of reliability and practicality. Most of the problems as to why systems haven’t worked in the past has not been because the software was inadequate for the task, (the software has worked fine for many years). Most of the problems are environmental, and my solution tackles these environmental issues. Rather than trying to make technology that works in our environment, my solution changes the environment to enable the technology to work. I believe it is inevitable that all future voice control systems will need to take this approach for the system to work.
This article will give you all the information you need to control your Windows Media Center home theatre PC with your voice. I will provide the easy to edit scripts and show you how to install them on your PC. I will also explain what works and what doesn’t, as well as explaining why previous attempts have not been successful. The more I explain how it all works, the easier it will be for you to set it up and get it working reliably. This will not be as easy as installing the software and having the results you want right away. You will need to train it to recognise your voice, and you will need to learn the correct commands to make. A solution that can understand the whole English language is a long way off. It is much more difficult to synthesize human understanding than it is for a computer to understand dictation. That is why we need to have set commands.
There is a video of my home theatre PC running this system after the jump.

What you need: The costs
- A Windows 7 PC running Windows Media Center 7
- A decent microphone. I have been using this one from Logitech which retails for $50, though it is not hard to find cheaper. This microphone picks me up from anywhere in the room and has noise cancelling features. I plan on putting in boundary microphones in the future.
How it works:
This system uses Windows Speech Recognition(WSR) to understand the commands we say. This is free software that is built into every Windows 7 PC. WSR Macros runs in parallel with WSR to perform actions based on what we say. I used this to create voice tags which link in with keyboard shortcuts. i.e. Saying “Stop TV” will send the keystroke Ctrl+s. Because keyboard shortcuts are being used, the xml files could easily be altered to work with XBMC or Media Portal.
The second component is what makes my system work. The AutoHotKey script waits for a predefined button press (0 or [). When that button is pressed, the volume of the media drops to a level that WSR will not pick up enough sound to misinterpret as a command. It then opens up communication to WSR welcoming our commands as we talk at a natural volume.
When we have finished saying our commands, we can either say “Play TV” or press the button again. This will turn off WSR, put the volume back to a suitable listening level and then resume playback of our media.
Using this method, we don’t care how loud the volume is when the media is playing. It makes no difference if the stereo is on full blast because the trigger button will drop the level to a volume that we can talk comfortably to the system. I have been unable to find any products or patents that do this, and it is a necessary step for voice control to work. The alternative is to yell over the sound coming out the speakers, and at the same time hoping that WSR doesn’t pick up music as commands.
Windows Media Center has voice control built in, but it suffers the same problems as all the other products on the market. The volume needs to be impractically low for it to work. These built in commands do not clash with the commands built into my system. They work in conjunction with each other, and they only work when a trigger has been pressed.
The software:
All of the software is free.
Please don’t be put off by the list of programs below. Each of them are necessary for the system to work, and they are all fairly straightforward to setup. The format they are in allows you to easily make any changes to the voice tags. The system is very open so you can use it as you want.
 Windows Speech Recognition: This software is available from the Speech Recognition Applet within your Control Panel. I feel it has never been given the props it deserves. I can’t ask for much more than 100% accuracy when using this system with a headset. It does have a requirement that you use the English (US) language, so if your system is currently running a different language, you will need to change it in the Regional and Language Applet of the Control Panel.
- WSR Macros: This program works with WSR. It lets us install xml scripts which define the commands the computer will listen for. WSR Macros can be downloaded for free from Microsoft.
- AutoHotkey: This is not required, but it is what I wrote the script in. If you want to make changes to the script, you will need this program. It is available from Autohotkey.com.
- The following programs and scripts are included in Voice Control.zip file.
- Nircmd.exe: It is used by the script to change the system volume. It is truly a fantastic piece of freeware.
- Speech Recognition Control.exe & Speech Recognition Control – No Eventghost.exe: This is a compiled version of Speech Recognition Control.ahk. This manages the trigger function and volume changes. Use No Eventghost if you do not yet have eventghost installed.
- Media Center.xml: This script contains the majority of the commands I have setup for WSR Macros.
- Sydney TV Channels.xml: This is a sample script which looks after TV channel control.
 Installation:
To launch Windows Speech Recognition, go into your Control Panel and launch the Speech Recognition Applet. There is not much to setup in this software. Within the options, you will probably want to tick the setting to load it at startup. I also turned off audible feedback and the dictation scratchpad.
Download and install WSR Macros. You will need to have this loading at startup. The easiest way to do this is to make a shortcut to it in the Startup folder of your start menu. At the same time, unzip the zip file to the Speech Macros folder within your Documents folder. This folder will automatically be created when WSR Macros is installed.
The options for both WSR and WSR Macros can be found in your task tray near your clock.

Select Advanced
Copy and paste the entire Media Center.xml into the text box. Click Next.
You can call the file anything you want, but I call mine Media Center.WSRMac.
 Ensure you digitally sign the file. This will ensure the script is allowed to run on your computer. This has advantages later on also. The alternative to digitally signing your files is to drop the security level down. I would recommend against reducing your security.
Repeat the steps above for the Sydney TV Channels.xml file. You will probably want to change the xml file to suit your needs. The code is as follows.
<command>
<listenFor>ABC</listenFor>
<listenFor>Channel 2</listenFor>
<sendKeys>2</sendKeys>
<sendKeys>\</sendKeys>
</command>
The <listenFor> command determines what phrase you say to go to the particular channel. It is best to make it 3 or more syllables i.e. instead of saying “GO”, say “channel go”. You can have as many phrases for each channel as you want.
The <sendKeys> command determines the keyboard button to press. i.e. This example presses 2 on the keyboard which will go to channel 2.
The <sendKeys>\</sendKeys> is necessary as it turns off speech recognition and turns the volume back up to listening volume.
If you are willing, please send me your altered TV Channels.xml files so I can share them among readers to save them from requiring to go through this step.
Finally, create a shortcut in the Startup folder of your Start menu to Speech Recognition Control.exe.
If you have installed the system correctly, after you reboot, you should see a green H icon, WSR icon and WSR Macro icon in your system tray. You are now ready to test it out. The trigger button is either “[” or “0” as determined by Speech Recognition Control.exe. In effect, you should be able to press the 0 button on your keyboard and the system will be triggered. In most cases the 0 button of your remote control will also work.
Training:
 Training is an essential part of getting this to work. Without going through the training process, this is unlikely to work for you. The process is simple, but it will take each member of your family a bit of time. Each training session takes around 10 minutes.
I needed to make the system understand my Australian accent so I had to be very patient with it. I ran through the training session 3 times in the first week. I then spent a lot of time using the system to have it understand me well. It took around 3 weeks before it really got a hold of my voice. Much of the problems were related to me saying commands that didn’t exist yet, but you should not have the same problem if you use the “What can I say sheet”. I am now 6 months into this project and it understands me around 95% of the time (given the right environment). I hope the rest will be solved by using better equipment.
Open up the Speech Recognition applet from the Control Panel. Click on “Train your computer to better understand you”.
Follow the prompts. You will see the screen to your right. Speak the text in the box. Not only will the tutorial learn your voice very effectively, you will learn the many features of Windows Speech Recognition. It is really quite amazing what the system is capable of.
 Once the computer understands the line you have spoken, it will progress automatically. I found that it did not progress each time. I would wait 2 seconds and then repeat the line. This felt like the system wanted me to say it again to get another sample of my voice. Some pages I needed to repeat up to 4 times.
It is worth doing this training session a few times over the following days or weeks. Putting in the time early on will save frustration later on.
Once training has taken place, my understanding is that the system will continue to better understand you over time. That is how it has been for me. When the computer does understand you, you are able to transfer your voice profile from computer to computer, so you will only need to go through it once.
Troubleshooting and Tips:
- Many of the problems are likely to come from inadequate training. If you haven’t trained it, you may have trouble seeing the system work effectively.
- When editing the xml files, alter the xml file rather than the macro. Ensure you delete unnecessary macros so that any two macros don’t conflict.
- Ensure the correct microphone is selected. Using the “Setup your microphone” option within WSR is a good place to start.
- This system uses keyboard shortcuts, so if you are press either [, ], \, 0, * or -, the function will occur rather than the character appearing on the screen. These buttons are rarely used in a media centre setup. A dedicated machine is recommended to avoid this problem. The keys can be changed in Speech Recognition Control.ahk if necessary.
- A reboot is often a sure fire way of getting it going again. I do this weekly, but I needed to do it more frequently when I was going through the training.
When it will work:
- It will work where there is a quiet environment without much background noise.
- It will work if you train it adequately, and continue to improve the more you use it.
- If you live alone, this is likely to work fantastically well for you.
- If you are a quiet and patient person.
- When everyone in the household uses it.
- It will work exceptionally well in a sound proofed room.
When it will not work:
- If there is any background noise i.e. all the noise we have always taken for granted.
- If the shopping is being put away
- If a neighbour is mowing their lawn
- If kitchen appliances are running near your TV room, i.e. dishwasher
- If the rain is loud on the roof
- If someone is eating chips in the TV room
- If you have young kids, the technology is unlikely to work for them or around them.
- When inadequate training has taken place.
- If you yell at it – a natural tone works best. If it isn’t working, there is likely another problem.
- In a corporate environment. Each person would need their own office which would be a good outcome, but also an unrealistic one.
- If your system is busy with other tasks and resources are drained. i.e. My system struggles a little when recording 4 channels at once.
Resolving the problems:
Sound proofing the room is a solid way of fixing some of the problems, with the added benefit that sound won’t escape from the room. Saying this, it won’t be a practical option for many people.
Some of the problems can be controlled somewhat by isolating the rooms which are going to use this technology. We can put noise gates and effects on the intercepted voice, but this is only going to go so far. Sound can only be altered so much, and the human voice uses a huge frequency range, so to cut out any frequencies will affect the incoming signal detrimentally. No matter how long we wait into the future, technology will have very little impact in resolving the majority of these issues.
As I said earlier, we need to create an environment that allows the system to operate. This is likely to impact on the ways that we want to use it. Some considerations will need to be made by people in your household for voice control to work effectively in your home. The majority of the problems are cultural and can be resolved by changing how and when we do things. It will be up to us individually to adapt to the technology to give it every opportunity to work. I believe that using the technology (and making minor alterations in the way we do things and in our homes to accommodate it) will result in very positive outcomes for everyone who grabs it with two hands and runs with it. Time will tell…
This system is much more complicated than simply installing software and watching it do it’s thing. As people are using the system and someone talks to them while the microphone is open, the system will fail. Naturally a little anger may go towards that person. The same will occur as they are using the system towards you. The result could be that we give up on using the system altogether, or we all take a bit of extra time to think before we talk so as to be sure that the system isn’t in use. The only technology I can think that may help this is to install a light that goes on when the microphone is open (On Air). But as far as I can think, that is as close as technology can get to fixing such problems.
Why use voice?:
Keyboards and mice have been necessary tools to help us communicate with computers over the last 50 years. They were created because there was no way to control computers by voice at the time. Now that computers have got to such speeds that enables voice control to work, we can start commanding a computer using our natural form of communication, speech. In time, we will be able to control all electrical devices in our home in much more simple ways.
Each voice tag can perform any task or tasks we want. The result is that we can say one word to set off a series of tasks automatically. A good example is changing volume. If we want to change the volume from 40% to 20%, using a traditional remote, we would need to press the volume down button 20 times. With voice, we can go directly to the volume we want.
Anything a computer can control can be triggered by a voice tag. This has great potential in home automation, and controlling anything electronic around the house. This is better than the current home automation where the switches are relocated to a single panel on a wall. Other tasks can be automated without any human input. This is the start of a fully encompassing system which will make our lives easier.
Speech Recognition vs Voice Control:
Voice control and speech recognition are very different things. Speech recognition is when we expect a computer to recognise anything we say, and then have the computer convert it to text. This is very complicated because our language has many thousands of words and even more combinations of words. Everyone’s voice is different and accents and lisps have a huge impact on what the computer hears. I am yet to see a free program that does this reliably.
Voice control is based upon a set of various predefined commands, where the computer decides which command it should perform based on what it hears us say. This narrows down what the computer expects to hear from us down to a few hundred commands. Because of this, voice control is much simpler to get working, and the results are much more reliable.
How and why my system is different to others:
The main difference between my system and others is the volume drop that occurs before we give commands. This is what makes it all possible and practical. Without this functionality, it will never work in rooms we listen to our media in. It is possible in quieter rooms to have the computer respond to a keyword to open up listening for commands, but as this system will already be in place, I will probably retain it throughout the house as this system develops.
This same volume drop allows for the use of a microphone that is free standing. We don’t need to use a headset for the system to work. This keeps our hands free, which is pretty much the point of using voice in the first place.
It would be very easy to have the computer tell me what it is doing each time I say a command, as most other commercial packages do. But I don’t want a relationship with my computer. I don’t want it to take 5 seconds to tell me it is going to do something I don’t want. When I give a command, I want the computer to perform that command instantly without whingeing. That is why I have not added this feature.
It would be very easy to add in commands for playing genres or artists. The code already exists here (look for Windows Media Player), but yet again it complicates the list of words by adding in thousands of extra commands the computer needs to choose between. The script would need to be altered slightly so it does not clash with my commands. For these reasons I chose to take it out of this script. It will be easy to add this functionality later, but the way I use the system, I don’t see much benefit to it apart from it being a neat trick. (Update: The included Advanced commands script will add in this functionality. I have removed some of the ambiguity requests. It seems to work quite well for me now.)
I have made the commands a little longer than what some other systems use. This helps the software better understand what it is meant to do. i.e. There is not a big difference between the sound of the words play or replay. I have extended them to be Instant Replay and Play TV, which are both very unique sounding commands. This makes the system a whole lot more reliable. Once I have installed adequate sound equipment in my house, it may be possible for the computer to differentiate between the shorter versions, in which case I will change the script to respond to those words. In the meantime our voice profile is learning our voices to give much more reliable responses into the future. (Update: The new script includes both the longer and shorter commands. The longer commands are more reliable, but the shorter commands do work when the computer understands them.)
Resources:
Windows Media Center keyboard shortcuts – Link to Microsoft
WSR Macro Library and Samples – Link to MSDN, Microsoft
Conclusion:
This system works for me exactly as I have explained in this article. Hundreds and hundreds of hours have gone into these scripts and macros through testing and tweaking. I am hopeful this will work really nicely for you. The format it is in opens doors for easy expandability for future projects. There are many commands which stretch well outside of Windows Media Centers’ normal capabilities. Please keep coming back to Inspect My Gadget to see where this system leads me. There are plenty more projects in the pipeline, and voice control allows what was once my imagination to become a reality.
Remember, most of the problems will be able to be resolved by changing your environment or training the system more. There is a good chance I will delete comments complaining that the software doesn’t work for the first few weeks as it is not helpful to anyone. It took months to learn how to type, and this requires the same effort. If you believe it doesn’t work, I think it is likely you will never have voice control in your home.
Windows Software: Windows Media Player 21 Feb 2011 11:00 AM (14 years ago)
 Windows Media Player was a program that I never gave much respect to, until I recently found a new use for it. Windows Media Center relies on Windows Media Player to playback most media files. This means that any changes we make in the Windows Media Player settings will carry through to Windows Media Center. i.e. Windows Media Center does not have cross fading built in, but if we turn on cross fading in Windows Media Player, the music we listen to in Windows Media Center will also have cross-fading. The same goes for setting up visualisations, CD ripping options etc.
There are so many expected and unexpected features in it, and many of them are relatively well hidden within the program. This is great as the hard to find features such as cross-fading or SRS WOW effects won’t need to be changed often. This has allowed the interface to show us the features we want to use all the time. The way the software is laid out lets us use the full screen to organise our media with a very simple drag and drop layout.
 Windows Media Player makes it very easy to make playlists that can be used with Windows Media Center. The interface also makes it very easy to add information to files, such as producing your own star ratings. It even makes burning a CD simple. It is a comprehensive package that has now become my tool for managing my media.
This is by no means a review, or an encouragement to use this as your main media player, but it is worth having another look at it to see what it can do. It is a great resource to pull out when it is needed. If there is something you want to do with your media, where your normal media player doesn’t have the facility, it is likely Windows Media Player will. It is very likely to serve your needs. Because it has been tested on every Windows machine, it has become very stable and the chances of it crashing are very low.
After giving it another run, I have found it to be an outstanding media player.
Windows Media Player is available for free from your start menu.
My Projects: My Home Theatre PC 20 Feb 2011 3:00 PM (14 years ago)
 With Analog TV being turned off in Australia and around the world in the next couple of years, set top boxes, PVRs and Tivo are all going off the shelves and into peoples homes very quickly. Many people are unaware that Windows Media Center is an option to switch to Digital TV, and there are considerable benefits over the PVR units above.
You can view ALL of your media on your TV, you can record more channels at once, you can store more media, with automatic meta data fetching and you can even play games. It was a no brainer for me to choose to use a computer to control my media.
If you have a computer running Windows 7, there is a huge chance you already have everything you need to set up the basic configuration in your house. The only cost may be to purchase a TV tuner which start at around $20. It is worth dedicating a computer for this task, but there is little harm in experimenting on what you already have. Consider re-purposing your current machine as a dedicated media centre when you upgrade. If you want a new feature, eg. BluRay, you can generally just plug in a new drive at a considerably lower cost than buying a stand alone unit.
This is a “What more could you want?” scenario. With the system being capable of handling full screen HD video chat (pending internet connection), only minor software updates are likely to be necessary to allow new technology to work with this system. This system should keep me ahead of mainstream consumer technology for many years.*
I have spent a lot of time over the last 12 months, trying to create a Windows Media Center that would work flawlessly. With the strong foundation of Windows Media Center 7, a bunch of free programs and a lot of research and tweaking the puzzle pieces have come together. I hope that this guide will help you build a system that will give you as much enjoyment as this system has for me.
Check out a video of my media centre in action after the jump.
In my research, I came across a number of videos and websites explaining their own media centre setup, but I was unable to find an example that covered everything (or even came close to doing) what I wanted my media centre to do. I was also unable to find a computer based media centre that didn’t require regular back-end maintenance. I have been able to automate every aspect of this media centre and there is nothing that I have wanted that is lacking.
Most of the setup is very straight forward, though there are a lot of steps involved. This is an ideal weekend project for anyone with a bit of interest in computers and TV.
I had a few requirements to consider in building this system:
- I needed the system to abide by Australian copyright law. More info…
- I needed my family to be keen to use it. The front end needed to be simple.
- I wanted to save money in the long run.
- I wanted the system to be as future proof as possible.
- I wanted the system to be low to no maintenance.
On all five counts above, the system has exceeded my high expectations significantly. As an added surprise, it is safe to say that the system has comfortably paid for itself already as I have not needed or wanted to buy as many DVD’s, or any other technology for that matter. This is an all in one solution, far exceeding anything else I have seen on the market at any price point.
I don’t want the length of this article to scare people from doing it. It really is quite simple. All you need is a computer running Windows Media Center and then to install a few programs on the computer. I believe anyone can do it. Visit the sites and click the download links. Once the file is saved in a location of your choosing, double click on the file and follow the prompts. Making a decent bacon and eggs is much more difficult. The additional information in this article is useful for people who want to understand how it all works.
Hardware requirements:
It is really preferable to have a machine dedicated as a Media Center PC. When I had Vista, I was launching Windows Media Center when I wanted to watch TV. The rest of the time, Windows Media Center would be closed while I checked my email or the like. Now that I have invested in a separate machine, the media centre is always ready to go. There is also much less of a risk that newly installed software may corrupt or change the setup. I wanted this to be a set and forget solution. There are already a fair few pieces of software that run in the background to make all of this work correctly. I did not want to complicate it further.
When I initially set out to make this media centre, I used an old Pentium 4 machine as a media centre does not require a great deal of processing power. The most important things to me were sufficient storage space, enough slots in the motherboard for TV tuners, and I also wanted to be sure of system reliability. I had this system up and running fine on the older machine for 2 months before the processor called it a day. The only upgrades I had made to the machine were an additional 1GB RAM and a new AGP videocard capable of HDMI output. These were quite a challenge to find because generally people don’t want these items anymore. Once the processor blew, it was illogical to try to replace it so I started from fresh and bought a new machine.
My main considerations for the new machine were:
- Video Output – HDMI
- Audio Output – Optical\HDMI
- TV Tuners – I wanted 4 tuners and one with Radio
- Enough slots in motherboard for TV tuners
- External DVD drive for convenience
- Enough storage for all recorded TV/Music/Pictures
You can go wild and add a fancy case, silent cooling and that is fine but I went as simple and as cheap as I could. I purchased items that were at a reasonable price point. I can always upgrade various items later.
Saying all that, the quicker your machine, the better your experience is likely to be.
I ended up with:
- Processor: Intel i5 Core 750
- RAM: 2GB
- Graphics: GTX250 w\ HDMI
- Tuner cards: 3 x Winfast DTV1000 S
- Tuner + Radio: Winfast PxDVR3200 H
- Storage: 4 x 500GB drives
The other components worth noting are an external DVD player, USB Turntable, Webcam. These aren’t necessary, but they are handy.
This is not a top of the line machine. The cost was roughly $1200 2 years ago. A similar spec machine is now around $700. Wait another 2 years and you will pick one up at the side of the road. As I said earlier, it is worth considering recycling your current machine for this task.
Windows Media Center 7:
There are a fair few reasonable media centre packages available now which run on various Operating Systems. A number of them don’t have support for recording TV (my main use) and the ones that do, I have found to be more complicated to setup than Windows Media Center. It is also nice to work in an environment I am most familiar with.
Windows Media Center has always worked for me with very few problems. It is easy to use Windows Explorer and Windows Media Player to manage your media and it has a large support community keen to help out and enhance the user experience.
Windows Media Center has a very simple interface that gives you quick access to all your music, movies, pictures, television and radio; all incorporated into the one system. While this should be expected for any media centre, there are lots of nice fade effects and transparencies that do a lot more than look good. They all enhance the experience.
If you want to use Media Portal or XBMC etc, feel free. They both look great and have many community made themes that can give your media centre your personal touch. It is worth running them over Windows Media Center as some of the software mentioned below will only work with Windows Media Center. i.e Use WMC to manage\record your media, other media centre software to view it. You have nothing to lose by experimenting. I will need to switch to one of these alternative systems later on if the Buy Music link is not removed. (I don’t want my kids selecting that).
Programs and Plugins:
Due to the amount of programs you will want to install on your system, please click on the more info link for a full review of each individual program. Each of these programs offer a unique but valuable feature or enhancement to your media centre.
| Media Center Studio: Media Center Studio is used to customise your Windows Media Center Menu. It lets you get rid of all the menu options you don’t want to use, simplifying the navigation. You can also use it to add your own programs to the Media Center menu, such as games. More Info… (Website) |  |
| My Channel Logos: My Channel Logos lets you show the various channel logos from your country in the TV guide. This aesthetic improvement is well worth 10 minutes of your time to install. My Channel logos also works with Remote Potato to make your remote scheduling look quite stylish. More Info… (Website) |  |
| Media Browser (formerly Movie Browser): Media Browser is a Media Center plugin that displays your movies in a few formats different to the standard media centre movie browser. It looks nice and is worth having, even if you don’t want it to replace the standard movie browser permanently. More Info… (Website) |  |
| Media Center Master: Media Center Master will automatically download meta data such as movie cover art, film descriptions, as well as parental ratings and cast and crew information. More Info… (Website) |  |
| Scripts: I wrote a script that moves files around depending on their file name. I have used it to detect movies and copy them to another drive. This script will also create folders for files so that Media Center Master downloads the movie information. More Info… |  |
| Remote Potato: Remote Potato allows you to schedule Windows Media Center from anywhere you have an internet connection. You can also stream your media to phone or computer away from home. More Info… (Website) |  |
| Windows Media Player: Windows Media Player is used by Windows Media Center for most of it’s playback functionality. This means that the settings we change in it, will carry through to WMC. Use this to turn on crossfading or to EQ your music. More Info… | |
Once all of these programs are installed, you will have the same software on your system as you can see in the video above. You will need to go into each program to configure your system, but apart from the scripting, it is really quite simple. If you are unable to figure out the settings on a piece of software, there is great information on each of the individual websites.
Controlling the system:
There are many ways to control the system. As soon as the media centre is setup, the mouse and keyboard will work to control it. Most TV tuner cards come with a remote control which will work with Windows Media Center. I use a Harmony 880 universal remote which is programmed to communicate with the tuner cards receiver. An added advantage to the Harmony range is that it can be used to turn on your TV and Receiver with the press of a single button.
There are better ways though. I have been using voice to control my system for a few months now and am finding it to be by far the best way to control anything. So long as the environment is quiet, the benefits of voice are huge. If you would like to use voice, please check out my article on How-to: Voice control Windows Media Center.
Connecting your computer to your TV:
This has become much easier in recent years. Every computer has the software and capability to do this. You just need to make a physical connection and then change the software settings to accommodate. Here is a past article I wrote explaining the many ways of doing this.
Key Features:
- Record 4 channels at once while watching recorded TV (normally good shows are on at the same time)
- Each show/movie will have appropriate information downloaded from the internet
- Enough storage for hundreds or even thousands of hours entertainment
- Music and pictures on hand through the same interface
- Remote scheduling of TV shows
- Stream shows to computers anywhere pending internet connection
- Easy to upgrade
- Cheaper than buying various individual components to do the same tasks
- A whole lot more that I will tell you about in coming days. These features are unlikely to ever be possible using normal entertainment components. At least not for many years.
Conclusion:
This system has changed the way we live. We rarely watch live TV anymore. The only time we do is when there is a sporting event on. We can now watch what we want, when we want. I can record a show so that it is ready to be watched after dinner, rather than trying to time dinner around when the show is on.
We rarely buy DVDs now because having a system that records a movie from TV and downloads the cover artwork and cast information is a much nicer option. It sure beats preparing to watch a DVD and then being required to sit there for 10 minutes while it goes on about video piracy, while the only people effected by those ads are the people who legitimately purchase the discs.
I needed to ensure my family would see the advantages of this new technology over the regular TV. Now my family love it and it has changed the way we keep ourselves entertained throughout the house. This is a solution that my family actually appreciates and enjoys. As an added bonus, we don’t need to fight about which program can be watched on live TV. By recording your entertainment, you never need to miss out on anything, even if you are away on holidays.
More Information:
Over the coming week, I will be adding a great deal of additional information to this article. It will clearly explain why a computer based system is best. You would be wise to wait until these articles have been published before rushing out to buy an expensive media centre PC.
*This system is part of a future home automation system. My current home theatre PC will ultimately become a media server for the whole house. This system will record and manage the media, while cheaper media centres will make the media viewable from anywhere. Other media centres I place around the house will not need as much processing power, though they are likely to have more power as they were purchased later down the line.
Resources:
The Green Button
Hack7mc
Australian Media Centre Community
Lifehacker