New Divi Tutorials Coming 6 Mar 2020 5:35 PM (5 years ago)
Now that I have some time to devote to making video tutorials i’ll be posting them shortly.


Seattle Superior Motors Project 9 May 2017 5:38 PM (7 years ago)
Having a blast working on this great client project in Seattle, Superior Motors.
Seattle Superior Motors
10 Plugins For Divi Sites 27 Dec 2016 12:43 PM (8 years ago)
10 Plugins For Divi Sites
Lately i’ve been using Divi for the majority of my projects since it’s such a great theme for adapting to any type of business or service. And, my clients like the drag ‘n drop interface which, oddly, is easier to teach to someone than the standard WordPress editor making it an added bonus.
Every site I create with Divi gets the same base lineup of plugins. Some of these are designed to further compliment the Divi builder, some are used in the general admin interface, and some are for security purposes. Here’s the list.

Brian Sniff
Owner/Designer
01
All In One Security
Let’s face it, there are bad people out there. And, they’re looking to doing bad things to your WordPress website IF they can get access. There are several excellent security plugins available but after experimenting with them over the years and understanding how the typical ‘hacks’ occur, this one provided the best protection.
We suffered a severe hack a few years ago where they were able to deface about 60 websites hosted on our server before we could get a handle on what was happening. They were also successful in uploading some malicious scripts that provided them access to our server’s system and accounts in order to run ‘phishing scams’. I was curious as to how they did it and began researching every resource I could find about the typical methods of hacking WordPress sites. The All In One Security addresses each of the common weaknesses they exploit. Therefore, it’s the first plugin we install.
Price: FREE
02
ARYO Actiivity Log
Do you ever get that phone call or email that the site is broken yet no one can explain how or why it happened? Then you need this plugin! This monitors all logins and changes to the site so it’s clear who did what and when. It can also act as a security add-on since it displays a list of changed files (should you be hacked), who changed them, etc..
Being able to quickly see what has occurred and by whom is a huge advantage in fixing site issues. Therefore, we recommend this plugin as an extra measure of security and convenience.
Price: FREE
03
CMS Tree View
The WordPress default page manager is pretty clunky, let’s face it. So, for easy navigation through pages and sub-pages we use the CMS Tree View which makes itself available under the Pages menu. There are other plugins that provide drag ‘n drop re-arranging and other features. But, we just wanted something simple, fast, and less likely to cause conflicts with other plugins or theme functions.
Price: FREE
04
Child Theme Configurator
There’s all kinds of plugins and ways to make child themes. However, if you REALLY want to manage your child themes and control how they work then Child Theme Configurator is the best we’ve seen.
This plugin provides complete access to moving files between parent theme and child theme. This is vital in the event you wish to modify a header or footer file and not lose the ability to update your parent theme. Plus, it offers the ability to edit those files, analyze parent themes for conflicts, and much more.
Price: FREE
05
Gravity Forms
This is the first ‘premium’ plugin that we install. There’re lots of form plugins available but I can assure you that we have designed some of the most amazing form-based sites with Gravity Forms. It’s highly flexible, has a huge community providing both support and resources, is continually updated, and is pretty easy to show the basics to the client when they wish to take over their site updates.
Gravity Forms has provided the most reliable communications between site visitors and site owners that we’ve ever used. In contrast, we have had several issues with the contact form that comes with Divi in regards to consistent sending of form submissions.
Price: $39 for single site license (annually)
06
Monarch
I don’t know about you, but i’m fed up with social networking/sharing plugins that want to plaster ads all over my admin page(s) for upgrading and purchase options for other plugins. Therefore, we immediately go with the excellent Monarch plugin from the ET group. It offers lots of options regarding display, has most of the major networks already integrated, is highly customizable and, basically, it works. Oh, and there’s no unwanted ads!
Price: SUBSCRIPTION
07
Jetpack
Many people consider Jetpack a bloated mess of good ideas but too bulky. There are a couple of features that Jetpack offers, however, that can’t be disputed. First, there are stats that are displayed in the admin area providing the client with easy access to their traffic info. Sure, Google Analytics is a more professional traffic monitor. But, after years of dealing with this, it’s just another login that the client forgets and never looks at. It’s much easier to have them log into a familiar admin area and simply see a snapshot of their daily, weekly or monthly traffic.
The second feature that is a huge factor is the Publicize function. This allows your posts to be ‘published’ simultaneously to your Facebook, Twitter, LinkedIn, Google+ and other accounts. Basically it’s broadcasting your post to all these social networks when you hit the Publish button in your post. This single function is worth installing Jetpack for as it saves hours of time by multi-publishing your articles instead of having to manually repeat that process for each network.
Jetpack allows you to turn off any features you don’t want. This has streamlined the load process and keeps your site running quickly. Once the Publicize integration is set up for each of your social networks then the client doesn’t need to do anything but just write articles. There’s no learning curve for the client which makes this ‘install, configure, and forget’.
Some may feel that there are other individual plugins that do the same thing. And, there are! But, the idea is to keep the number of plugins to a minimum. Plus, Jetpack has many other features that the client may wish to take advantage of by simply activating them in the settings panel.
Price: FREE
08
Divi PB Widget Builder
A premium plugin that all Divi designers and users should have. This plugin allows you to place any Divi library item into a widget that can then be placed into a sidebar. And, as we know already about Divi, you can create as many sidebars as you wish and integrate those into your page designs as desired. This allows for the ability to have ‘global’ sidebars with Divi library elements you control via the library editor.
Imagine putting any Divi module into a widget. Sliders, testimonials, posts, and more…. all become sidebar elements with this simple but ingenious plugin!
Price: $5.00 (worth every penny)
09
Image Inject
Rarely do my clients have relevant photos or images that can be used on the site for backgrounds, headers and so forth. And, in order to continue with posts and pages so they are created in a similar fashion as the original design, images become a huge part of the equation. Most of my clients wouldn’t spend the time to tediously search various sites for the right image, download it (or, purchase it if necessary) and open it in Photoshop, crop/resize/optimize it, then insert it into their post or page.
This plugin allows them to search for images from within the WordPress editor interface. The images are pulled from Creative Commons and GPL licenses from various sources displayed in a thumbnail format for the user to select from and can be chosen to be inserted into the page/post text or used as the featured image.
This convenience factor will help the site owner keep a consistent look throughout the site and help keep them out of trouble from doing the dangerous ‘copy/save image as’ for protected images on the web.
Price: FREE
10
WP Sweep
The other day, while searching for another issue on a client site, I noticed that there were literally hundreds of revisions kept in the history of many pages. The home page, for example, had 194 revisions dating back a couple of years. This can cause slow page loads, chews up unnecessary database space and it’s doubtful that someone would ever revise back to the first draft of the page or post.
WP Sweep allows you to flush out the revisions based upon two settings, the length of time to keep them and how many to keep. A reasonable number would be 10 revisions max and perhaps anything beyond a month old should be flushed (after the 10). This plugin helps me to police the customer sites without having to do anything in regards to their revision history since it works seamlessly in the background. It also optimizes the database tables as well.
Price: FREE
Cool Divi Icon Background 18 May 2016 9:59 AM (8 years ago)
I came across this tip while visiting another site and thought i’d share it here. Basically it uses two Divi modules to create the look you see below. By combining the Blurb module and Divider module in the right stacking order and minimal CSS you can easily create this horizontal line background effect.
We’re concentrating on the Divi module method for this but there are other methods involving icon images and also Font Awesome icons as well.
STEPS:
- Create a new page (or post) and select the Divi builder
- Insert a standard section with a single column row
- Insert the blurb module and do the following:
- Use Icon: Yes
- Select the Icon you wish to use
- Icon Color: Select a contrasting color
- Circle Icon: Yes
- Circle Color: #ffffff; /* this needs to be same color as page background
- Show Circle Border: Yes
- Circle Border Color: #ffffff; /* this needs to be the same color as circle
- Icon Placement: Top
- Animiation: No Animation /* so there’s no delay in the icon displaying
- Add a new Divider module below the Blurb module in the same row
- Set the Divider to ‘Show Divider’
- Set the Divider color to whatever color you wish as long as it’s dark enough to see against the page background.
CUSTOM CSS:
This needs to be applied to the ‘Main Element’ in the Custom CSS tab of the Blurb module.
position: relative;

top: 85px;

z-index: 2;
You may have to adjust the top: 85px to fit your needs so the icon is centered over the divider. This look can also be done in 1/4, 1/3 and 1/2 columns as well.
Cool List Connected Bullets For Divi 5 Jan 2016 8:46 AM (9 years ago)
I was surfing for some recipes the other day and happened across what I thought was a nicely styled ordered list that used connecting dots to add a nifty touch to the display. I dug into their source code to see how it was done and how it could be repeated easily and came up with these solutions. The dots/lines will automatically stretch to the height of each list item.
First, here’s what it looks like so we know what we’re talking about:
- 1
Adipiscing elementum, turpis etiam ut porttitor augue arcu, est mid vut odio dignissim amet habitasse platea ac turpis lacus dolor, nunc, nec mid. Dictumst nec proin parturient sed dapibus urna! Tempor vel nec tincidunt sed magna, phasellus vel porta. Nisi dapibus ac ultrices cursus tincidunt hac eu et, diam odio, amet nec, vut elementum, - 2Adipiscing elementum, turpis etiam ut porttitor augue arcu, est mid vut odio dignissim amet habitasse platea ac turpis lacus dolor, nunc, nec mid. Dictumst nec proin parturient sed dapibus urna! Tempor vel nec tincidunt sed magna, phasellus vel porta. Nisi dapibus ac ultrices cursus tincidunt hac eu et, diam odio, amet nec, vut elementum, Adipiscing elementum, turpis etiam ut porttitor augue arcu, est mid vut odio dignissim amet habitasse platea ac turpis lacus dolor, nunc, nec mid. Dictumst nec proin parturient sed dapibus urna! Tempor vel nec tincidunt sed magna, phasellus vel porta. Nisi dapibus ac ultrices cursus tincidunt hac eu et, diam odio, amet nec, vut elementum,
- 3Adipiscing elementum, turpis etiam ut porttitor augue arcu, est mid vut odio dignissim
The HTML Code
This is one way to do it, using a wrapping div.
- 1 Adipiscing elementum, turpis etiam ut porttitor augue arcu, est mid vut odio dignissim amet habitasse platea ac turpis lacus dolor, nunc, nec mid. Dictumst nec proin parturient sed dapibus urna! Tempor vel nec tincidunt sed magna, phasellus vel porta. Nisi dapibus ac ultrices cursus tincidunt hac eu et, diam odio, amet nec, vut elementum,
- 2Adipiscing elementum, turpis etiam ut porttitor augue arcu, est mid vut odio dignissim amet habitasse platea ac turpis lacus dolor, nunc, nec mid. Dictumst nec proin parturient sed dapibus urna! Tempor vel nec tincidunt sed magna, phasellus vel porta. Nisi dapibus ac ultrices cursus tincidunt hac eu et, diam odio, amet nec, vut elementum, Adipiscing elementum, turpis etiam ut porttitor augue arcu, est mid vut odio dignissim amet habitasse platea ac turpis lacus dolor, nunc, nec mid. Dictumst nec proin parturient sed dapibus urna! Tempor vel nec tincidunt sed magna, phasellus vel porta. Nisi dapibus ac ultrices cursus tincidunt hac eu et, diam odio, amet nec, vut elementum,
- 3Adipiscing elementum, turpis etiam ut porttitor augue arcu, est mid vut odio dignissim
The CSS Code
This should be placed in your child theme stylesheet or similar location in order to make it a ‘global’ effect for all OL’s.
/*---------------- DOTS LIST -----------------------------------------*/
.dots-list {
width: 100%;
}
.dots-list ol {
    padding-left: 50px;
    position: relative;
    margin-bottom: 20px;
    list-style: none !important;
}

.dots-list ol li {
position: relative;
margin-top: 0em;
margin-bottom: 20px;
}

.dots-list ol li .number_divider {
    position: absolute;
    left: -50px;
    font-weight: 800;
    font-size: 2em;
top: -5px;
}

.dots-list ol li:before {
    content: "";
    background: #8dbeb2;
    position: absolute;
    width: 2px;
    top: 1px;
    bottom: -21px;
    left: -24px;
}

.dots-list ol li:after {
    content: "";
    background: #8dbeb2;
    position: absolute;
    width: 15px;
    height: 15px;
    border-radius: 100%;
    top: 1px;
    left: -31px;
}

.dots-list ol li:last-child:before {
content: "";
background: #ffffff;
}
As you can see, we’ve instructed the OL’s within the div class “.dots-list” to create the dots and connecting lines as backgrounds. You could also skip the use of the actual div wrapper and, in Divi, assign the class name to the module you’re inserting the list into (typically it would be text module or possibly a blurb). I showed it this way so that anyone not using Divi could still apply the CSS directly with the use of the wrapping div.
Using It For Uniformed Lists
To adapt this to a regular UL all you need to do is remove the ‘span’ tags and the numbers from the HTML. Since the OL list CSS has told the numbers to not display ( list-style: none; removes the numbers ) we have manually added them back in using the ‘span’ tag which then allows the CSS to format their location and style. The other change necessary is in the CSS code where you reference OL, you would need to change that to UL. Like this:
/*---------------- DOTS LIST -----------------------------------------*/
.dots-list {
width: 100%;
}
.dots-list ul {
    padding-left: 50px;
    position: relative;
    margin-bottom: 20px;
    list-style: none !important;
}

.dots-list ul li {
position: relative;
margin-top: 0em;
margin-bottom: 20px;
}

.dots-list ul li .number_divider {
    position: absolute;
    left: -50px;
    font-weight: 800;
    font-size: 2em;
top: -5px;
}

.dots-list ul li:before {
    content: "";
    background: #8dbeb2;
    position: absolute;
    width: 2px;
    top: 1px;
    bottom: -21px;
    left: -24px;
}

.dots-list ul li:after {
    content: "";
    background: #8dbeb2;
    position: absolute;
    width: 15px;
    height: 15px;
    border-radius: 100%;
    top: 1px;
    left: -31px;
}

.dots-list ul li:last-child:before {
content: "";
background: #ffffff;
}
Have Fun!
iHover Effects Example and Tutorial for Divi 8 Nov 2015 4:53 PM (9 years ago)
Square Effect #4
Square Effect #5
Instructions For Using iHover CSS Effects
First off you need to have some knowledge on how and where to insert this code within the realms of both WordPress and Divi to make it work.
In WordPress –
You can go to Appearance and Editor which should take you directly to your stylesheet opened in the editor itself. CAUTION: You should be using a child theme for these additions! If you are using a child theme then and this is your first trip to the editor then the stylesheet should be mostly blank with the exception of some code at the top that MUST REMAIN there. You will insert the new code below it.
This is where you will insert the CSS instructions from iHover by doing a copy/paste. Trying to paste this much code into the Divi custom CSS box in the ePanel will make you go crazy. So don’t do it.
In Divi –
You will need to insert the HTML into the Code module that contains all the div class names and assignments. Once again, DO NOT attempt to paste all this code into the Divi custom CSS box if you wish to keep your sanity.
First Step - get prepared
You need to have the image uploaded to the Media Library and you need to have the URL to that image handy so you can insert it in place of the image reference in the sample HTML code from iHover.
Second Step - Get the code from iHover
It’s doubtful that you wish to use ALL the effects available. Therefore you don’t need to copy the entire CSS file from iHover. Plus, loading all that extra code will just slow your page load times down by loading unnecessary stuff if you’re only using a single effect. So, we want to pluck out of their CSS file just the stuff we need. Here’s the minimum that you’ll need to get:
First, the basic code handling the global instructions for the effects. This should be about the first 100 lines of code from the CSS file.
.ih-item {
  position: relative;
  -webkit-transition: all 0.35s ease-in-out;
  -moz-transition: all 0.35s ease-in-out;
  transition: all 0.35s ease-in-out;
}
.ih-item,
.ih-item * {
  -webkit-box-sizing: border-box;
  -moz-box-sizing: border-box;
  box-sizing: border-box;
}
.ih-item a {
  color: #333;
}
.ih-item a:hover {
  text-decoration: none;
}
.ih-item img {
  width: 100%;
  height: 100%;
}

.ih-item.circle {
  position: relative;
  width: 220px;
  height: 220px;
  border-radius: 50%;
}
.ih-item.circle .img {
  position: relative;
  width: 220px;
  height: 220px;
  border-radius: 50%;
}
.ih-item.circle .img:before {
  position: absolute;
  display: block;
  content: '';
  width: 100%;
  height: 100%;
  border-radius: 50%;
  box-shadow: inset 0 0 0 16px rgba(255, 255, 255, 0.6), 0 1px 2px rgba(0, 0, 0, 0.3);
  -webkit-transition: all 0.35s ease-in-out;
  -moz-transition: all 0.35s ease-in-out;
  transition: all 0.35s ease-in-out;
}
.ih-item.circle .img img {
  border-radius: 50%;
}
.ih-item.circle .info {
  position: absolute;
  top: 0;
  bottom: 0;
  left: 0;
  right: 0;
  text-align: center;
  border-radius: 50%;
  -webkit-backface-visibility: hidden;
  backface-visibility: hidden;
}

.ih-item.square {
  position: relative;
  width: 316px;
  height: 216px;
  border: 8px solid #fff;
  box-shadow: 1px 1px 3px rgba(0, 0, 0, 0.3);
}
.ih-item.square .info {
  position: absolute;
  top: 0;
  bottom: 0;
  left: 0;
  right: 0;
  text-align: center;
  -webkit-backface-visibility: hidden;
  backface-visibility: hidden;
}

.ih-item.circle.effect1 .spinner {
  width: 230px;
  height: 230px;
  border: 10px solid #ecab18;
  border-right-color: #1ad280;
  border-bottom-color: #1ad280;
  border-radius: 50%;
  -webkit-transition: all 0.8s ease-in-out;
  -moz-transition: all 0.8s ease-in-out;
  transition: all 0.8s ease-in-out;
}
.ih-item.circle.effect1 .img {
  position: absolute;
  top: 10px;
  bottom: 0;
  left: 10px;
  right: 0;
  width: auto;
  height: auto;
}Third Step - Find the effect code you want
If you just want Square Effect #4 (as an example) then that’s all the code you need from the CSS file. If you search down to about line #101 you will see where the name and number of the effects start to appear in the form of something like this:
.1h-item.circle.effect1
That is effect #1 for the circle effect. There will be several instructions following this line that contain effect1 in it. You need ALL of these if you intend to use effect #1 or all of whatever it is of the effect you wish to use. For example, line(s) 101 to 148 are all needed in order to use Effect #1 for circles. Copy and paste these into your child theme’s stylesheet BELOW where you pasted the global CSS for the iHover effects.
This is the code for Square Effect #5 (example on right) just to show you what needs to be copy/pasted:
.ih-item.square.effect5.colored .info {
  background: #1a4a72;
}
.ih-item.square.effect5.colored .info h3 {
  background: rgba(12, 34, 52, 0.6);
}
.ih-item.square.effect5 .img {
  -webkit-transition: all 0.35s ease-in-out;
  -moz-transition: all 0.35s ease-in-out;
  transition: all 0.35s ease-in-out;
  -webkit-transform: scale(1);
  -moz-transform: scale(1);
  -ms-transform: scale(1);
  -o-transform: scale(1);
  transform: scale(1);
}
.ih-item.square.effect5 .info {
  background: #333333;
  opacity: 0;
  -webkit-transition: all 0.35s ease-in-out;
  -moz-transition: all 0.35s ease-in-out;
  transition: all 0.35s ease-in-out;
}
.ih-item.square.effect5 .info h3 {
  text-transform: uppercase;
  color: #fff;
  text-align: center;
  font-size: 17px;
  padding: 10px;
  background: #111111;
  margin: 30px 0 0 0;
}
.ih-item.square.effect5 .info p {
  font-style: italic;
  font-size: 12px;
  position: relative;
  color: #bbb;
  padding: 20px 20px 20px;
  text-align: center;
}
.ih-item.square.effect5 a:hover .img {
  -webkit-transform: scale(0);
  -moz-transform: scale(0);
  -ms-transform: scale(0);
  -o-transform: scale(0);
  transform: scale(0);
  -webkit-transition-delay: 0;
  -moz-transition-delay: 0;
  transition-delay: 0;
}
.ih-item.square.effect5 a:hover .info {
  visibility: visible;
  opacity: 1;
  -webkit-transform: scale(1) rotate(0deg);
  -moz-transform: scale(1) rotate(0deg);
  -ms-transform: scale(1) rotate(0deg);
  -o-transform: scale(1) rotate(0deg);
  transform: scale(1) rotate(0deg);
  -webkit-transition-delay: 0.3s;
  -moz-transition-delay: 0.3s;
  transition-delay: 0.3s;
}

.ih-item.square.effect5.left_to_right .info {
  -webkit-transform: scale(0) rotate(-180deg);
  -moz-transform: scale(0) rotate(-180deg);
  -ms-transform: scale(0) rotate(-180deg);
  -o-transform: scale(0) rotate(-180deg);
  transform: scale(0) rotate(-180deg);
}

.ih-item.square.effect5.right_to_left .info {
  -webkit-transform: scale(0) rotate(180deg);
  -moz-transform: scale(0) rotate(180deg);
  -ms-transform: scale(0) rotate(180deg);
  -o-transform: scale(0) rotate(180deg);
  transform: scale(0) rotate(180deg);
}Fourth Step - Get the HTML for the effect you want
Now you need to copy/paste the HTML into your page that contains the div classes and code to display the image and the effects. From the example page (located here: https://gudh.github.io/ihover/dist/) find the effect you want and you’ll see the HTML code for each just below the demos. The part you need is just this:

Basically the HTML between the “normal” and “end normal” comment lines. This is the code you will copy/paste into the Code module you’ve inserted into your page using the Divi builder. NOTE: This snippet is for Effect #5 only. The HTML will be different for each effect. You must copy/paste the HTML for the effect you want.
You MUST replace the with your URL to your image that you did in Step #1
Now, just change the text that refers to Headline Here and Description. These lines here:
          Heading here
          Description goes here
To whatever you want them to say. Be advised, though, these are space limited so you can’t get too crazy with the amount of text. Short and sweet!
Hit the Save & Exit and preview your page to see if the effects work.
Divi Vertical Navigation Fix 1 Mar 2015 9:55 AM (10 years ago)
Divi’s vertical navigation option (Appearance / Customize / Theme Options) by default doesn’t allow the vertical column/menu to scroll with the rest of the page. This can be a problem if you have a lengthy menu as it will not be totally visible on many screens. Nor will they be able to scroll down to bring it in to view.
This snippet will fix that problem and make the vertical navbar scroll with the rest of the page allowing you to have longer menus and easier access with less limitations.
.et_vertical_nav #page-container #main-header {
position: absolute;
}
Native LED Lighting Sales 27 Nov 2013 2:56 PM (11 years ago)
I’m always proud to work with this group. This is the latest creation for a website showcasing LED lighting and bulb replacement and sales. The main purpose of the site is to provide information about lighting solutions and initiate contact between potential customers and them as the suppliers.
We chose a WordPress theme that will allow for us to expand into eCommerce at a later date if they so choose. In the interim, the site is a showcase for the various lighting selections available for residential, industrial and commercial applications both indoor and outside.
Since the bulbs themselves have many different details we created a custom page template and utilized the excellent Advanced Custom Fields plugin that allows us to create post specific fields for the bulb details. A series of PHP calls to those fields were built into our special bulb template and then formatted with CSS to get the look we wanted. A snapshot of the custom template is shown below.
The other request was for a ‘Customer Page’ so they could start a gallery of existing customers. This was done by slightly modifying a portfolio system to create a gallery effect and make it simple to add customers as time goes by.
Screenshots
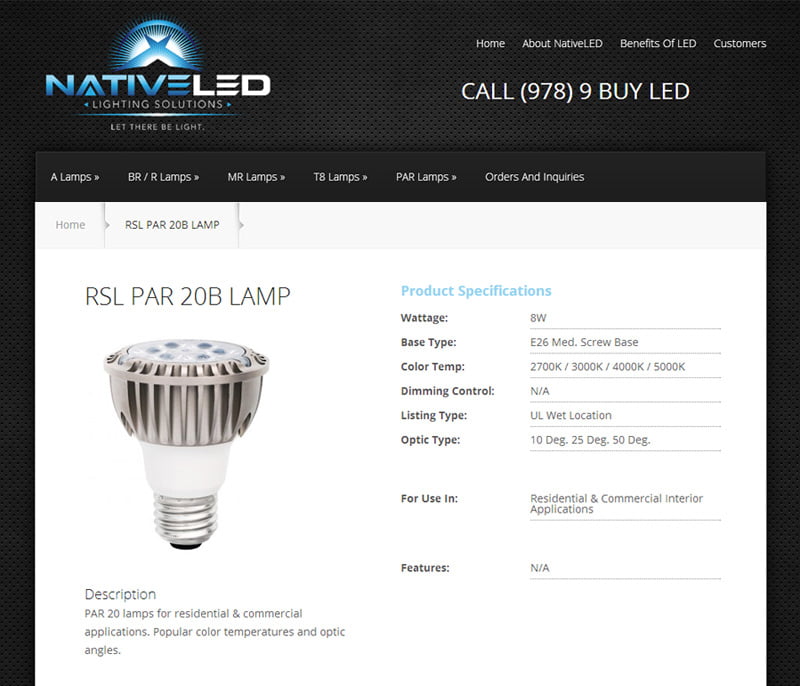
Product custom template
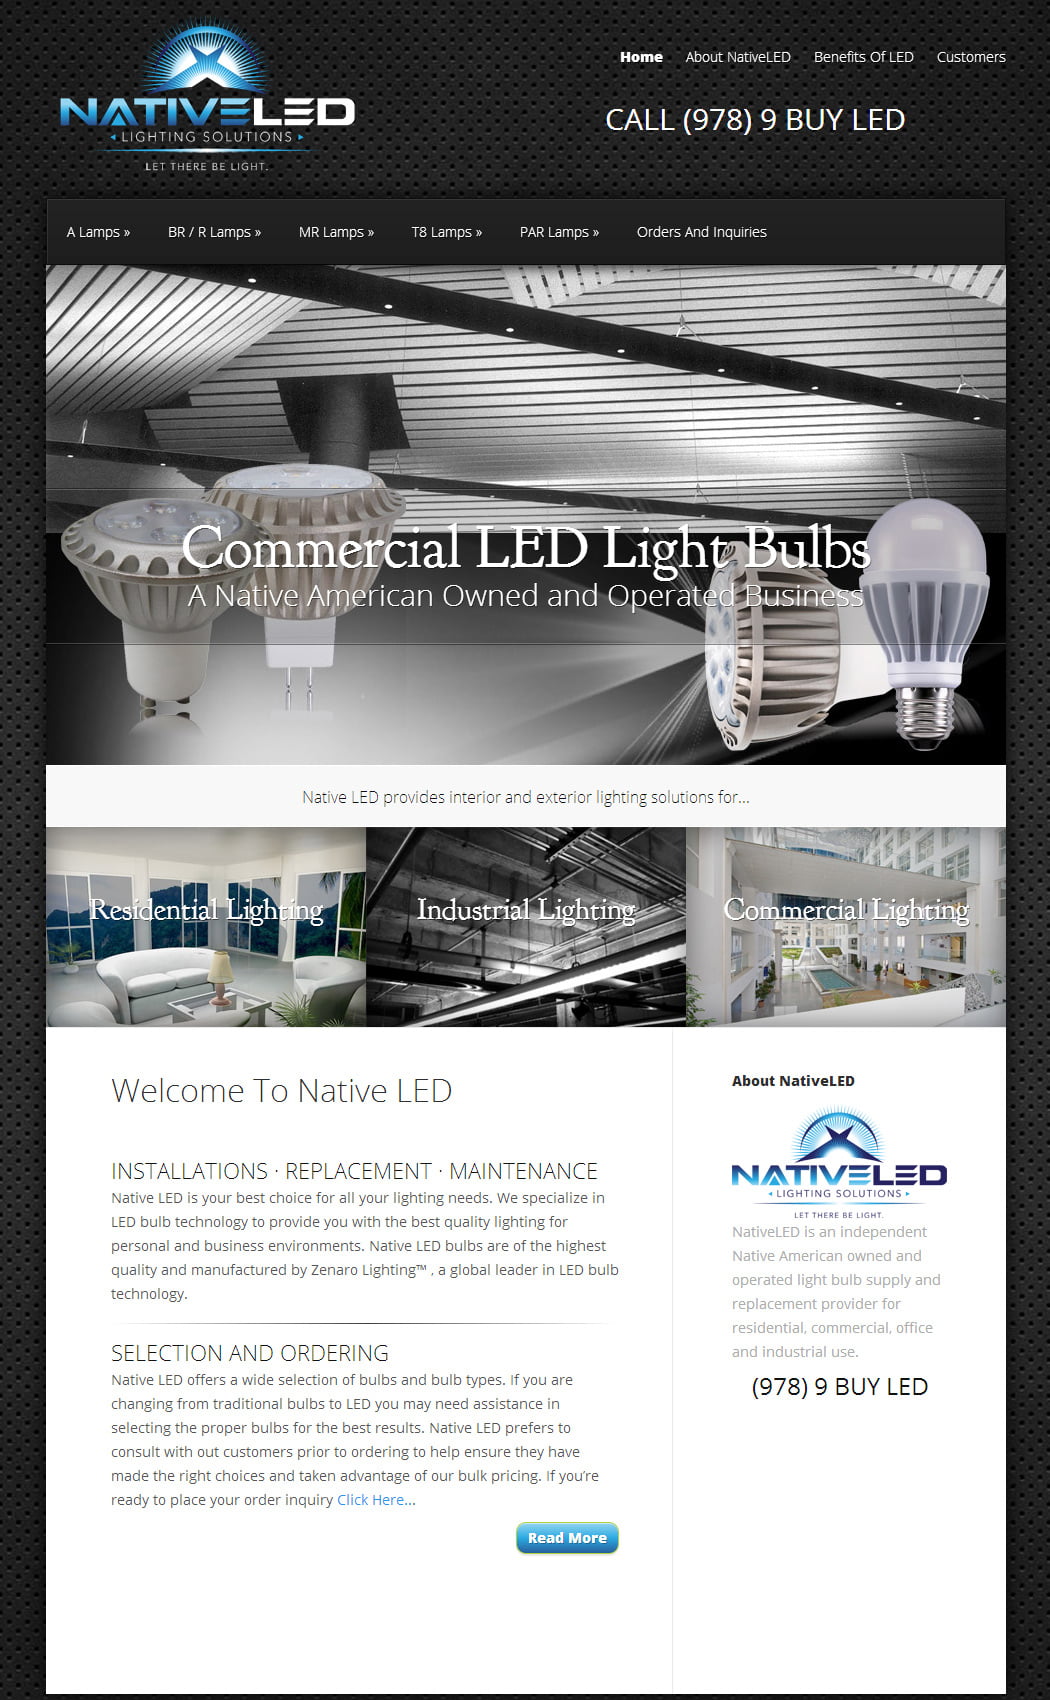
Home Page Layout
Weatherly Suites Design 6 Oct 2013 7:05 PM (11 years ago)
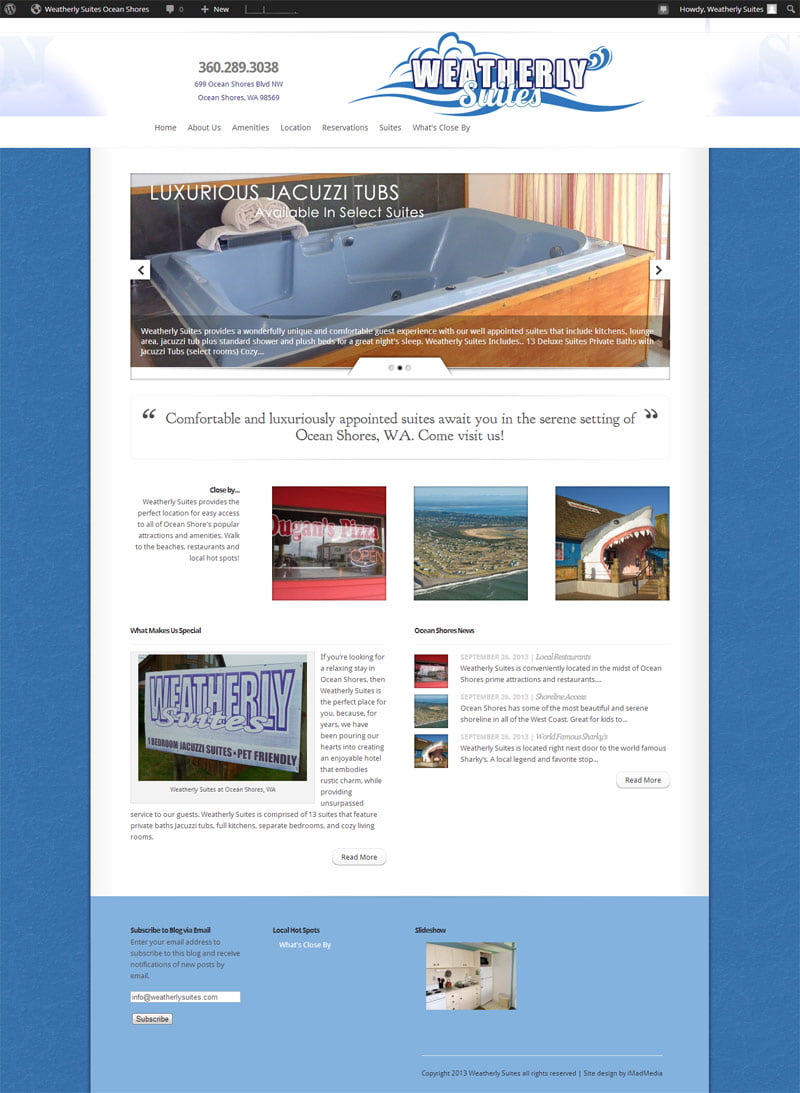
I was recently asked to create an affordable and mobile friendly website for a hotel in beautiful Ocean Shores, WA. A popular coastal destination located at the edge of the Puget Sound. The objective was to showcase the various amenities and location of the resort in proximity to all the popular attractions for the area.
In order to provide the ability for continued updates and changes we created the site with WordPress. This allowed us tremendous flexibility in how to address future functionality such as bookings and additional visitor attractions.
Weatherly Suites did not have a previous website and expressed a desire to have something that was mobile and tablet friendly as well. Therefore, the site was built using fully responsive design elements in order to make it viewable across many platforms and devices.
Images
Here is a screenshot of the finished site, or, visit at https://www.weatherlysuites.com
Jones Family Chiropractic Redesign` 5 Sep 2013 7:24 PM (11 years ago)
Currently i’m working on the redesign of an existing customer whose site was originally created in standard HTML and PHP. Our transformation will convert it to a WordPress based site in order to take advantage of the powerful social networking tools and SEO capabilities of the WordPress platform.
The site is already performing very well in search engines and is the major source for new business. We will be enhancing on that by adding in the ability to blog about relevant articles and post directly to Facebook and Twitter.
Images – Before and After
I have completed most of the design elements, keeping it simple but giving it an overall modern look with a more coordinated color scheme.
[nggallery id=15]